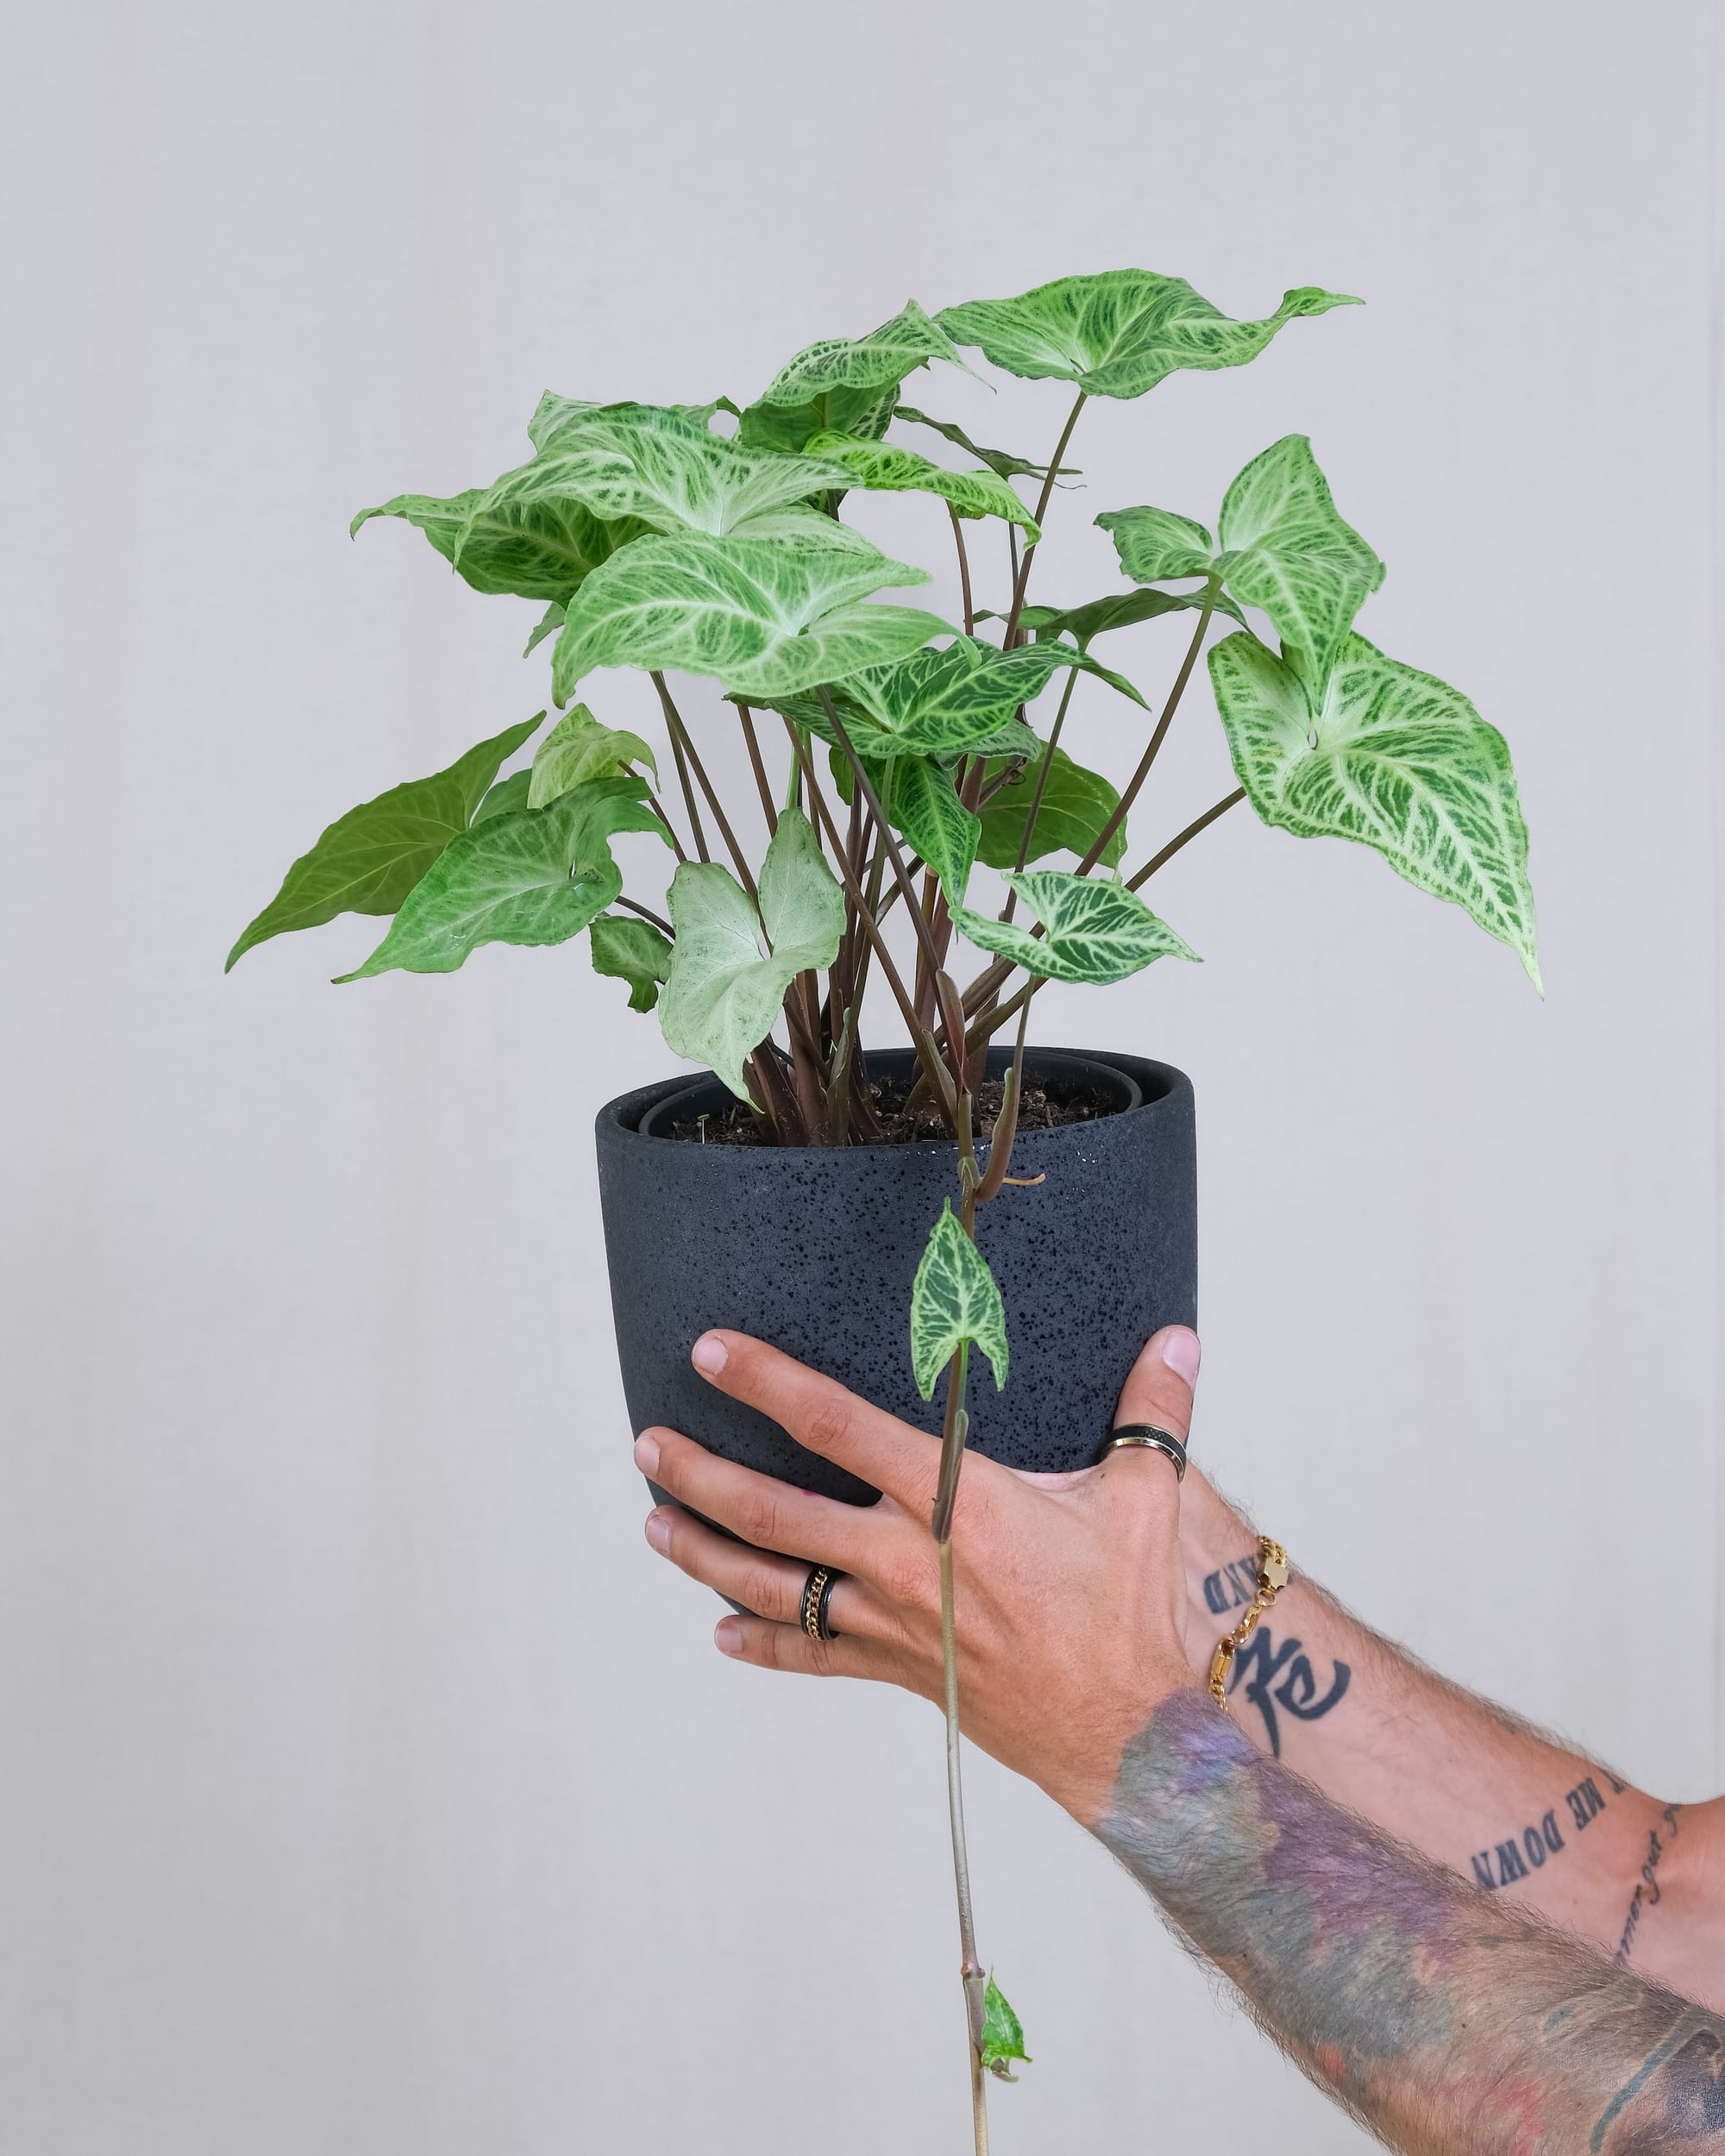
Syngonium podophyllum
Contents
- Top Tips
- Location, Water, Humidity & Fertilisation
- Common Issues
- Origins, Temperature, Propagation, Repotting & Toxicity.
Are you struggling to find the answer to your specific plant issue? Book a 1-to-1 video call with THE HOUSEPLANT DOCTOR™, the website's friendly author, to put an end to your stress today! Available on iMessage, WhatsApp, Facebook Messenger & more.
Top Tips & Info
- Care Difficulty - Easy
- Bright indirect light is best, avoiding prolonged exposure to the sun, especially in the spring and summer. A location that is too dark will cause the variegations (foliar patterns) to weaken, leaving you with just a green plant.
- Keep the soil evenly moist, allowing the top third to dry out in between hydrations. Avoid promoting droughts due to the heightened chance of yellowing leaves and weakened growth.
- Provide a good level of humidity by misting the foliage weekly or creating a pebble tray.
- Fertilise using a 'Houseplant' labelled feed every four waters in the spring and summer, reducing this to every sixth water in the colder months.
- In spring, repot every three years with 'Houseplant' compost. Water the plant 24hrs beforehand, to reduce the risk of damaging the root hairs. (Transplant Shock).
- 'Tot' specimens in a 5cm pot are perfect for tropical-themed terrariums or displays due to the slow growth habits!
Location & Light - 🔸🔸
A brightly lit spot away from the direct sunlight is best for quality growth. A sunny position that's too sharp will cause a 'washed out' appearance, along with spindly growth and a general decline in health. Locations that are too dark will cause the variegations to shallow, as well as an increased chance of mould developing on the soil. The amount of light and current season of the year will directly govern the frequencies of waters per month. Specimens placed in darker areas must be kept on the drier side to life, whereas brighter locations will require more soil moisture to lubricate photosynthesis.
Water - 🔸🔸
Although shortlived droughts won't necessarily hurt a Syngonium, consistent irrigations are mandatory for healthy growth. Allow the top third of the soil to dry in between waterings, or a few inches for specimens that are too large to lift. Never allow standing water to accumulate beneath its pot as root rot is a common issue among gardeners. Under-watering symptoms include stunted growth, crispy brown patches forming on the leaves, and wilting; these issues are commonly due to either too much light/heat or forgetfulness. Over-watering symptoms include yellowing lower leaves, leaf blotches in brown, yellow or black, wilting or rotting stems and roots.
Humidity - 🔸🔸🔸
A generous level of humidity should be at the forefront of a happy Syngonium. You can either mist the foliage weekly or introduce a pebble tray to reduce the risk of browning leaf tips. Specimens that are situated in moist environments are more likely to produce better quality growth due to the favoured conditions.
Fertilisation - 🔸
Feed every four waters in the growing period and every six in the autumn and winter, using a 'Houseplant' labelled fertiliser. Never over-fertilise the plant as a build-up of salts and chemicals can burn the roots, causing stunted growth and yellowing leaves over time.
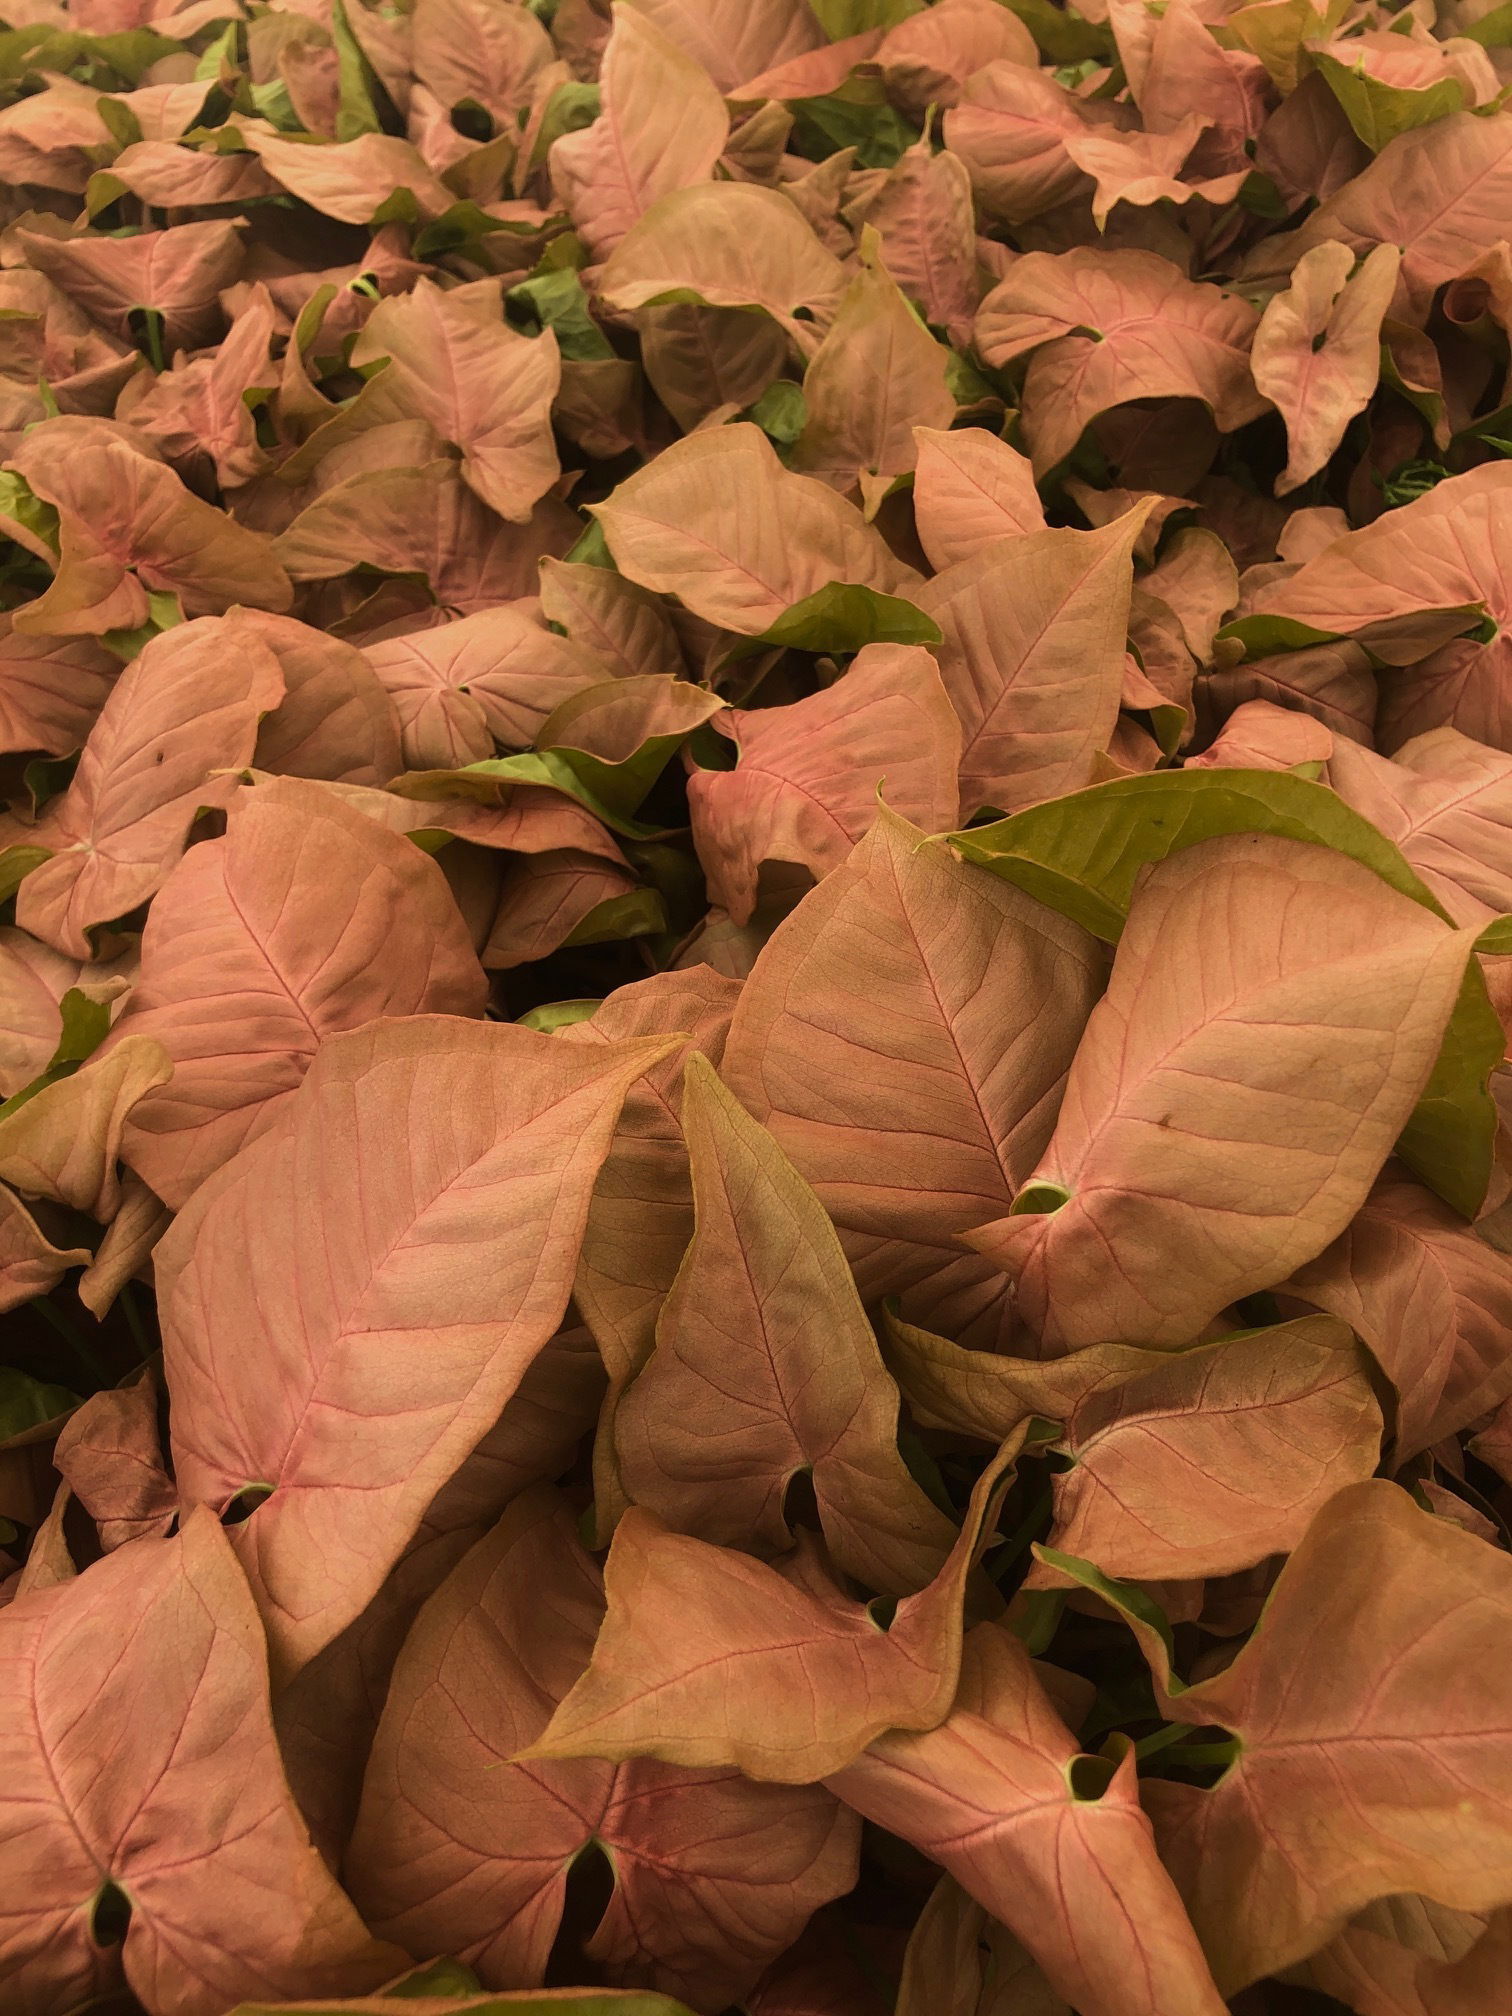 Pink or red Syngoniums must be kept in a brighter location than entirely-green specimens to perform enough photosynthesis for growth.
Common Issues with Syngonium
Too low humidity may cause browning leaf tips with yellow halos. Although this won't kill the plant, increase humidity to prevent new growth adopting these symptoms. Either mist weekly while the heaters are on, or create a humidity tray to present a better growing condition.
Is your Syngonium producing smaller leaves or just naked, leggy stems each time it grows? It's most likely to do with its light levels or low temperatures. We recommend improving its location by placing it in a sunless windowsill or under a grow light for better, more reliable growth. You can also consider pruning any leggy, leafless stems back to the first leaf to promote a new cluster of foliage in months to come. Other reasons for its reduction of leaf size could be: an absence of a moss pole or plant to climb up, a lack of fertilisation and/or root rot.
Dust the leaves regularly. A build-up of dust particles can clog up the plant's pores, causing lowered light capturing-efficiency. Wipe and hose-down the topsides of the leaves once a month to keep the levels down.
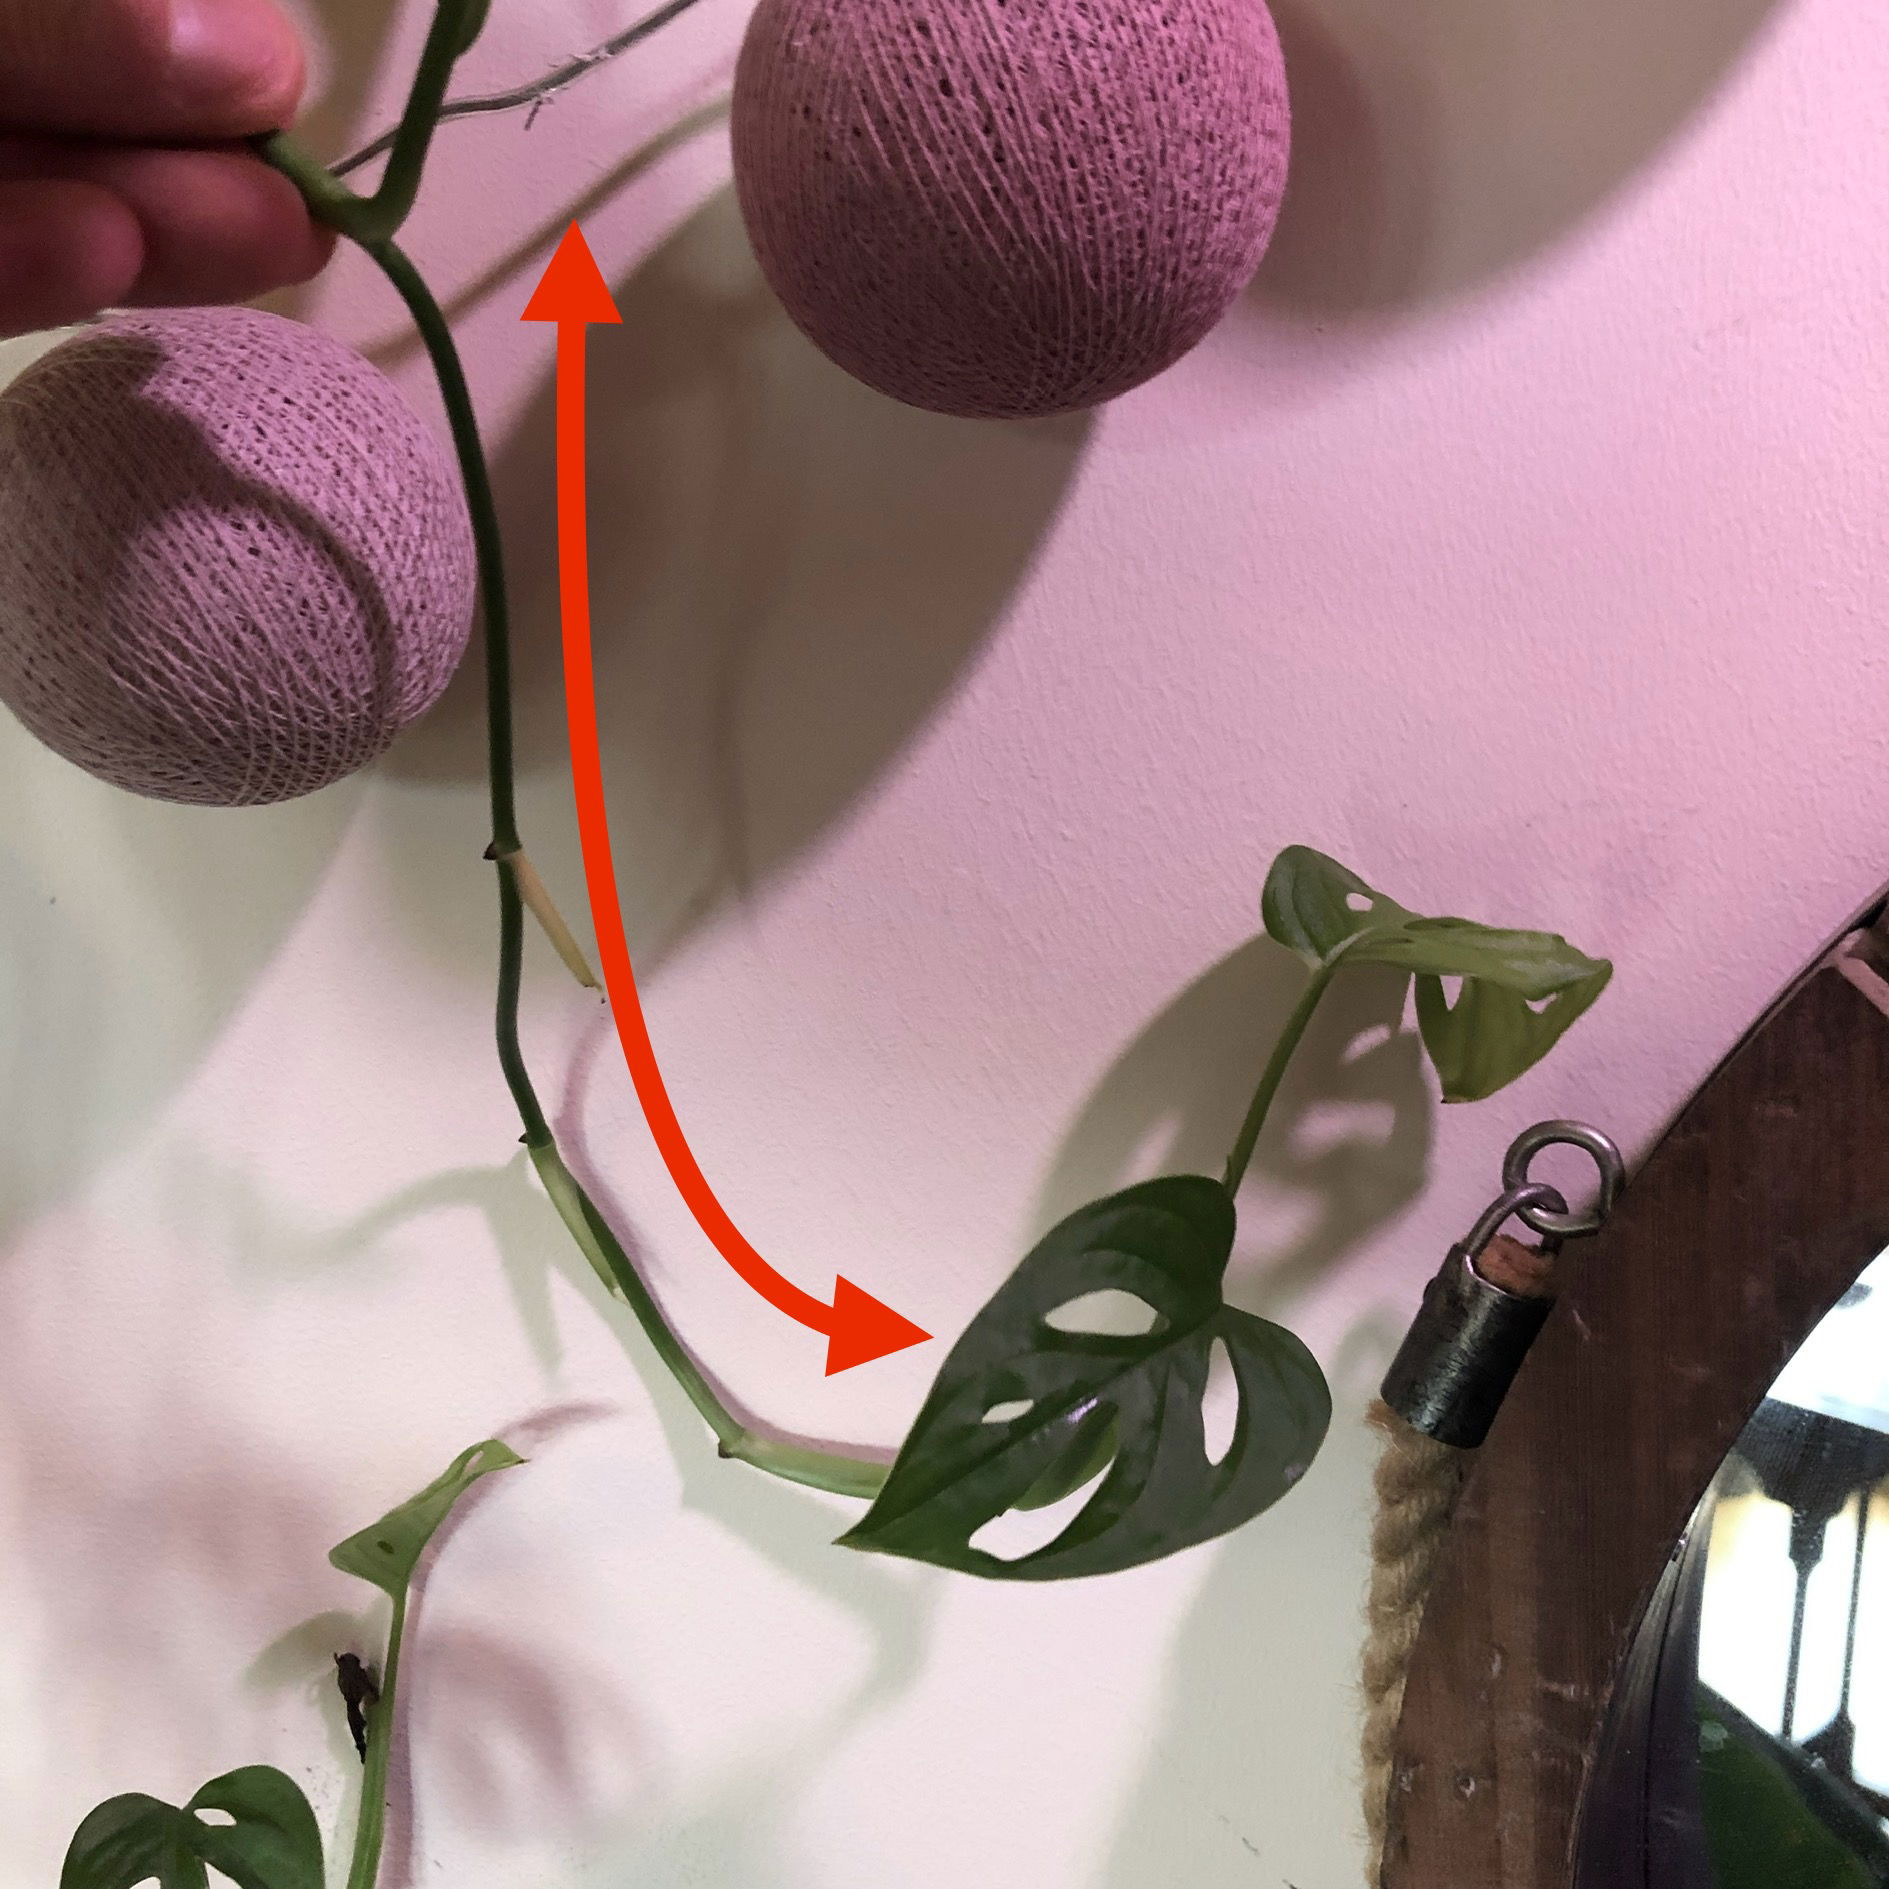 If your Syngonium (Arrowhead Vine) has lost leaves in a certain area of its stem (or is growing long stems with no leaves), this is to do with too little light. Consider pruning the stem(s) back to promote a bushier appearance and propagate the cuttings in water. Transplant them into the original plant's soil once the roots are 5cm (2 inches to further thicken the overall foliage. (Although the plant is a Monstera adansonii, the principle is identical).
Root rot is a common issue, with typical symptoms including rapidly yellowed lower leaves, stunted growth and stem collapse. Take the plant out of the pot and inspect its root system; if it's yellow and firm, you're good to go, but if it's brown and mushy, action must be taken quickly. More information about addressing root rot can be found on this link.
Spider Mites are minute chlorophyll sucking pests that can wreak havoc if left to manifest. Areas of attack are the under-leafs, the cubbyholes between the stem & petiole and along the midrib (central column of leaf). For more information on how to identify and address this issue, click here.
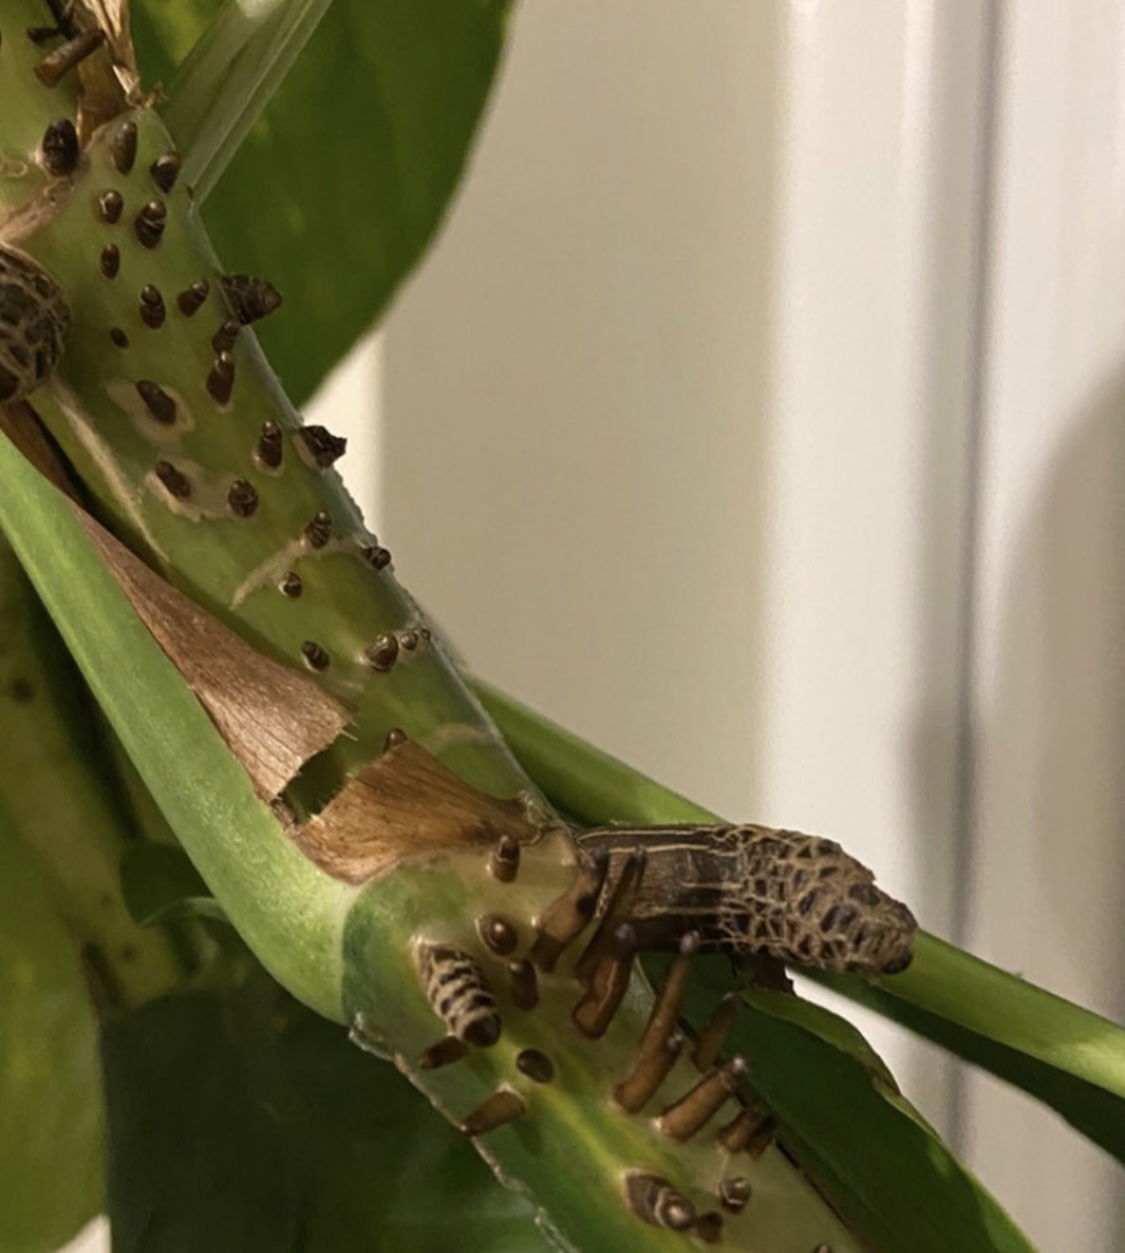 Short brown bumps on your plant's vines are dormant root nodes that'll spring into life when exposed to moisture. In the wild, these root nodes will emerge and stick onto the nearest tree or structure, allowing the plant to reach the tree's canopy in record time.
A loss of variegations is caused by too little light. Although Syngoniums can be used in semi-dark locations, it'll come at a cost of the variegations. If you're not entirely bothered about this, simply skip this step. Move the plant into a brighter location to allow the variegations to re-develop on the new growth. Alternatively, extreme variegations that hinder the plant's green appearance is caused by too much sunlight.
Failed propagated stem cuttings - There are several reasons why the cuttings haven't rooted well, including: the time of year (spring or summer is best), its size (Syngonium cuttings should have at least three leaves), poor growing conditions (replace water weekly for water-propagated cuttings, and avoid over-watering for soil-grown plants), and its growing environment (a bright sunless windowsill and warmth is important).
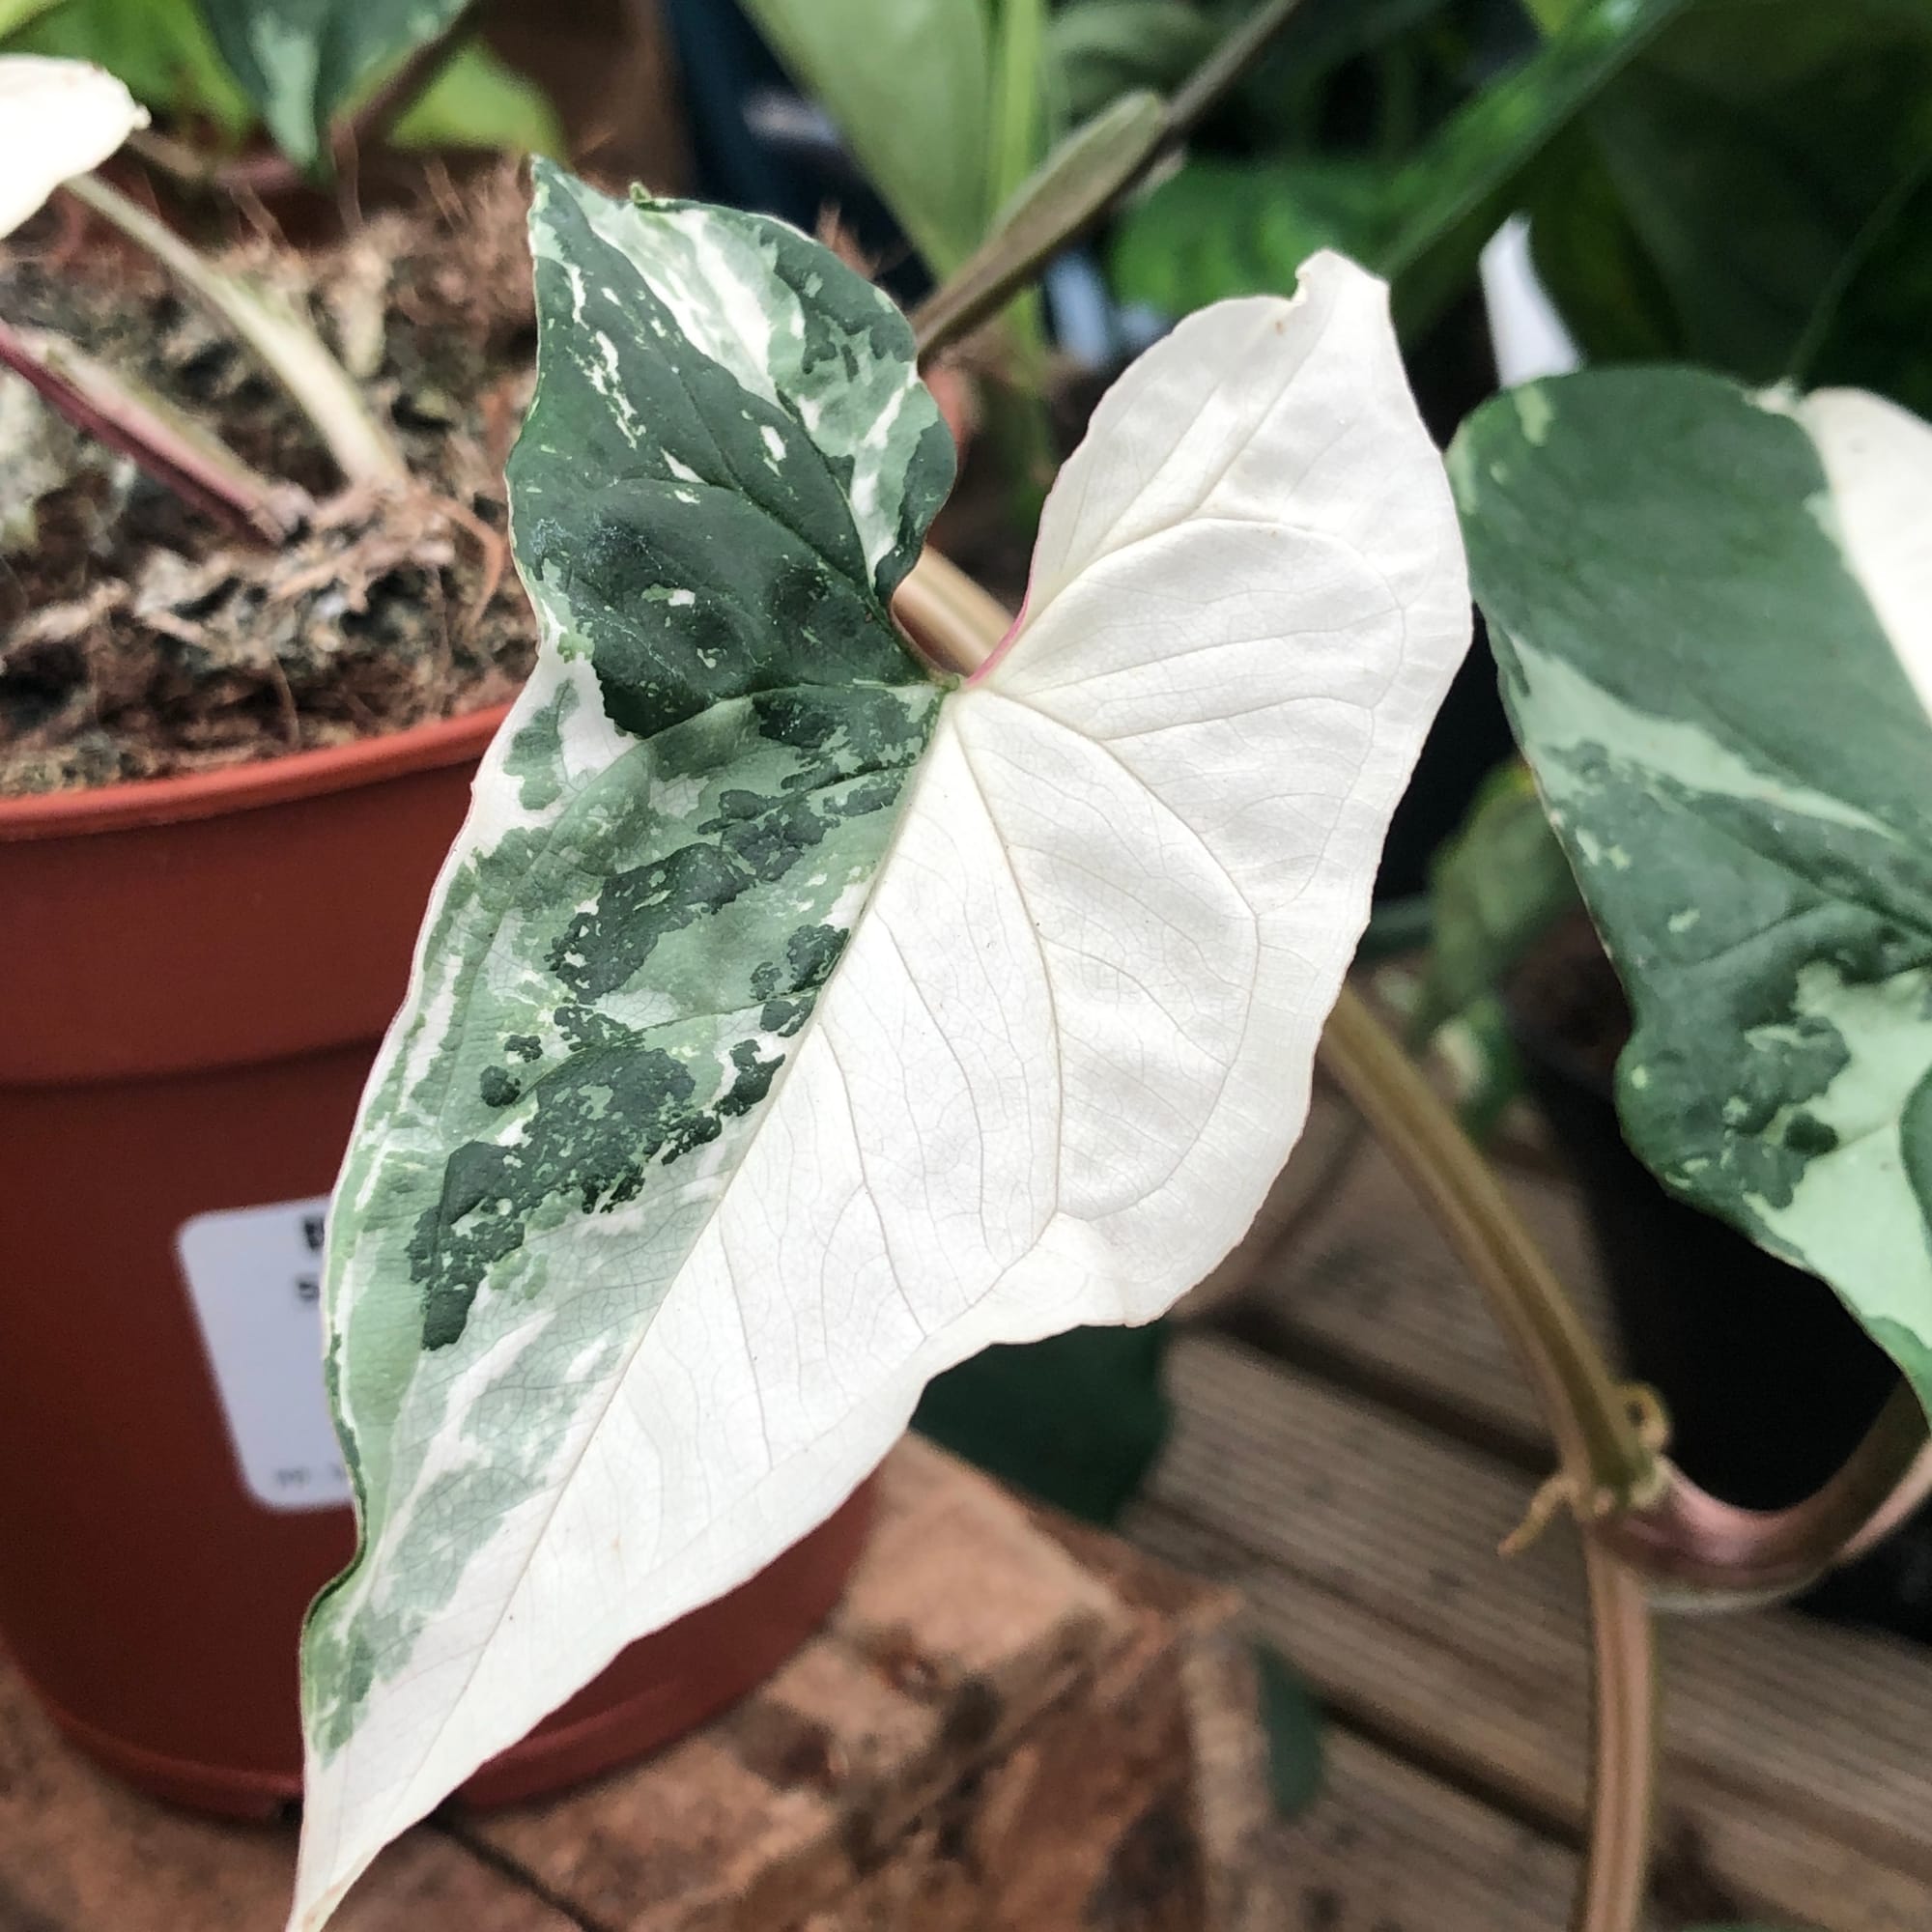 Syngonium podophyllum 'Albo Variegatum' is a stunning variety of Arrowheads that you can grow at home. This species prefer brighter light and higher humidity than other Syngoniums, so ensure yours is within 2m (6ft) of a window (or keep it under a grow light).
Origins
Syngonium is a genus of around thirty-four species, all ranging within tropical America. The most popular and widespread species, the S. podophyllum, has natural distributions between Mexico and Brazil. Its scientific name was first penned by Heinrich Schott in the 1830s and comes from the Greek words for 'syn' meaning plus, and the 'gonium' that refers to the the fused ovaries of the female flowers (gonada). 'Podophyllum' is the Latin epithet for 'stout-stalked leaves'. Despite the species being first described in 1759 as Arum auritum, it was placed in its own genus in 1879 after a short spell in the visually-similar African genus, Nephthytis.
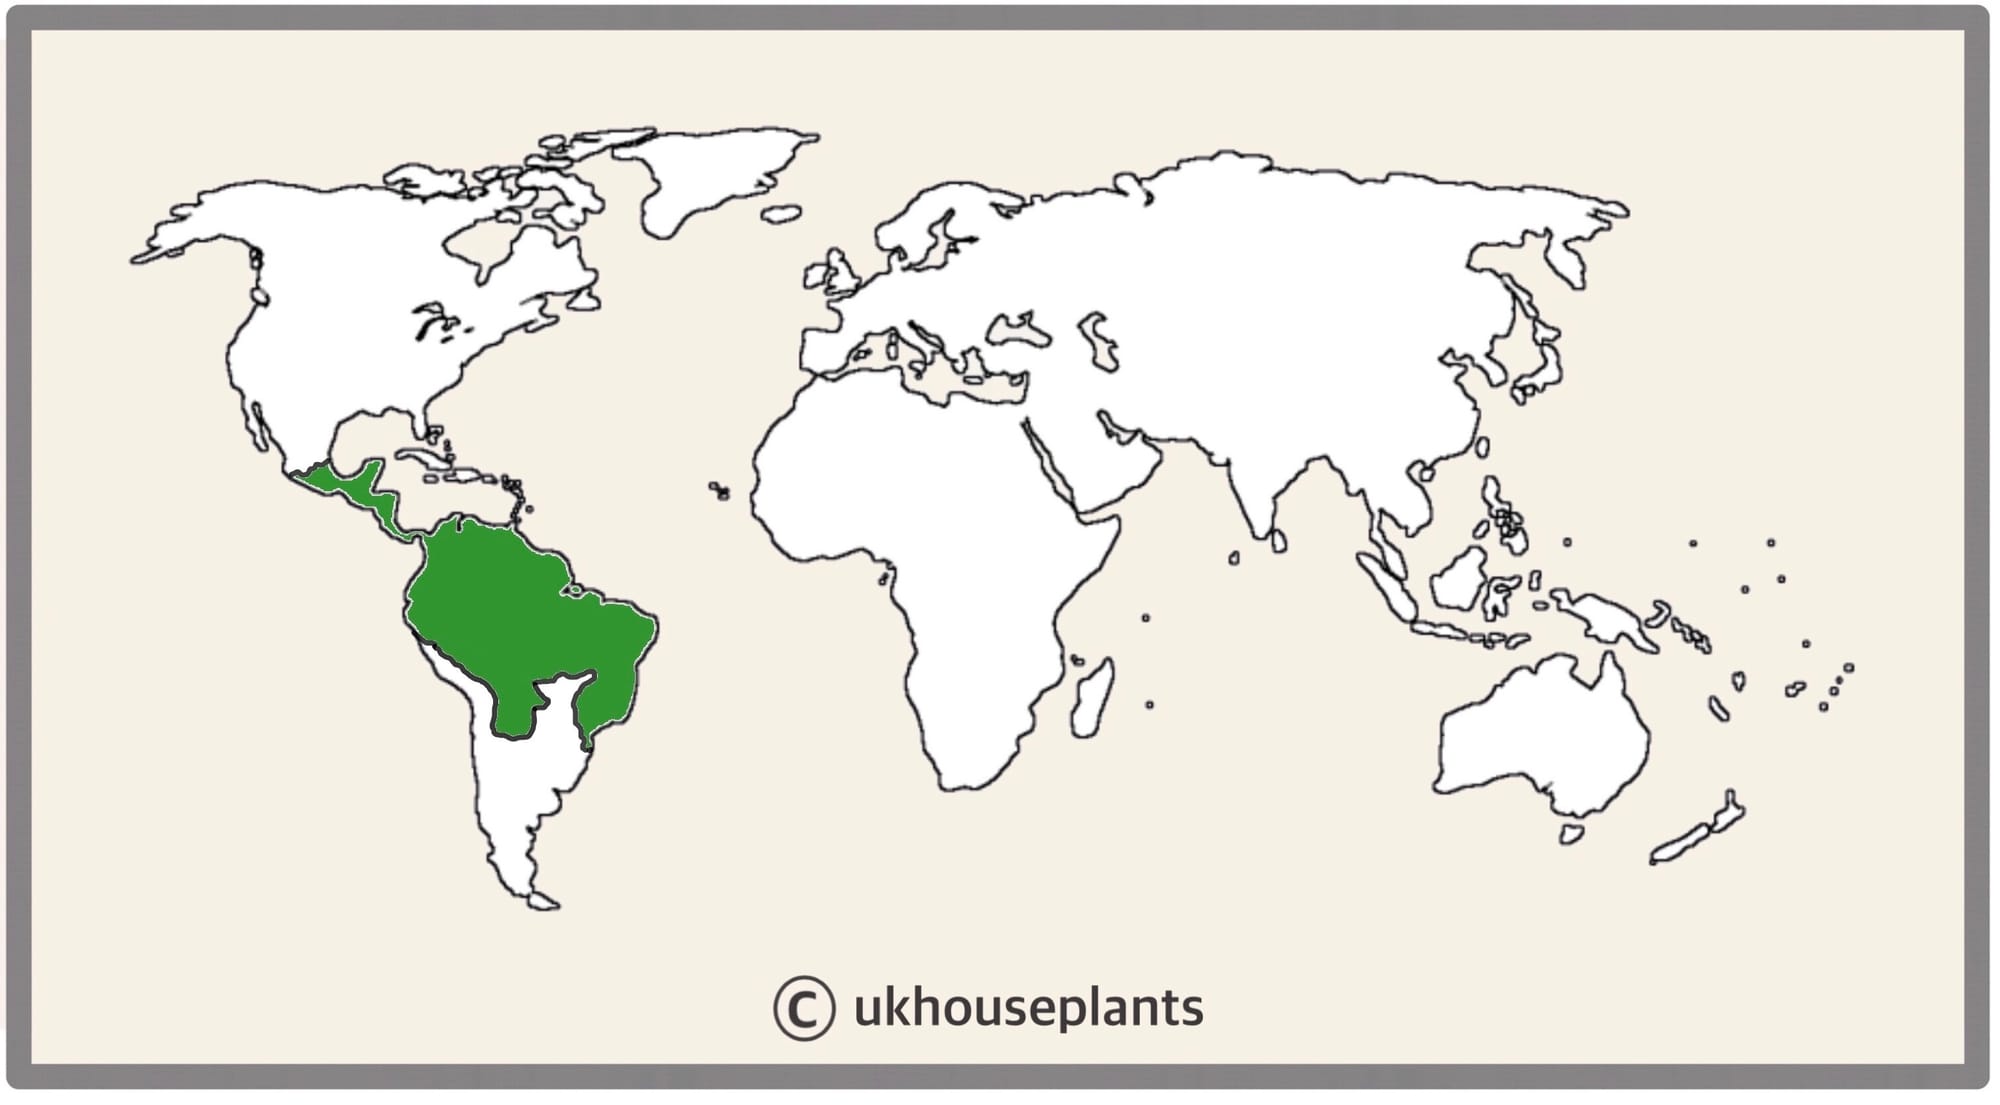 The Distribution of Syngonium.
Temperature
15° - 26°C (59° - 80°F)
H1b (Hardiness Zone 12) - Can be grown outdoors during the summer in a sheltered location with temperatures above 10℃ (50℉), but is fine to remain indoors, too. If you decide to bring this houseplant outdoors, don't allow it to endure more than an hour of direct sunlight a day as it may result in sun-scorch. Regularly keep an eye out for pests, especially when re-introducing it back indoors.
Spread
As Syngoniums are vines, they can reach up to 1.5m in height and 0.6m in width, with 20cm of new growth per year. The ultimate height will take between 5 - 10 years to achieve. Its foliage will change shape in concordance to the level of maturity; smaller specimens will sport the typical 'Philodendron' leaf, wehereas a matured specimen have palmate growth, largely similar to those of a Fatsia.
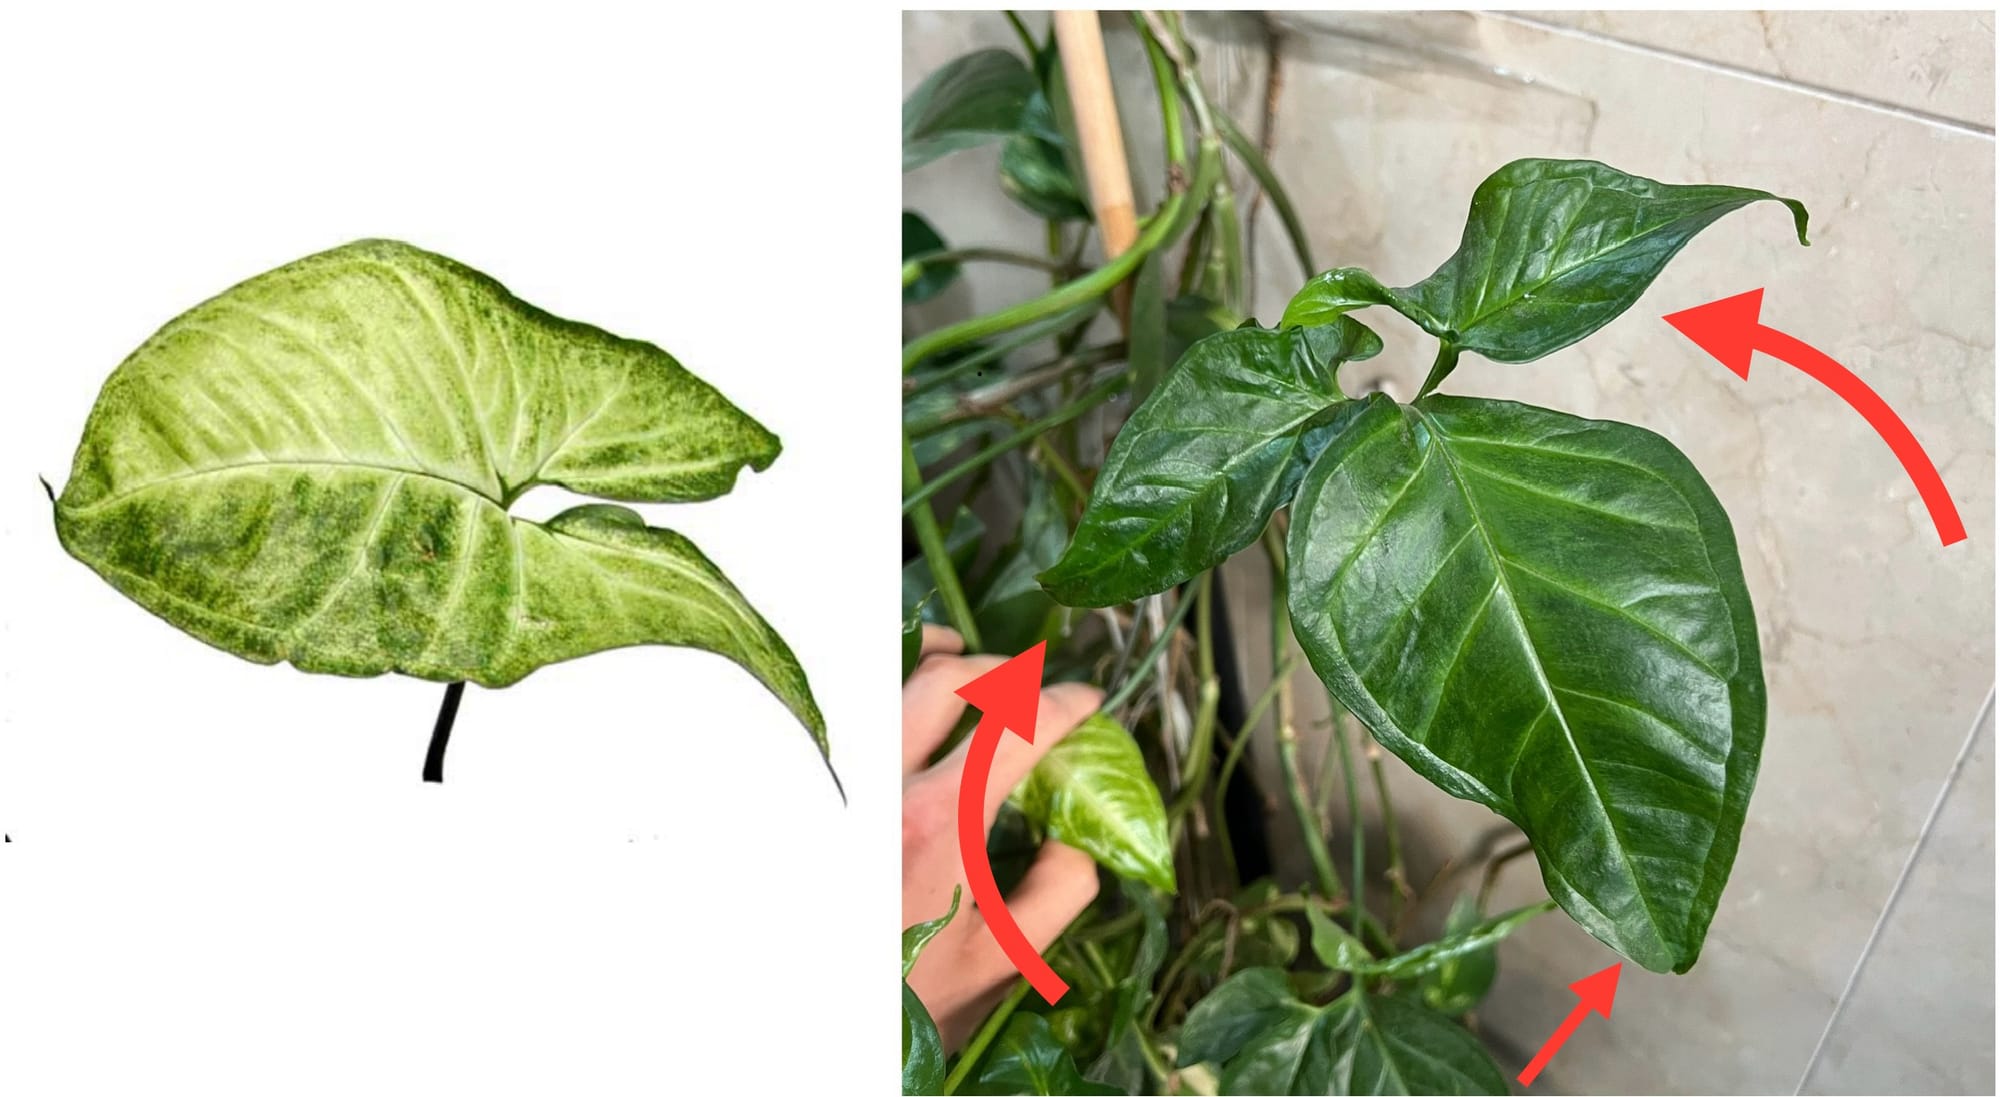
Syngonium produce two distinct shapes of leaves based on the plant's maturity as it grows. 'Leaf dimorphism' is where immature/juvenile plants produce 'hastate' leaves (the ones you see on specimens at garden centres, pictured left), before developing 'digitate' foliage (with three distinct leaf-points) as seen on the left. This phenomenon will take around six years.
Pruning & Maintenance
Remove yellowed or dying leaves and plant debris to encourage better growth and all-round growing conditions. When removing dying flowers or leaves, use clean scissors or shears to reduce the chance of bacterial and fungal diseases, and remember to make clean incisions as too much damage can shock the plant.
Never remove its aerial roots that'll develop along the stem, as it may result in stress and a weakened health.
Propagation
Via Seed, Stem Cuttings or Sucker Separation.
Stem Cuttings via Water Propagation (Easy)
- Choose the healthiest, most established vines. This propagation method can be taken from spring to summer, using between two to five leaves, with the vine being at least 8cm (2.5 inches) in length with two nodes (one for foliar development and the other for root growth). Although more nodes are fine, be sure only to submerge the bottom ones in water to avoid unneeded rooting elsewhere on the stem. (More on this later)
- Cut directly below a node using a clean knife to reduce bacteria count. Remove the lower half of the leaves and place the vines into a container of lukewarm water. Be sure to submerge at least one node into the water, or else the root development will be hindered.
- The leaves must stay above the waterline for the prevention of disease.
- Replace the water weekly, using lukewarm water to avert shocking the cutting with cold temperatures.
- Once the roots surpass 4cm (2 inches) in length, it's time to pot the cutting.
- Choose a potting mix - as long as it has a well-draining nature, most soils are fine. Either 'Houseplant' labelled compost or our Monstera Potting Mix is suitable for potting up.
- Use a 7cm (2 inch) plastic or coir pot that has suitable drainage holes. Try not to transplant the cuttings too deeply in the soil as rot may occur.
- Fill the bottom quarter of the pot with soil, before sitting the cutting on top. Fill the remaining gaps with compost until the soil line reaches four-fifths of the pot's height. Lightly tap the pot's side to consolidate the soil into place. (Don't press down on the soil!)
- Provide bright, indirect light in a windowsill or under a grow light, along good humidity by placing the potted plant into a transparent plastic bag for the first couple of weeks.
- Open the bag every two days for an hour for the prevention of disease. After a month of being placed in soil, remove it from the bag and follow the care tips provided above.
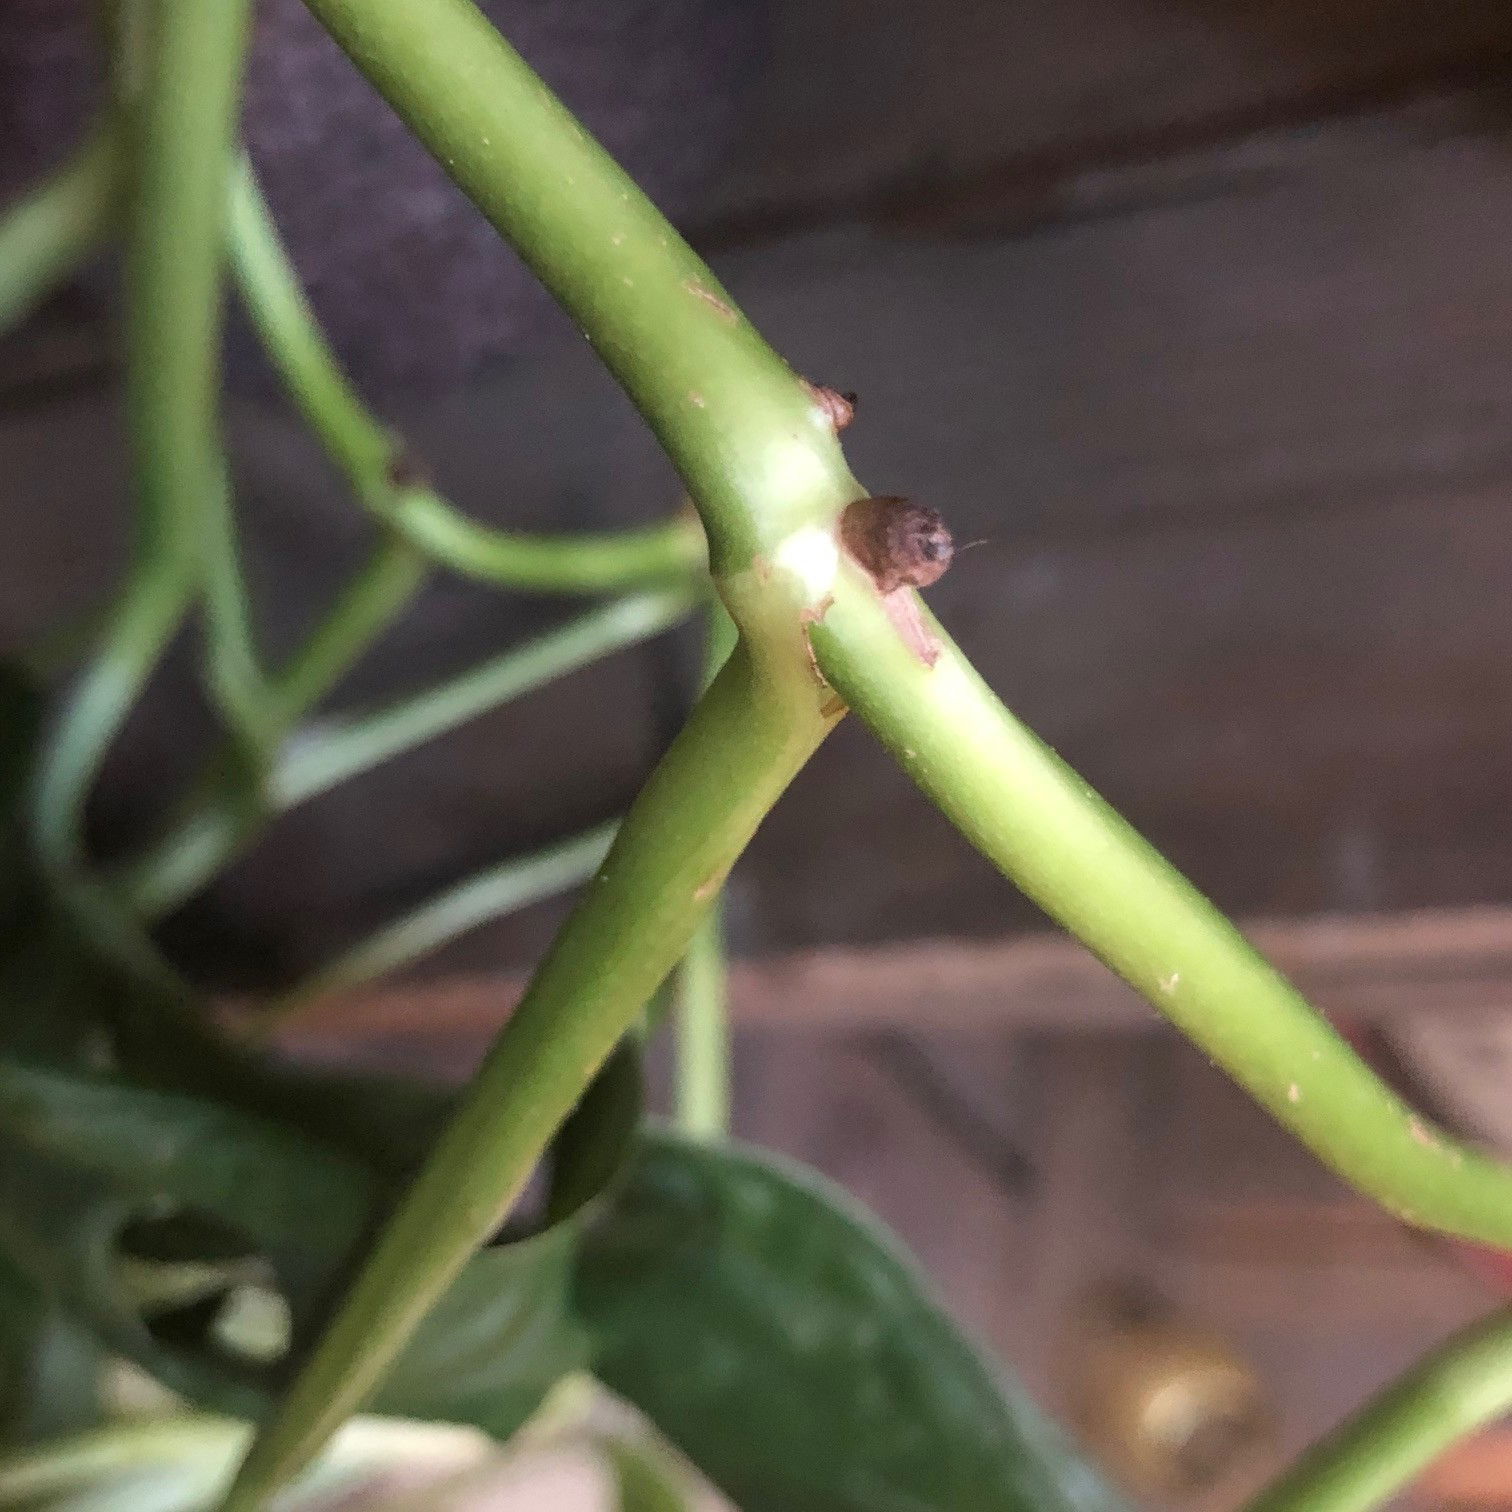 Pictured here is a node that can produce a new branch of foliage and aerial roots to start off the propagation process.
Stem Cuttings via Soil Propagation (Moderate)
This second option is still easy to perform, but it'll need some extra steps to avoid dehydration while the cutting roots in the soil.
- Choose the healthiest, most established vines. This propagation method can be taken from spring to summer, using between two to five leaves, with the vine being at least 8cm (2.5 inches) in length with two nodes (one for foliar development and the other for root growth). Although more nodes are fine, be sure only to submerge the bottom ones in water to avoid unneeded rooting elsewhere on the stem. (More on this later)
- Cut directly below a node using a clean knife to reduce bacteria count. Remove the lower half of the leaves and place the vines into a container of lukewarm water. Be sure to submerge at least one node into the soil, or else the root development will be hindered.
- Choose a potting mix - as long as it has a well-draining nature, most soils are fine. Either 'Houseplant' labelled compost or our Syngonium Potting Mix is suitable for potting up.
- Use a 7cm (2 inch) plastic or coir pot that has suitable drainage holes. Try not to transplant the cuttings too deeply in the soil as rot may occur.
- Fill the bottom quarter of the pot with soil, before sitting the cutting on top.
- Fill the remaining gaps with compost until the soil line reaches four-fifths of the pot's height. Lightly tap the pot's side to consolidate the soil into place. The leaves must always stay above the soil-line for the prevention of disease.
- Provide bright, indirect light in a windowsill or under a grow light, along good humidity by placing the potted plant into a transparent plastic bag for the first couple of weeks. Humidity will be your cutting's best friend, so ensure the plant doesn't dehydrate because of dry air.
- Open the bag every two days for an hour for the prevention of disease. After a month of being placed in soil, remove it from the bag and follow the care tips provided above.
Basal Offset Division (Easy) - Your plant will produce several basal offsets that can be separated once they have a sufficient root system, and surpass 8cm in stem length. If possible, water the soil 24hrs before the main event to reduce the risk of transplant shock, when its dry root systems are over-fingered. Take the plant out of its pot and place your fingers close to the nodal junction; soil may have to be removed for better access. Push the chosen offset downwards until you hear a snap. Separate the foliage and its root system away from the mother plant, mentally noting the high risk of damage. Transplant in the appropriate sized pot with a fresh batch of 'Houseplant' soil. Maintain evenly moist soil and situate it in a bright, indirect location away from any direct sunlight. After eight weeks, treat it like a normal specimen, following the care tips above!
Flowers
As Syngonium is part of the Araceae family, their blooms are much like a Peace Lily's flower consisting of a white or green spathe (the spoon-like shell) surrounding a spadix. Blooms can last up to five days and is usually visible during late spring or early summer around 20cm from the soil line, though Syngonium rarely flower due to duration it takes to fully mature.
Repotting
Repot every three years in the spring using 'Houseplant' labelled compost and the next sized up pot. For matured specimens, introduce more grit to promote a stronger root ball; click on this link for more information on how to perform the perfect transplant.
Pests & Diseases
Keep an eye out for mealybugs, aphids, spider mites, thrips, whitefly, blackfly, vine weevils & root mealybugs, although Syngonium are generally pest-free. Syngonium are also susceptible to leaf-spot disease, powdery mildew, botrytis & root rot - click here to learn about these issues.
Toxicity
This plant is classified as poisonous, so if small sections are eaten, vomiting, nausea and a loss of appetite may occur. Consumption of large quantities must be dealt with quickly; acquire medical assistance for further information.
Retail Locations
Online Stores.
Book a 1-to-1 Call with THE HOUSEPLANT DOCTOR™
If you need further advice with your houseplants, book an advice call with ukhouseplants' friendly and expert writer today! This can be done via a video or audio call on most apps, including Facebook, FaceTime & Skype. A ten-minute call costs £5.99 (US$7), or £15.99 for thirty minutes. You can ask multiple questions, including queries on plants, pests, terrariums, repotting advice and anything in between. Please consider supporting this service to keep ukhouseplants thriving!
Comments