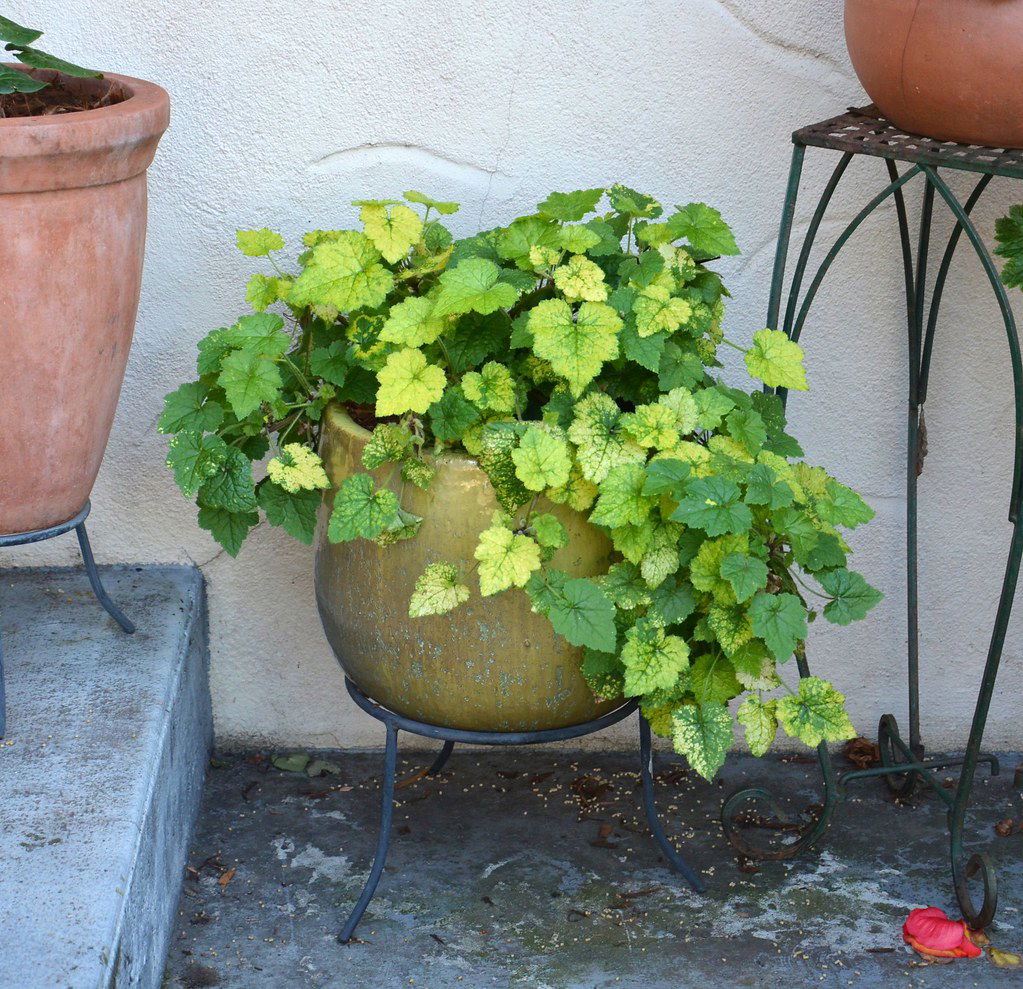
Tomiea meziesii 'Taff's Gold'. Copyright: Flickriver
Contents
- Top Tips
- Location, Water, Humidity & Fertilisation
- Common Issues
- Origins, Temperature, Propagation, Repotting & Toxicity.
Need the answer to a specific plant query? Book a 1-to-1 video call with Joe Bagley, the website's friendly author, to overcome and address your niggling problem! Available on iMessage, WhatsApp, Facebook Messenger & more.
Top Tips & Info
- Care Difficulty - Easy to Moderate
- Piggyback Plants are best suited for a location with natural, indirect light. Excessive periods in the sharp rays will significantly increase the risk of adopting sun-scorch.
- They'll require near-constant moist compost, with the soil's top third drying out in between waters. Avoid under-watering as the risk of dehydration during the spring and summer months is relatively high. Over-watering, however, is less common but can still cause severe consequences to the specimen's overall health.
- Fertilise using a 'Houseplant' labelled feed every four waters in the spring and summer, reducing this to every six in the colder months.
- Repot every three or four years during the spring with a 'Houseplant' labelled potting mix and the next sized pot. Treat the roots with respect as Transplant Shock is a prominent killer among newly-planted specimens.
- Keep an eye out for Mealybugs that'll hide in the plant's cubbyholes and under-leaves.
- Scroll down to 'Propagation' to learn more about how to take leaf cuttings.
Location & Light - 🔸🔸🔸
Piggyback Plants are best kept in bright, indirect locations away from excessive sunlight or deep shade. For those worried about its setting being too dark, if a newspaper can be read while having your back towards the window, you're good to go. We recommend a north-facing window, within two metres of any other window, or under a grow light as the place to situate a Piggyback Plant.
Water - 🔸🔸🔸
Piggyback Plants are best kept in reliably moist soil, as inconsistent moisture levels may result in crisped growth and an unhappy plant. Allow the compost's top third to dry out in between waters in the growing period, reducing this further in the autumn and winter. Under-watering symptoms include dehydrated foliage, leaf-plantlet death & browned areas forming on the leaf edges. These issues are usually caused by too much light/heat or just forgetfulness - remember, the brighter the location, the more watering you'll need to do. Over-watering symptoms include the central foliage beginning to yellow rot, little to no new growth, yellowing lower leaves and eventual plant death. If you feel that over-watering is to blame for its demise, click here to learn more about root rot and how to address it.
Humidity - 🔸🔸🔸
Although Piggyback Plants can deal with average room humidity in the home, creating a humidity tray will not only provide a moist and stable environment for your plant, it'll downplay the risks of dehydration, too. This method is particularly good for those who regularly dehydrate their specimens, especially when located within a few metres of an operating heater.
Fertilisation - 🔸🔸
Fertilise every four waters during the growing period before reducing this to every six in the autumn & winter. Although an 'All-Purpose' fertiliser will still do the job, we'd recommend using a specific 'Houseplant' labelled fertiliser as it'll support the vital thirteen nutrients that this species will need to grow.
Common Issues with Piggyback Plants
If you still can't find the answer to your specific houseplant problem, book a 1-to-1 video call with Joe Bagley to point you in the right direction today.
Yellowing lower leaves could be a sign of irrigation abuse, but equally is a byproduct of maturity. If the older leaves rapidly become yellow in quick succession, both under, or over-watering could be to blame. People don't realise that a plant's root system needs access to oxygen, too; when soil is watered, the air will travel upwards and out of the potting mix. A lack of accessible oxygen for the roots will cause them to subsequently breakdown over the oncoming days. If yours is a victim of neglect, create a watering schedule to avoid forgetfulness in the future.
Crisped foliage with brown leaf-edges is the result of too little water and potential over-exposure to the sun. Piggyback Plants are best located in bright settings, with those that haven't acclimatised to the harsh rays may show signs of sun-scorch and environmental shock. A splash of morning sunlight is acceptable as long as the soil moisture is regularly observed, once the introductory period has elapsed.
If your specimen is located in a dark environment with mould developing on the compost's top layer, use a chopstick to gently stab the soil in various areas. Aim to enter the compost between the base of the plant and the pot's edge, as failure to do so may lead to damaging its lower portion. Leave the holes open for a few days before re-surfacing the soil to avoid it becoming overly dry. Not only will the gentle shift in the soil's structure mimic the work of small invertebrates in the wild (worms, etc.), but it'll also add oxygen back into the soil, thus reducing the risk of root rot. Repeat this monthly, or whenever you feel the potting-mix isn't drying out quickly enough.
Mealybugs are white shell-like critters that'll slowly extract the sap from its leaves. Have a check under the foliage, most notably along the midrib, for cottony webs and the critters. Click here to read our article about eradicating Mealybugs, along with some extra tips that you may not find elsewhere!
Failed leaf-cuttings could be the product of several different reasons. As Piggyback Plants are best propagated during the spring, those taken in the dormant months will root much slower, and could even die in the meantime. Study the cutting's environment - is there enough light to read a newspaper? If not, improve the growing conditions by increasing the amount of indirect sunlight it receives. Never situate it in direct sunlight, too, as this will result in severe dehydration and most likely death. The overall size of the cutting will play a big part in its success, with those that are 5cm in height with several leaves being most likely to root. Smaller specimens won't root appropriately due to the lower amounts of stored energy situated in the leaf. You can either remove the mother leaf (where the cutting will be housed) or leave it be to help speed the process of rooting. As the leaves are propagated via hydroponics, replace the water weekly to prevent the bacteria's risk of thriving within the container. Keep the foliage mostly above the waterline, as yellow or browned sections that slowly rot away is caused by poor hygiene or over-submersion that'll lead to suffocation. Scroll down to 'Propagation' for more information on leaf-cuttings!
Origins
Frederick Traugott Pursh first documented the species as Tiarella menziesii back in 1813, placing it in a genus first created by Carl Linnaeus. The species was then relocated into Tolmiea by John Torrey & Asa Gray, keeping its specific epithet of menziesii that honoured Scottish botanist, Archibald Menzies. Tiarella comes from the Greek word for 'Tiara', which refers to the foliage's shape, whereas Tolmiea honours 19th-century Scottish doctor, William Fraser Tolmie.
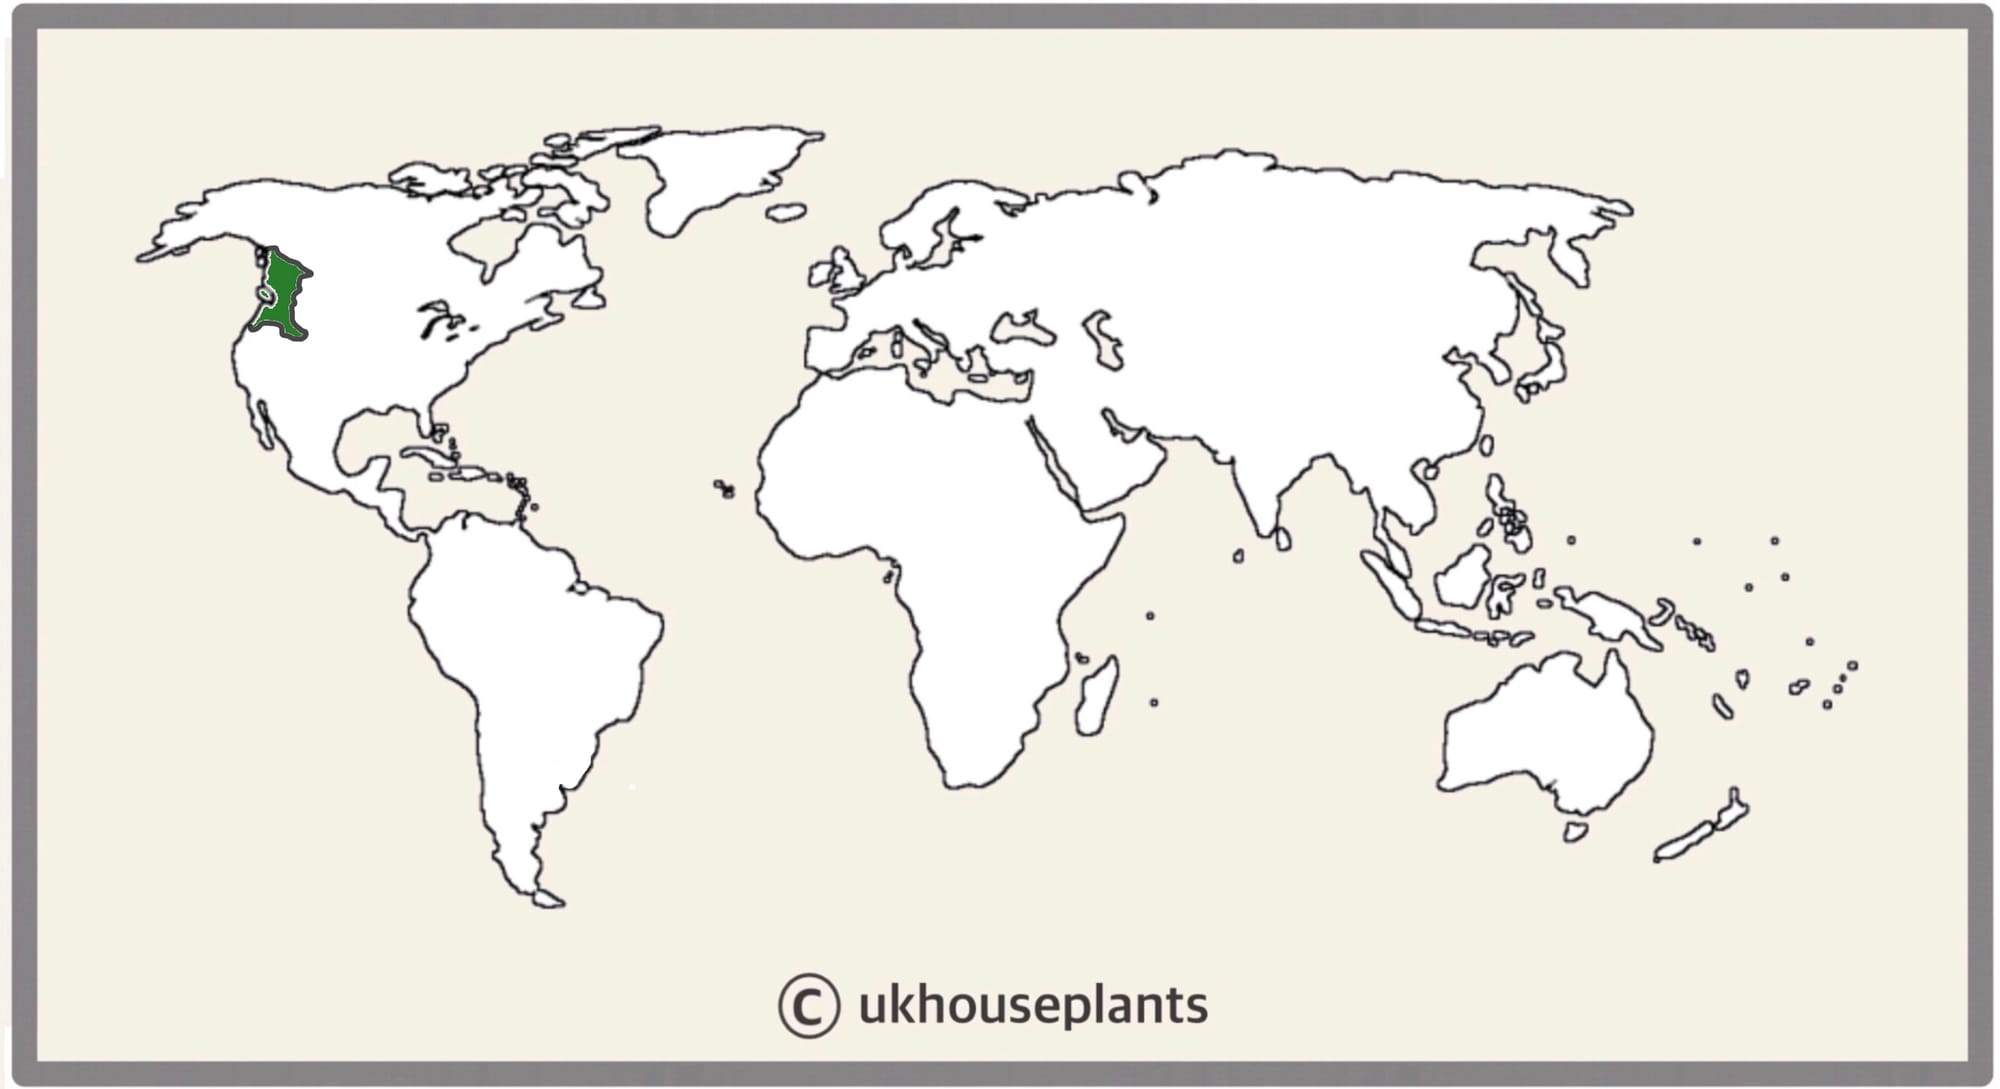 The Distribution of Tolmiea menziesii.
Temperature
12° - 32℃ (54° - 90℉)
H1b (Hardiness Zone 12) - Can be grown outdoors during the summer in a sheltered location with temperatures above 12℃ (54℉), but is fine to remain indoors, too. If you decide to bring this plant outdoors, don't allow it to endure any direct sunlight as it may result in sun-scorch and dehydration. Regularly keep an eye out for pests, especially when re-introducing it back indoors.
Spread
In a domestic setting, the overall length will up to 0.4m (1.3ft) in height and the width of the pot. As you can see in the image above, mature Piggyback Plants often trail over the pot, as supposed to having a wooded stem.
Pruning & Maintenance
Remove yellow or dying leaves, and plant debris to encourage better-growing conditions. While pruning, always use clean scissors or shears to reduce the chance of bacterial and fungal diseases. Never cut through yellowed tissue as this may cause further damage in the likes of diseases or bacterial infections. Remember to make clean incisions as too-damaged wounds may shock the plant, causing weakened growth and a decline in health.
Propagation
Via Seed, Leaf Cuttings & Rhizomatous Division.
Leaf Cuttings (Easy to Moderate) - Leaves that already house the small plantlets are the best for propagation. Remove the mature leaf's petiole that connects the main plant to it, keeping the baby plantlet secure on the leaf for the time being. If the plantlet is over 5cm (2 inches) with several developed leaves, you may remove it from the main leaf to become fully independent. Place the cutting's base into water (either with the original leaf or on its own), keeping the plantlet's leaves above the water. Thin white roots will develop quickly from its base (similar to Pilea cuttings), readying itself for soil transplantation in a matter of weeks. Once the plantlet has 5cm of root growth, place its bottom half in 'Houseplant' labelled compost, making sure the leaves are entirely above the soil line and not submerged. Provide a bright, indirect setting with continuous moist soil for best results. After eight weeks, treat it like a mature specimen, following the care tips provided at the start of this article. If you're experiencing issues with your cuttings, scroll up to the final paragraph in 'Common Issues' for more information.
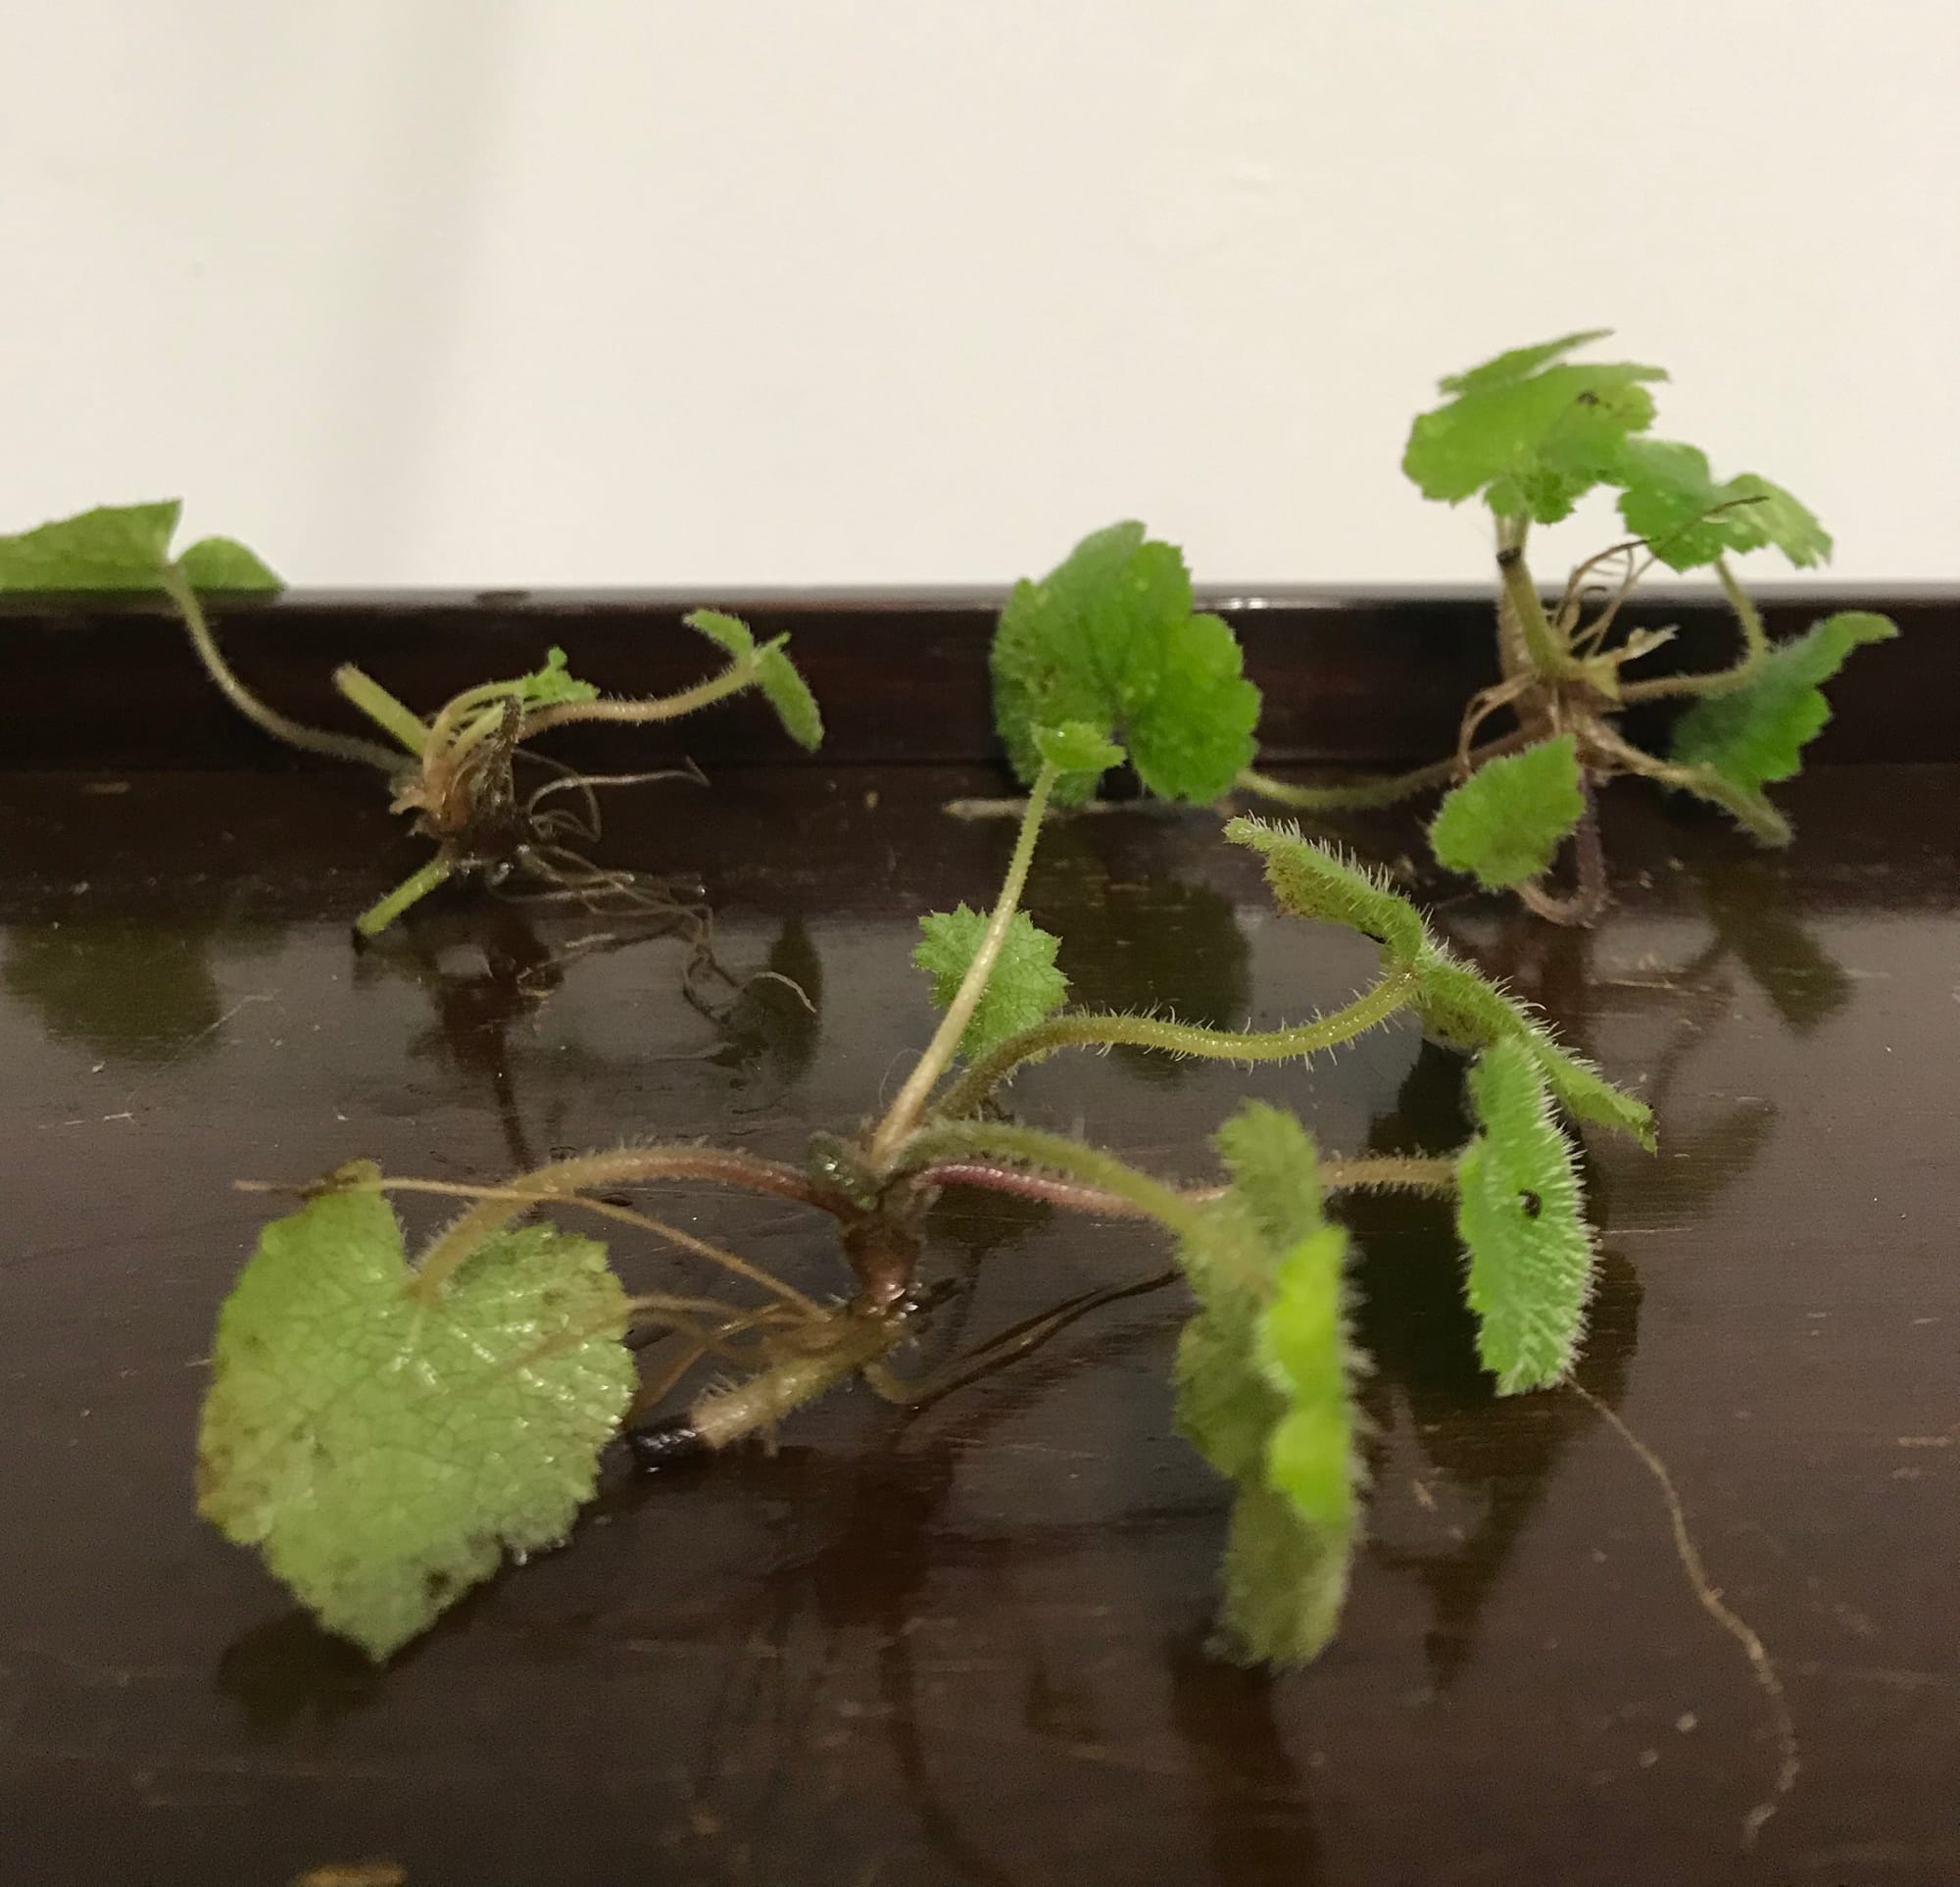 Here is a visual representation of a plantlet that's been removed from the main leaf.
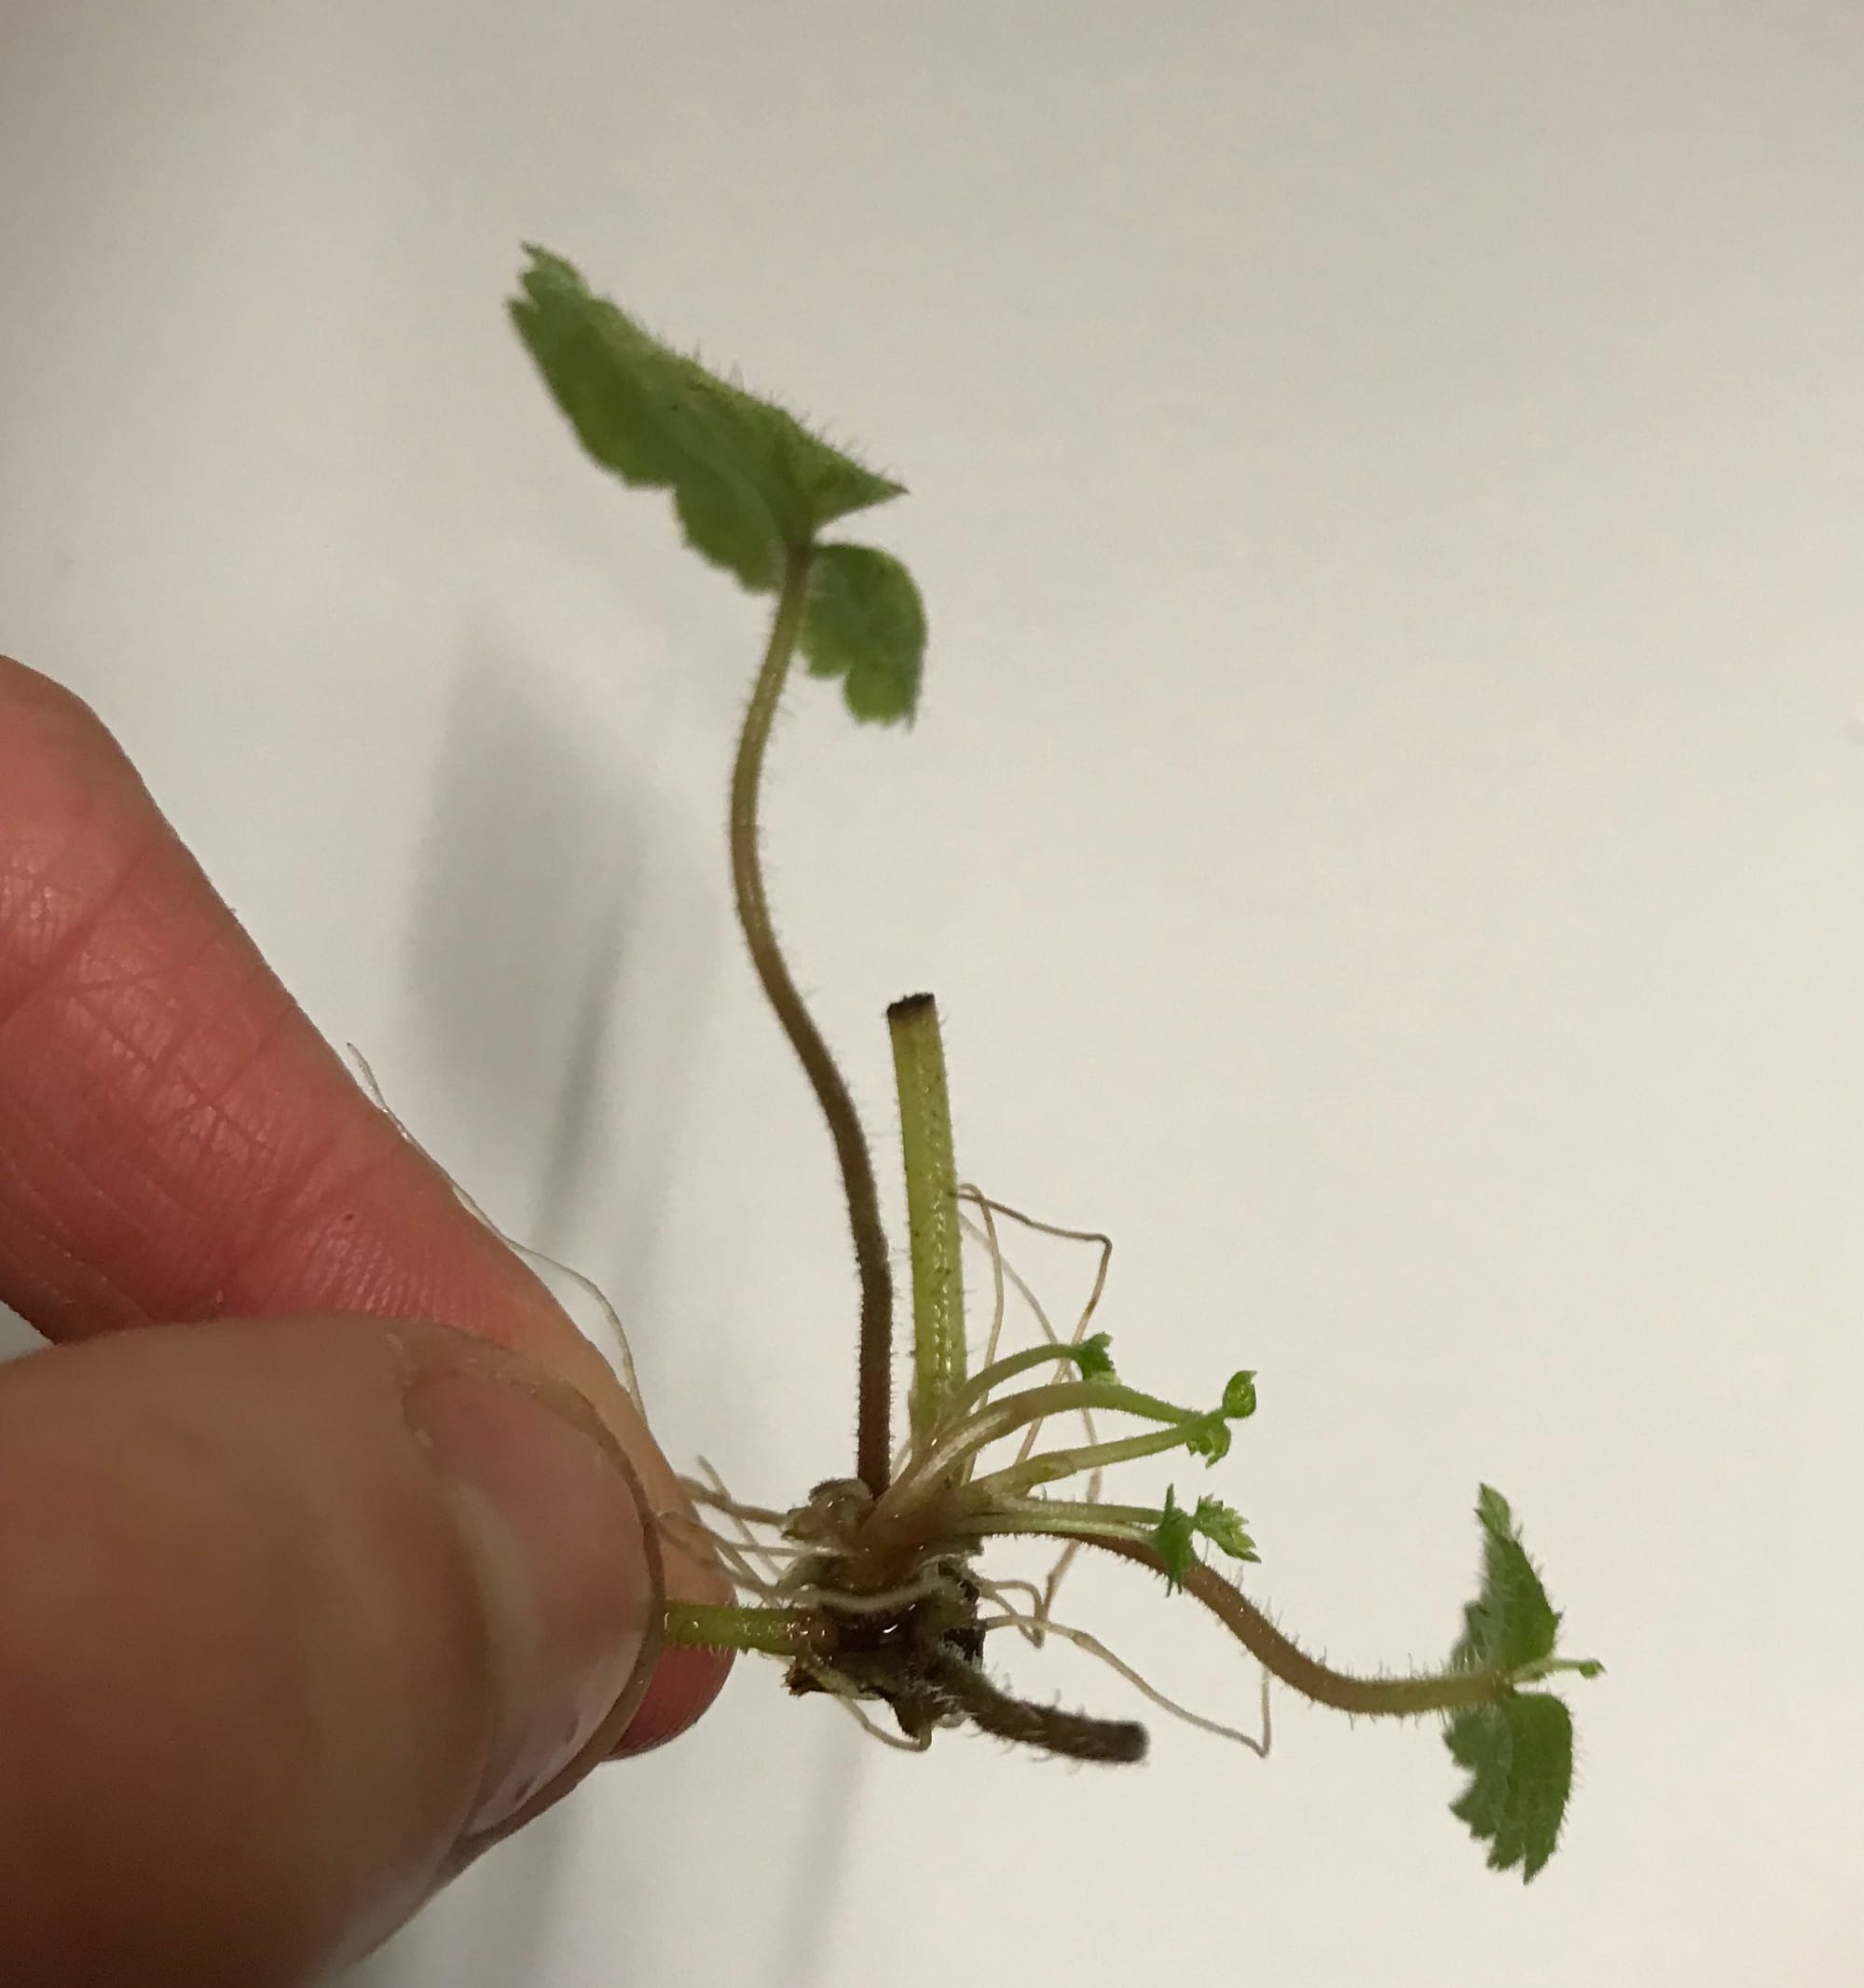 This plantlet is now ready to be placed in soil, after a short spell in water to grow over 5cm of roots.
Rhizomatous Division (Difficult, Unrecommended) - The best time to divide is during the repotting period in the spring or summer. To prevent transplant shock (common with heavy-handed transplants), water the plant 24hrs before the main event. Gently tease away some of the soil, and split the horizontal rhizome along with its healthy root systems. Do not touch, or over-finger the roots as the small hairs are sensitive and may cause death in some instances. Place the rhizome's base slightly submerged into moist 'Houseplant' compost, while avoiding submerging the leaves due to the risk of rot. Avoid direct sunlight or periods of droughts for best results.
Flowers
Domestically grown specimens may never bloom due to insufficient growing conditions. The small purple tubular-shaped flowers are arranged on a large shaft, measuring up to 30cm in height. The common time for a Piggyback Plant to flower in the spring and summer months, but may bloom slightly earlier in some cases.
Repotting
Repot every three or four years in the spring, using a 'Houseplant'-labelled potting mix and the next sized pot with adequate drainage. Piggyback Plants are far better potbound for several years due to the heightened risk of root rot and repotting-issues (like transplant shock) - so only repot if you feel it's wholly necessary.
Hydrate the plant 24hrs before tinkering with the roots to prevent the risk of transplant shock. For those situated in a darker location, introduce extra amounts of perlite and grit into the lower portion of the new soil to downplay over-watering risks. Click here for a detailed step-by-step guide on transplantation, or via this link to learn about repotting with root rot.
Pests & Diseases
Keep an eye out for mealybugs, aphids, spider mites & whitefly. Common diseases associated with this species are root rot, red leaf-spot, heart rot, botrytis & southern blight - click here to learn more about these issues.
Toxicity
Not known to be poisonous when consumed by pets and humans. If large quantities are eaten, it may result in vomiting, nausea and a loss of appetite.
Retail Locations
Facebook Market (sometimes) & Online Stores.
Book a 1-to-1 Call with Joe Bagley
If you need further advice with your houseplants, book an advice call with ukhouseplants' friendly and expert writer today! This can be done via a video or audio call on most apps, including Facebook, FaceTime & Skype. A ten-minute call costs £5.99 (US$7), or £15.99 for thirty minutes. You can ask multiple questions, including queries on plants, pests, terrariums, repotting advice and anything in between. Please consider supporting this service to keep ukhouseplants thriving!
Comments