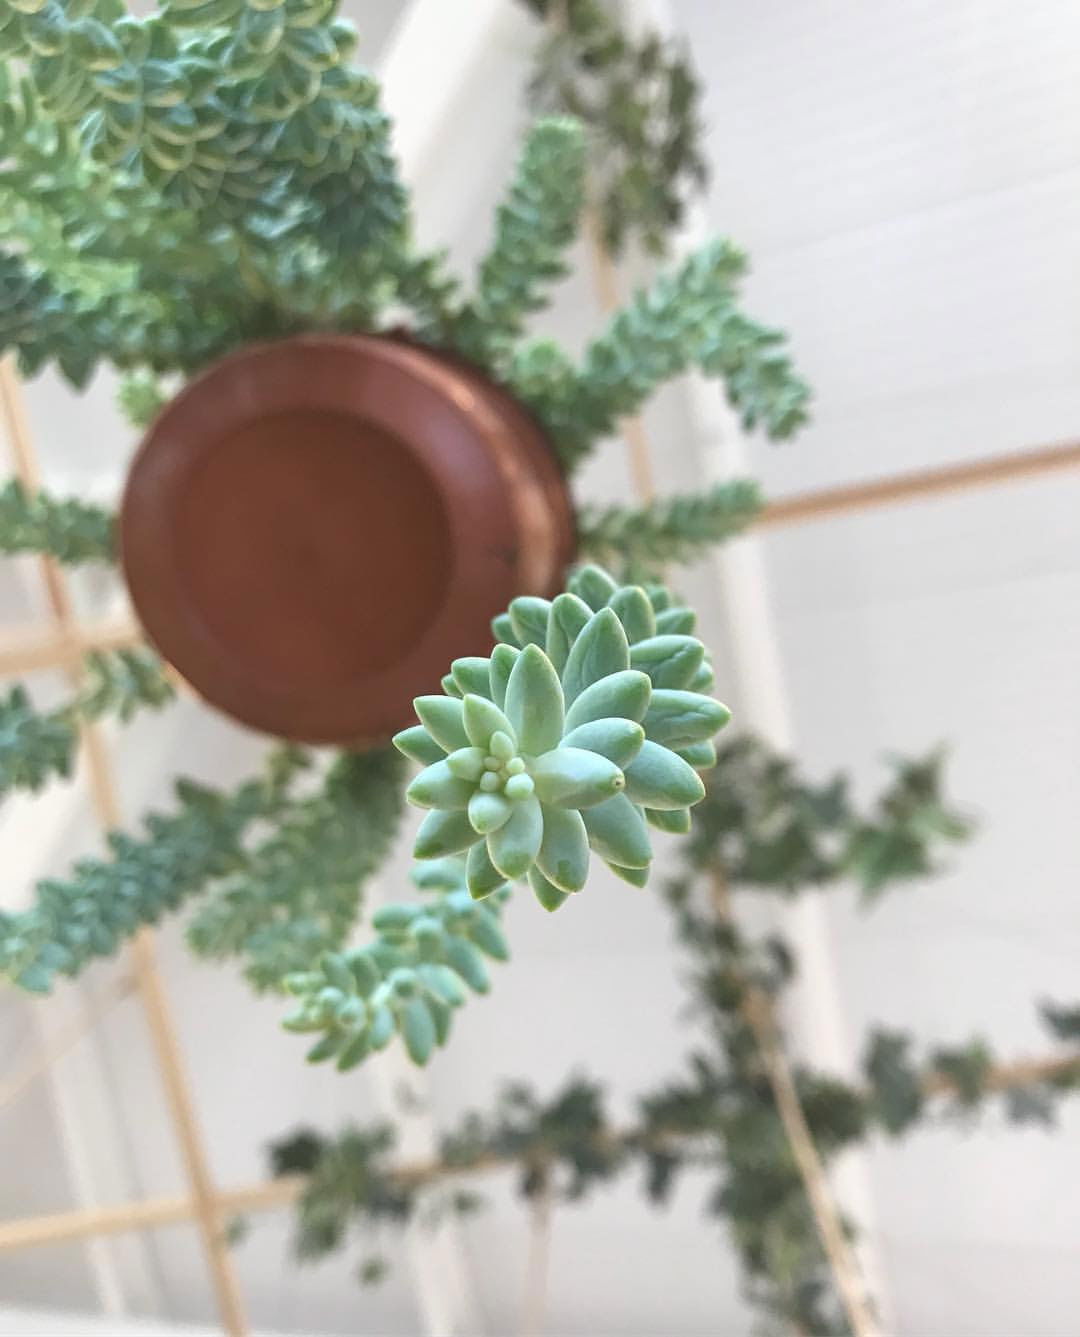
Sedum morganianum
Contents
- Top Tips
- Location, Water, Humidity & Fertilisation
- Common Issues
- Origins, Temperature, Propagation, Repotting & Toxicity
Need the answer to a specific plant query? Book a 1-to-1 video call with Joe Bagley, the website's friendly author, to overcome and address your niggling problem! Available on iMessage, WhatsApp, Facebook Messenger & more.
Top Tips & Info
- Care Difficulty - Easy
- Burro's Tails require a few hours of morning or evening sun, especially in the winter months to avoid root rot from over-watering. Those kept on a shelf without natural light penetrating the compost's surface are most at risk of rot and potential soil mould.
- Allow ALL of the soil to dry out in between waters - if you're stuck with when to water it, think of the ukhouseplants' phrase of 'Drenches Between Droughts'.
- It's advised to water the plant using the bottom-up method of submersion, for the prevention of rotting foliage (caused by excess moisture above the soil line).
- Fertilise every two or three months using either a 'Cactus' or 'Houseplant' labelled feed.
- Repot every three years during the spring, using a 'Cactus & Succulent' potting mix and the next sized pot.
Location & Light - 🔸🔸🔸
Burro's Tails like to be sat in the brightest room possible. A few hours of off-peak sunlight will be highly beneficial for the specimen, as it'll significantly reduce the risk of over-watering and root rot. Due to the species' intolerance to low light, avoid placing one in areas where a newspaper can't be read without the use of artificial light.
Water - 🔸
The ukhouseplants phrase, 'drenches between droughts' should strongly be associated with all Sedums, especially Burro's Tails. During the growing period, allow ALL of the soil to dry out in between waters for at least a week, reducing this further during the autumn and winter.
Instead of pouring water directly through the foliage, irrigate using the bottom-up method by placing the pot on a saucer of water (25% submerged) until thorough absorption. Wetting the foliage every time the plant is hydrated will slowly allow excess moisture to settle, causing the leaves to yellow and rot away - scroll down to 'Common Issues' for more information on this. Under-watering symptoms include deflated leaves, little to no growth and gradual foliage decline. Be sure to study its environment; a position that offers too much sunlight will dry out the soil far too quickly and will eventually scorch the plant's leaves. Over-watering symptoms include rapidly yellowing leaves, wilting, mushy leaves or stem and plant death. Again, study where it's situated in your home. If it doesn't receive bright or overhead light, a relocation is mandatory to get your specimen back on track!
Humidity -
This is not a necessity; however, a quick hose down from time to time will hydrate the leaves and wash away dust or potential pests.
Fertilisation - 🔸
Fertilise every two months during the growing period before reducing this to every three months in the autumn & winter. Although a 'Houseplant' fertiliser will still do the job, we'd recommend using a specific 'Cactus' labelled feed as it'll support the vital thirteen nutrients that this species will need to grow.
Common Issues with Burro's Tails
Root rot is a common issue among specimens sat in too dark environments with prolonged soil moisture. Symptoms include rapidly yellowing leaves, mouldy soil, shrivelled growth and a rotten brown base. Take the plant out of the pot and inspect health below the compost line. If the roots sport a yellow tinge, you're good to go, but those that are brown and mushy must be addressed immediately. More information about addressing root rot can be found on this link.
A lack of leaves on the soil's top could be the product of excess moisture settling on the foliage. Although watering from the top is best, it's recommended to use the bottom-up method if you're a messy waterer. For specimens that have a bare head, improve growing conditions by using this method and increasing the light levels and air circulation. Take vine cuttings to promote a bushier appearance above the soil line - scroll down to 'Propagation' for more information. Finally, always remove yellowed or rotten debris from the soil as it could harbour both bacterial and fungal diseases, which will continue the plant's decline.
Failed leaf or vine cuttings are a common issue among amateur gardeners, with damaged wounds or too small vines being the usual culprits. Although Burro's Tail propagation is relatively easy, people still find it hard to ace. Not only will the size of the vine dictate its success, damaging the leaves or vine can also hurt the chances of it rooting. Scroll down to 'Propagation' for more information regarding this issue!
Too much sunlight will cause a red tinge to the foliage. Although Burro's Tail is best grown in locations offering around two hours of direct sunlight a day, prolonged periods of intense rays cannot be tolerated. Reduce the amount of sunlight received to just one hour a day, while keeping the growing conditions relatively similar to reduce the effects of environmental shock. Although the new growth will revert to its original green texture, sunburnt leaves will remain scorched for the rest of its functioning life.
Origins
Sedum consists of around six hundred species that mostly originate from temperate or subtropical locations around the world. The genus was first described in 1753 by Carl Linnaeus, with Burro's Tail was first being mentioned in the 1930s in Mexico by German botanist, E. Walther. The species is often confused with S. burrito, which most likely is a hybrid of the S. morganianum due to its similar foliar characteristics and absence in the wild.
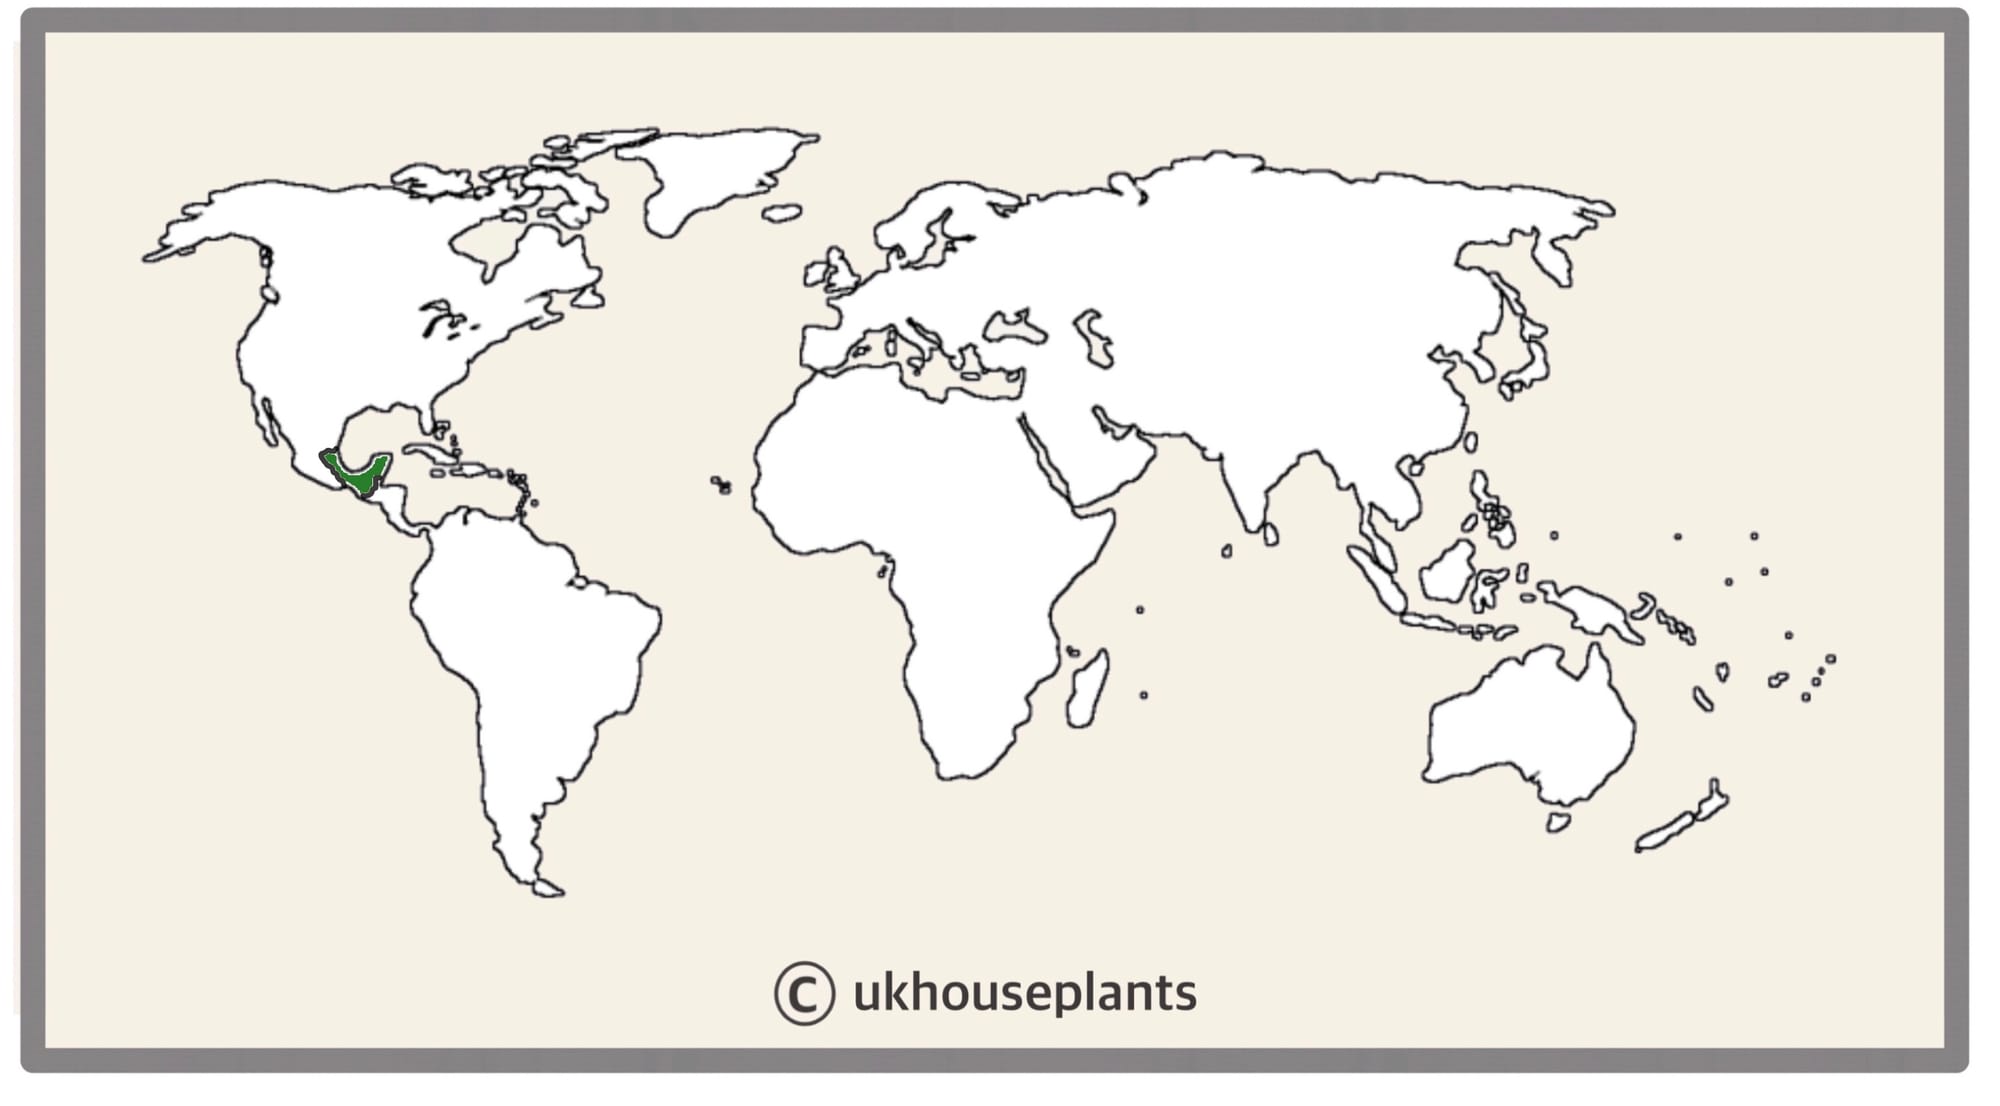 The Distribution of Sedum morganianum.
Temperature
10° - 26°C (50° - 78°F)
H1b (Hardiness Zone 12) - Can be grown outdoors during the summer in a sheltered location with temperatures above 12℃ (54℉), but is fine to remain indoors, too. If you decide to bring this plant outdoors, don't allow it to endure any direct sunlight as it may result in sun-scorch and dehydration. Regularly keep an eye out for pests, especially when re-introducing it back indoors.
Spread
Up to 60cm in length with its width solely relying on diameter of the pot that it's in. The ultimate height will take between 3 - 5 years to achieve, but can live over a decade or more in the right care.
Pruning
Remove yellow or dying leaves, and plant debris to encourage better-growing conditions. While pruning, always use clean utensils or shears to reduce the chance of bacterial and fungal diseases. Never cut through yellowed tissue as this may cause further damage in the likes of diseases or bacterial infections. Remember to make clean incisions as too-damaged wounds may shock the plant, causing weakened growth and a decline in health.
Propagation
Vine Cuttings - Easy
Choose the healthiest stems located at the vine terminals; these should be damage-free and wholly plump. Cut off at least five inches and remove the older half of the leaves for the reduction of transpiration (moisture loss).
Soil - Use a well-draining potting mix, preferably 'Cactus & Succulent' compost, and coil the vine in a circular shape, pinning it down with a paper clip. Cover the older half in half an inch of soil (the area where you removed the leaves) to promote quicker root development. Try not to cover the actual foliage with soil as this will harm its light-capturing efficiency, along with higher rates of rotting. Place the potted cuttings into a transparent bag and mist the soil and foliage once a week to maintain high humidity. Situate it in a bright, indirect setting with temperatures above 18°C (64°F). Be sure to pierce a few holes in the bag and actively remove any yellow or rotten debris to present a healthier environment. As the roots will develop first, remove the bag and treat it as an adult specimen once there are signs of new foliar development.
Water - Place the bottom half of the vine (closest to the soil) in tepid water until roots develop. Be aware that this process may take up to two months, so patience is key with this form of propagation. Replace the water every few days and immediately remove any yellow or rotten debris to maintain good growing conditions. Once the roots begin to develop, coil the growth onto a bed of 'Cactus & Succulent' compost with the appropriate sized pot. Be sure to submerge the rooted section around half an inch into the soil, allowing the leaves to remain above the surface to photosynthesise. Mist the soil once a week and place the potted cuttings into a transparent bag to maintain high humidity. Place the potted cuttings into a transparent bag and mist the soil and foliage once a week to maintain high humidity. Situate it in a bright, indirect setting with temperatures above 18°C (64°F). Be sure to pierce a few holes in the bag and actively remove any yellow or rotten debris to present a healthier environment.
As the roots will develop first, remove the bag and treat it as an adult specimen once there are signs of new foliar development. If you need any more help regarding succulent propagation, don't hesitate and send us an email via this link!
Leaf Cuttings (Easy) - Leaves that are halfway along the vine have the most potential due to their size and maturity. Gently place your fingers between the mother's stem and the leaf's base, pulling it downwards until you hear a snap. Ensure the wound is wholly intact with no damage, as a bruise or tear will result in unsuccessful propagation. Set the leaf ON TOP OF a bed of moist 'Cactus & Succulent' compost for root growth. Not only will this callus the wound (to prevent disease), but it'll also speed up the propagation process considerably. Once there are signs of small roots developing on the node, place it one third into the compost, at a slight angle. Provide a bright setting with temperatures around 18°C (64°F) with the majority of the soil drying out in between waters. New leaves should emerge within a month or two, thus signalling the start of its independent life!
Flowers
Burro's Tails will readily flower in summer if its previous dormancy period has been served well. Small pink or red flowers will develop at the vines' terminals that can last up to several weeks. The quality of its blooms largely relies on the quality of the dormancy period served in the previous winter.
To replicate its dormancy period:
- Reduce temperatures down to around 12°C (54°F) from late autumn until early spring, with little hydrations or fertilisation.
- Allow all of the soil to dry out for at a fortnight in between irrigations thoroughly, and never apply cold water as this may damage the roots.
- Provide a few hours of off-peak direct sunlight with one fertilisation throughout this period, until the first bud develops at the end of spring.
Repotting
Repot every three years in the spring, using a 'Cactus & Succulent' potting mix and the next sized pot with adequate drainage. Burro's Tails are far better being potbound for several years due to the heightened risk of root rot and repotting-issues (like transplant shock), so only repot if you feel it's wholly necessary - restricted root growth will also increase the chance of blooms, too.
Hydrate the plant 24hrs before tinkering with the roots to prevent the risk of transplant shock. For those situated in a darker location, introduce an extra amount of perlite and grit into the deeper portion of the pot to downplay over-watering risks. Click on this link for a detailed step-by-step guide on transplantation, or via this link to learn about repotting with root rot.
Book a 1-to-1 video call with Joe Bagley if you'd like a personal guide to repotting your houseplant. This will include recommending the right branded-compost and pot size, followed by a live video call whilst you transplant the specimen for step-by-step guidance and answer any further questions!
Pests & Diseases
Keep an eye out for mealybugs, scale, fungus gnats, whitefly, vine weevils & root mealybugs that'll locate themselves in the cubbyholes and undersides of the leaves, with the exception of the latter two in the soil. Common diseases associated with this species are root rot, leaf-spot disease, botrytis, rust, powdery mildew & southern blight - click here to learn more about these issues.
Toxicity
Almost all Sedums are classified as poisonous, especially the Burro's Tail. If parts of the plants are eaten, vomiting, nausea and a loss of appetite could occur. Consumption of large quantities must be dealt with quickly; acquire medical assistance for further information.
Retail Locations
Blue Diamond, Online Stores.
Book a 1-to-1 Call with Joe Bagley
If you need further advice with your houseplants, book an advice call with ukhouseplants' friendly and expert writer today! This can be done via a video or audio call on most apps, including Facebook, FaceTime & Skype. A ten-minute call costs £5.99 (US$7), or £15.99 for thirty minutes. You can ask multiple questions, including queries on plants, pests, terrariums, repotting advice and anything in between. Please consider supporting this service to keep ukhouseplants thriving!
Comments