Monstera deliciosa
Contents
- Top Tips
- Location, Water, Humidity & Fertilisation
- Common Issues
- Origins, Temperature, Propagation, Repotting & Toxicity
Need the answer to a specific plant query? Book a 1-to-1 video call with THE HOUSEPLANT DOCTOR™, the website's friendly author, to overcome and address your niggling problem! Available on iMessage, WhatsApp, Facebook Messenger & more.
Top Tips & Info
- Care Difficulty - Easy
- Present a bright, indirect location in the spring and summer is best, increasing this to a few hours of morning sun for the rest of the year.
- Keep the soil evenly moist, allowing the soil's top third to dry out in between waters.
- Reduce hydrations further during the colder months of the year to replicate their much-needed dormancy period.
- Fertilise using a 'Houseplant' labelled feed every four waters in the spring and summer, reducing this to every six in the colder months.
- Repot annually in the spring with a well-draining potting mix, for example 'Houseplant' compost, with the next-sized pot. Scroll down to the 'Repotting' section to learn more about repotting a specimen that's attached to a moss pole.
- Keep an eye out for Spider Mites & Mealybugs that'll inhabit the cubbyholes of the stem and leaves.
- This article is suitable for all Monstera deliciosa, including variegated species like 'Albo', 'Aurea', Thai Consellation' & 'Borsigiana Albo'.
Location & Light - 🔸🔸
A whole range of indirect light levels can be tolerated; however, all-day exposure to the direct sun mustn't be permitted. A Monstera kept in a sun-filled position should be monitored regularly for drying soil and dehydration. In contrast, specimens placed in darker areas must be kept on the drier side to life, to prevent the risk of over-watering.
Three metres within a north, east or west-facing window is best, or in a semi-shaded conservatory is the ideal environment. If you're worried about its location being too dark, if a newspaper can be read while having your back towards the light source, you're good to go.
Variegated Monsteras must be kept in brighter areas of the house to help support the leaf's patterns. Locations that are too dark will increase the likelihood of greener growth, with little to no variegations on the new juvenile foliage.
Water - 🔸🔸🔸
During the spring and summer, maintain good soil moisture by only allowing the top third to dry out. If you're wondering about when is the right time to water, feel the weight of the pot for confirmation of soil dryness. Reduce this further in the colder months of the year to replicate its dormancy period and to downplay the high risk of root rot during this time. One word to mention is that Monstera situated in darker locations must be watered far less than those located in brighter ones to off-set the chance of over-watering. Remember - the amount of light and current season of the year will directly govern the frequencies of waters per month. Over-watering symptoms include the yellowing of lower leaves, brown mushy patches developing in the stems, and mould forming on the soil. For more severe cases, remove the plant from the pot and inspect its roots. If root rot is present, be sure to click on this link for further advice on addressing this issue. Under-watering symptoms include stunted or no new growth, dry brown sections on the leaves and yellowing older leaves; these issues are commonly due to an over-crowded pot, too much light or forgetfulness.
Humidity - 🔸🔸🔸
Although average humidity will be tolerated, we'd recommend introducing a pebble tray to maintain a steady level of atmospheric moisture. Along with the prevention of browning leaf-tips, which are a common trait of dry air, your specimen's growth will be far quicker and more reliable. Hose the foliage once a month to hydrate its leaves and to wash off the thin layer of dust that'll inhibit its light-capturing efficiency.
Fertilisation - 🔸🔸
Feed every four waters during the growing period and every six in the autumn and winter using a 'Houseplant' labelled fertiliser. Nutrient deficiencies tend to be more prolific with Monstera than with other species, so regularly nourishment is essential for healthy, reliable growth. Click here to learn more about which fertilisers are best, along with the function of each nutrient.
 Regularly dust and wash its leaves to improve the light-capturing efficiency.
Common Issues with Monstera (Cheese Plants)
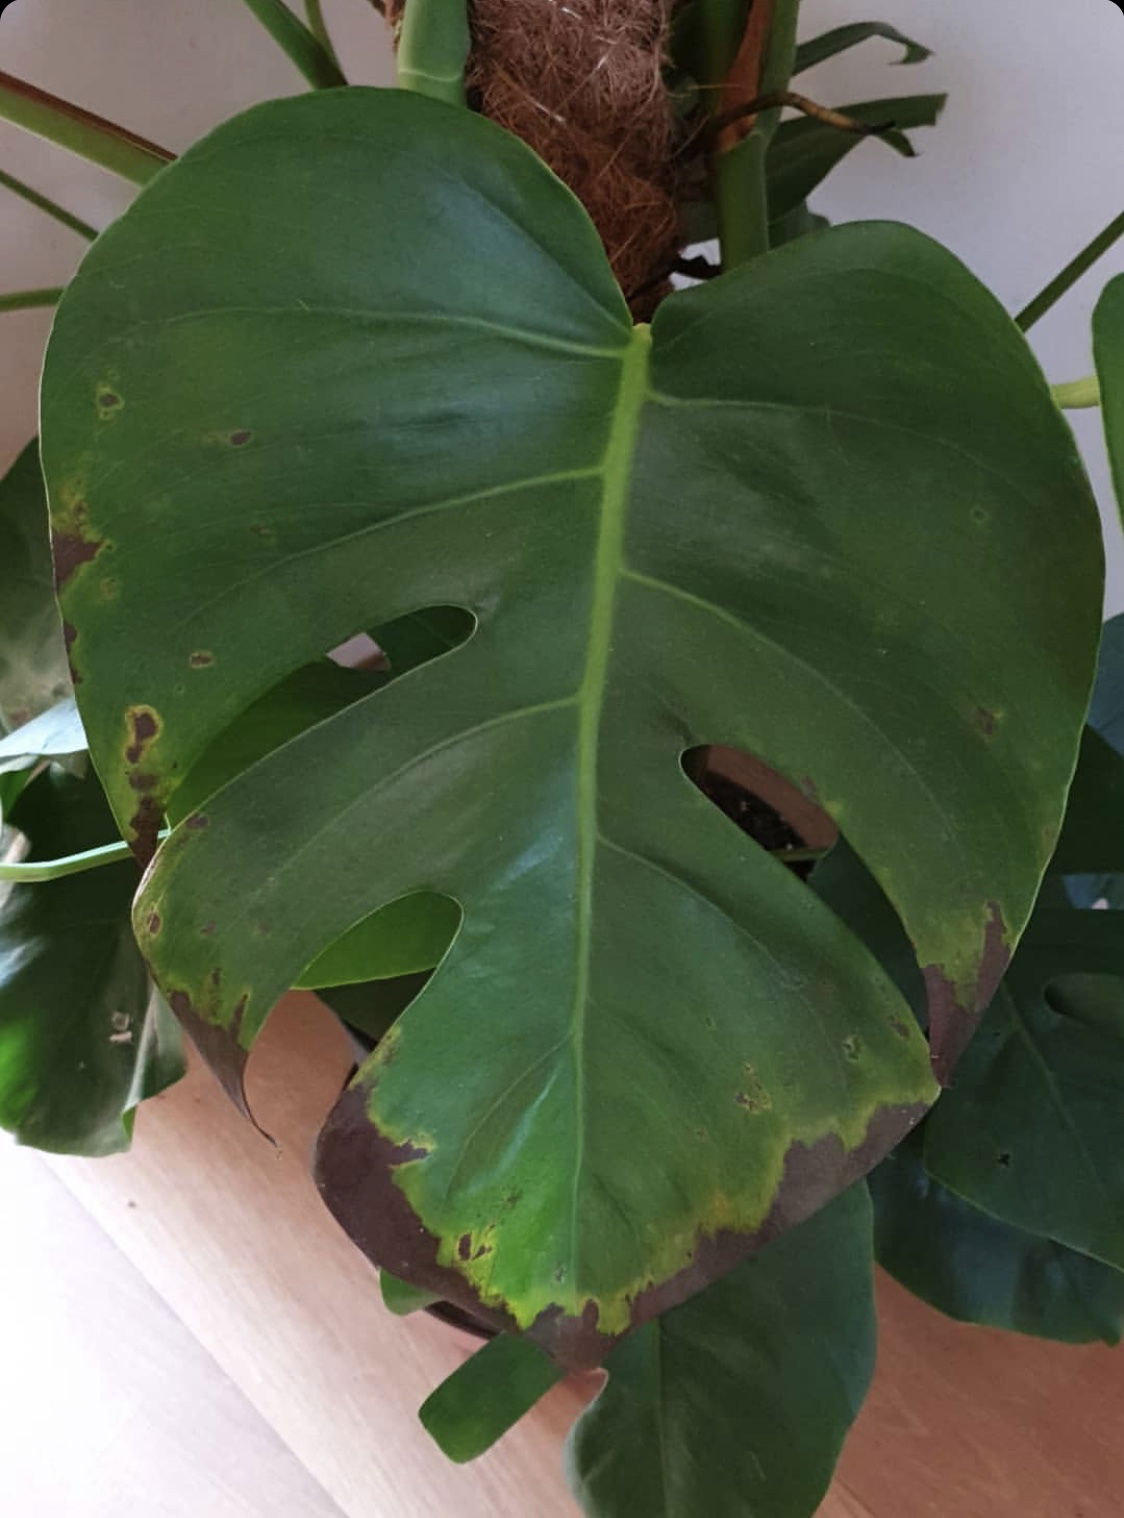
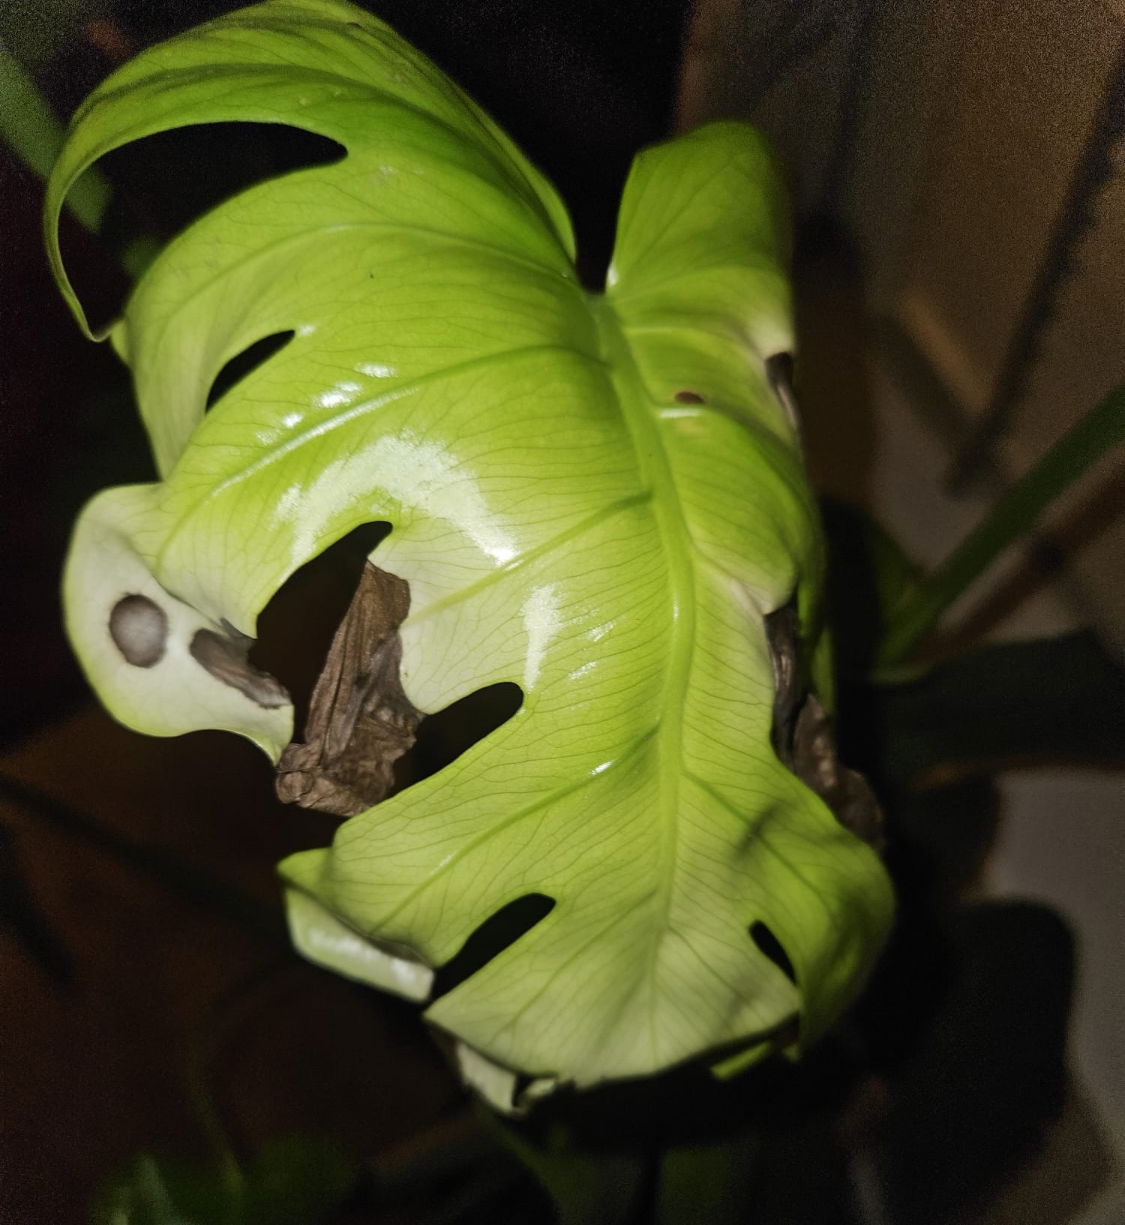
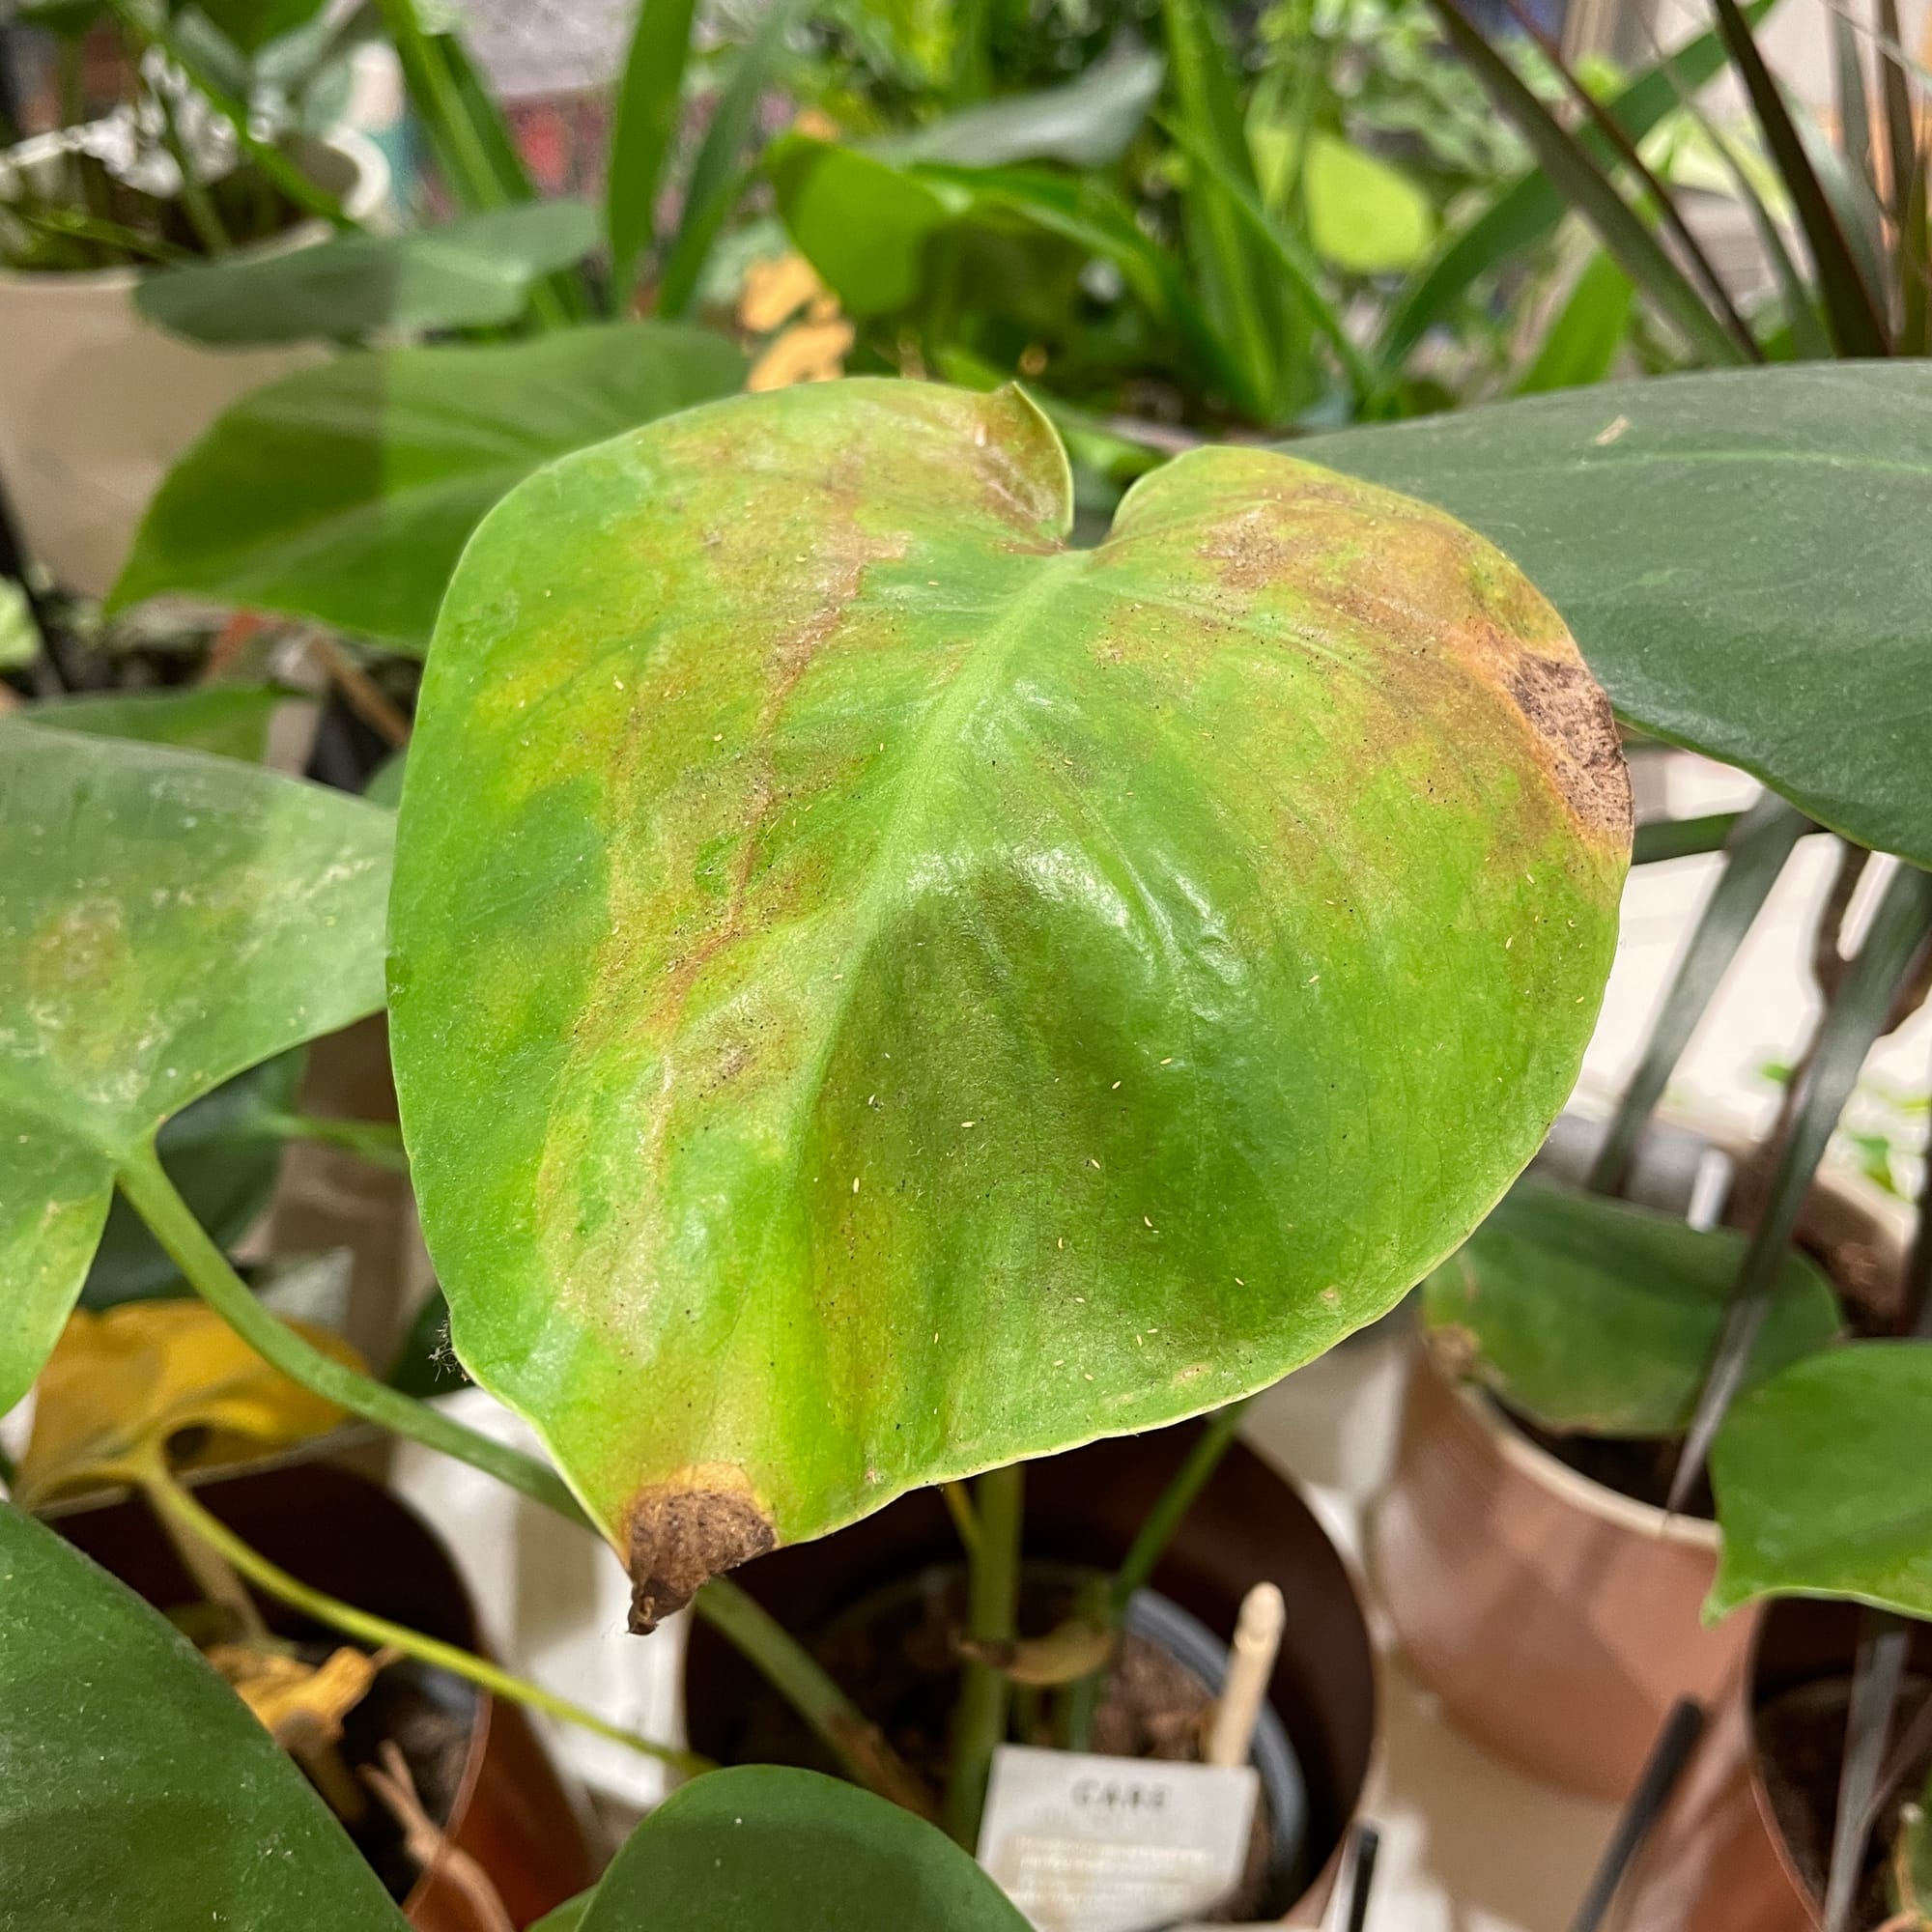
An array of simultaneous cultivation issues will increase the chance of developing yellowed leaf-sections with browned halos - see image below for visual reference. Firstly, the location may be too dark, with its compost staying too saturated in-between waters; if mould is growing across the soil, this is usually a bad sign. Further, you're potentially using too cold water or tap water that hasn't been allowed to sit for 24hrs. This period of rest will not only bunk-up its temperature, but the harsh chemicals used to preserve water hygiene (fluoride & chloride) will begin to settle after a few hours. If possible, use fresh bottled water from a shop or supermarket to prevent further chemical burns. The final culprit might be lack of fertilisation, with regular feeds being paramount for long-lasting, healthy leaves. If the specimen hasn't been nourished in over two months, it'll begin to show signs of nutrient deficiencies seen in this article.
If this common problem has occurred with your specimen, remove the affected leaves (not areas) and improve the growing conditions considerably. Fertilise regularly with lukewarm water and be sure to allow the top third to dry out in between hydrations. Its new growth should be problem-free, but if you'd like to speak to ukhouseplants in regards to this issue, be sure to book a 1-to-1 video call for more detailed advice.
 Example 1
 Example 2
Root rot is another common issue with specimens sat in too moist or waterlogged soil for long periods. Symptoms include rapidly yellowing leaves, stunted growth and a rotten brown base. Take the plant out of the pot and inspect health below the soil line. If the roots sport a white tinge, you're good to go, but if they're brown and mushy, action must be taken immediately. More information about addressing root rot can be found on this link.
 Floppy juvenile leaves are common among gardeners, often accompanied by inconsistent watering and irregular growth rates. Although the leaf may not become fully rigid, it still should mature and contribute to photosynthesis. Only water the specimen once the top third dries out and its future leaves should be good as new!
The rapid yellowing of lower leaves is a clear sign of over-watering, usually caused by too little light. Although they can do well in darker locations, the frequency of irrigations must be reduced to counteract the chance of root rot. People don't realise that a plant's root system needs access to oxygen too; when soil is watered, the air will travel upwards and out of the potting mix. A lack of accessible oxygen for the roots will cause them to subsequently breakdown over the oncoming days. Click here to learn more about root rot and how to address it, and always feel the pot's weight for confirmation (heaviness = good soil moisture, & vice versa).
Brown crispy new growth on a Monstera (Cheese Plant) could be a sign of insufficient light. THE HOUSEPLANT DOCTOR™ recommends to relocate the Monstera to a brighter spot, but somewhere that offers less than one hour of sunlight. You can easily cause sun scorch when a dark-grown specimen is suddenly placed in bright sunshine.
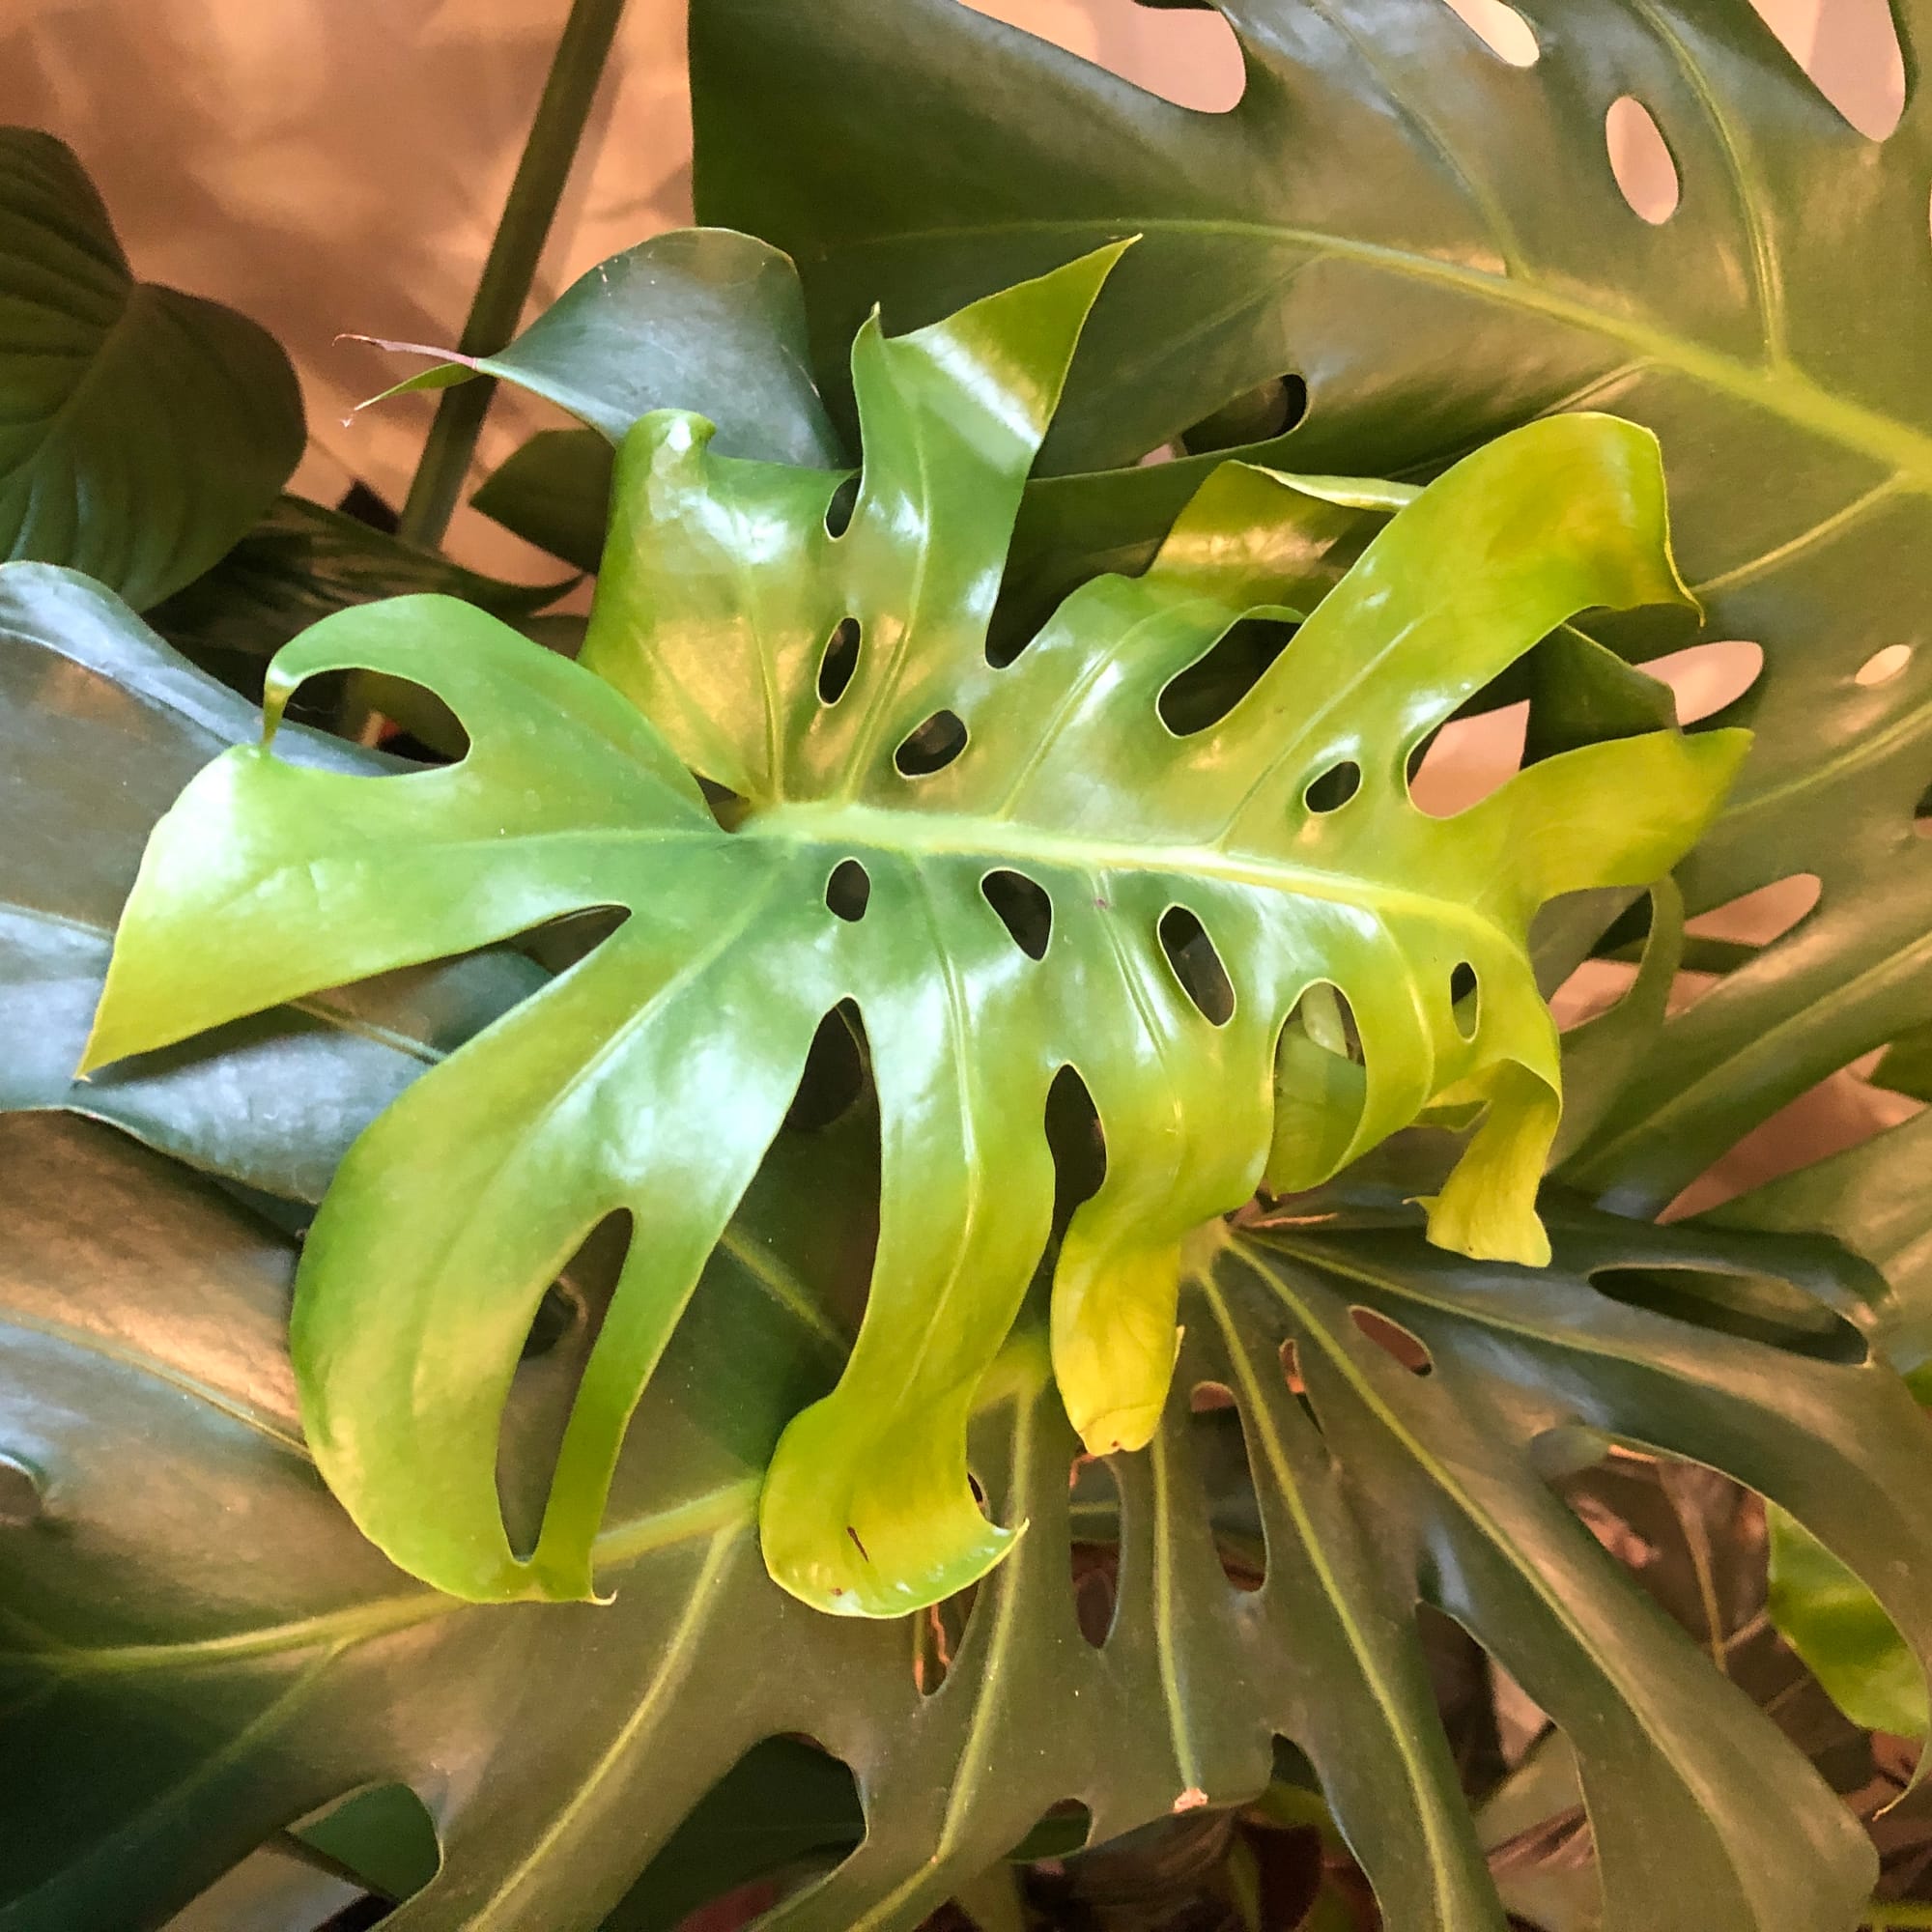
Is your Monstera (Cheese Plant) producing smaller leaves (or losing its ability to produce fenestrations/holes in the leaves) each time it grows? It's most likely to do with its light levels or low temperatures. We recommend improving its location by placing it in a sunless windowsill or under a grow light for better, more reliable growth. You can also consider pruning any leggy, leafless stems back to the first leaf to promote a new cluster of foliage in months to come. Other reasons for its reduction of leaf size could be: an absence of a moss pole or plant to climb up, a lack of fertilisation and/or root rot.
Smaller leaves developing on a Monstera cutting is entirely normal whilst it roots in the new soil. Be patient; new, larger growth will emerge as the weeks and months roll on!
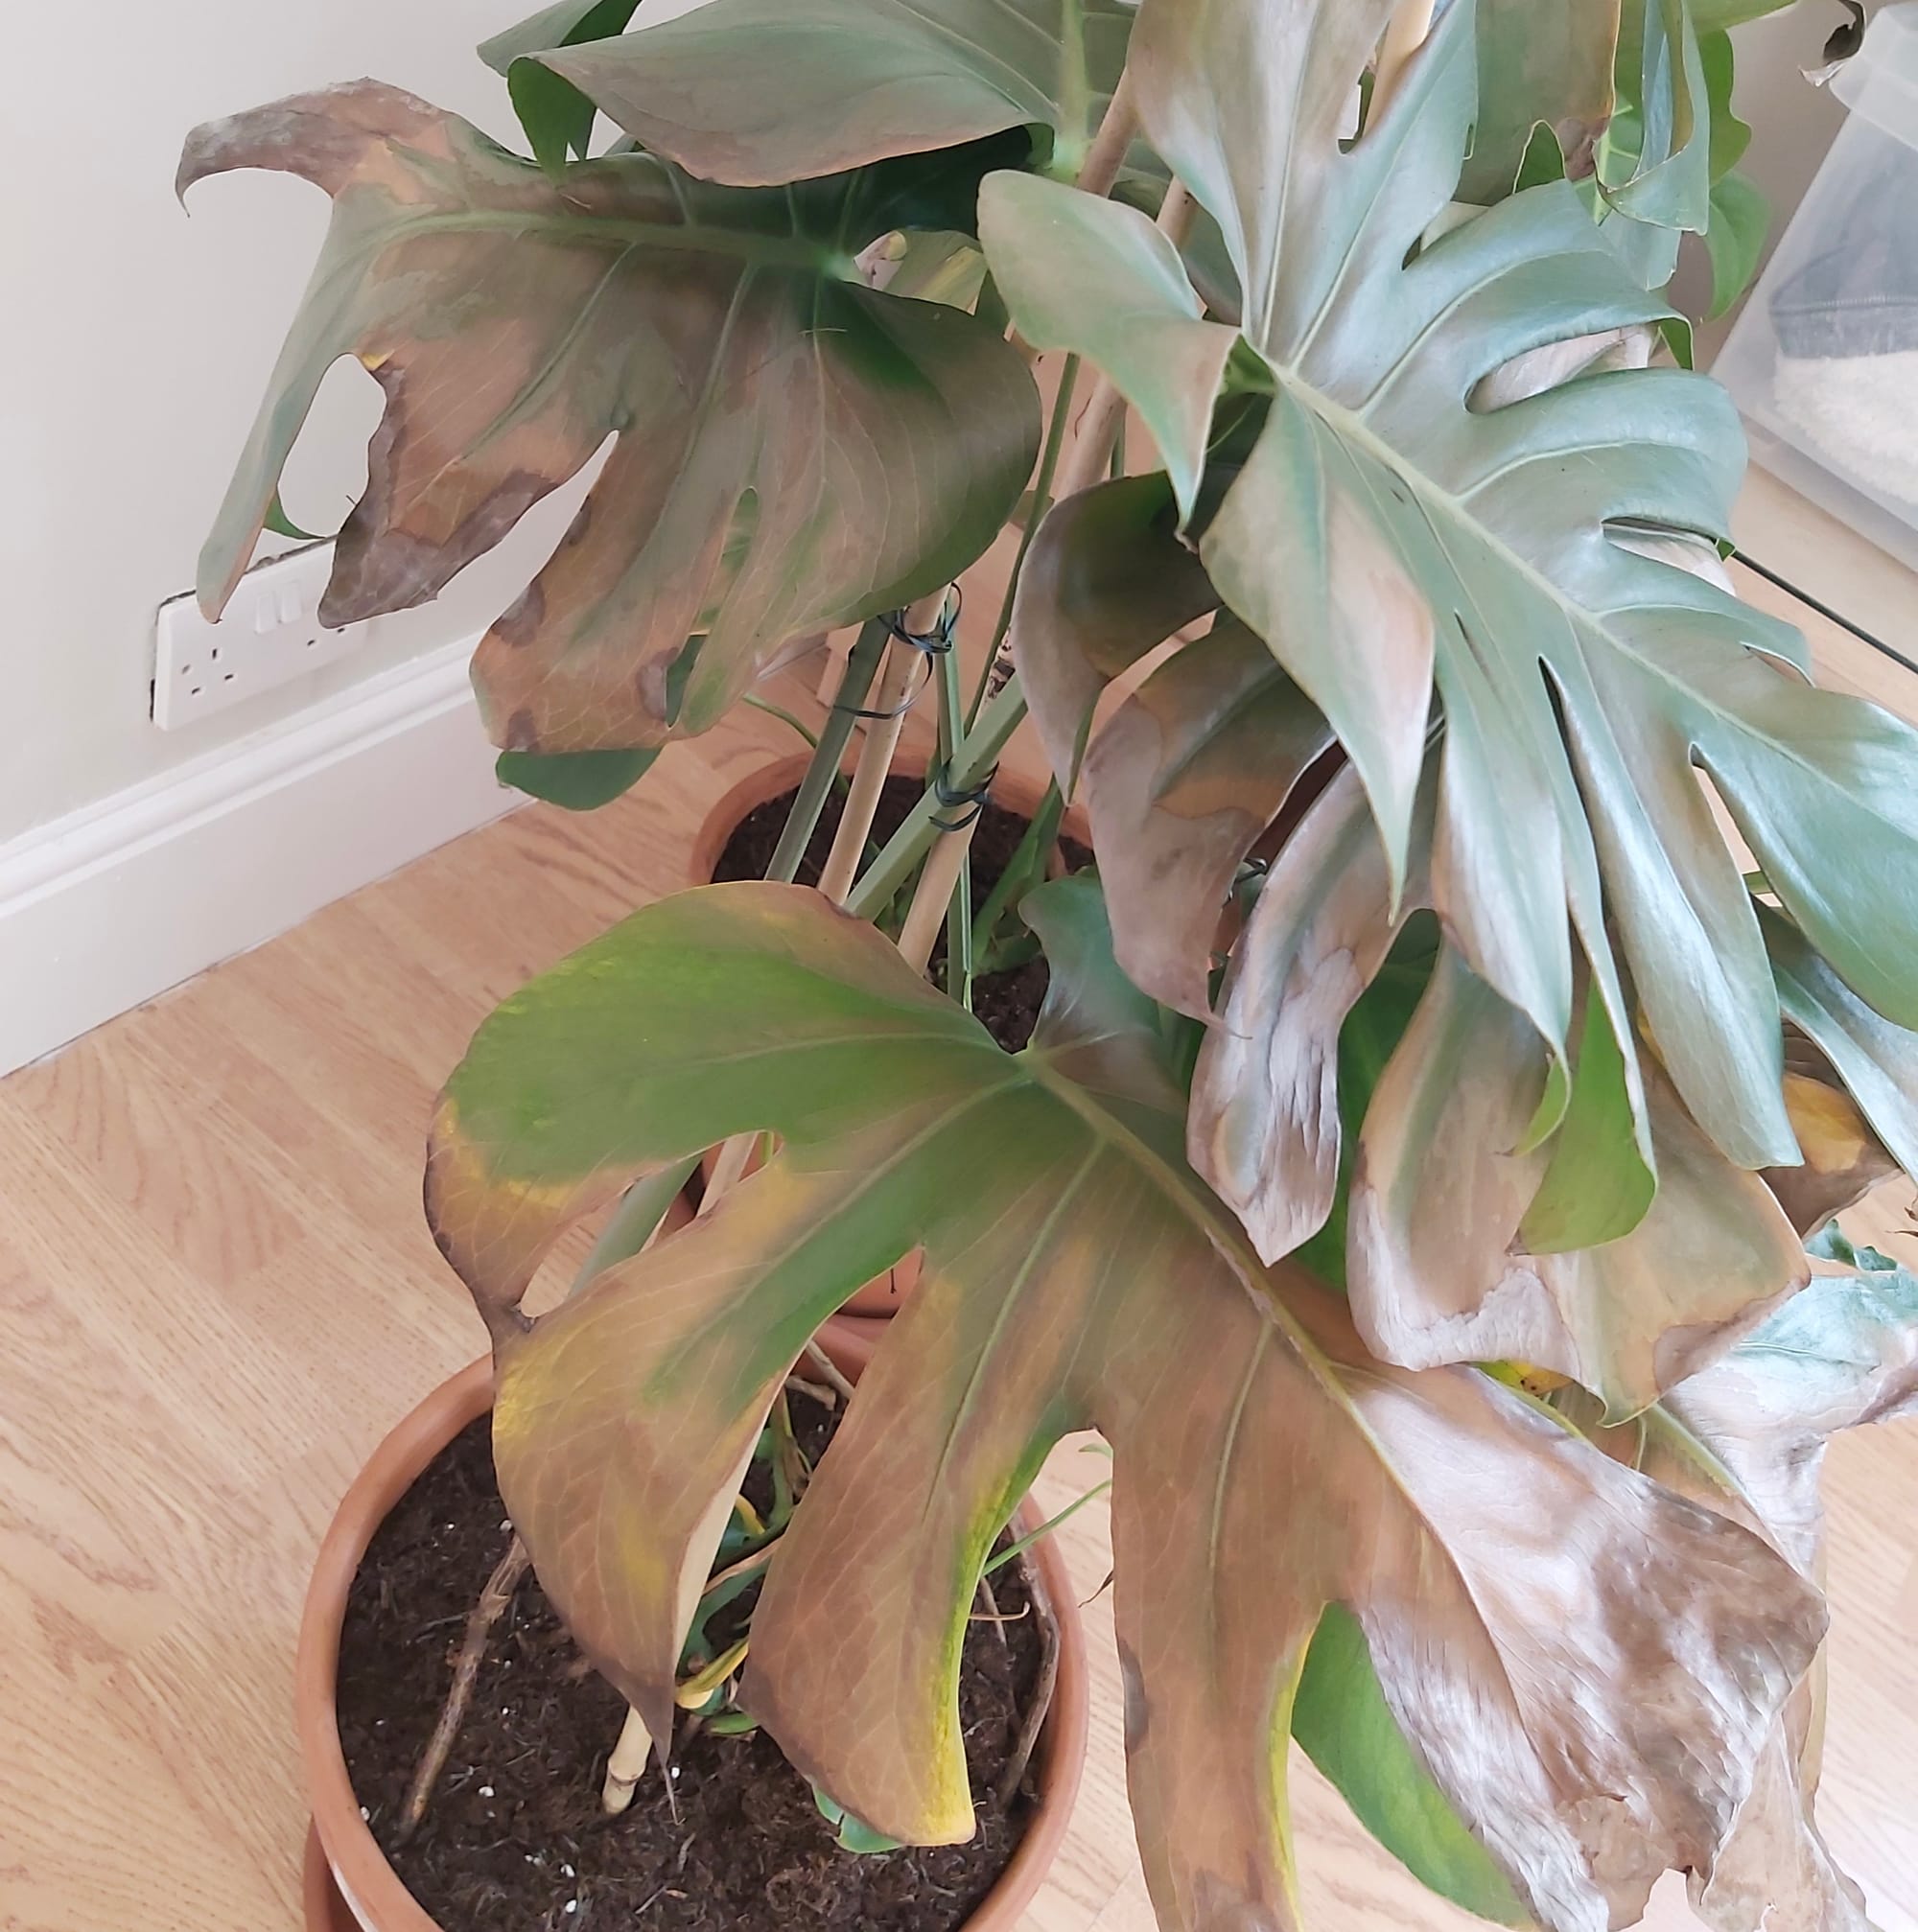
Curled or scabbed brown leaf-edges are the result of too little water and over-exposure to the sun. Monstera are best located in bright, indirect settings, and those that haven't acclimatised to the harsh rays will show signs of sun-scorch and environmental shock. A splash of winter sunlight is acceptable as long as the soil moisture is regularly observed, with complete avoidance once summer comes along.
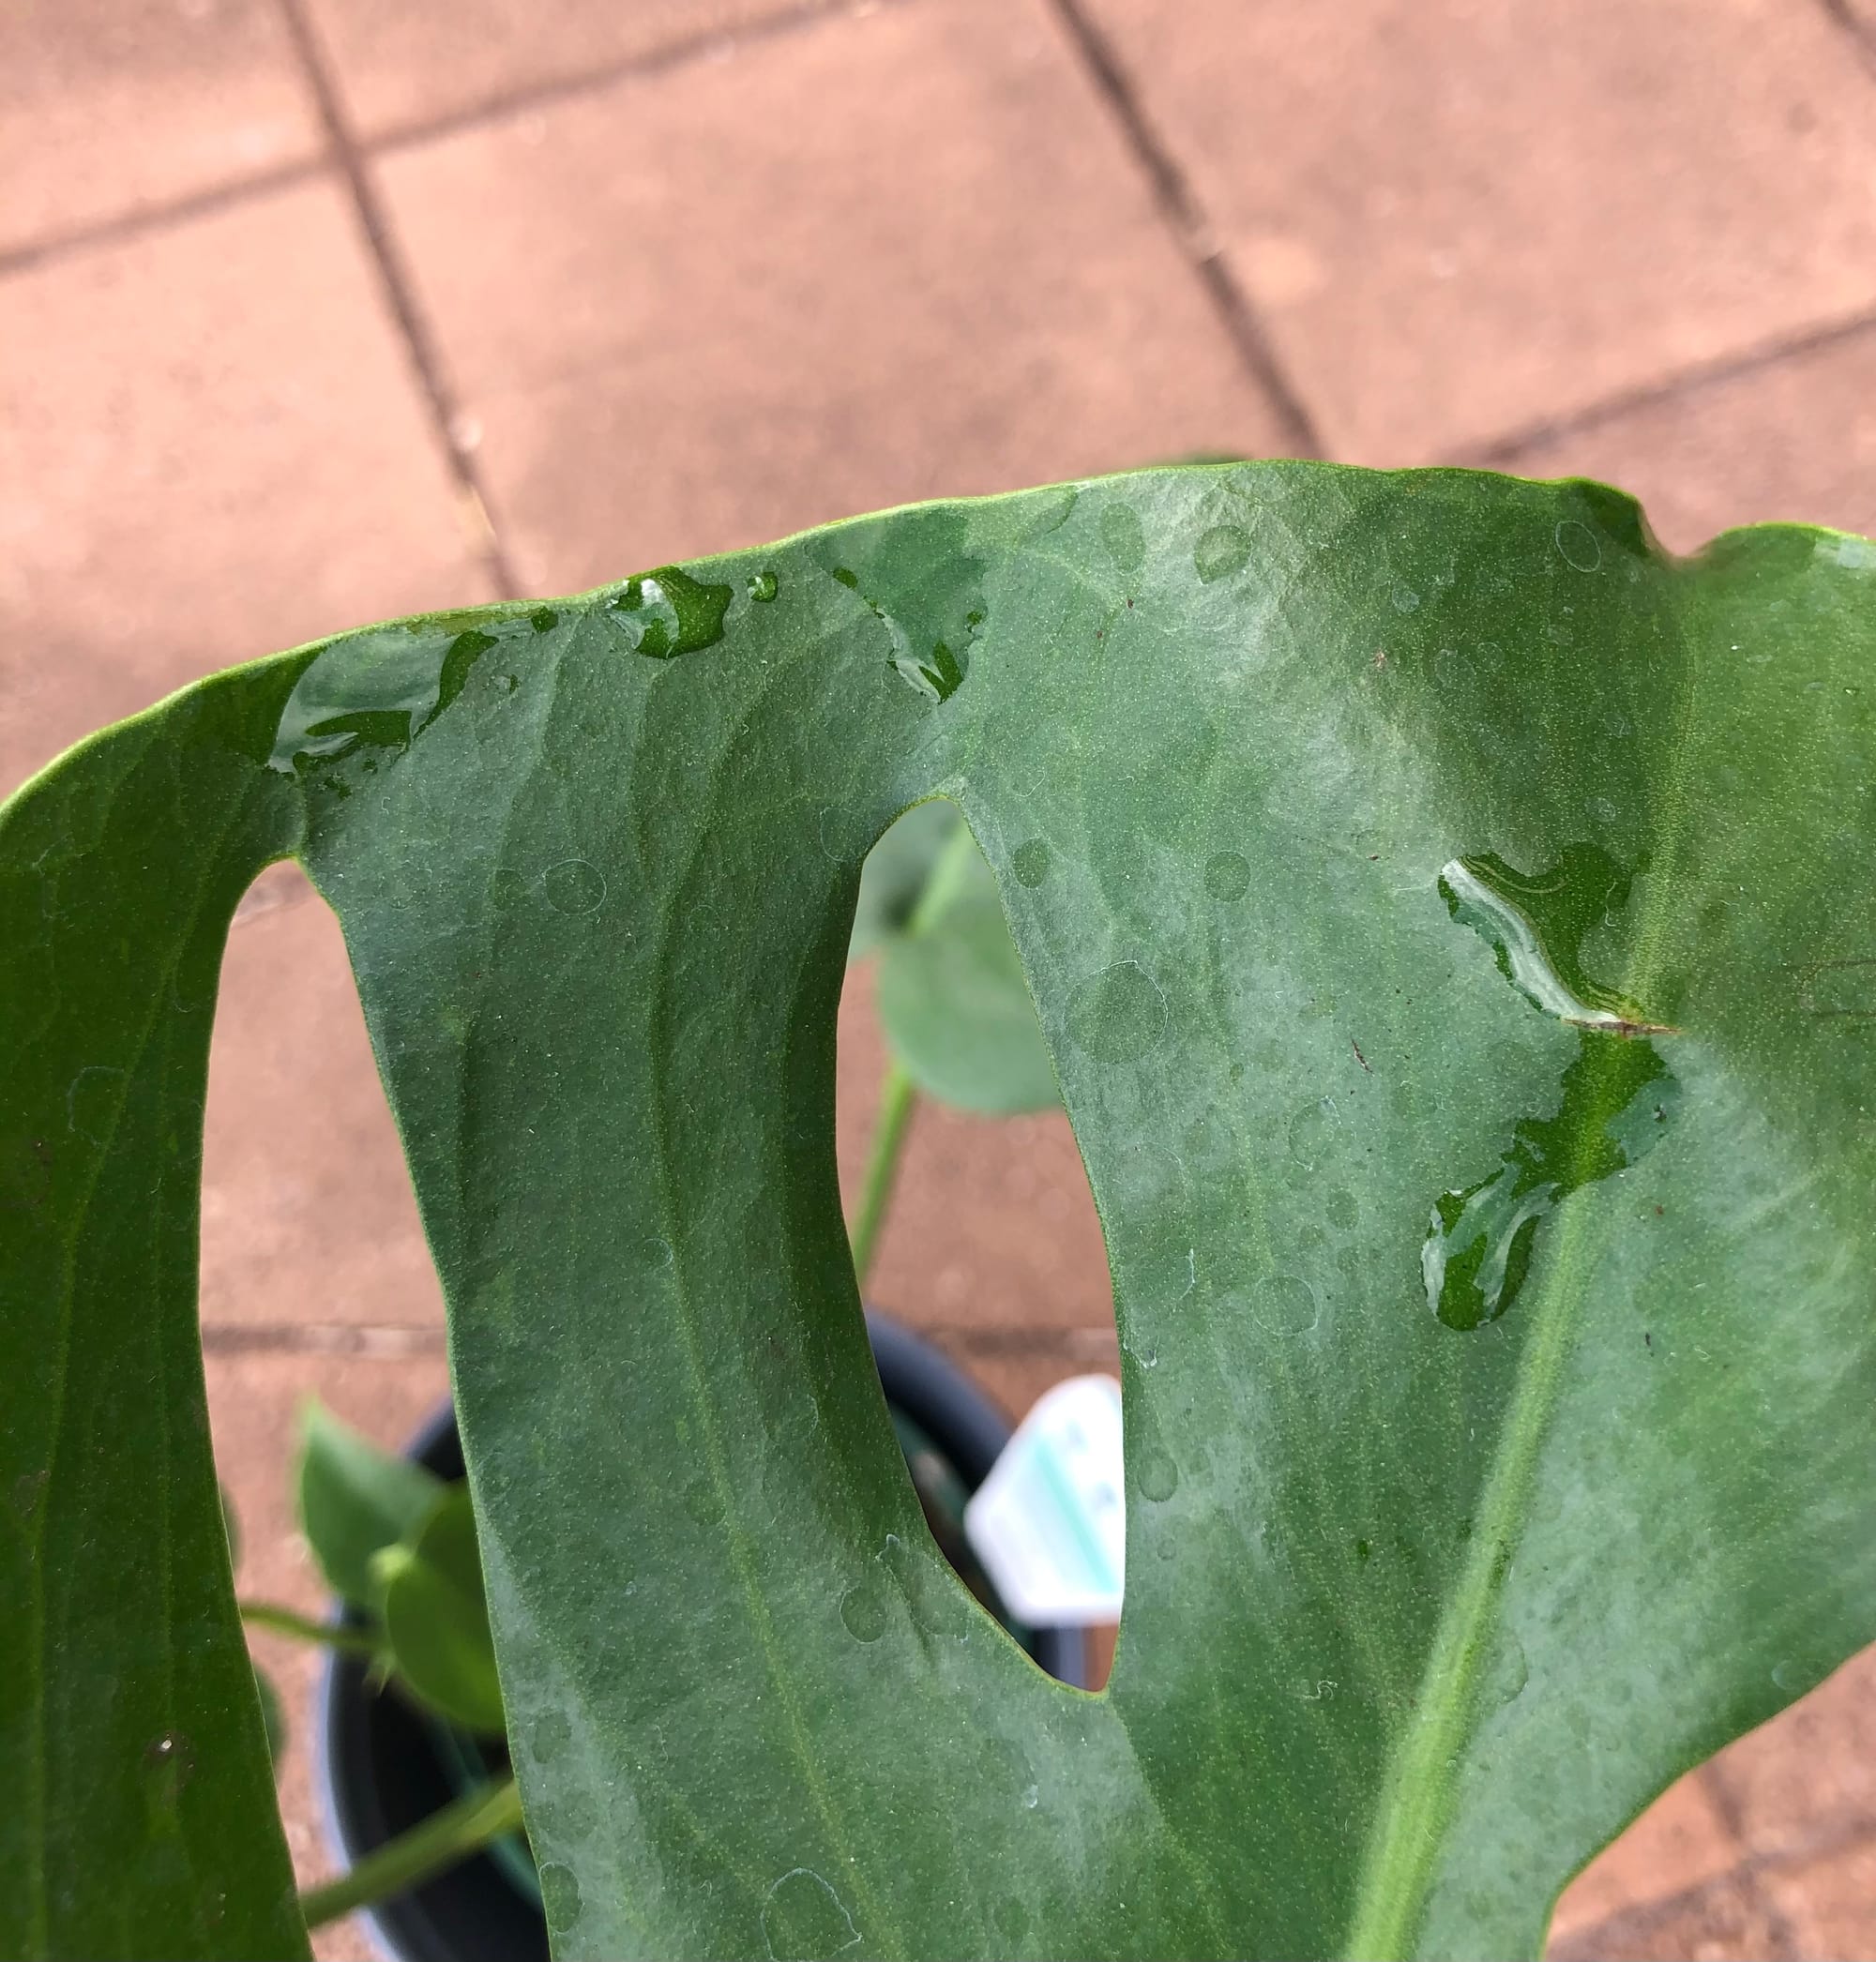
Guttation (above) is a perfectly normal phenomenon, but it may signify slight over-watering or dry air. Moisture is absorbed through the roots and will exit the plant via the stomata, called 'transpirational pull'. In situations of coldness, dry air or at night, the stomata will shut, leading to an imbalance within the plant. As the pressure mounds with the roots continuing to draw in moisture, small droplets will appear around the edges of the leaves. Although in some cases, it could be the product of over-watering, nine times out of ten, it's harmless and requires no difference in care.
Although aerial roots shouldn't be pruned off, it's safe to cut a root if it has damage to its tip. Remember to use a clean pair of scissors or secateurs around three inches from the area to avoid the problem spreading. A smaller root will develop near to the wound, signalling the resurgence of its overall health!
Pests could arise at any time, with infestations starting from the original nursery or via contamination in your home. Spider Mites and Mealybugs tend to be the usual inhabitants, with the first being minute and almost transparent, roaming the leaves in search of chlorophyll and a site to hide its eggs. The latter, however, will stand out much more, with white cottony webs developing across the foliage and stems. Thoroughly check the plant's cubbyholes before giving it the all-clear, or click on the appropriate links to learn more about eradicating these issues.
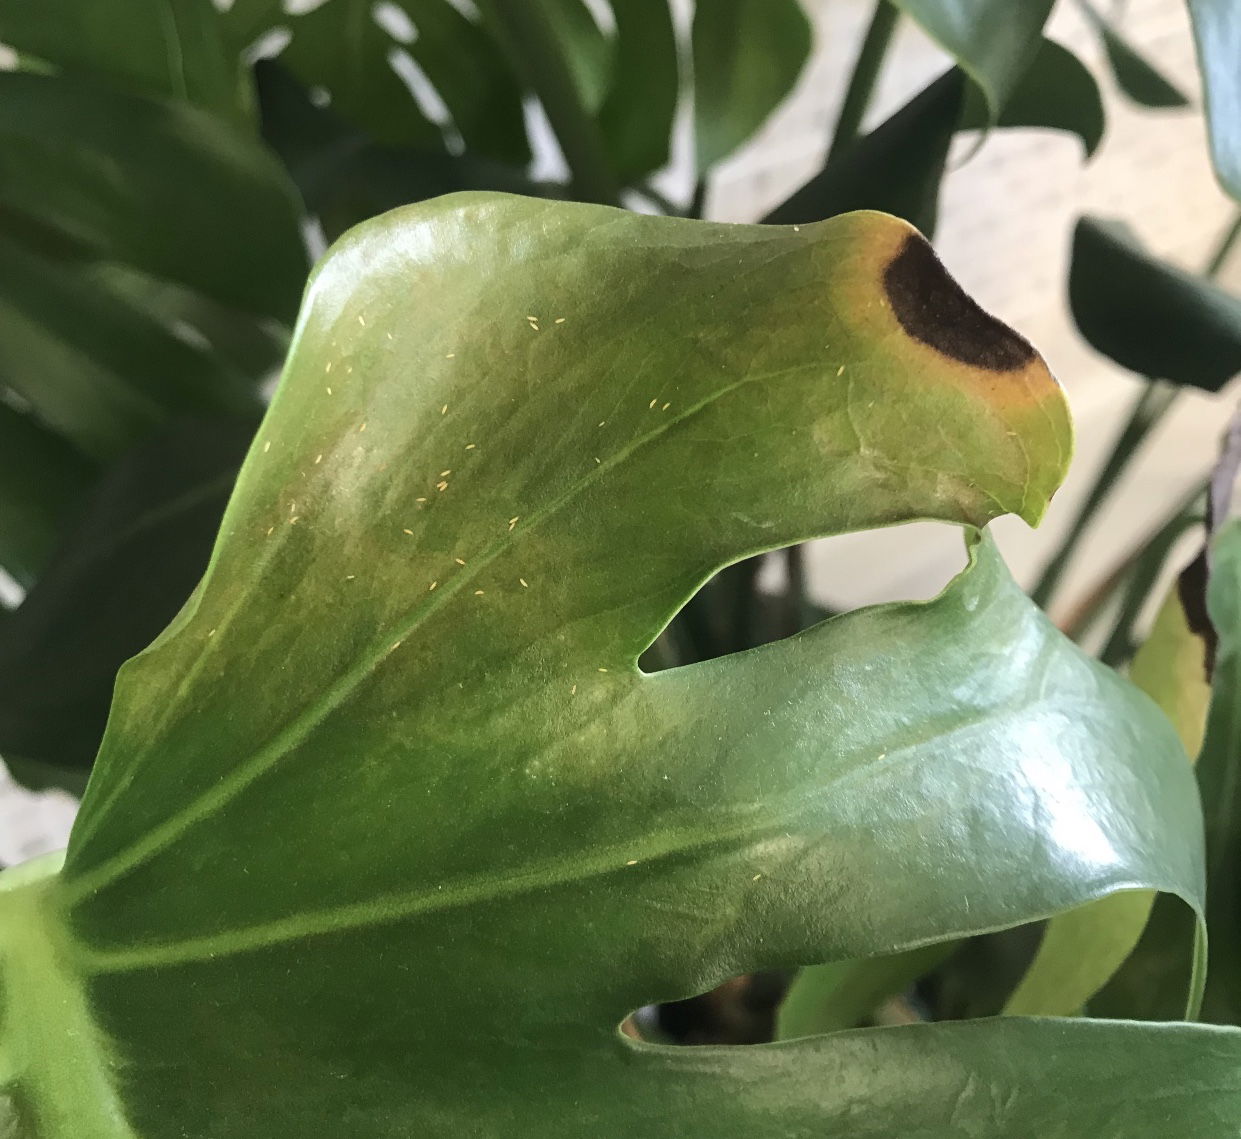
Thrips are another serious pest that causes havoc with Monstera. If you see small, tubular-shaped black or yellow pests roaming the foliage, you MUST act quickly as the leaves will turn yellow (pictured above) within a few days. Click here for more information on this.
 A second example of Thrip damage on a newly unfurled Monstera leaf.
Too low humidity can cause browning tips with yellow halos on juvenile leaves. Although this won't kill your specimen, you may want to increase the local moisture to prevent the new growth from adopting these symptoms. Mist or rinse the foliage from time to time and create a humidity tray while the heaters are active to create a stable environment. The browning of leaf-tips on older leaves is wholly natural and is the product of extensive photosynthesis during its life.
If your Monstera is losing a few older leaves but is equally producing new foliage on top, don't worry - this is a natural part of this plant's yearly growth cycle. If, however, there's an issue of overly moist soil (root rot) or pest damage (like Thrips), be sure to reach out us to get a definitive answer & remedy!
 Slowed growth rates and frequent wilting may highlight your Monstera is potbound. We recommend not pruning its root system and instead transplant with our 'Monstera' soil into a new pot that can accommodate the plant's rootball.
The browning of the cataphyll shouldn't of be a concern, as it's a wholly natural process which affects all specimens across the world. Remove the brown section once it becomes dry and crispy, using a clean pair of scissors or peeling it back by hand.
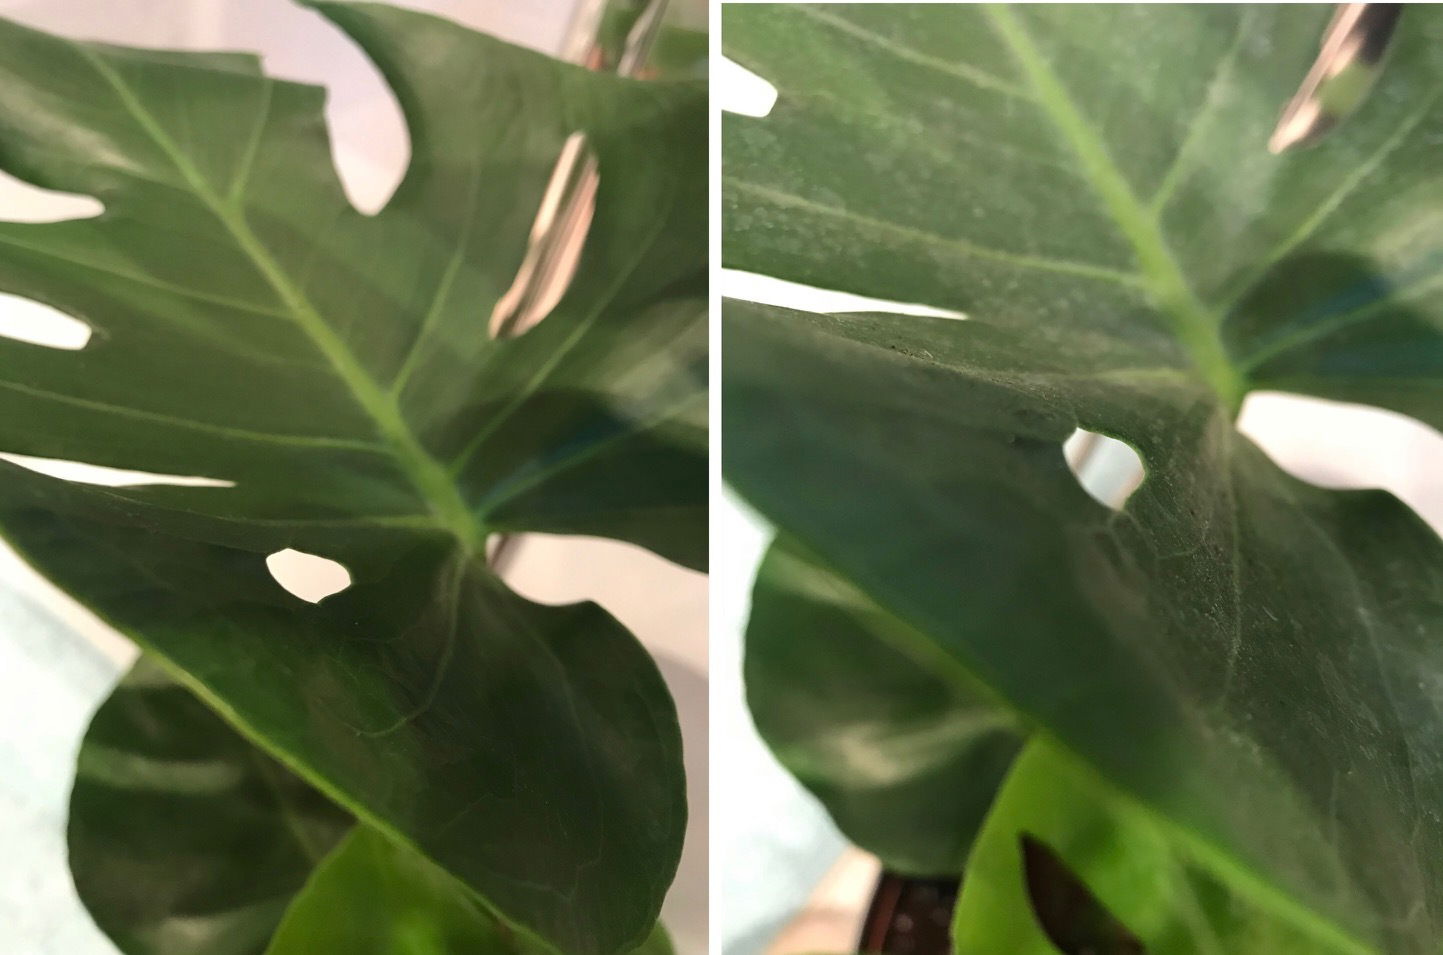
Dust the leaves regularly. Although this isn't too much of an issue, a build-up of dust particles can clog up the plant's pores, causing lowered light capturing-efficiency. Wipe the topsides of the leaves down once a month to keep levels down and improve growing conditions.
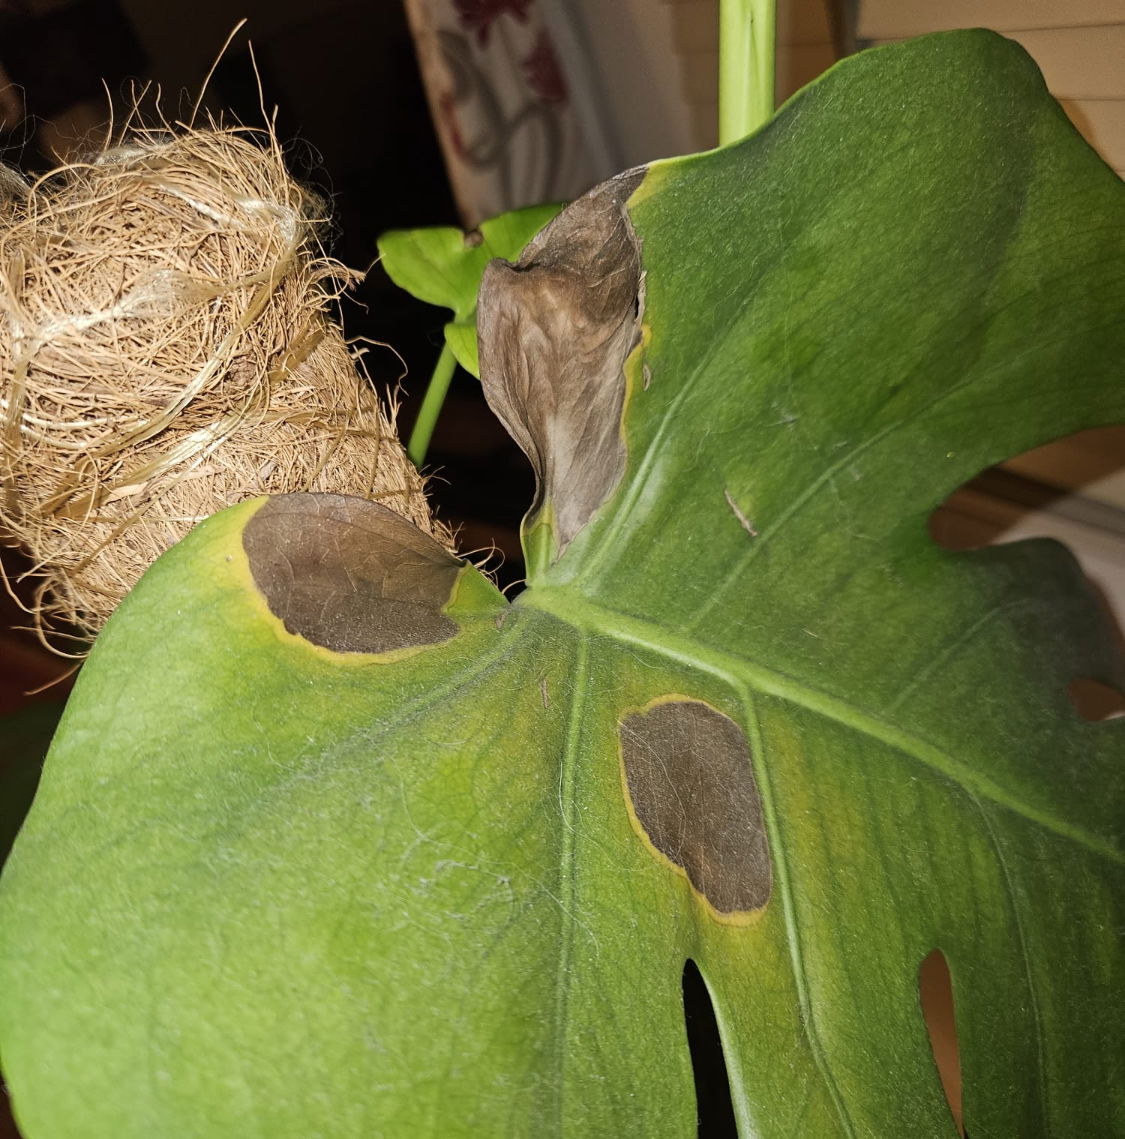
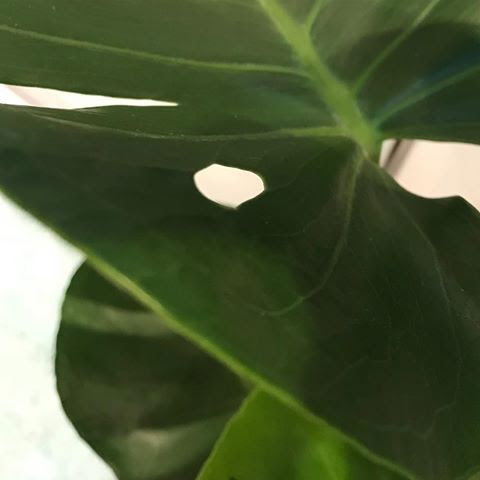
Brown crispy circles developing on your Monstera's leaf is nothing to worry about as it's very common with ageing leaves. If the leaf is more than a year old, there's a chance it'll discolour soon after, but it rarely causes the plant to become weak. Instead, keep the affected leaf attached to the plant until it fully yellows over as the plant may be retracting useable nutrients from it...
Environmental Shock is a familiar occurrence with newly-located specimens, that usually results in stunted growth and lower leaf loss (rare). When a plant is relocated into a new, unfamiliar setting, the effects can be catastrophic. The humidity, temperature and light levels will all suddenly shift into different proportions, inflicting great stress the individual. There are two options of addressing this issue; either wait it out or relocate it into a more Monstera-friendly environment. As long as the specimen appears healthy with little change to its pre-existing leaves, new nodular growth should emerge in the following months.
 Mould developing on the soil means two things - too little light and over-watering. Despite the harmlessness of the mould, it'll prove unsightly to most gardeners and is therefore removed once known. To remove, replace the top two inches of the soil for a fresh batch of houseplant compost. Either increase the amount of light received (no direct sunlight for the first few weeks to prevent environmental shock) or decrease the frequency of waters slightly. If the mould is accompanied by yellowing lower leaves, you may also have a case of root rot.
Failed propagated stem cuttings - There are several reasons why the cuttings haven't rooted well, including: the time of year (spring or summer is best), its size (Monstera cuttings should have at least three leaves), poor growing conditions (replace water weekly for water-propagated cuttings, and avoid over-watering for soil-grown plants), and its growing environment (a bright sunless windowsill and warmth is important).
If your specimen is located in a dark environment, use a chopstick to gently stab the soil in various areas. You should aim to enter the compost between the base of the plant and the pot's edge, as failure to do so may lead to damaging its lower portion. Leave the holes open for a few days before re-surfacing the soil to avoid it becoming overly dry. Not only will the gentle shift in the soil's structure mimic the work of small invertebrates in the wild (worms, etc.), but it'll also add oxygen back into the soil, thus reducing the risk of root rot. Repeat this monthly, or whenever you feel the potting-mix isn't drying out quickly enough.
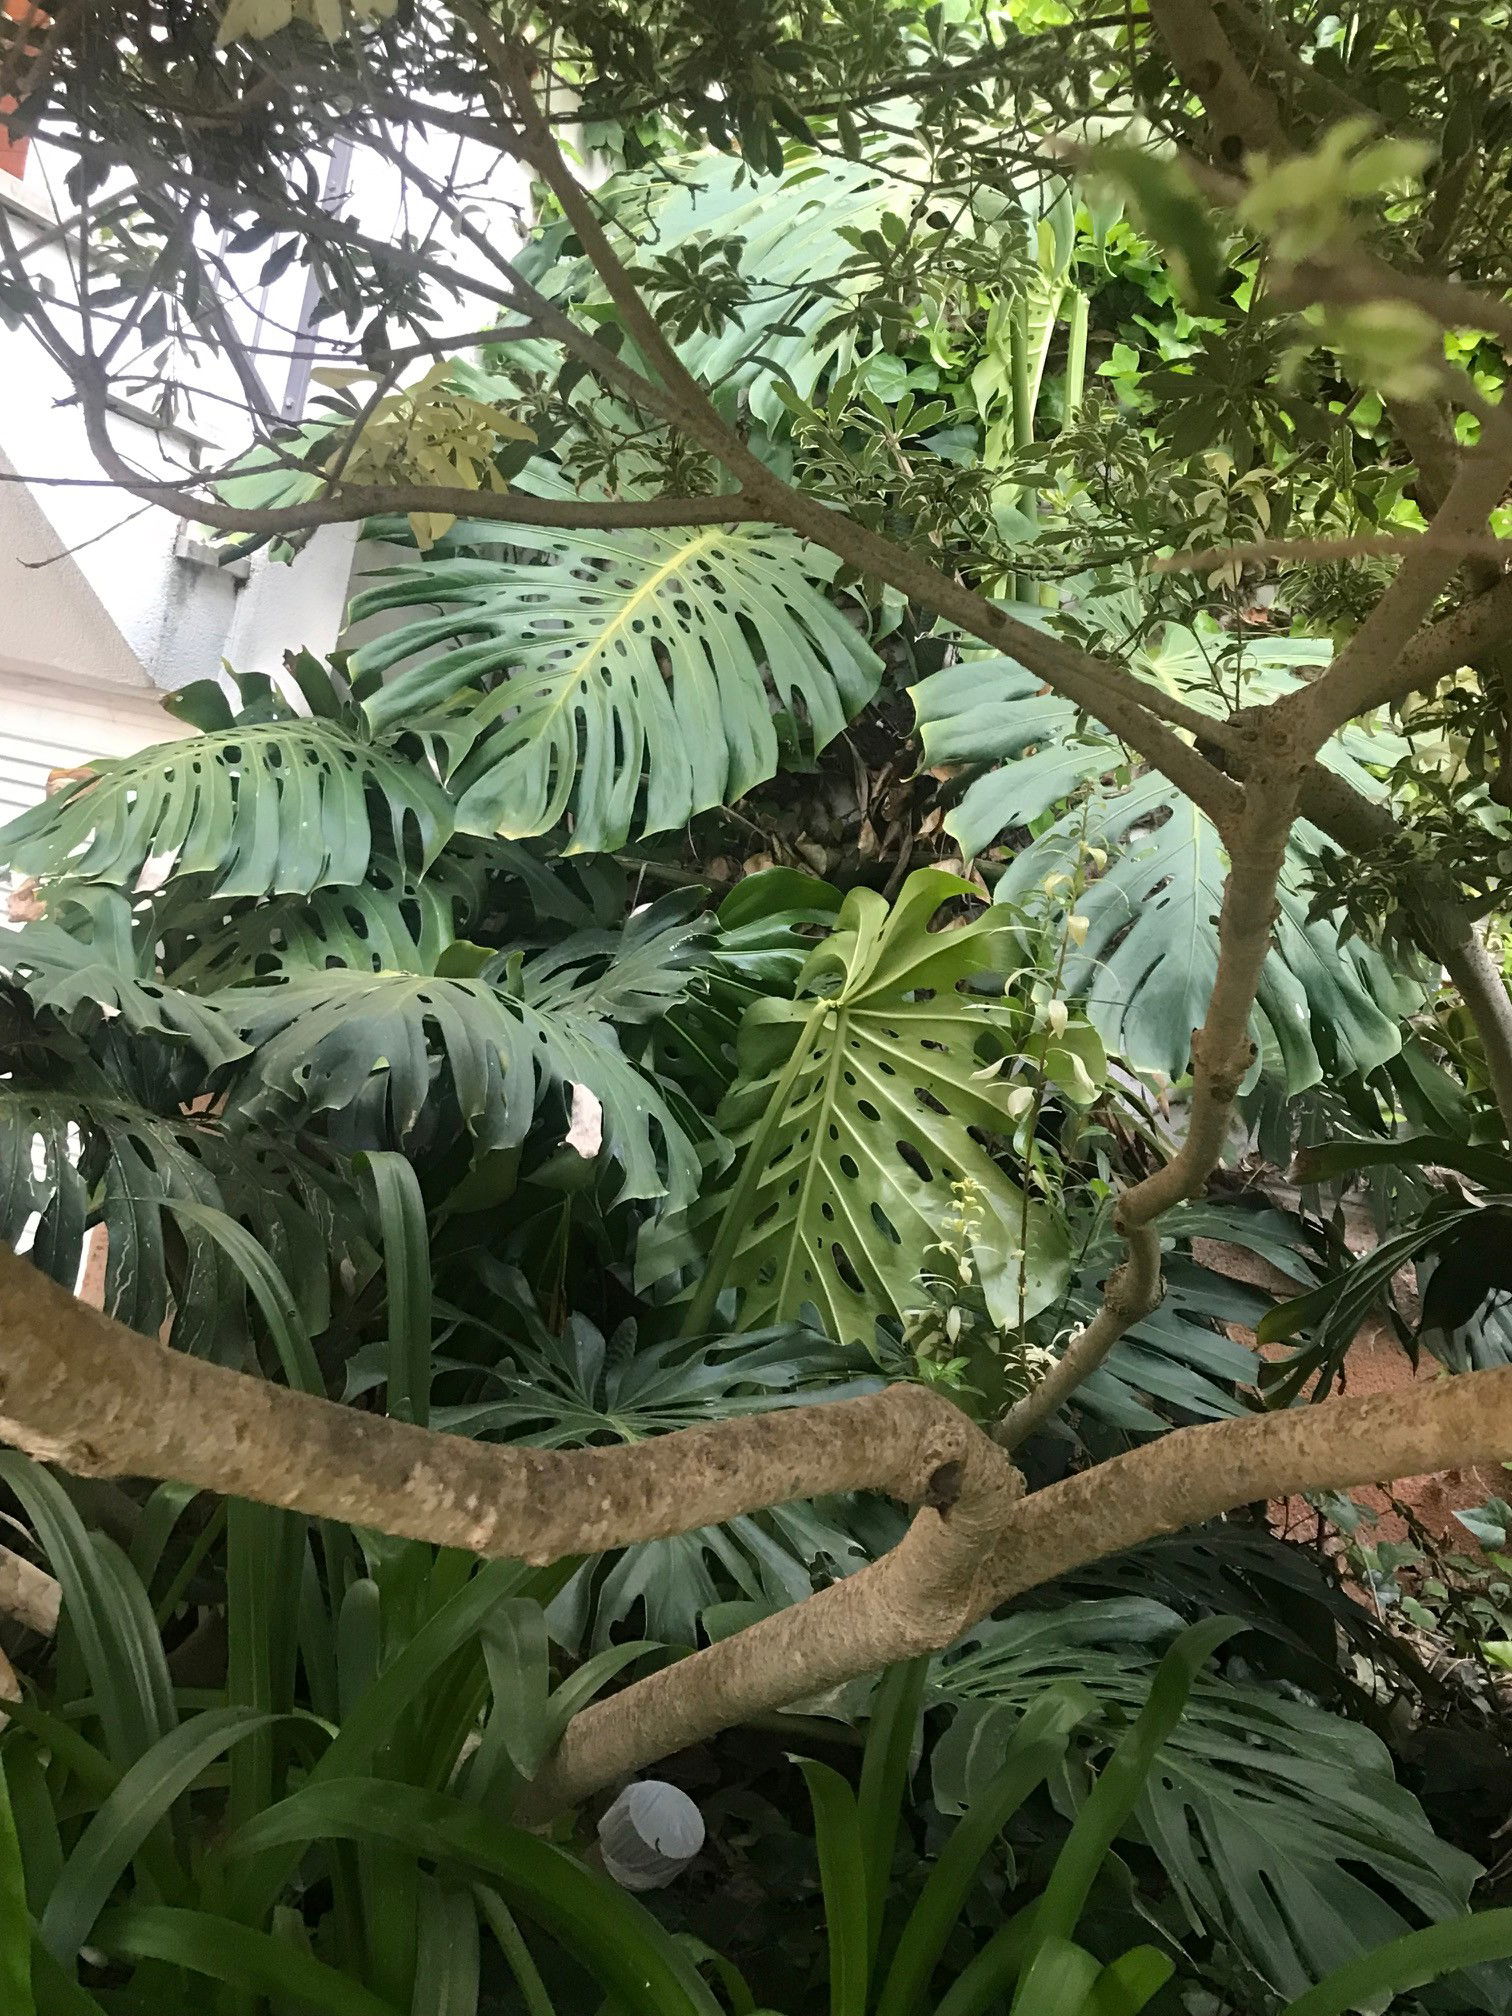 A medium-sized Monstera leaves that are approximately 70cm in diameter. Wild specimens can grow up to fifteen metres when climbing up a structure or tree, with metre-wide leaves sourcing the sun's nutrients.
Origins
Monstera deliciosa forms part of the Araceæ family that holds genera such as Spathiphyllum (Peace Lilies), Alocasia and Zamioculcas (ZZ plants) with natural distributions in central America. The name, monstera, derives from Latin word for 'monstrum', referring to the size some specimens can grow to (15m+) and deliciosa relating to the edible fruits that reportedly taste like fruit salad. Although the species, M. deliciosa, was first discovered in 1693, it was first formally described by Carl Linnaeus as the 'Dracontium pertusum' around fifty years later. Dracontium, is in fact, a wholly different genus and therefore was finally penned as Monstera pertusum during the 1860s by Danish botanist, Liebmann, with 'pertusum' translating to its holed-nature. Although many botanists argued over its similarities to Philodendrons, the species officially remains part of Monstera.
Why Does the Monstera deliciosa (Cheese Plants) have Fenestrations? (Holes in its Leaves)
Although the leaf structures aren't fully understood, many lean on the idea that the serrations and fenestrations (holes) can alleviate the effects of hurricanes or high winds. The smaller surface area of the leaf reduces the effects of air resistance created by the wind, thus resulting in less damage during windy spells. Others argue it's a natural mechanism to help the leaf remain cool (25℃, 77℉) during sunny spells, as fenestrations only occur once the plant reaches a certain height/maturity (the taller the stem, the more exposure to the sunlight, etc.).
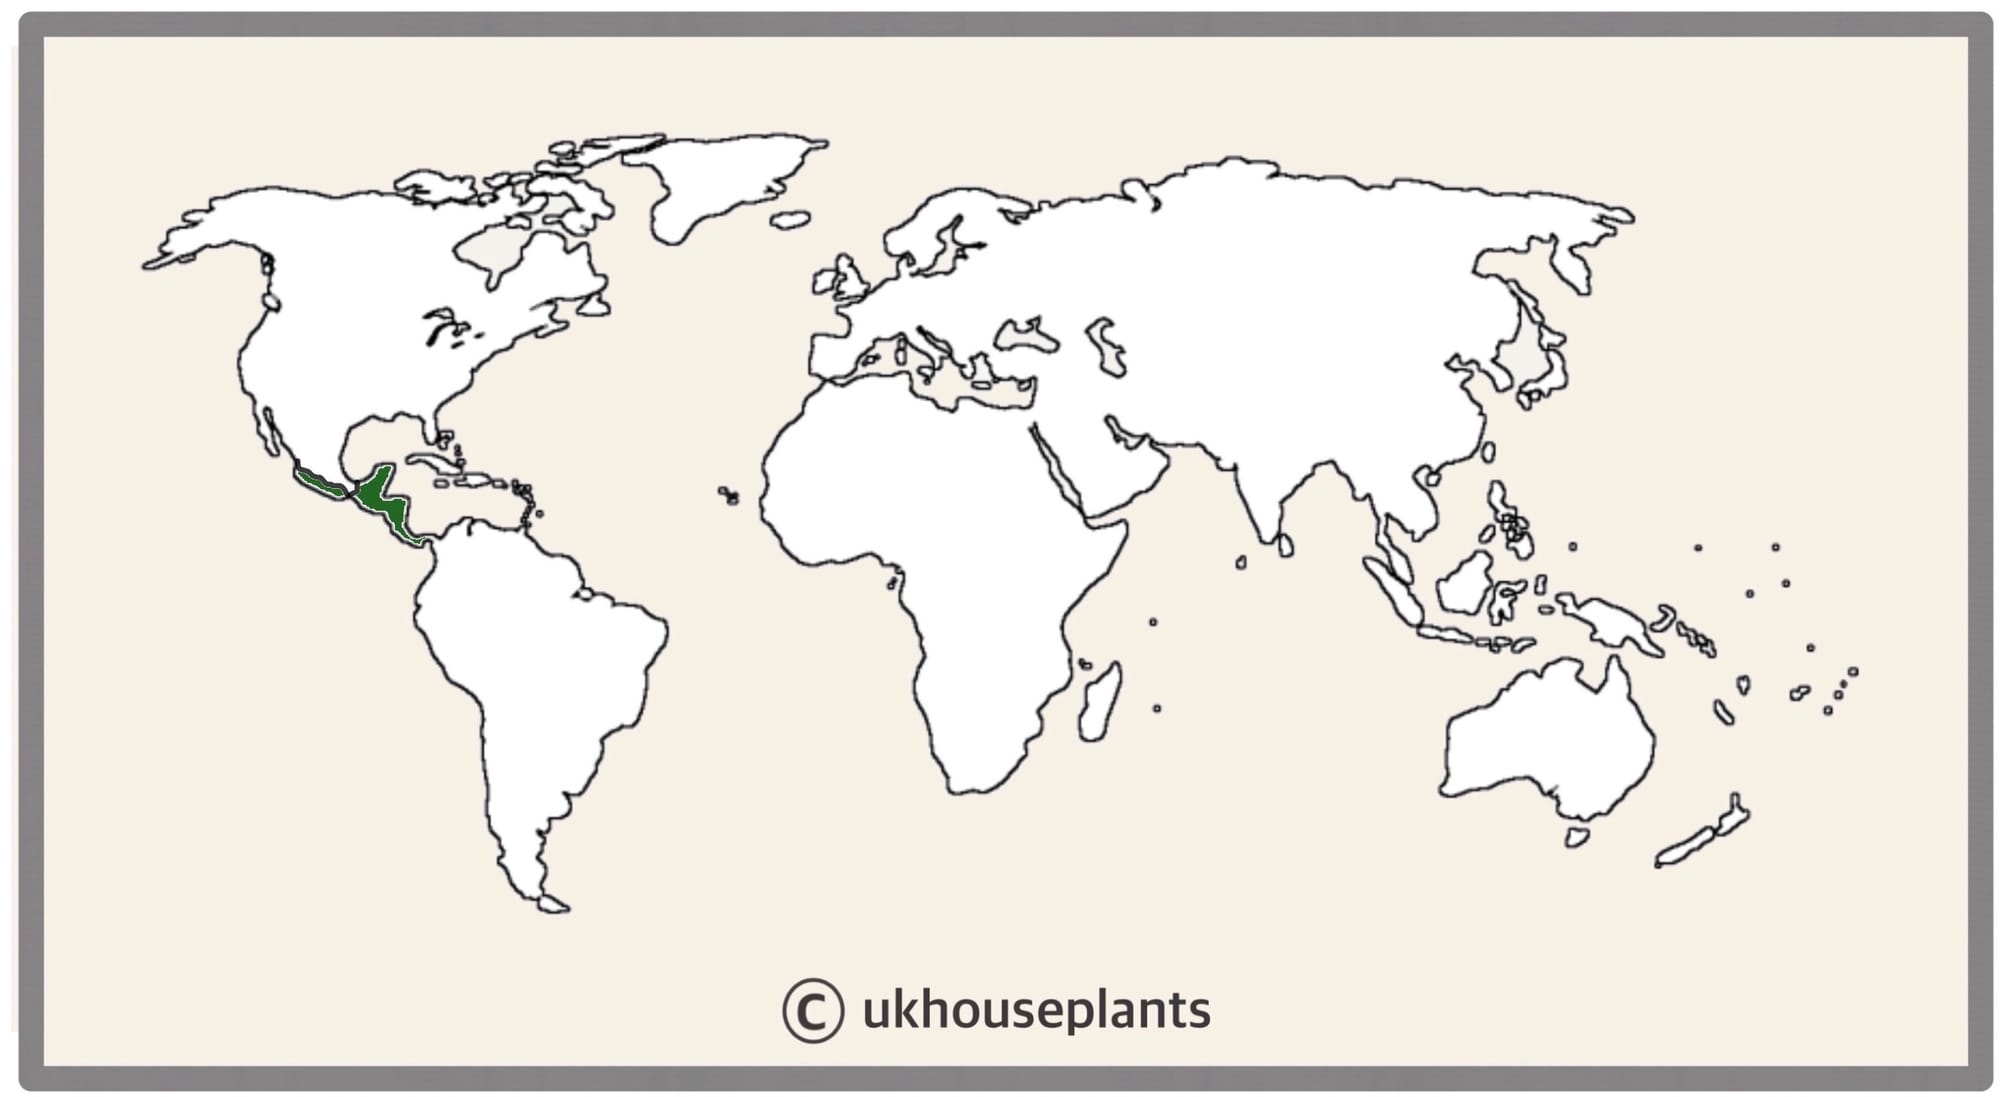 The Distribution of Monstera deliciosa.
Temperature
10° - 30°C (50° - 86°F)
H1b (Hardiness Zone 12) - Can be grown outdoors during the summer in a sheltered location with temperatures above 12℃ (54℉), but is fine to remain indoors, too. If you decide to bring this plant outdoors, don't allow it to endure any direct sunlight as it may result in sun-scorch and dehydration. Regularly keep an eye out for pests, especially when re-introducing it back indoors.
Spread
Up to 3m in height and 1m in width. The ultimate height will take between 8 - 10 years to achieve, with up to three new leaves per season. Monstera that naturally grow in the wild can reach heights of up to fifteen metres; however, with smaller root systems and less favourable growing conditions, they'll only grow to three metres, give or take.
Variegated Specimens
If you're looking for a fast-growing variegated Cheese Plant, we recommend purchasing the 'Albo', 'Aurea' or 'Mint' varieties over the Thai Constellation. Although these Monsteras will produce twice as many leaves as the latter, their variegations can be a little unreliable meaning green leaves are common until the plant gets used to your home. Thai Constellation Cheese Plants, however, will grow much slower than the rest, but will produce variegations on each leave - guaranteed.
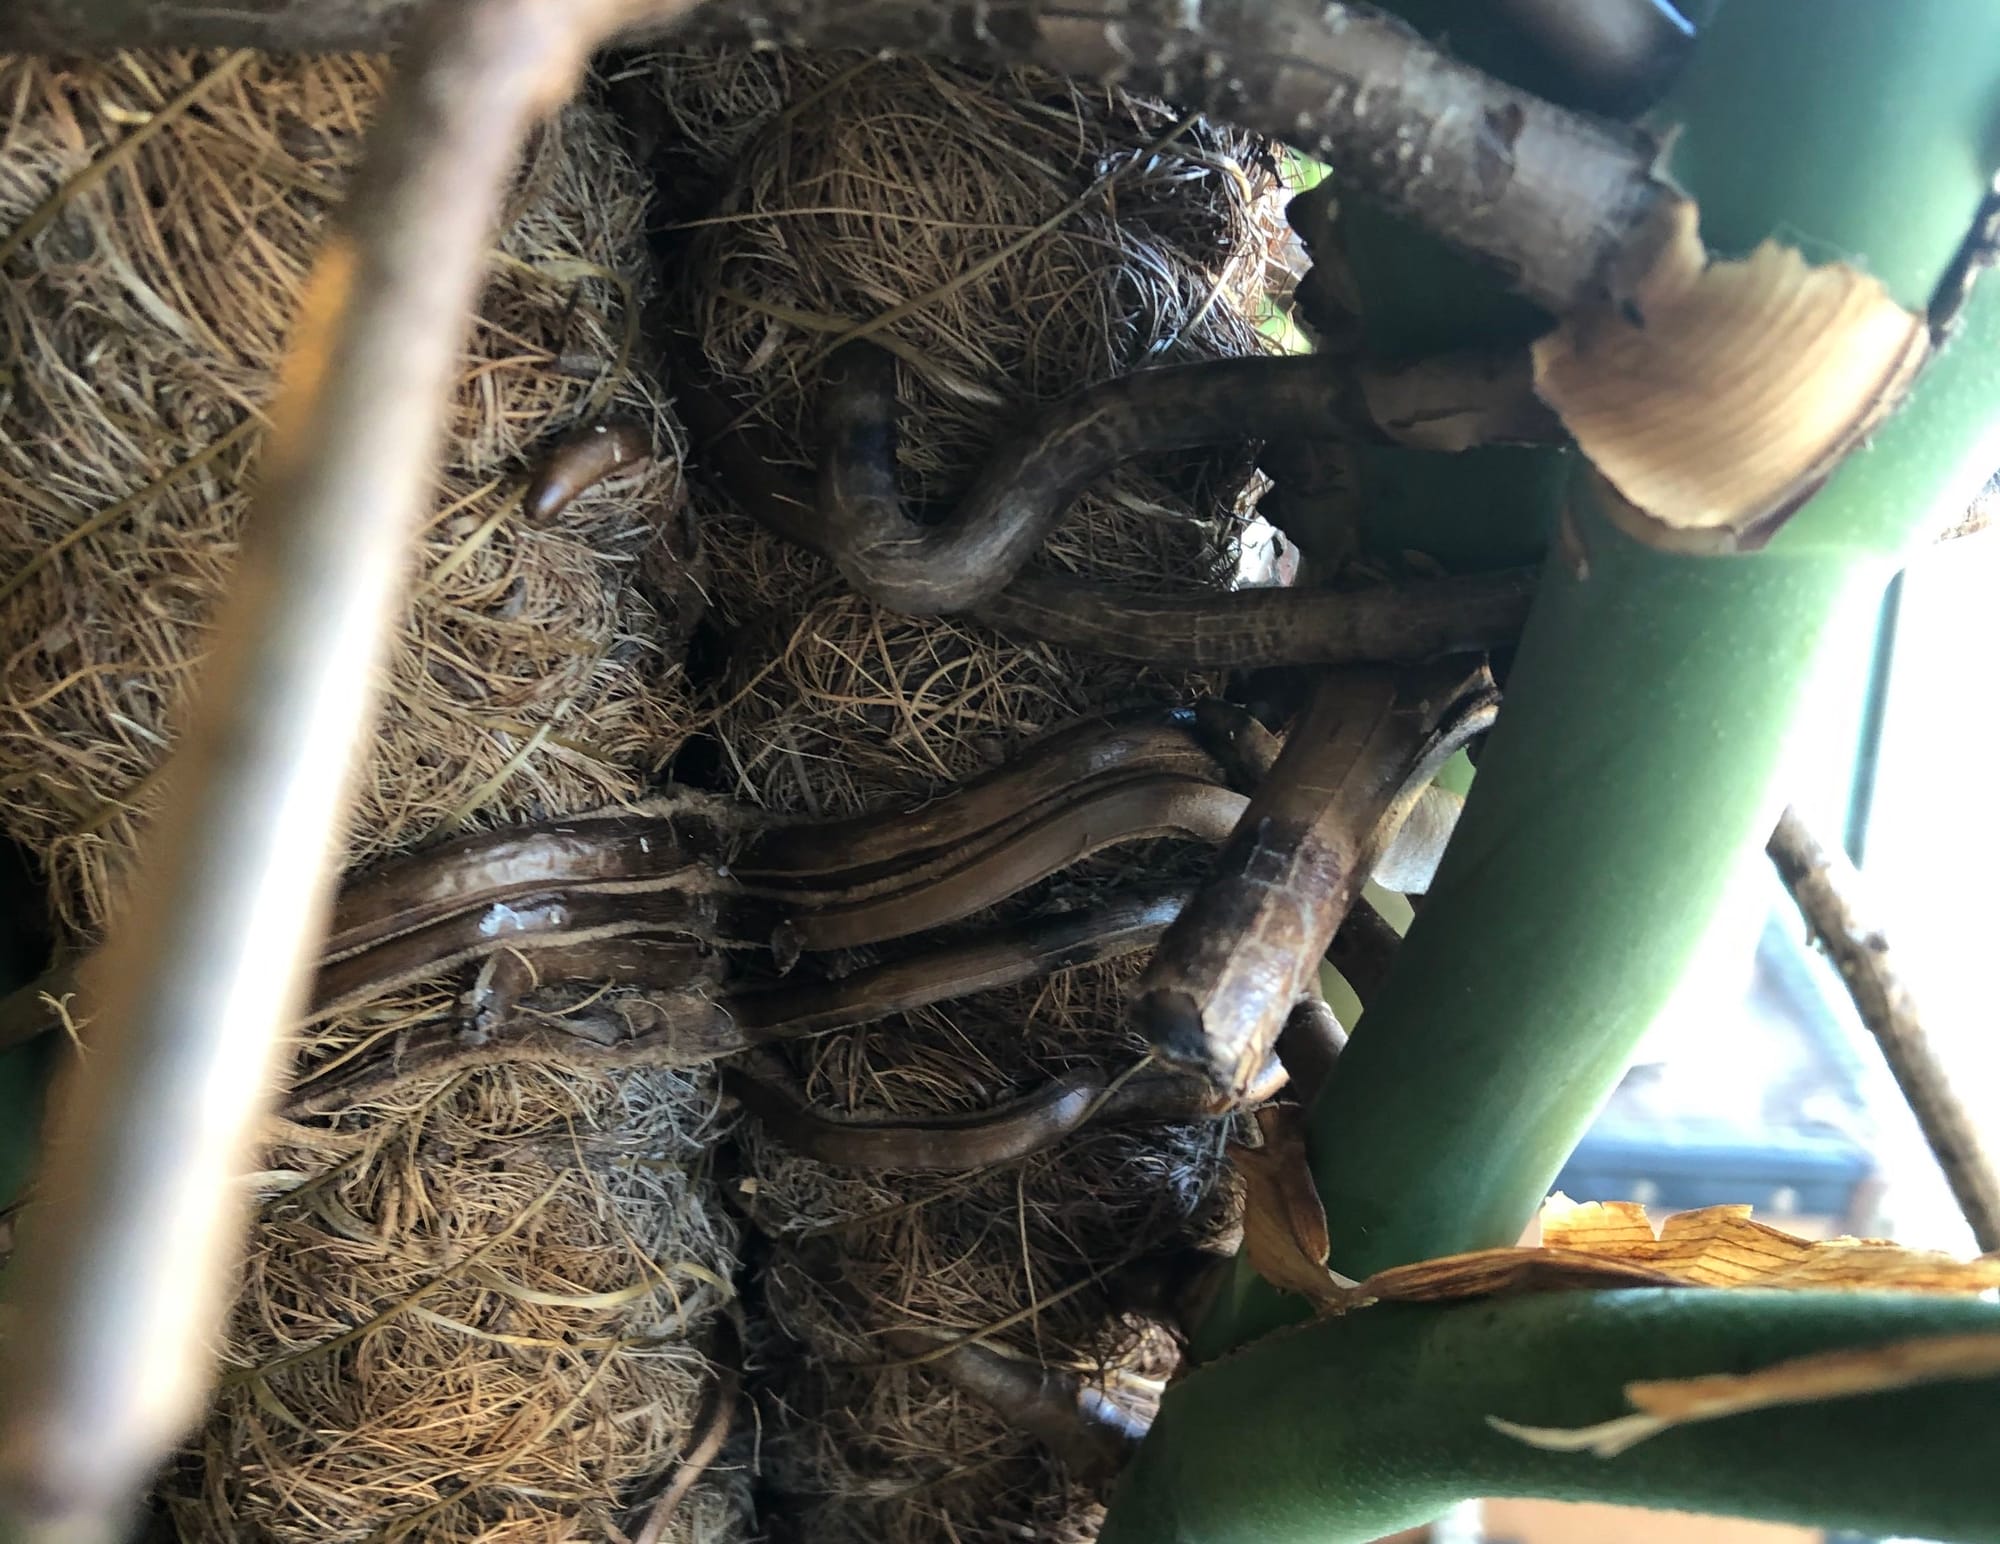
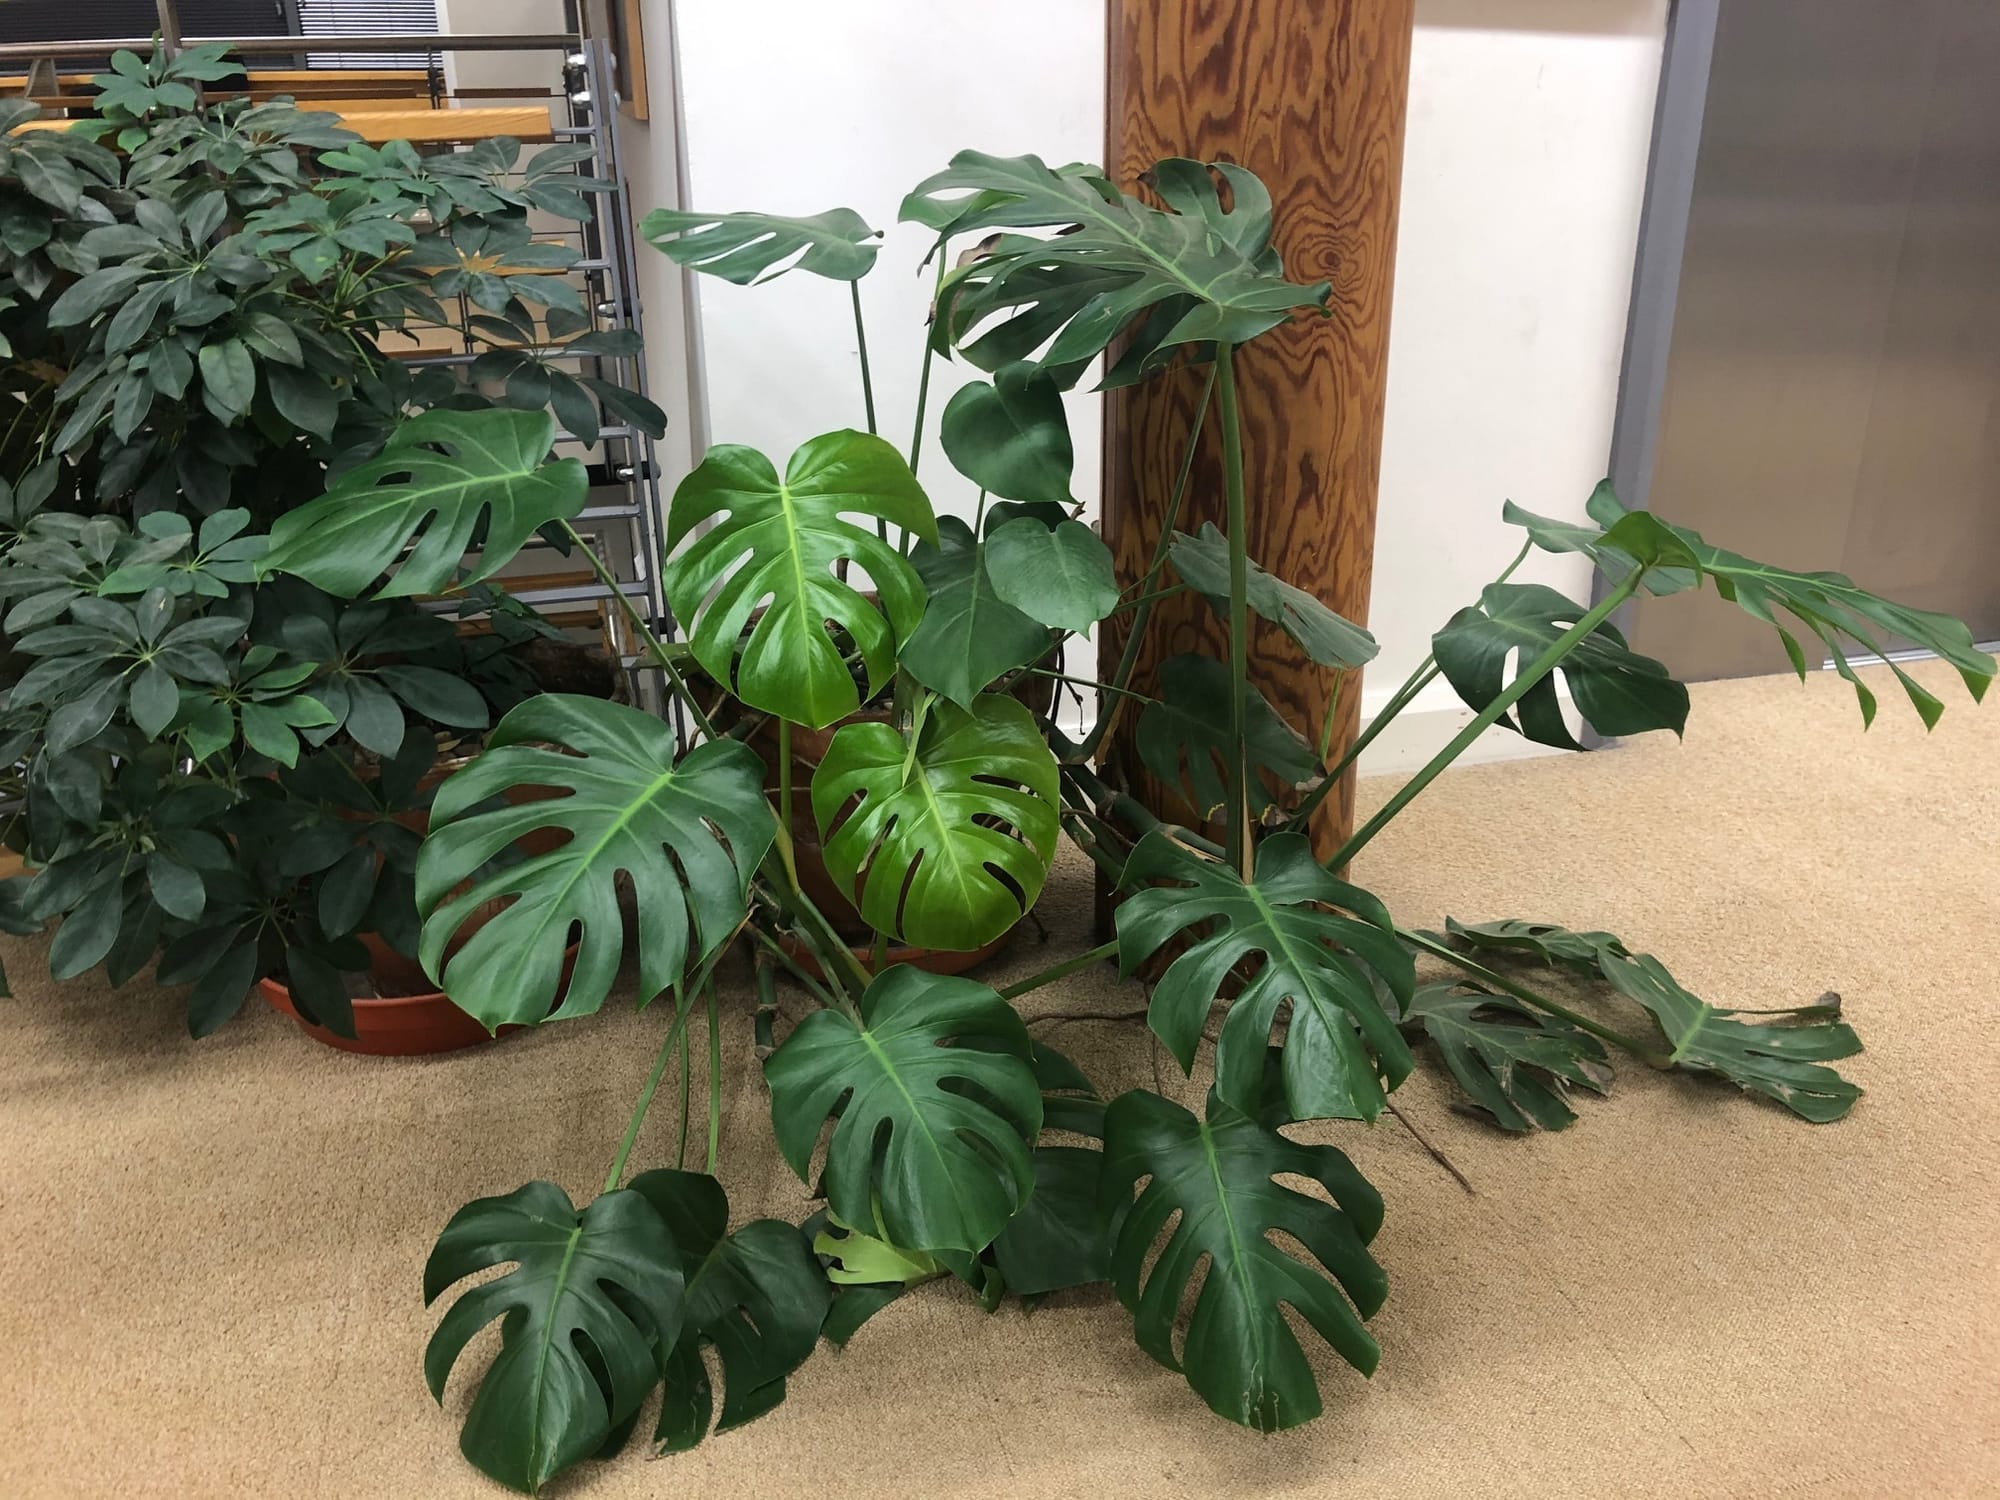 Without support, Monstera will begin to grow horizontally along the floor's surface, sending out an array of aerial roots to search for something to climb up.
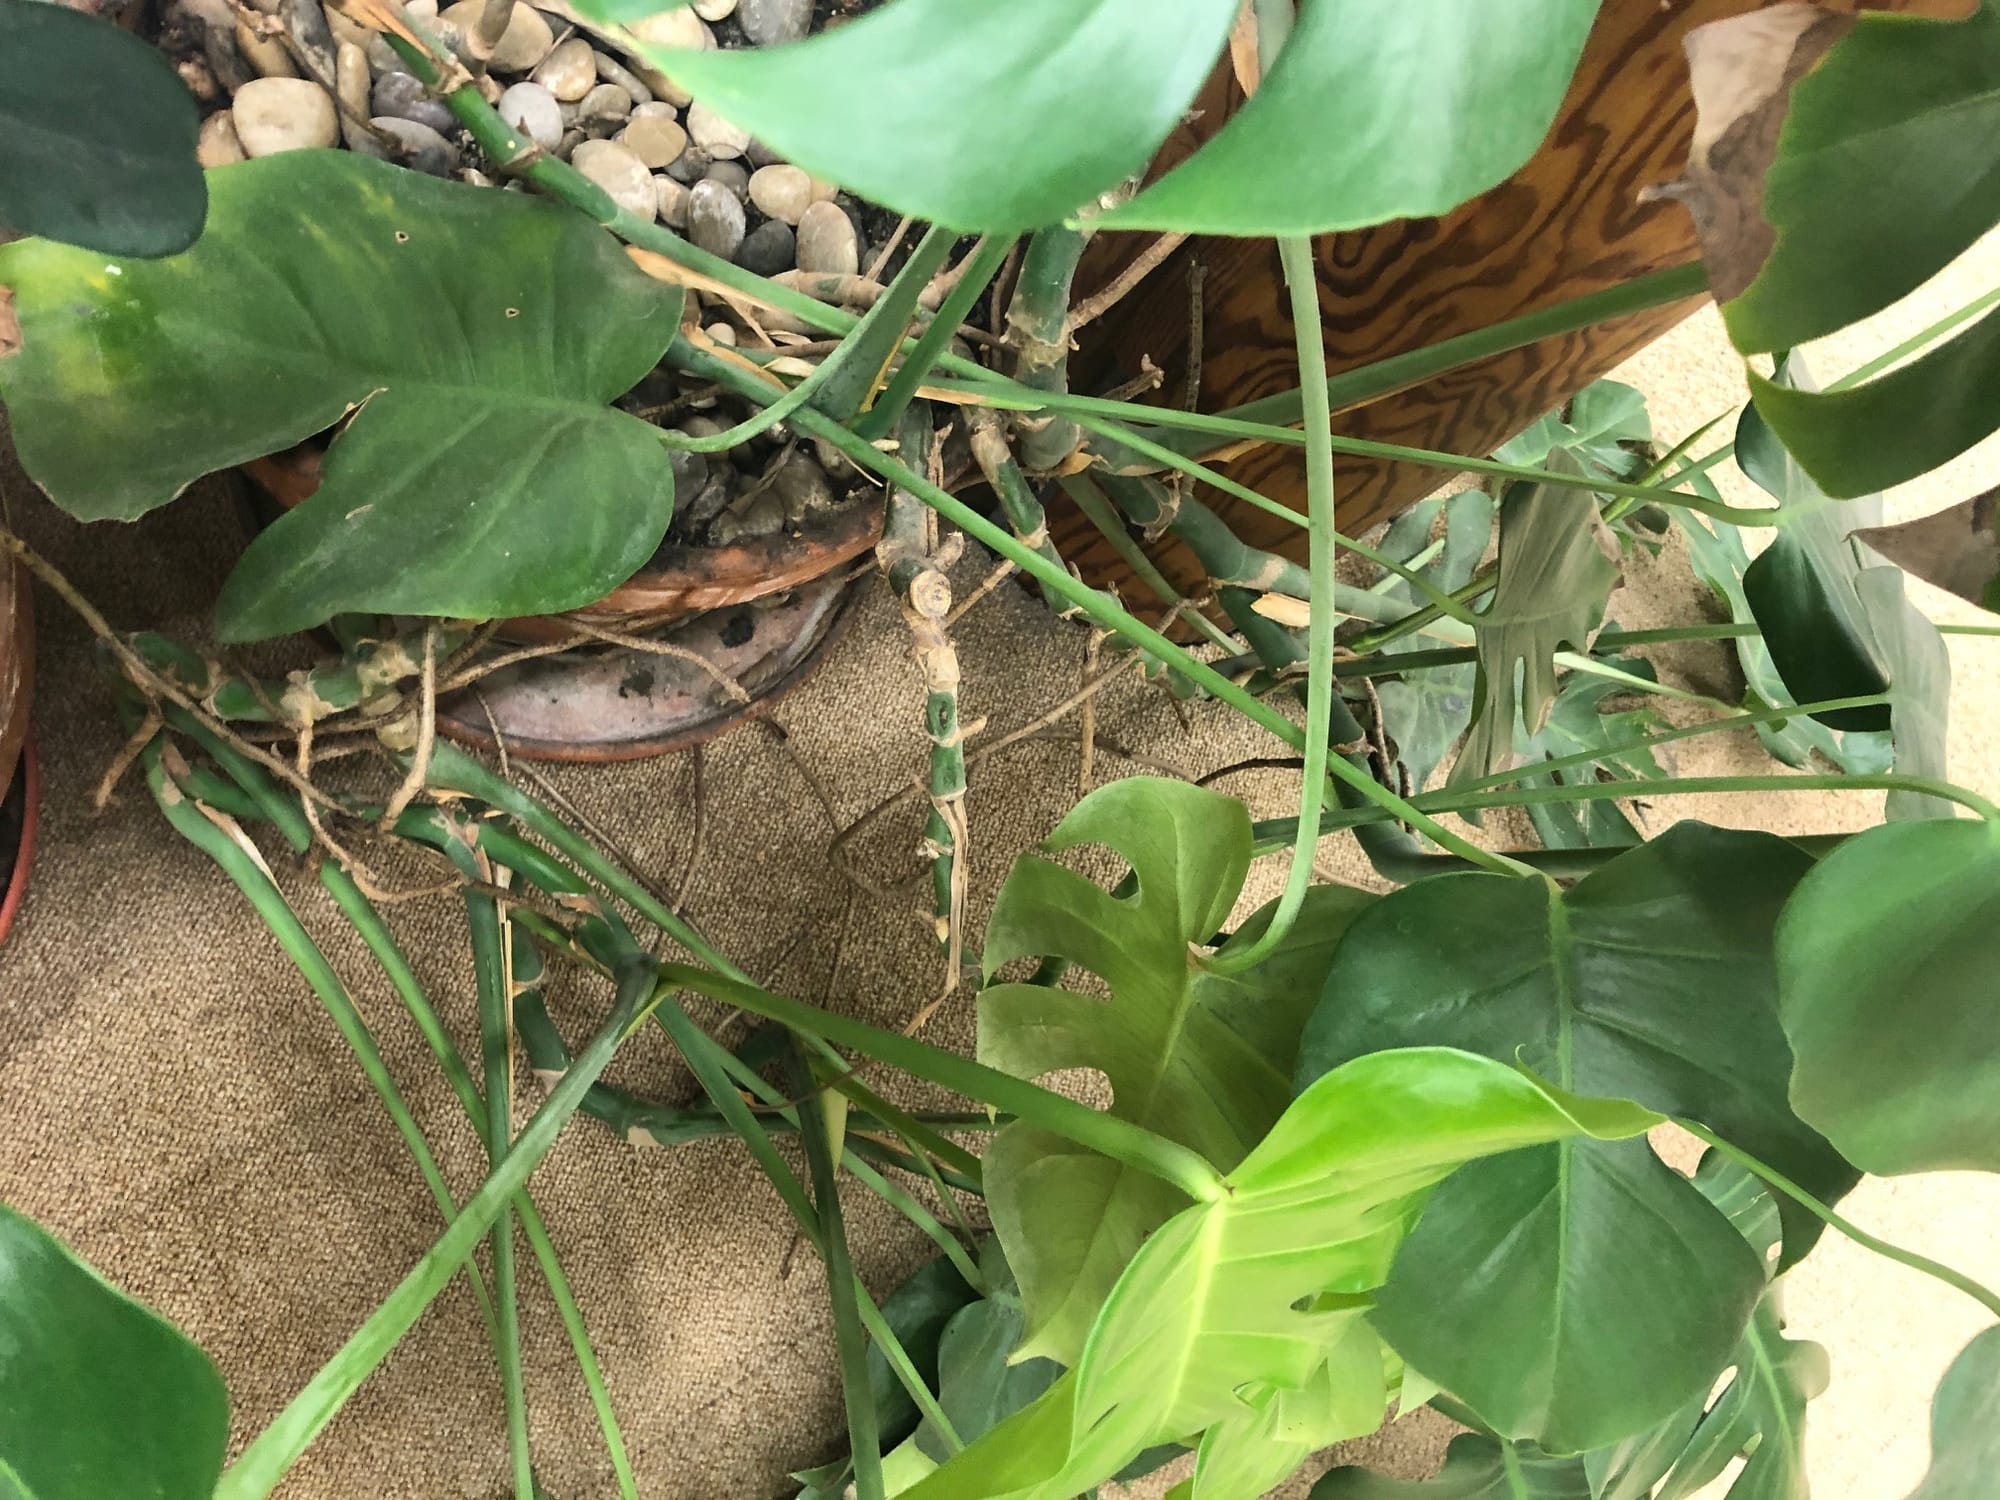 The same specimen's network of lateral stems and adventitious growth.
Pruning & Maintenance
Remove yellow or dying leaves, and plant debris to encourage better-growing conditions. While pruning, always use clean scissors or shears to reduce the chance of bacterial and fungal diseases. Never cut through yellowed tissue as this may cause further damage in the likes of diseases or bacterial infections. Remember to make clean incisions as too-damaged wounds may shock the plant, causing weakened growth and a decline in health.
Although its aerial roots aren't exactly appealing, we wouldn't recommend pruning them as it can lead to stress, potentially weakening the specimen over time.
If, however, there's visible damage to the aerial root, you can safely cut off to avoid any issues of bacterial rot. Remember to use a clean pair of scissors or secateurs around three inches from the area for best results. A smaller root will develop near to the wound, signalling the resurgence of its overall health!
Propagation
Via Seed, Stem Cuttings or Basal Offsets.
Stem Cuttings via Water Propagation (Easy)
- Choose the healthiest, most established vines. This propagation method can be taken from spring to summer, using between two to five leaves, with the main stem being at least 10cm (3 inches) in length with two nodes (one for foliar development and the other for root growth). Although more nodes are fine, be sure only to submerge the bottom ones in water to avoid unneeded rooting elsewhere on the stem. (More on this later)
- Cut directly below a node using a clean knife to reduce bacteria count. Remove the lower half of the leaves and place the vines into a container of lukewarm water. Be sure to submerge at least one node into the water, or else the root development will be hindered.
- The leaves must stay above the waterline for the prevention of disease.
- Replace the water weekly, using lukewarm water to avert shocking the cutting with cold temperatures.
- Once the roots surpass 10cm (3 inches) in length, it's time to pot the cutting.
- Choose a potting mix - as long as it has a well-draining nature, most soils are fine. Either 'Houseplant' labelled compost or our Monstera Potting Mix is suitable for potting up.
- Use a 12cm (4 inch) plastic or coir pot that has suitable drainage holes. Try not to transplant the cuttings too deeply in the soil as rot may occur.
- Fill the bottom quarter of the pot with soil, before sitting the cutting on top. Fill the remaining gaps with compost until the soil line reaches four-fifths of the pot's height. Lightly tap the pot's side to consolidate the soil into place. (Don't press down on the soil!)
- Provide bright, indirect light in a windowsill or under a grow light, along good humidity by placing the potted plant into a transparent plastic bag for the first couple of weeks.
- Open the bag every two days for an hour for the prevention of disease. After a month of being placed in soil, remove it from the bag and follow the care tips provided above.
Stem Cuttings via Soil Propagation (Moderate)
This second option is still easy to perform, but it'll need some extra steps to avoid dehydration while the cutting roots in the soil.
- Choose the healthiest, most established vines. This propagation method can be taken from spring to summer, using between two to five leaves, with the vine being at least 10cm (3 inches) in length with two nodes (one for foliar development and the other for root growth). Although more nodes are fine, be sure only to submerge the bottom ones in water to avoid unneeded rooting elsewhere on the stem. (More on this later)
- Cut directly below a node using a clean knife to reduce bacteria count. Remove the lower half of the leaves and place the vines into a container of lukewarm water. Be sure to submerge at least one node into the soil, or else the root development will be hindered.
- Choose a potting mix - as long as it has a well-draining nature, most soils are fine. Either 'Houseplant' labelled compost or our Monstera Potting Mix is suitable for potting up.
- Use a 12cm (4 inch) plastic or coir pot that has suitable drainage holes. Try not to transplant the cuttings too deeply in the soil as rot may occur.
- Fill the bottom quarter of the pot with soil, before sitting the cutting on top.
- Fill the remaining gaps with compost until the soil line reaches four-fifths of the pot's height. Lightly tap the pot's side to consolidate the soil into place. The leaves must always stay above the soil-line for the prevention of disease.
- Provide bright, indirect light in a windowsill or under a grow light, along good humidity by placing the potted plant into a transparent plastic bag for the first couple of weeks. Humidity will be your cutting's best friend, so ensure the plant doesn't dehydrate because of dry air.
- Open the bag every two days for an hour for the prevention of disease. After a month of being placed in soil, remove it from the bag and follow the care tips provided above.
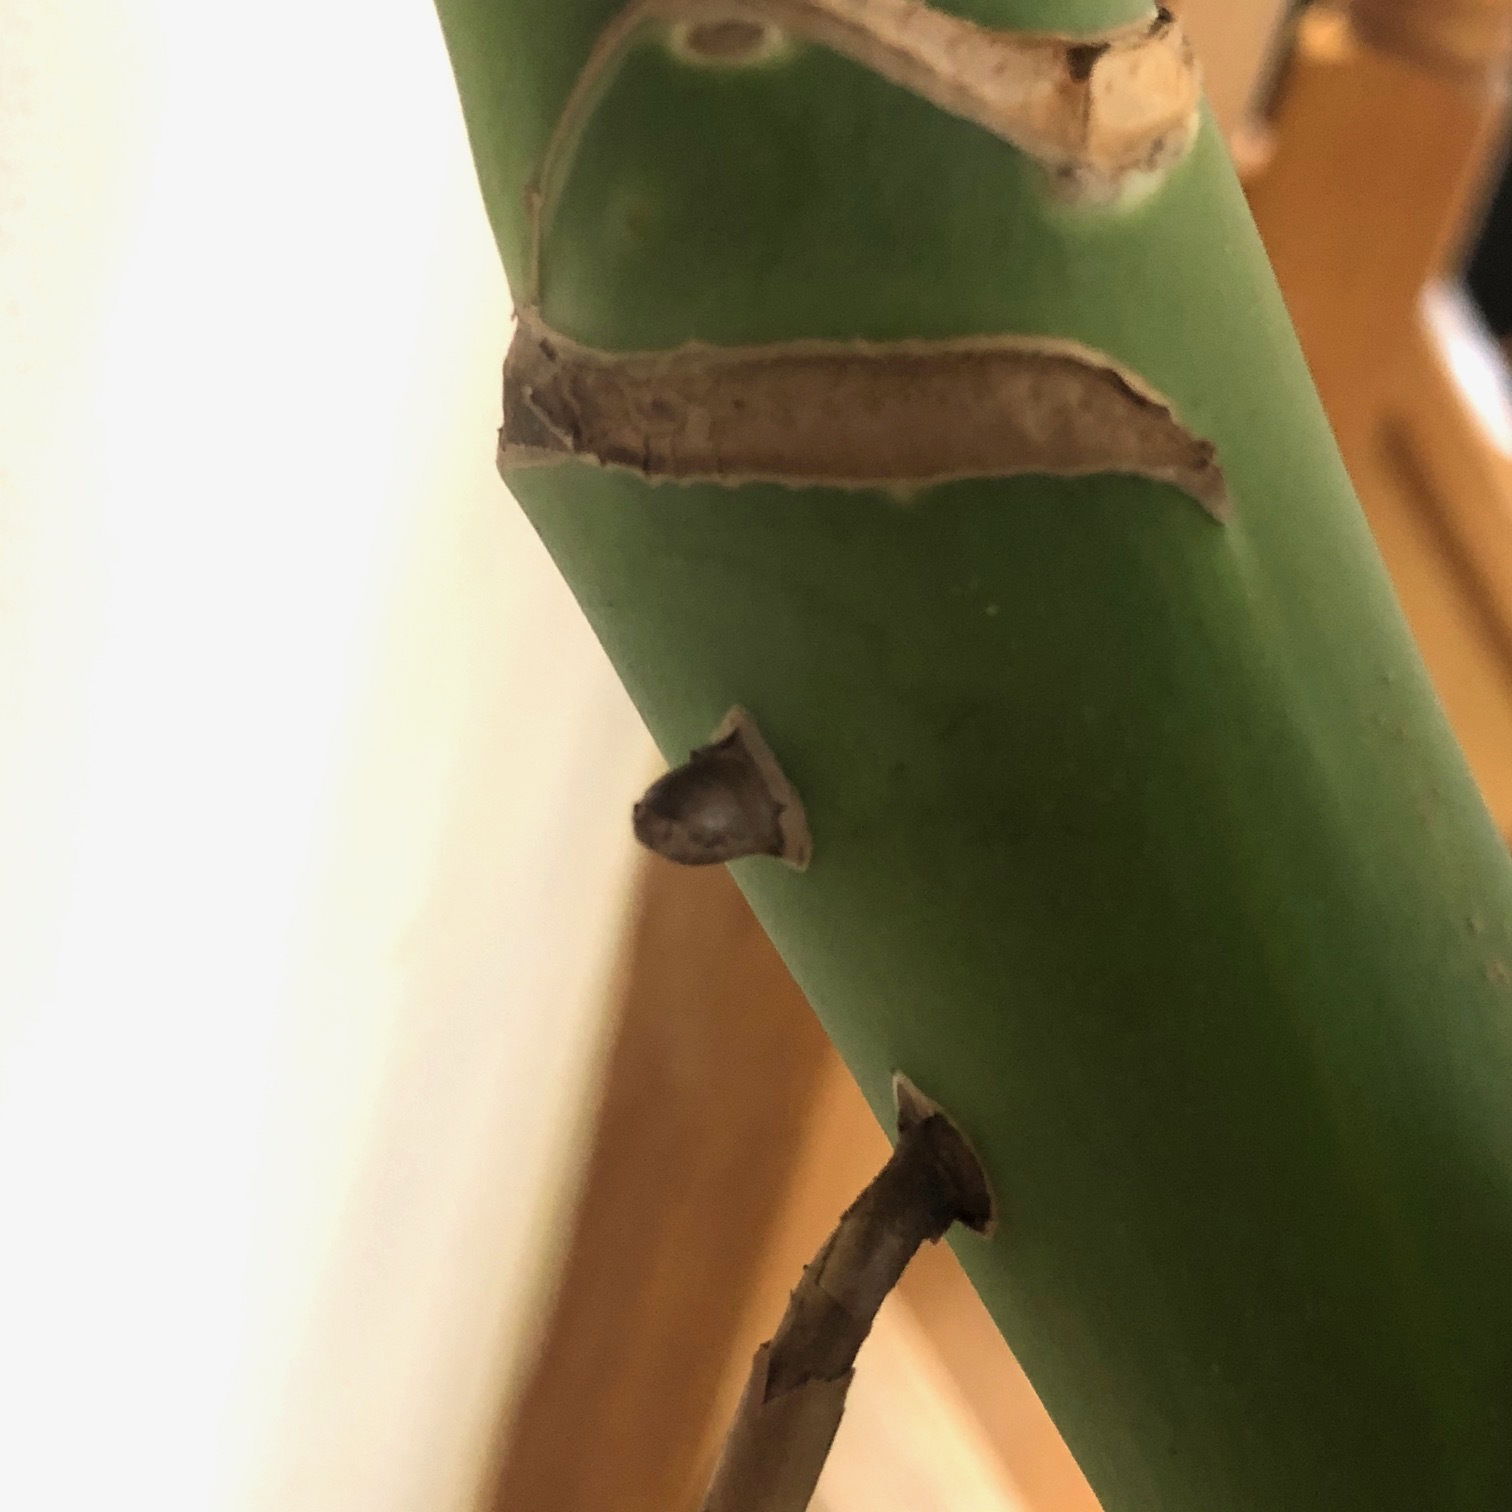 Aerial root buds should be a prominent feature on all potential stem cuttings as it'll significantly improve the yield's success & development speed.
Flowers
As Monstera is part of the Araceæ family, they'll produce white flowers with a green bract that looks largely similar to those of a Peace Lily. Despite its readiness to flower in the wild, those grown domestically will rarely bloom due to the unflavoured growing conditions. The photo below shows the edible fruits that apparently taste like the combination of Pineapple and Banana...
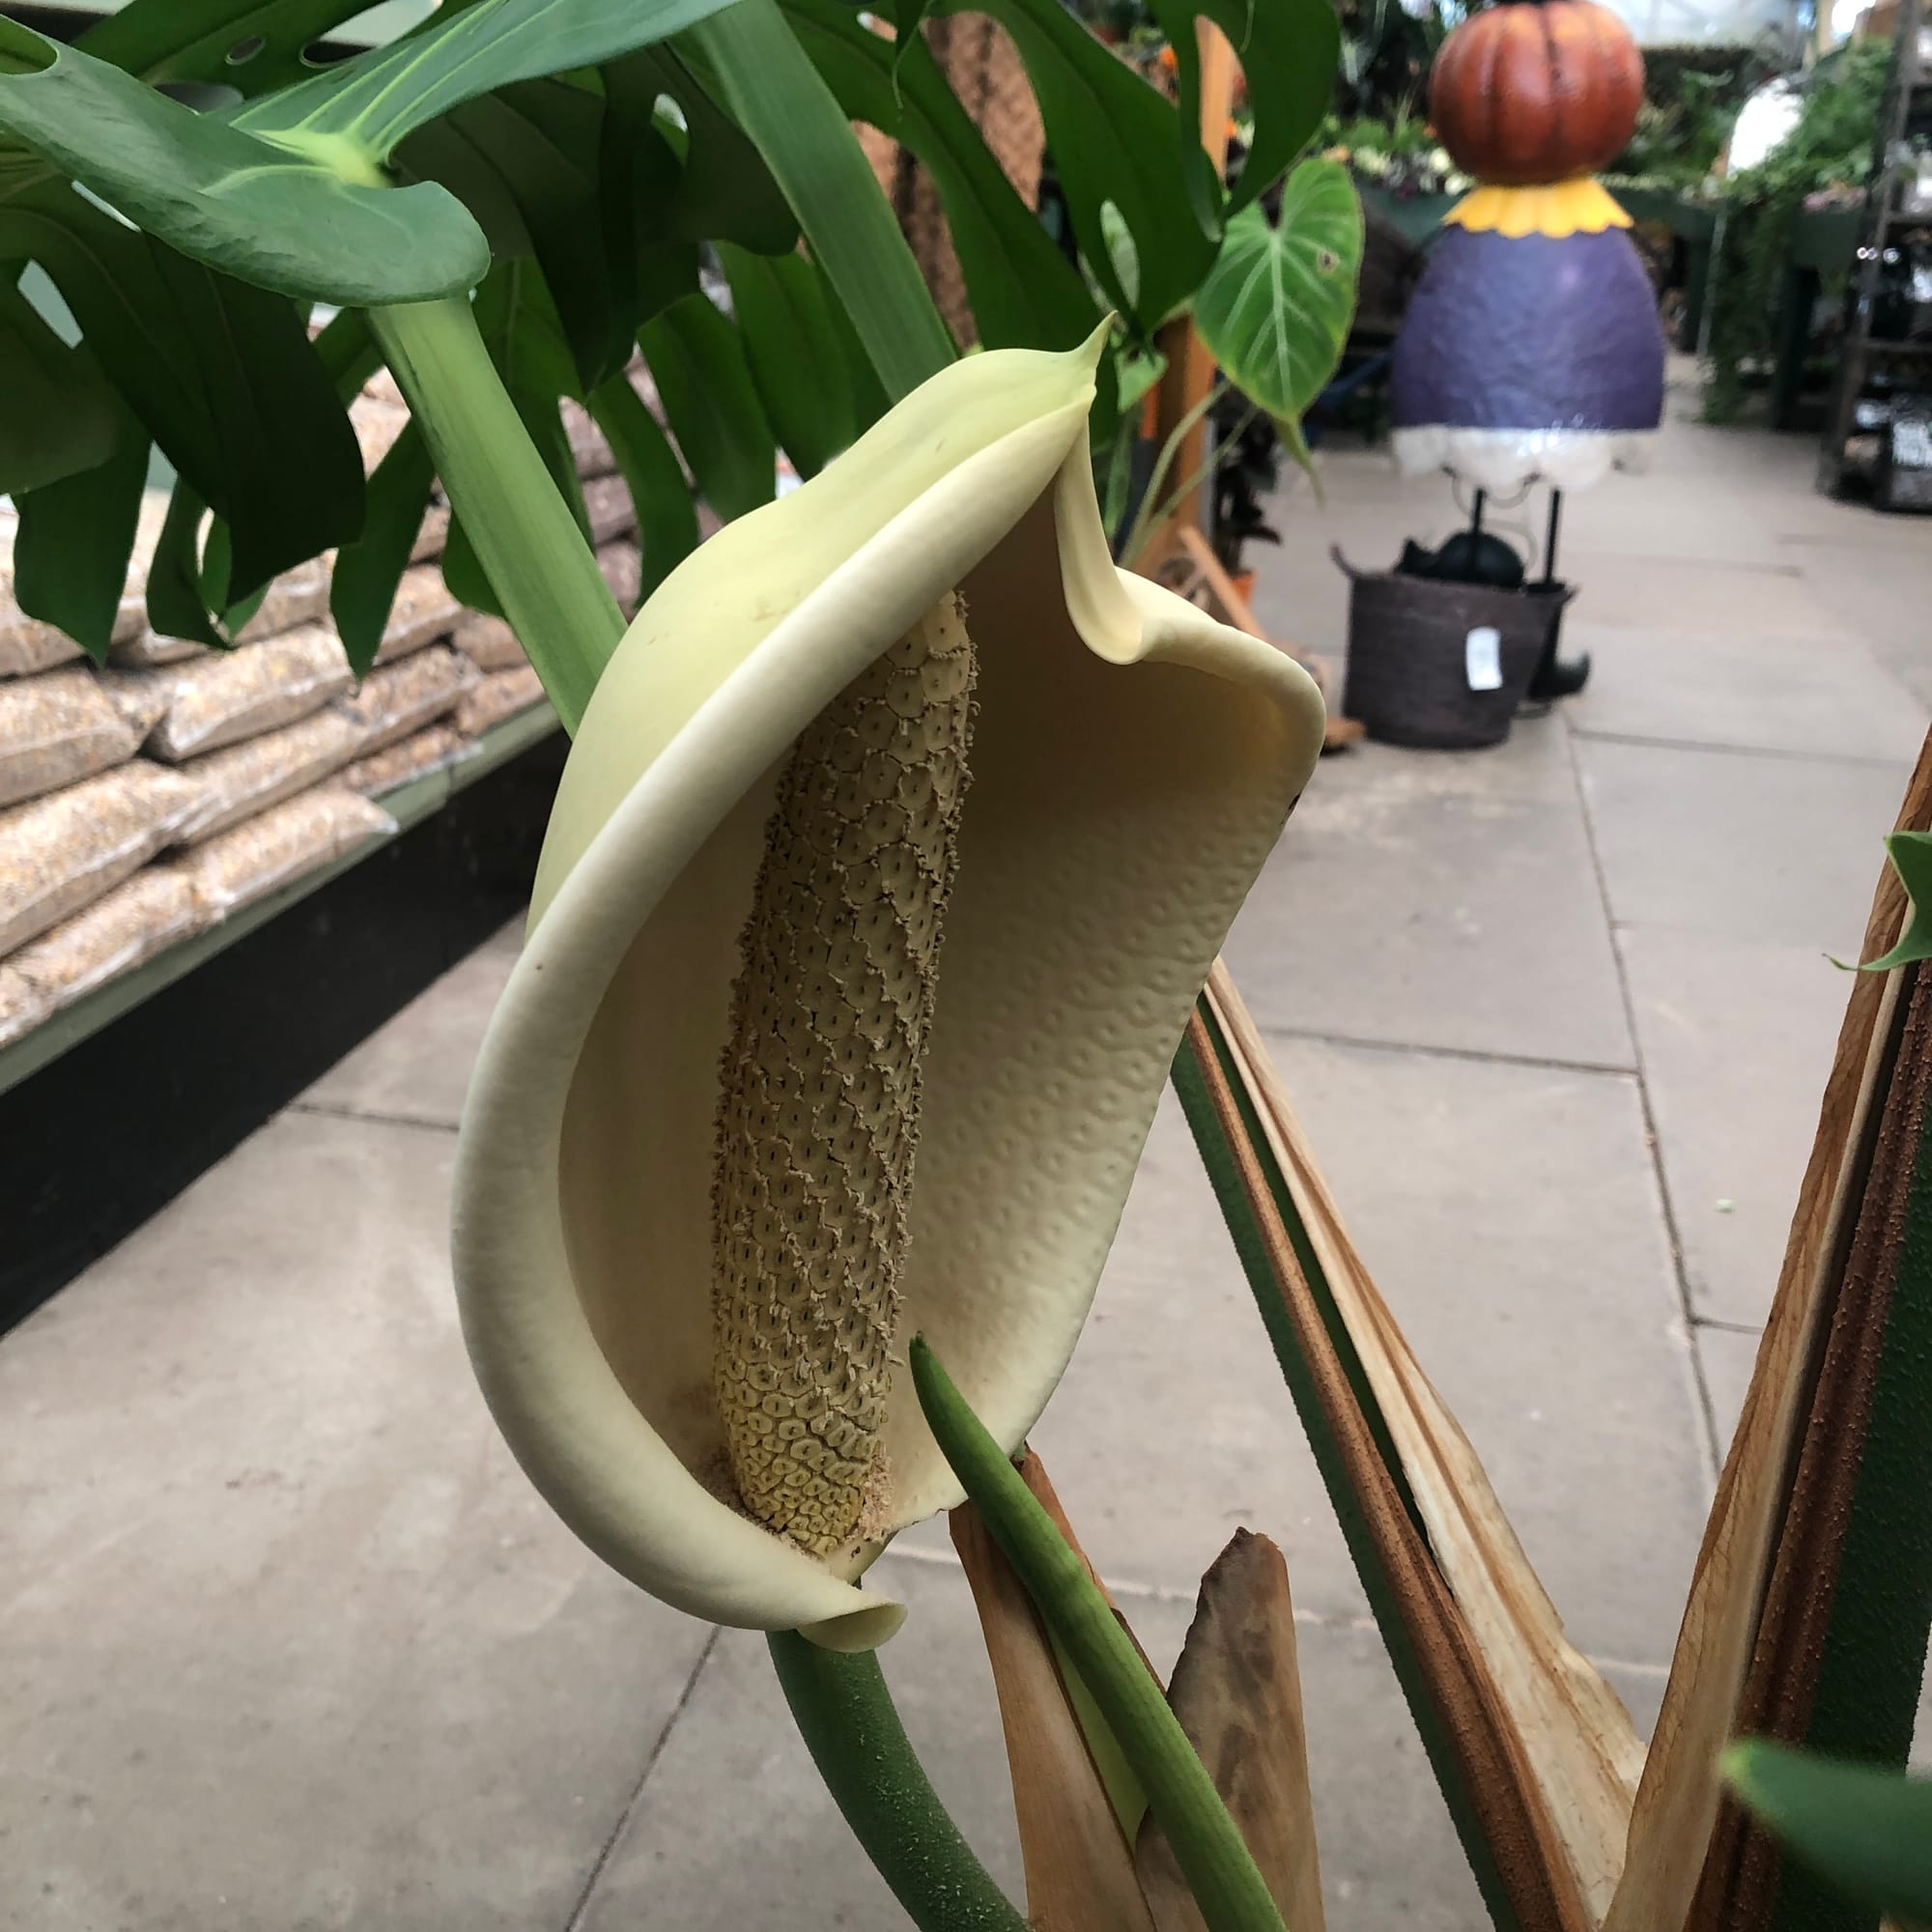 A Monstera deliciosa's flower will bloom for around two weeks.
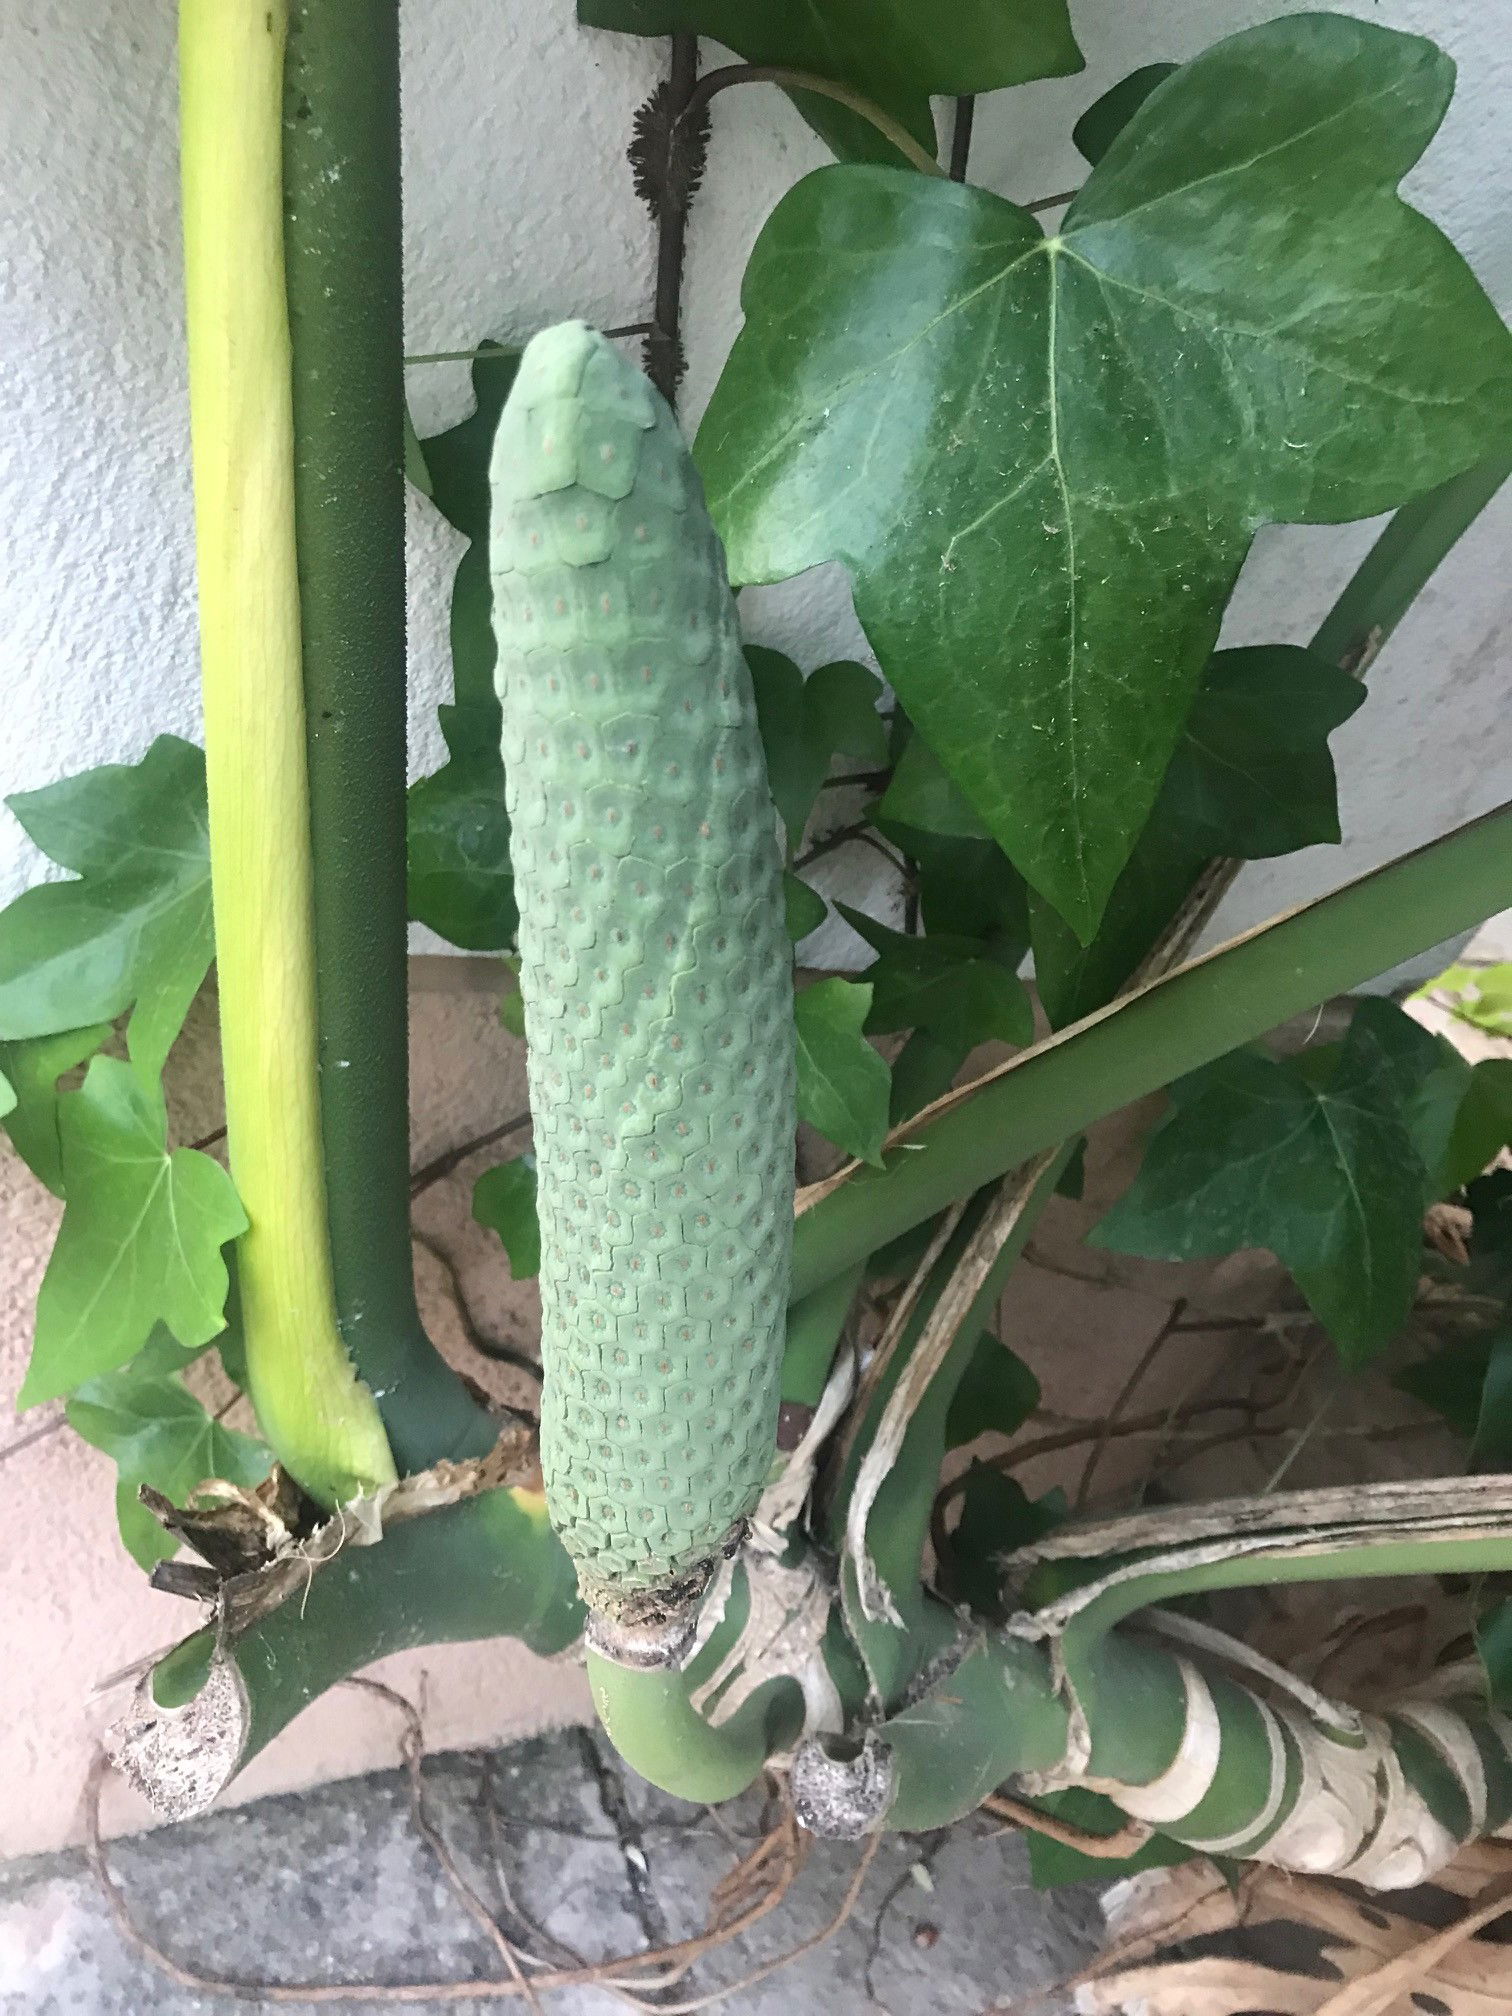 A cucumber sized fruit that's edible once ripe. The taste has clear similarities to a fruit salad, hence the species' epithet, 'deliciosa'.
Repotting
Monstera will develop large tuberous root systems that'll invade the pot within half a year. With this in mind, transplant annually using 'Houseplant' compost and a larger pot; this is an excellent time to check the roots' condition, as well as propagating stem cuttings or basal offsets. Click here for a detailed step-by-step guide on transplantation, or via this link to learn about repotting with root rot.
N. B. - If your specimen is producing an abnormal amount of aerial roots coupled with slowed growth, it could becoming pot-bound.
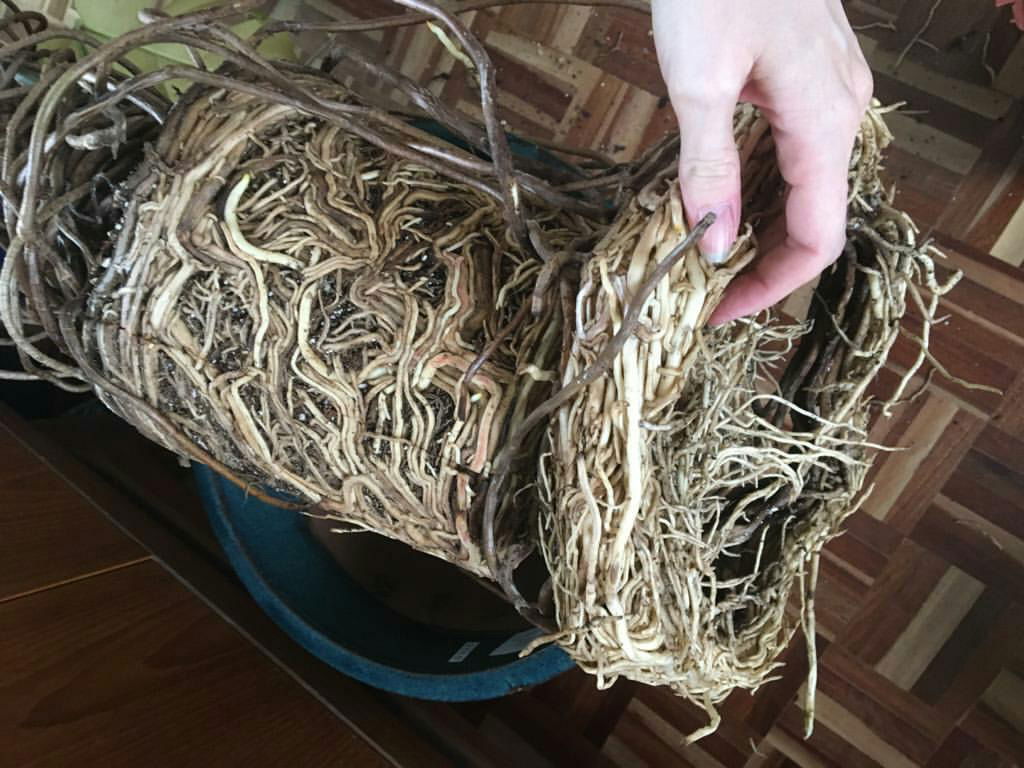
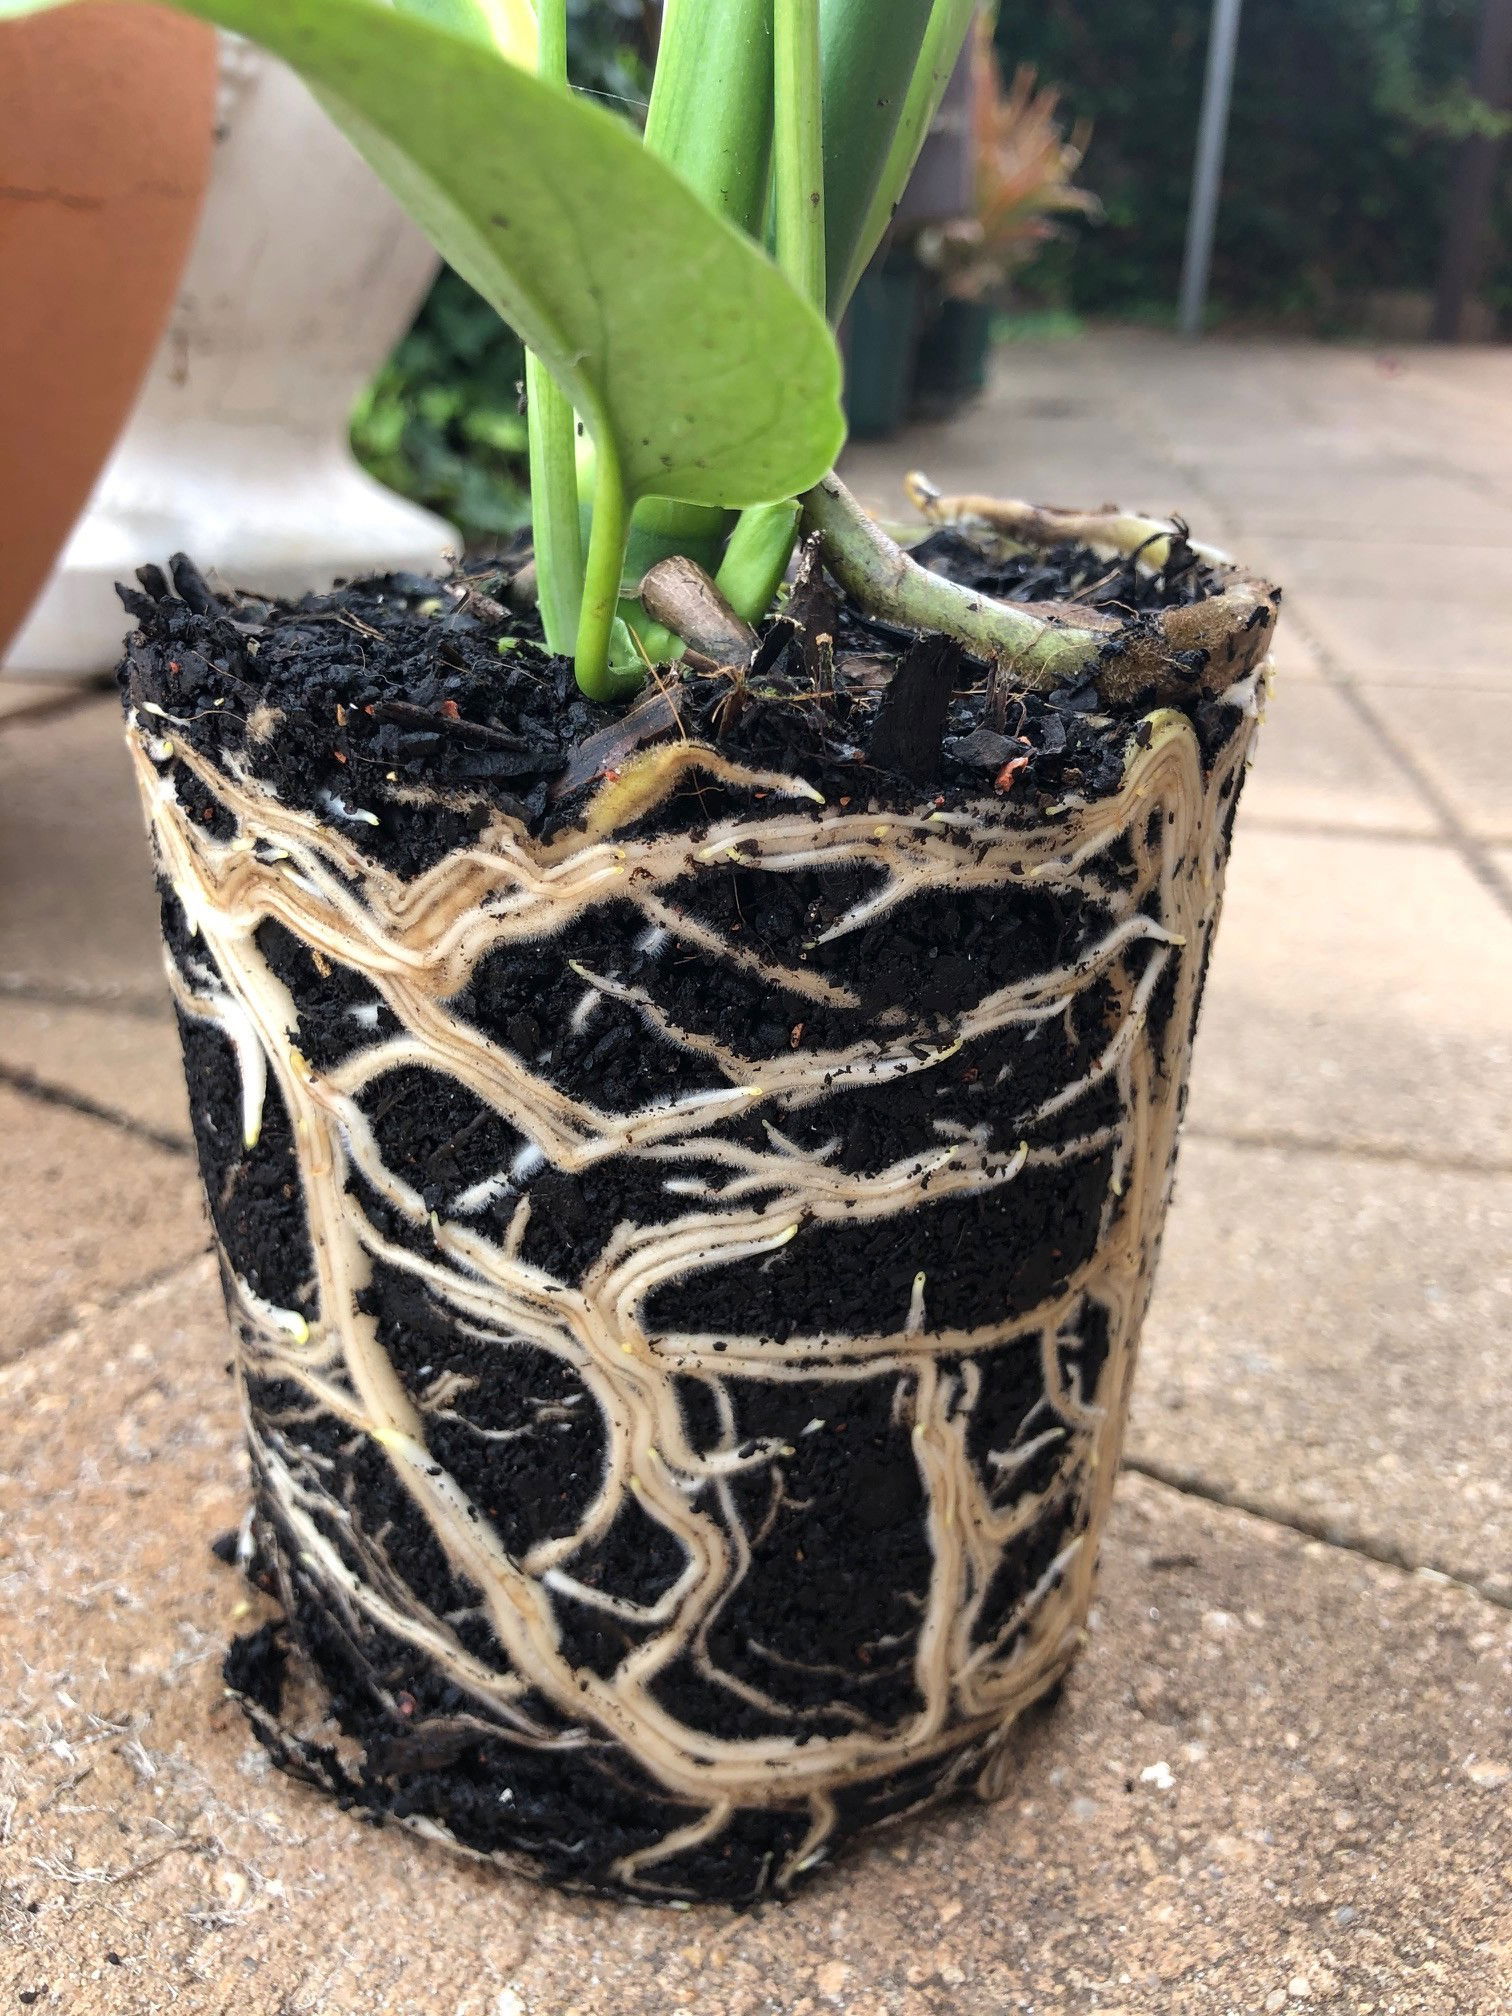 An example of perfectly healthy Monstera roots.
If you're thinking of repotting a specimen that's growing up a moss pole, never remove the attached aerial roots as the disturbance could put further stress on the plant. Extend by purchasing another same-sized pole and pushing directly into the hollow hole in the original's top - its moss-like material may have to be cut off from the top to access the hollow centre. Get a long, sturdy stick that has a similar length to the two poles combined and place in the two's centre to support the weight. Always perform the repot BEFORE adding another pole, as it'll prove more challenging due to the weight distribution and overall balance. NEVER remove soil from the roots, or over-touch the root system, as this will cause transplant shock and possible death.
If you're still unsure of what to do with mounting Monstera to moss poles, don't hesitate to book a 1-to-1 call with Joe Bagley to get his expert advice!
 Within a year or two, the Monstera should begin to use its roots to penetrate the moss pole for support!
Pests & Diseases
Keep an eye out for mealybugs, spider mites, scale, thrips, whitefly, vine weevils & root mealybugs that'll locate themselves in the cubbyholes and undersides of the leaves, with the exception of the latter two in soil. Common diseases associated with Monstera are root rot, leaf-spot disease, botrytis, rust, powdery mildew & southern blight - click here to learn more about these issues.
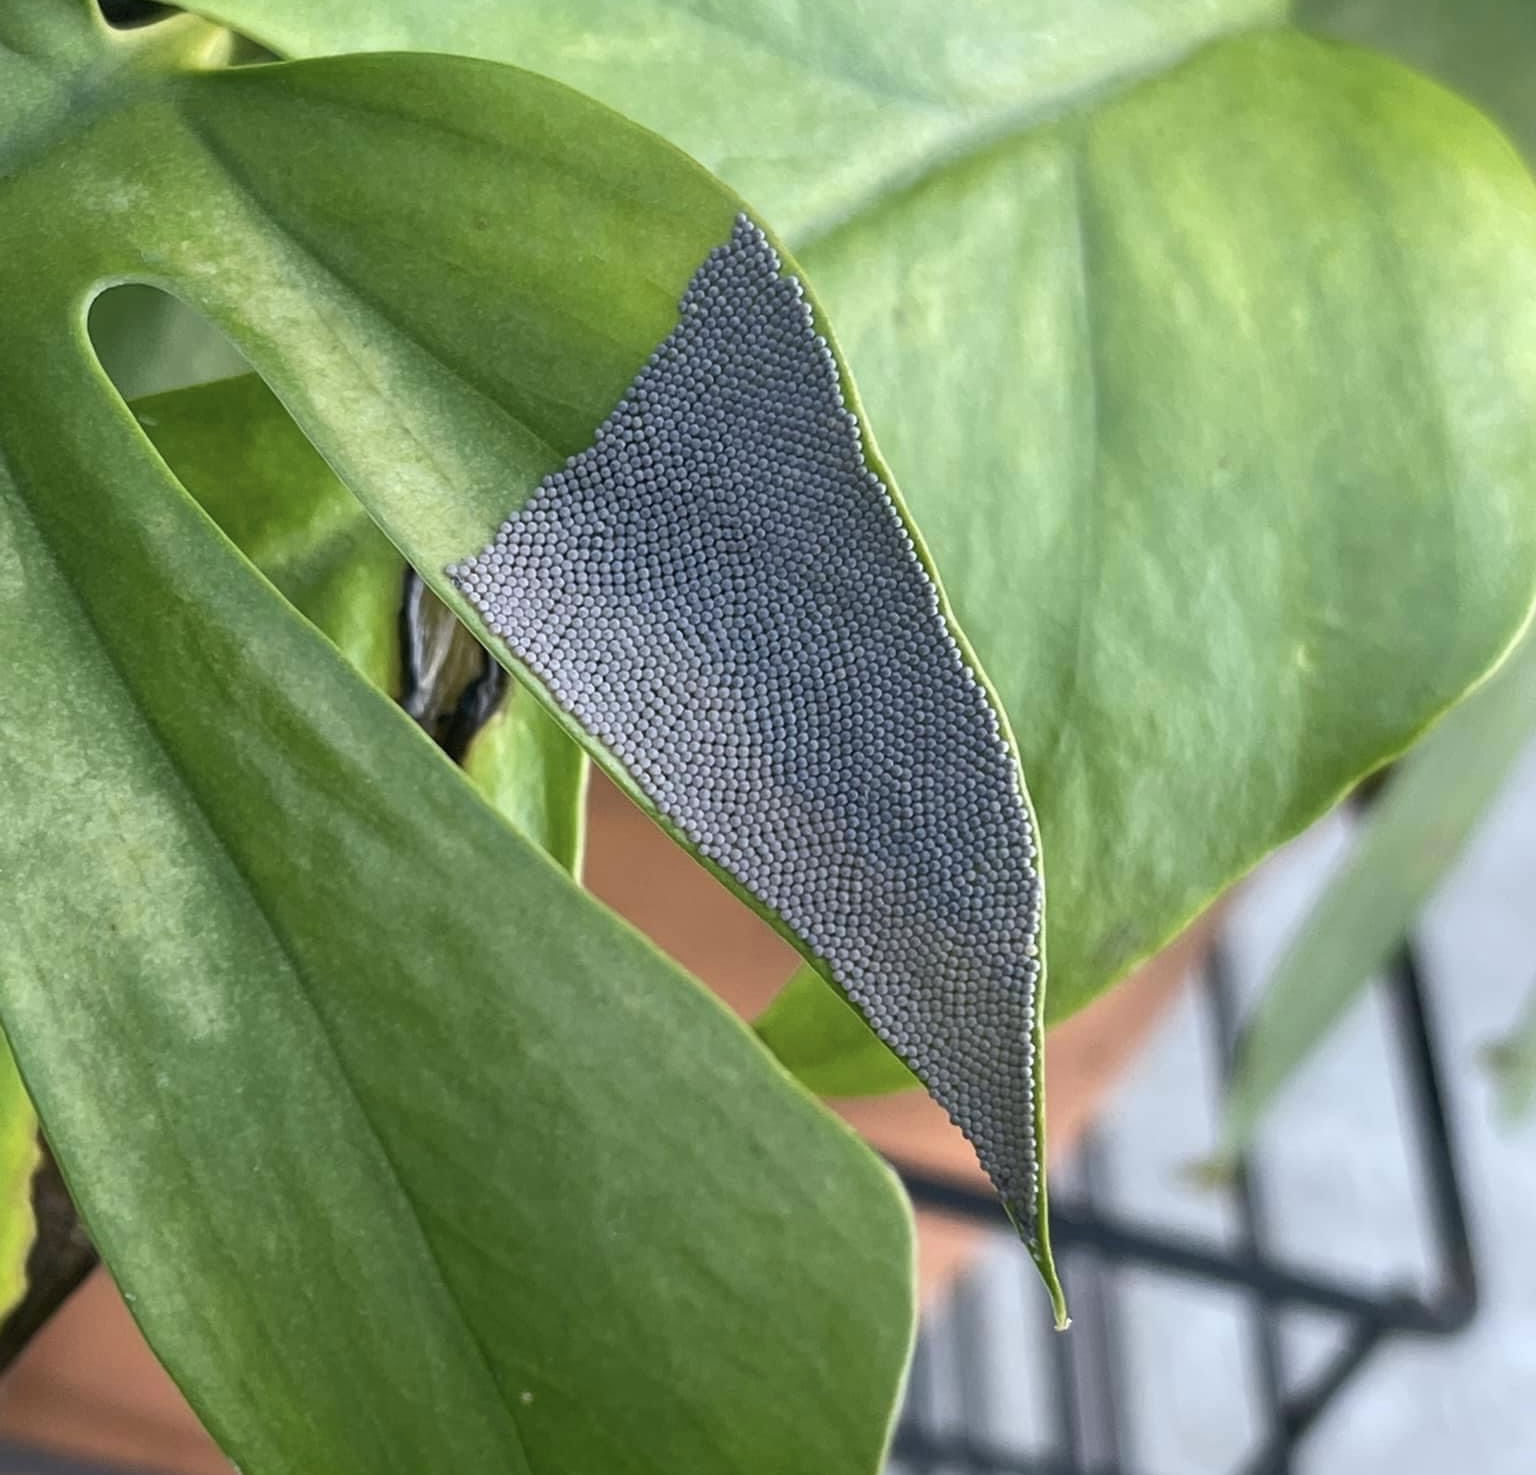 Although unlikely, your Monstera deliciosa may develop grey circular bumps along the stems in close proximity to each other. These are just Butterfly eggs that are harmless to the plant itself.
Toxicity
This plant is classified as poisonous. If parts of the plants are eaten, vomiting, nausea and a loss of appetite could occur. Consumption of large quantities must be dealt with quickly; acquire medical assistance for further information.
Retail Locations
Homebase, British Garden Centres, B&Q, IKEA, Dobbies, Blue Diamond, Online Stores.
Book a 1-to-1 Call with THE HOUSEPLANT DOCTOR™
If you need further advice with your houseplants, book an advice call with ukhouseplants' friendly and expert writer today! This can be done via a video or audio call on most apps, including Facebook, FaceTime & Skype. A ten-minute call costs £5.99 (US$7), or £15.99 for thirty minutes. You can ask multiple questions, including queries on plants, pests, terrariums, repotting advice and anything in between. Please consider supporting this service to keep ukhouseplants thriving!
Comments