
Alocasia macrorrhizos
Contents
- Top Tips
- Location, Water, Humidity & Fertilisation
- Common Issues
- Origins, Temperature, Propagation, Repotting & Toxicity.
Need the answer to a specific plant query? Book a 1-to-1 video call with THE HOUSEPLANT DOCTOR™, the website's friendly author, to overcome and address your niggling problem! Available on iMessage, WhatsApp, Facebook Messenger & more.
Top Tips & Info
- Care Difficulty - Easy
- Elephant Ear Plants can do remarkably well in several locations around the house, as long as it receives bright, indirect light. Ideal spots are those that can provide near-perfect overhead lighting, so within 2m of a window or in a semi-shaded conservatory is best.
- Allow the top third to dry out in between waters, reducing this further in the autumn and winter. Over-watering during its dormancy period is a common issue among owners, so always bear this in mind when the colder months arrive.
- Fertilise using a 'Houseplant' labelled feed every four waters in the spring and summer, reducing this to every six in the colder months.
- Keep an eye out for Spider Mites that'll form webs on the under-leaves of the plant.
- Especially with those kept in a dark location, wash or dust the foliage monthly to increase the light-capturing efficiency.
- Repot every two years, using 'Houseplant' soil or a general-purpose compost with some perlite. Introduce some grit for larger specimens to strengthen their root system.
Location & Light - 🔸🔸🔸
Although bright, indirect light is best, throw in some morning or evening sun if possible to help deter over-watering. Positions that are too dark will present many issues, ranging from lopsided growth, soil mould and root rot. For those who are worried about its location being too dark, if a newspaper can be read while having your back towards the window, you're good to go! Provide over-head lighting for balanced, vertical growth which can be achieved in a semi-heated conservatory.
Water - 🔸🔸
Allow the soil's top third to dry out in between waters, reducing this further in the autumn and winter. Remember, it's always better to under-water an Alocasia macrorrhizos than over-do it when situated in shady or cooler areas. When irritating, use lukewarm water as their roots systems are quite sensitive to temperature change. Although rainwater is best, if you decide to use tap water, allow it to stand for 24hrs to eliminate both chloride and fluoride. Large quantities of the chemicals will gradually build up in the soil over the course of several months, damaging the overall plant health and its soil quality. Under-watering symptoms include stunted growth, brown leaf edges and yellowing leaves. These issues are commonly caused by being pot bound, too much sunlight or heat, or pure forgetfulness. Over-watering symptoms include a collapsed base, yellowing older leaves, mouldy soil and plant death. If you feel that root rot is to blame, remove the affected leaves, roots, and soil, and replace with a fresh batch of houseplant compost. Click on this link for more info about addressing this disease.
Humidity - 🔸🔸
Create a humidity tray while the heaters are operating to provide a moist and stable environment for your plant. If the surrounding saturation is too low or the heat too high, its leaf-tips may start to brown over and curl, especially in direct sunlight. Hose the foliage down from time to time to hydrate the leaves and keep the dust levels down.
Fertilisation - 🔸🔸
Feed every four waters during the growing period and every six in the autumn and winter, using a 'Houseplant' labelled fertiliser. Never apply a 'Ready to Use’ product into the soil without a pre-water first, as it may burn the roots and lead to yellowed leaves.
 A beautiful A. macrorrhizos in the Adelaide Botanic Gardens
Common Issues with Alocasia Macrorrhizos
An array of simultaneous cultivation issues will increase the chance of developing yellowed leaf-sections with browned halos. Firstly, the location may be too dark, with its compost staying too saturated in-between waters; if mould is growing across the soil, this is usually a bad sign. Further, you're potentially using too cold water or tap water that hasn't been allowed to sit for 24hrs. The final culprit might be lack of fertilisation, with regular feeds being paramount for long-lasting, healthy leaves. If the specimen hasn't been nourished in over two months, it'll begin to show signs of nutrient deficiencies seen in this article.
If this common problem has occurred with your specimen, remove the affected leaves (not areas) and improve the growing conditions considerably. Fertilise regularly with lukewarm water and be sure to allow the top third to dry out in between hydrations.
Regular irrigations are key. Periods of droughts will quickly slip the plant into its dormancy period, causing stunted growth and a bewildered plant owner. If it hasn't repotted in a while, there may be too many roots and not enough soil to retain moisture, thus leaving the soil to dry out quicker. Click on this link to learn more about a transplant.
Slowed/paused growth or stems that are elongated/spindly could be a sign of too little light. Remember, this plant must be kept close to a window (or outdoors in the warmer months) so that it can grow upright and more compact in the future. Never place an Alocasia in a corner of the room unless there is a window or growlight nearby.
Pests could arise at any time, with infestations starting from the original nursery or via contamination in your home. Spider Mites and Mealybugs tend to be the usual inhabitants, with the first being minute and almost transparent, roaming the leaves in search of chlorophyll and a site to hide its eggs. The latter, however, will stand out much more, with white cottony webs developing across the foliage and stems. Thoroughly check the plant's cubbyholes before giving it the all-clear, or click on the appropriate links to learn more about eradicating these issues.
 Typical damage of Spider Mites.
Older leaves that rapidly become yellow are a clear sign of over-watering, usually caused by too little light, with other symptoms include mouldy or heavy soil, stunted growth and a rotten base. Although Alocasia macrorrhizos can be placed in darker locations, the frequency of irrigations must be reduced to counteract the chance of root rot. People don't realise that a plant's root system needs access to oxygen too; when soil is watered, the air will travel upwards and out of the potting mix. A lack of accessible oxygen will cause them to subsequently breakdown over the oncoming days. Click on this link to learn more about root rot and how to address it.
Snapped stems are common with Alocasia macrorrhizos (Elephant Ear Plants) that are grown too low light. Increase the light levels by placing it as close to a sunless windowsill as possible. If it's too big for a windowsill, try placing it directly in front to help the plant grow stronger, more upright stems. You can either try strengthening the damaged stem by using a chopstick as support or simply prune it entirely off.
Curled leaves and brown leaf-edges are the result of too little water and over-exposure to the sun. Alocasia macrorrhizos are best located in bright, indirect settings, and those that haven't acclimatised to the harsh rays will show signs of sun-scorch and environmental shock. A splash of winter sunlight is acceptable as long as the soil moisture is regularly observed, with complete avoidance once summer comes along.
Due to the species' sensitivity to chemicals, Leaf Shine shouldn't be used to improve the appearance of the foliage, and instead should be cleaned via a rinse of lukewarm water. Failure to do so may cause yellowed, mottled spots that cannot be undone.
 Alocasia can be riddled with pests due to its thin, broad leaves. In the image above, there's a third point of interest to look at - mineral/calcium deposits. This is a natural part of an Alocasia leaf's lifecycle, so don't worry about removing them!
Yellowing sections along its leaves could be the product of many issues, ranging from spider mite to chemical burns. Think about its recent cultivation of how frequently you rehydrate its soil, along with a quick scan over the foliage's undersides. The use of 'Leaf Shine' or other chemical-based products may also have a detrimental effect on its health, as Alocasia macrorrhizos are particularly sensitive to inorganic substances. When removing the affected leaf or leaves, be sure to avoid puncturing the yellowed/browned tissue as it may lead to further decline. Prune the entire leaf off via the petiole and investigate the rest of the plant for a potential spread of the problem. If you still need further advice regarding this matter, be sure to book a session with THE HOUSEPLANT DOCTOR™ via this link!
Clean the leaves regularly. Although this isn't too much of an issue, a build-up of dust particles can clog up the plant's pores, causing lowered light capturing-efficiency. Rinse the topsides of the leaves down once a month to keep levels down and improve growing conditions.
Too low humidity can cause browning tips with yellow halos on juvenile leaves. Although this won't kill your specimen, you may want to increase the local moisture to prevent the new growth from adopting these symptoms. Mist or rinse the foliage from time to time and create a humidity tray while the heaters are active to create a stable environment. The browning of leaf-tips on older leaves is wholly natural and is the product of extensive photosynthesis during its life.
Mould developing on the soil means two things - too little light and over-watering. Despite the harmlessness of the mould, it'll prove unsightly to most gardeners and is therefore removed once known. To remove, replace the top two inches of the soil for a fresh batch of 'Houseplant' compost. Either increase the amount of light received (no direct sunlight for the first few weeks to prevent environmental shock) or decrease the frequency of waters slightly. If the mould is accompanied by yellowing lower leaves, you may also have a case of root rot.
 Tip: Alocasia prefer to grow with overhead light (or within 1.5m of a window) as they naturally prefer to face their leaves upright. Never place this plant in a dark corner of your room as this will result in slowed growth & spindly new leaves.
Origins
Alocasia macrorrhizos was initially described as 'Arum macrorhizum' by Carl Linnaeus in 1753, before being switched by George Don in 1839 into the newly penned genus of 'Alocasia'. The species' epithet refers to large rhizomatous growths that'll emerge within the mother's rhizosphere.
If the corm (modified basal organ) is sufficiently cooked, it'll provide high levels of starch, used as energy in the body. The corms are used in 'Binagol' cuisine, whereby it is mashed and added to rice, nuts and coconut milk to make a well-known Filipino delicacy.
 The Distribution of Alocasia macrorrhizos
Temperature
10° - 30°C (50° - 86°F)
H1b (Hardiness Zone 12) - Can be grown outdoors during the summer in a sheltered location with temperatures above 12℃ (54℉), but is fine to remain indoors, too. If you decide to bring this plant outdoors, don't allow it to endure any direct sunlight as it may result in sun-scorch and dehydration. Regularly keep an eye out for pests, especially when re-introducing it back indoors.
Spread
Up to 3m in height and 1.5m in width, with the ultimate height being reached in around 5 - 10 years. Alocasia macrorrhizos are best grown with overhead lighting to compliment their growth structure; locations with lateral light sources (e.g. the corner of a room) will cause stunted, lopsided growth.
Pruning & Maintenance
Remove yellow or dying leaves, and plant debris to encourage better-growing conditions. While pruning, always use clean utensils or shears to reduce the chance of bacterial and fungal diseases. Never cut through yellowed tissue as this may cause further damage in the likes of diseases or bacterial infections. Remember to make clean incisions as too-damaged wounds may shock the plant, causing weakened growth and a decline in health.
Propagation
Via Seed, Corm Propagation or Stem Cuttings (the latter for mature specimens +4 years old).
Seeds (Difficult) - This form of propagation isn't common due to the difficulties growers might face trying to source seeds. For those who have the seeds ready, submerge the Alocasia seeds around 1cm deep in an 'Alocasia' labelled potting mix in a seed tray. Maintain reliable soil moisture and provide a bright, sunless windowsill while they germinate. You can separate the seedlings into individual 5cm pots once they produce their third leaf.
Corms (Easy to Moderate) - Most Alocasia are have corms, which are small globular-shaped brown bulbs that'll grow along the root system. A mature Alocasia can produce over ten corms at any time and can be harvested when you next repot it. Here's how to do it;
- The best time to repot is during the spring or early summer. Make sure that a few hours before repotting, you water the plant's soil to reduce the risk of 'transplant shock' when the roots are disturbed in dry soil.
- Take the mother plant out of its pot and gently work your fingers through the rootball (& soil) until you feel the small brown ball-shaped 1-2cm corms. Have a look at the image below for what they look like!
- With a clean pair of scissors or a knife, cut off the corm via the 'rhizome' (root) that attaches it to the mother's root system. Make sure around 0.5cm+ of the 'rhizome' is still attached to the corm, so don't prune too close to the bulb itself. Have a look at the images below.
- Once separated, place the corm sideways in a small glass (like a shot glass) or plastic cup. Pour around 20ml of water, so it creates a small puddle of water which should submerge around 10% of the corm. Do not fully submerge the corm as this could result in it rotting. Place the corm (in its container) in a warm, bright windowsill until roots develop which will take between 2-8 weeks. Replace the water twice a week to remove any bacteria. See the image below!
- One the roots are around 3cm (1in) in length (pictured below), plant it in fresh 'Alocasia' labelled potting mix in a 5-7cm plastic pot.
- With the mother plant, repot her back into its orignal pot with a fresh batch of 'Alocasia' labelled potting mix. If you're growing the mother Alocasia in hydroponics, repot this back into the same pot with fresh potting medium.
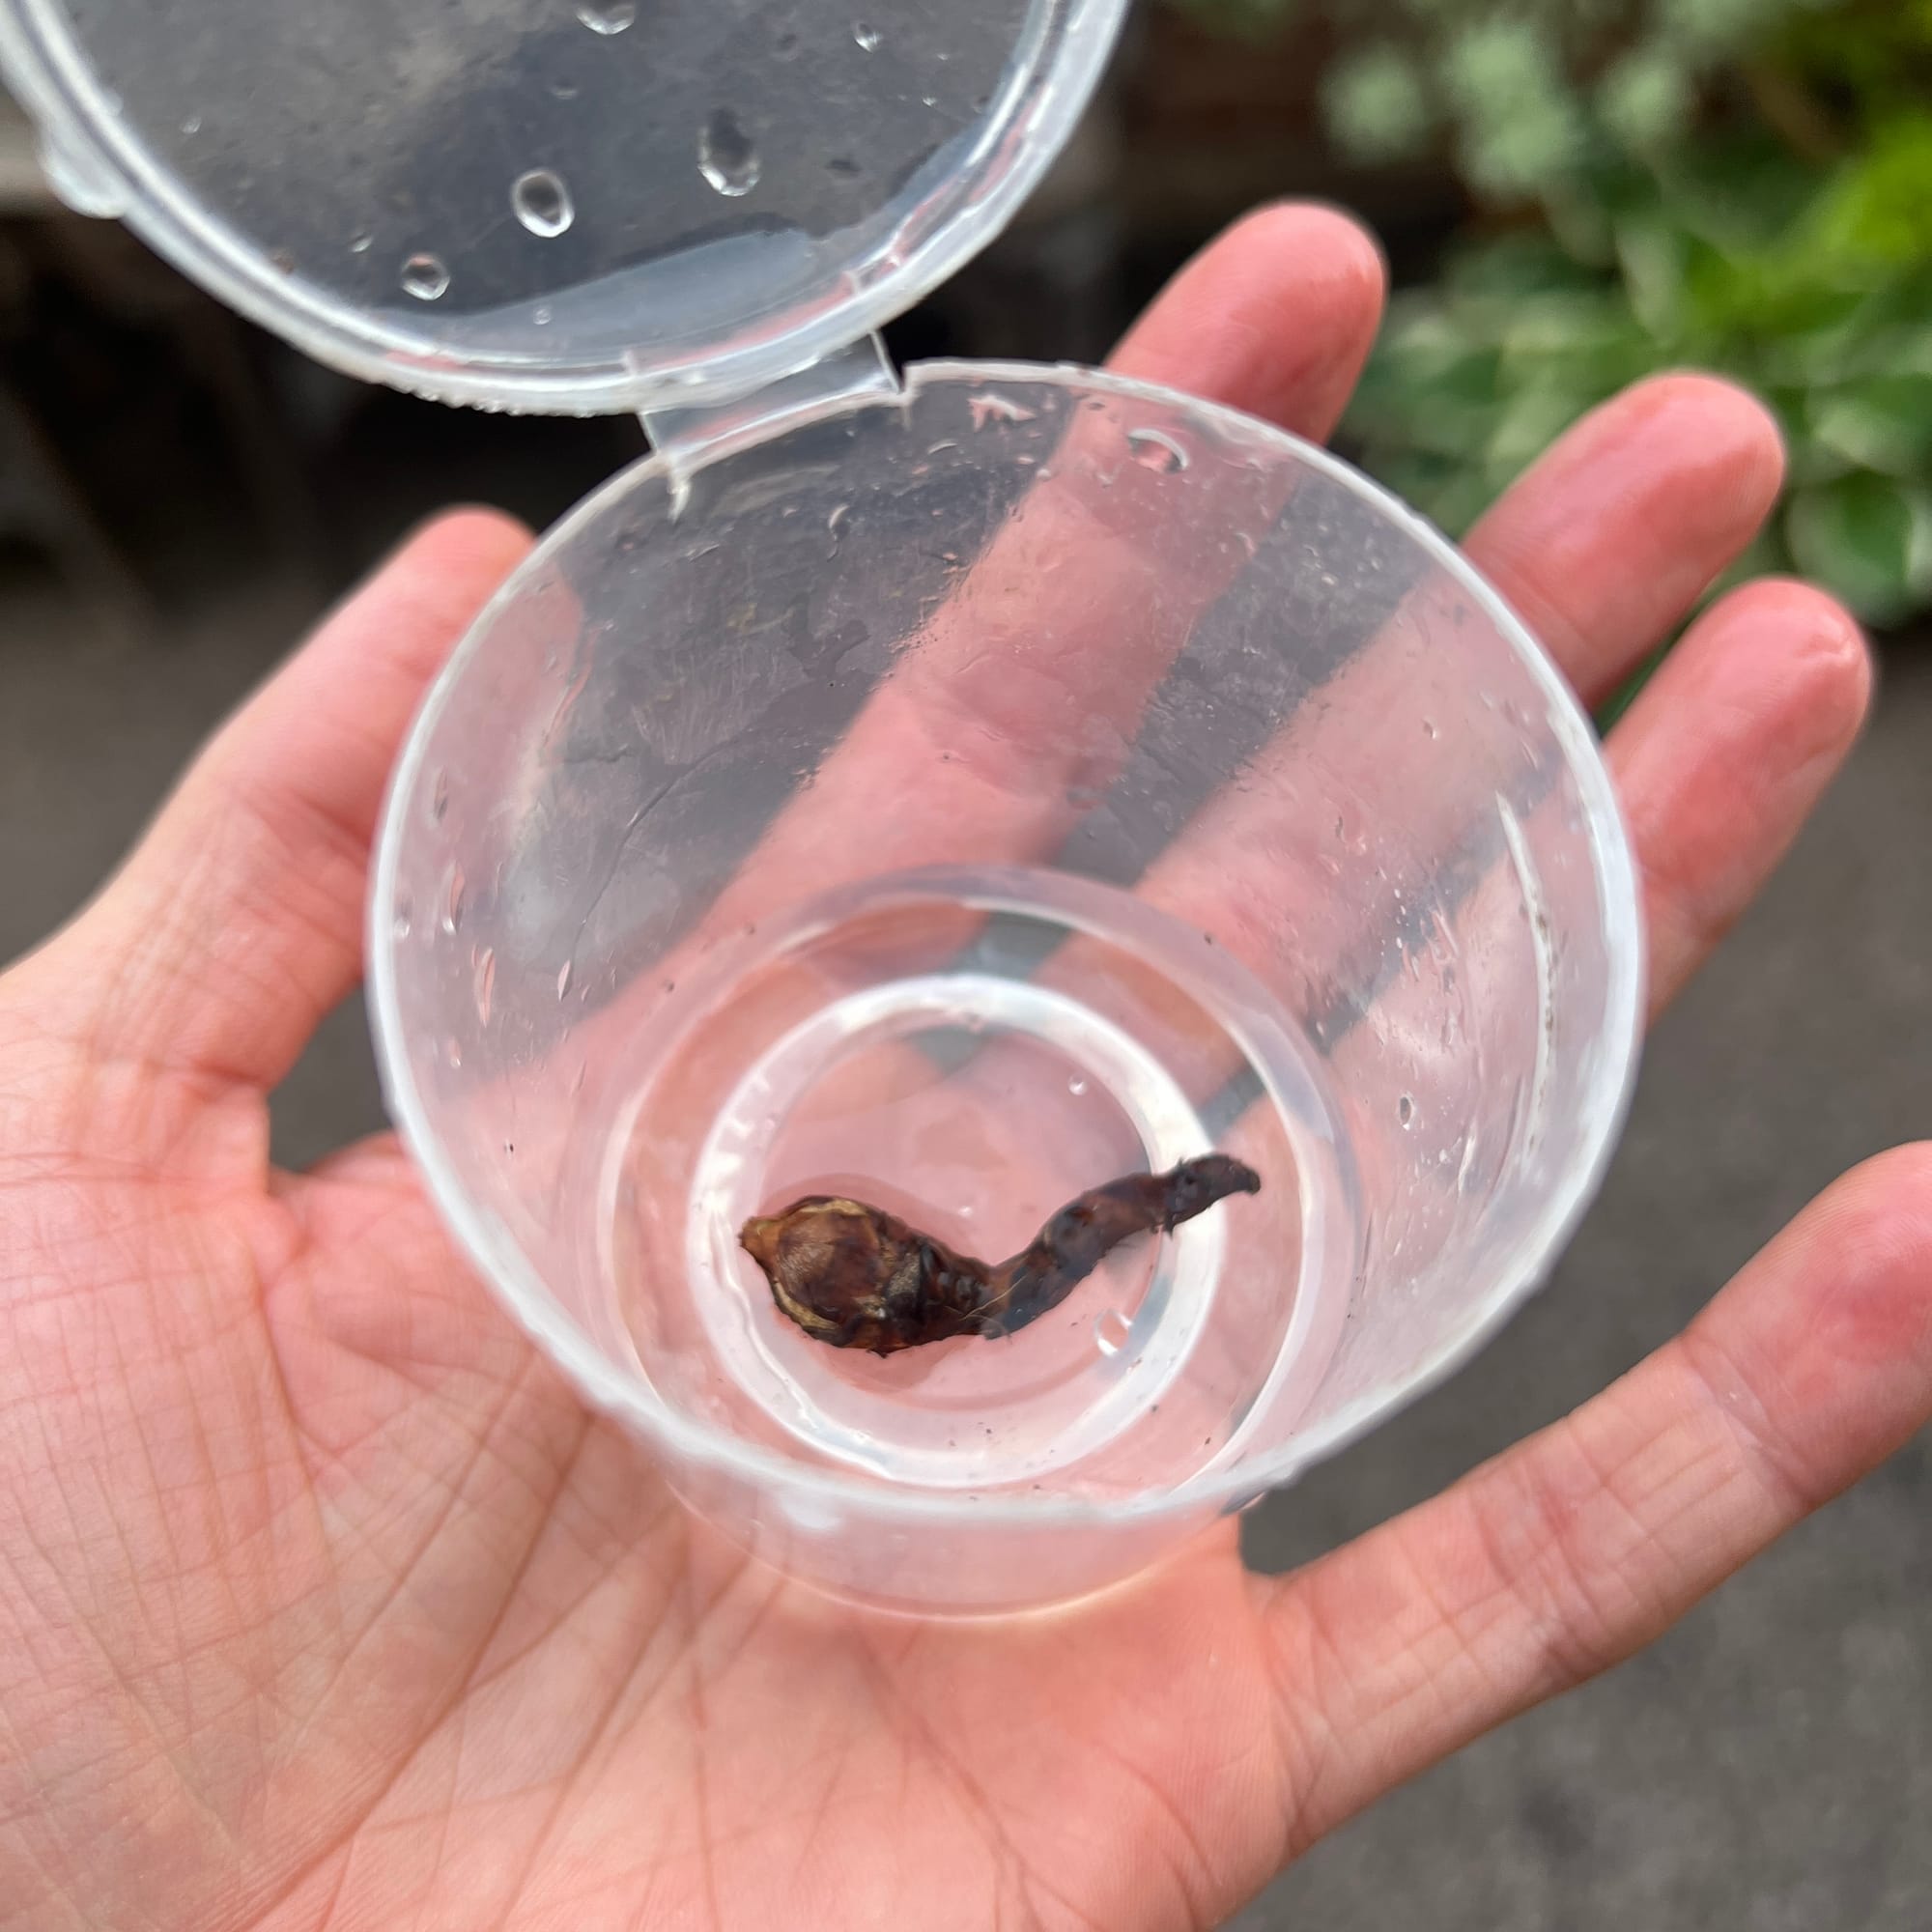
This is how you 'puddle' an Alocasia corm by submerging it in water to root. Never submerge the entire corm in water as this increases the likelihood of it rotting.
 Extra Tip: A healthy corm should be solid when pinched. Discard any bulbs that are softened or rotten as the bacteria will kill the whole corm.
 Here's a corm that THE HOUSEPLANT DOCTOR™ has grown hydroponically and is now ready to be planted in either soil or moss. (He recommends Sphagnum Moss as a good growing medium).
Stem Cuttings (Moderate) - For older Alocasia that are over four years old, they'll produce offshoots along its wooded stem. These little branches can be propagated when pruned off and grown as their own individual plant. Here's what to do;
- Only choose offshoots along the stem that have at least two leaves. Those with less than two leaves (or even none) may not root.
- With a clean knife, cut the offshoot along the stem so the cutting has as much stem as possible.
- Once separated, choose between placing the cutting directly in water to root, or by dipping the wound in rooting gel before planting straight into soil. If you have chosen to root directly in water, make sure to replace the water once every week and place in a 12cm pot with 'Houseplant' labelled soil once the roots surpass 5cm in length. (While rooting, don't submerge any of its foliage in water - only its stem!)
For those who are directly planting the rootless cuttings/offsets in soil, dip the wound (where it has been cut off) in rooting gel before planting it in a 12cm pot with 'Houseplant' labelled potting mix. Once potted-up, water the soil until it has become moist and wrap the cutting (its pot AND foliage) in a transparent plastic bag with a few holes for aeration. The bag will lock in humidity around the cutting and will reduce the risk of dehydration (common with tropical cuttings). Keep the soil moist by checking it twice a week. Once the plant has produced two more leaves while in the bag, remove the bag and treat like a mature specimen. - For either method of propagation, always ensure your cutting is kept in a bright, indirect location with no risk of sunlight. Warm temperatures above 20℃ (68℉) throughout this period is vital for success, too!
Flowers
Much like a Peace Lily's flower body, their flowers consist of a white or green spathe (the spoon-like shell) with the spadix being the site of pollination. Blooms can last up to five days and are usually visible during late spring or early summer around 30cm+ from the soil line.
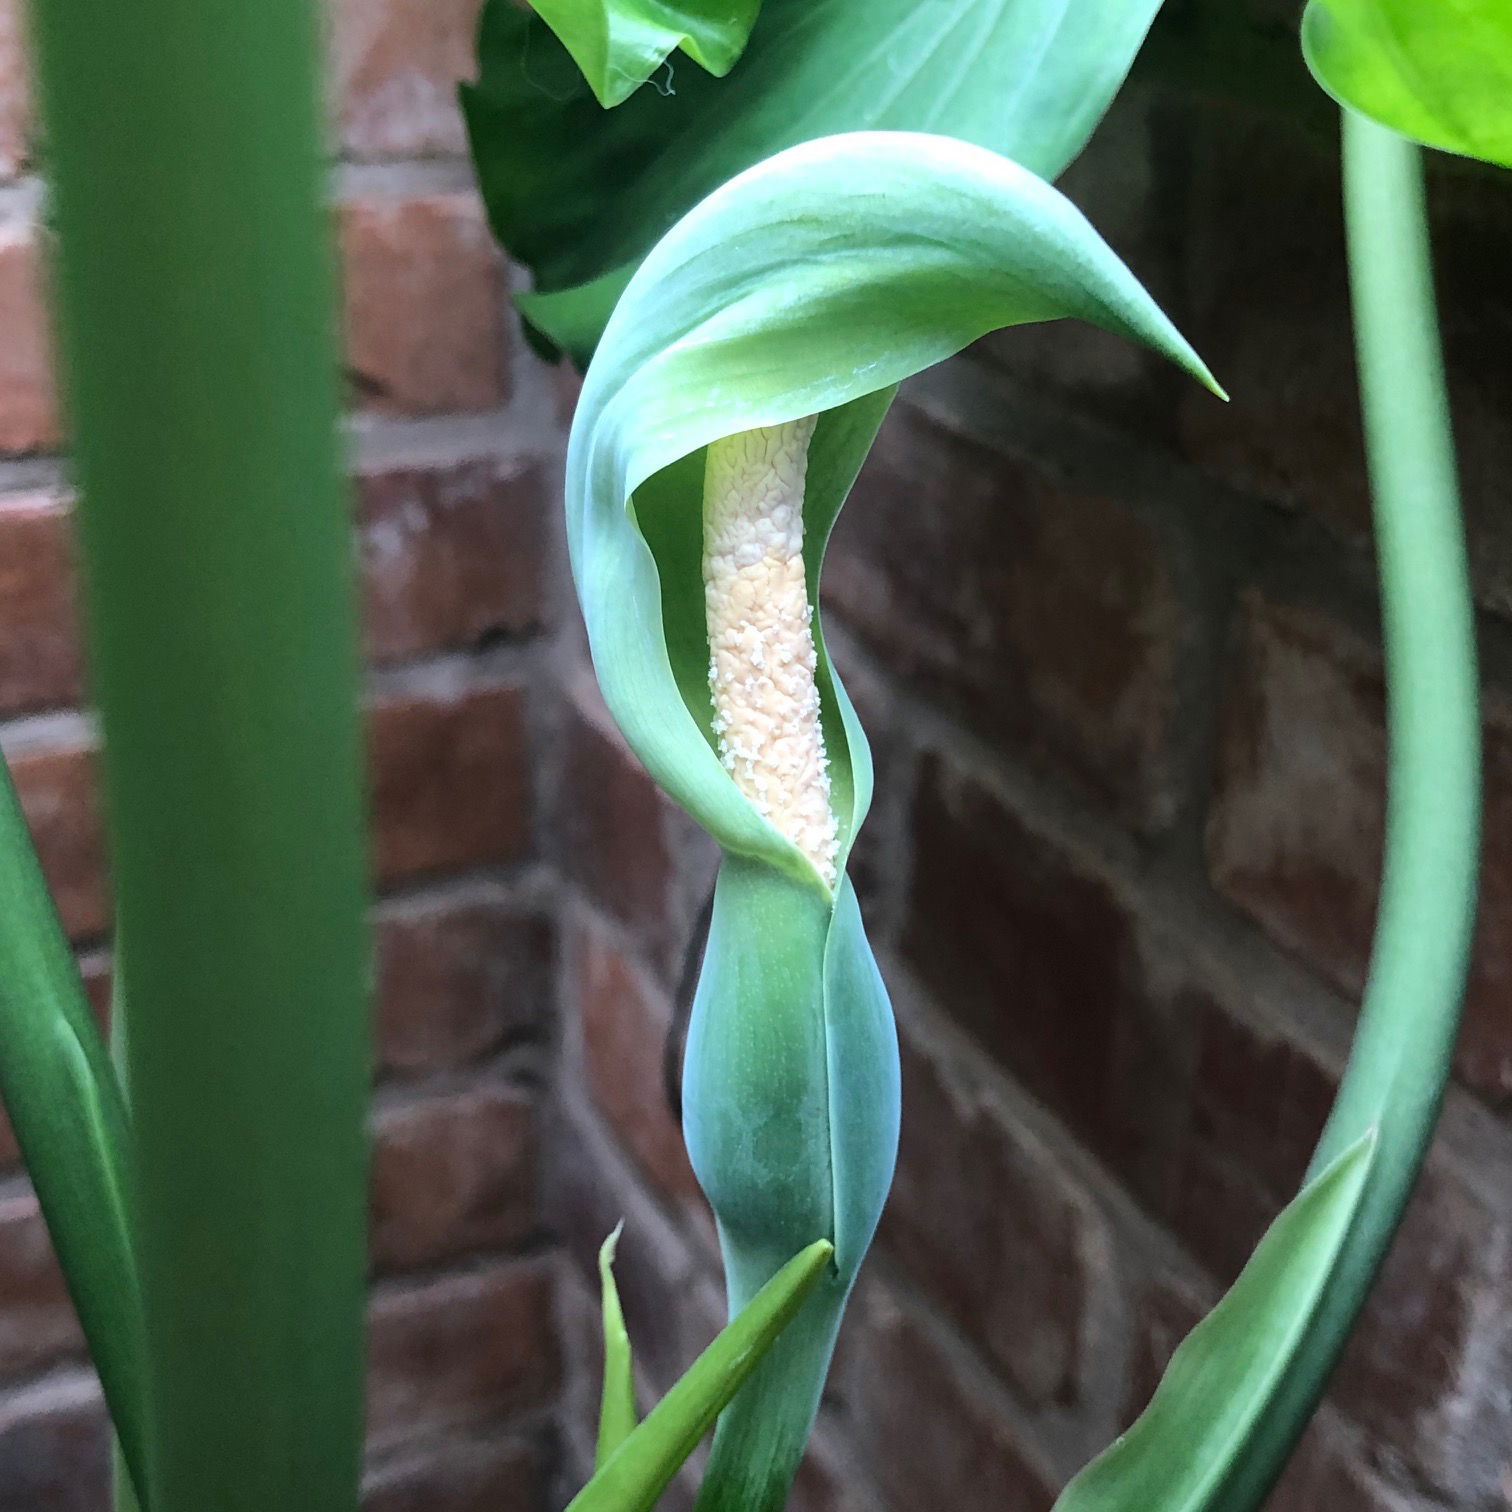 An example of its flower.
Repotting
Repot every two years in the spring using a 'Houseplant' labelled compost and the next sized pot with adequate drainage. Hydrate the plant 24hrs before tinkering with the roots to prevent the risk of transplant shock. For those that are situated in a darker location, add a thin layer of small grit in the compost's lower portion to improve drainage and downplay over-watering. Click here for a detailed step-by-step guide on transplantation, or via this link to learn about repotting with root rot.
Book a 1-to-1 video call with THE HOUSEPLANT DOCTOR™ if you'd like a personal guide to repotting your houseplant. This will include recommending the right branded-compost and pot size, followed by a live video call whilst you transplant the specimen for step-by-step guidance and answer any further questions!
Pests & Diseases
Keep an eye out for mealybugs, spider mites, scale, thrips & fungus gnats that'll locate themselves in the cubbyholes and undersides of the leaves. Common diseases associated with all Alocasia are root rot, leaf-spot disease, botrytis, rust, powdery mildew & southern blight - click here to learn more about these issues.
Toxicity
This plant is classified as poisonous due to varying concentrations of calcium oxalate crystals found around the plant's body. If parts of the plants are eaten, vomiting, nausea and a loss of appetite could occur. Consumption of large quantities must be dealt with quickly; acquire medical assistance for further information.
Retail Locations
Some garden centres will sell this variety of Alocasia, but the most reliable locations are online.
Book a 1-to-1 Call with THE HOUSEPLANT DOCTOR™
If you need further advice with your houseplants, book an advice call with ukhouseplants' friendly and expert writer today! This can be done via a video or audio call on most apps, including Facebook, FaceTime & Skype. A ten-minute call costs £5.99 (US$7), or £15.99 for thirty minutes. You can ask multiple questions, including queries on plants, pests, terrariums, repotting advice and anything in between. Please consider supporting this service to keep ukhouseplants thriving!
Comments