Colocasia esculenta
Contents
- Top Tips
- Location, Water, Humidity & Fertilisation
- Dormancy Care
- Common Issues
- Origins, Temperature, Propagation, Repotting & Toxicity.
Need the answer to a specific plant query? Book a 1-to-1 video call with THE HOUSEPLANT DOCTOR™, the website's friendly author, to overcome and address your niggling problem! Available on iMessage, WhatsApp, Facebook Messenger & more.
Top Tips & Info
- Care Difficulty - Easy
- Provide a bright, indirect location with minimal sunlight. Sites that are too bright will cause bleached leaves and sun-scorch, whereas shady areas will result in soil mould and root rot. It's best to locate Colocasia with overhead lighting, as their growth structure may topple over when situated too far from a light source.
- Allow the top third to dry out in between waters, reducing this further in the autumn and winter; over-watering is the most common issue with Colocasia, so always be cautious with your regime.
- Fertilise using a 'Houseplant' labelled feed every four waters in the spring and summer, reducing this to every six in the colder months.
- Keep an eye out for Spider Mites that'll form webs on the under-leaves of the plant, Aphids that'll attack the juvenile growth.
- Especially with those kept in a dark location, gently rinse the foliage monthly to increase the light-capturing efficiency.
- Repot every three years using a 'Houseplant' potting mix, or a general-purpose compost with some perlite. Introduce some grit for larger specimens to strengthen their root system.
Location & Light - 🔸🔸
Bright overhead lighting is best for wholesome (360º) growth, as locations too far from the window will cause dramatic phototropism. Although the excessive sunlight should be avoided at all costs, an hour or two of winter sun will provide vital nourishment to get it through the dormancy period.
Colocasia can be trained to tolerate harsher levels of sunlight (with exceptions) than most houseplants, by gently increasing the number of hours in the sun over the oncoming month. This process is best done from autumn to late winter, whilst the rays are at their weakest.
Each week, increase the amount of light by an hour, starting with just an hour of morning sunlight to gain its momentum. The plant will slowly decease the production of chlorophyll, which in turn will reduce the risk of bleaching and sun-scorch. Remember to keep the specimen well hydrated during this period, and always abort the experiment if it shows signs of sun-scorch. The maximum amount of sunlight for this plant is around four hours a day.
Water - 🔸🔸
A key difference between the Colocasia and its famous counterpart, Alocasia, is the tendency of needing slightly more water. Although it's highly important to not fall in the trap of over-watering (especially with those located in darker environments), periods of drought will result in the specimen falling back into its dormancy with stunted growth. Allow the top third to dry out in between waters, reducing this further in the autumn and winter. Under-watering symptoms include stunted growth, brown leaf edges and yellowing leaves. These issues are commonly caused by being pot bound, too much sunlight or heat, or pure forgetfulness. Over-watering symptoms include a collapsed base, yellowing older leaves, mouldy soil and plant death. If you feel that root rot is to blame, remove the affected leaves, roots, and soil, and replace with a fresh batch of houseplant compost. Click on this link for more info about addressing this disease.
Humidity - 🔸🔸
Create a humidity tray while the heaters are operating to provide a moist and stable environment for your plant. If the surrounding saturation is too low or the heat too high, its leaf-tips may start to brown over and curl, especially in direct sunlight. Hose the foliage down from time to time to hydrate the leaves and keep the dust levels down.
Fertilisation - 🔸🔸
Feed every four waters during the growing period and every six in the autumn and winter, using a 'Houseplant' labelled fertiliser. Never apply a 'Ready to Use’ product into the soil without a pre-water first, as it may burn the roots and lead to yellowed leaves.
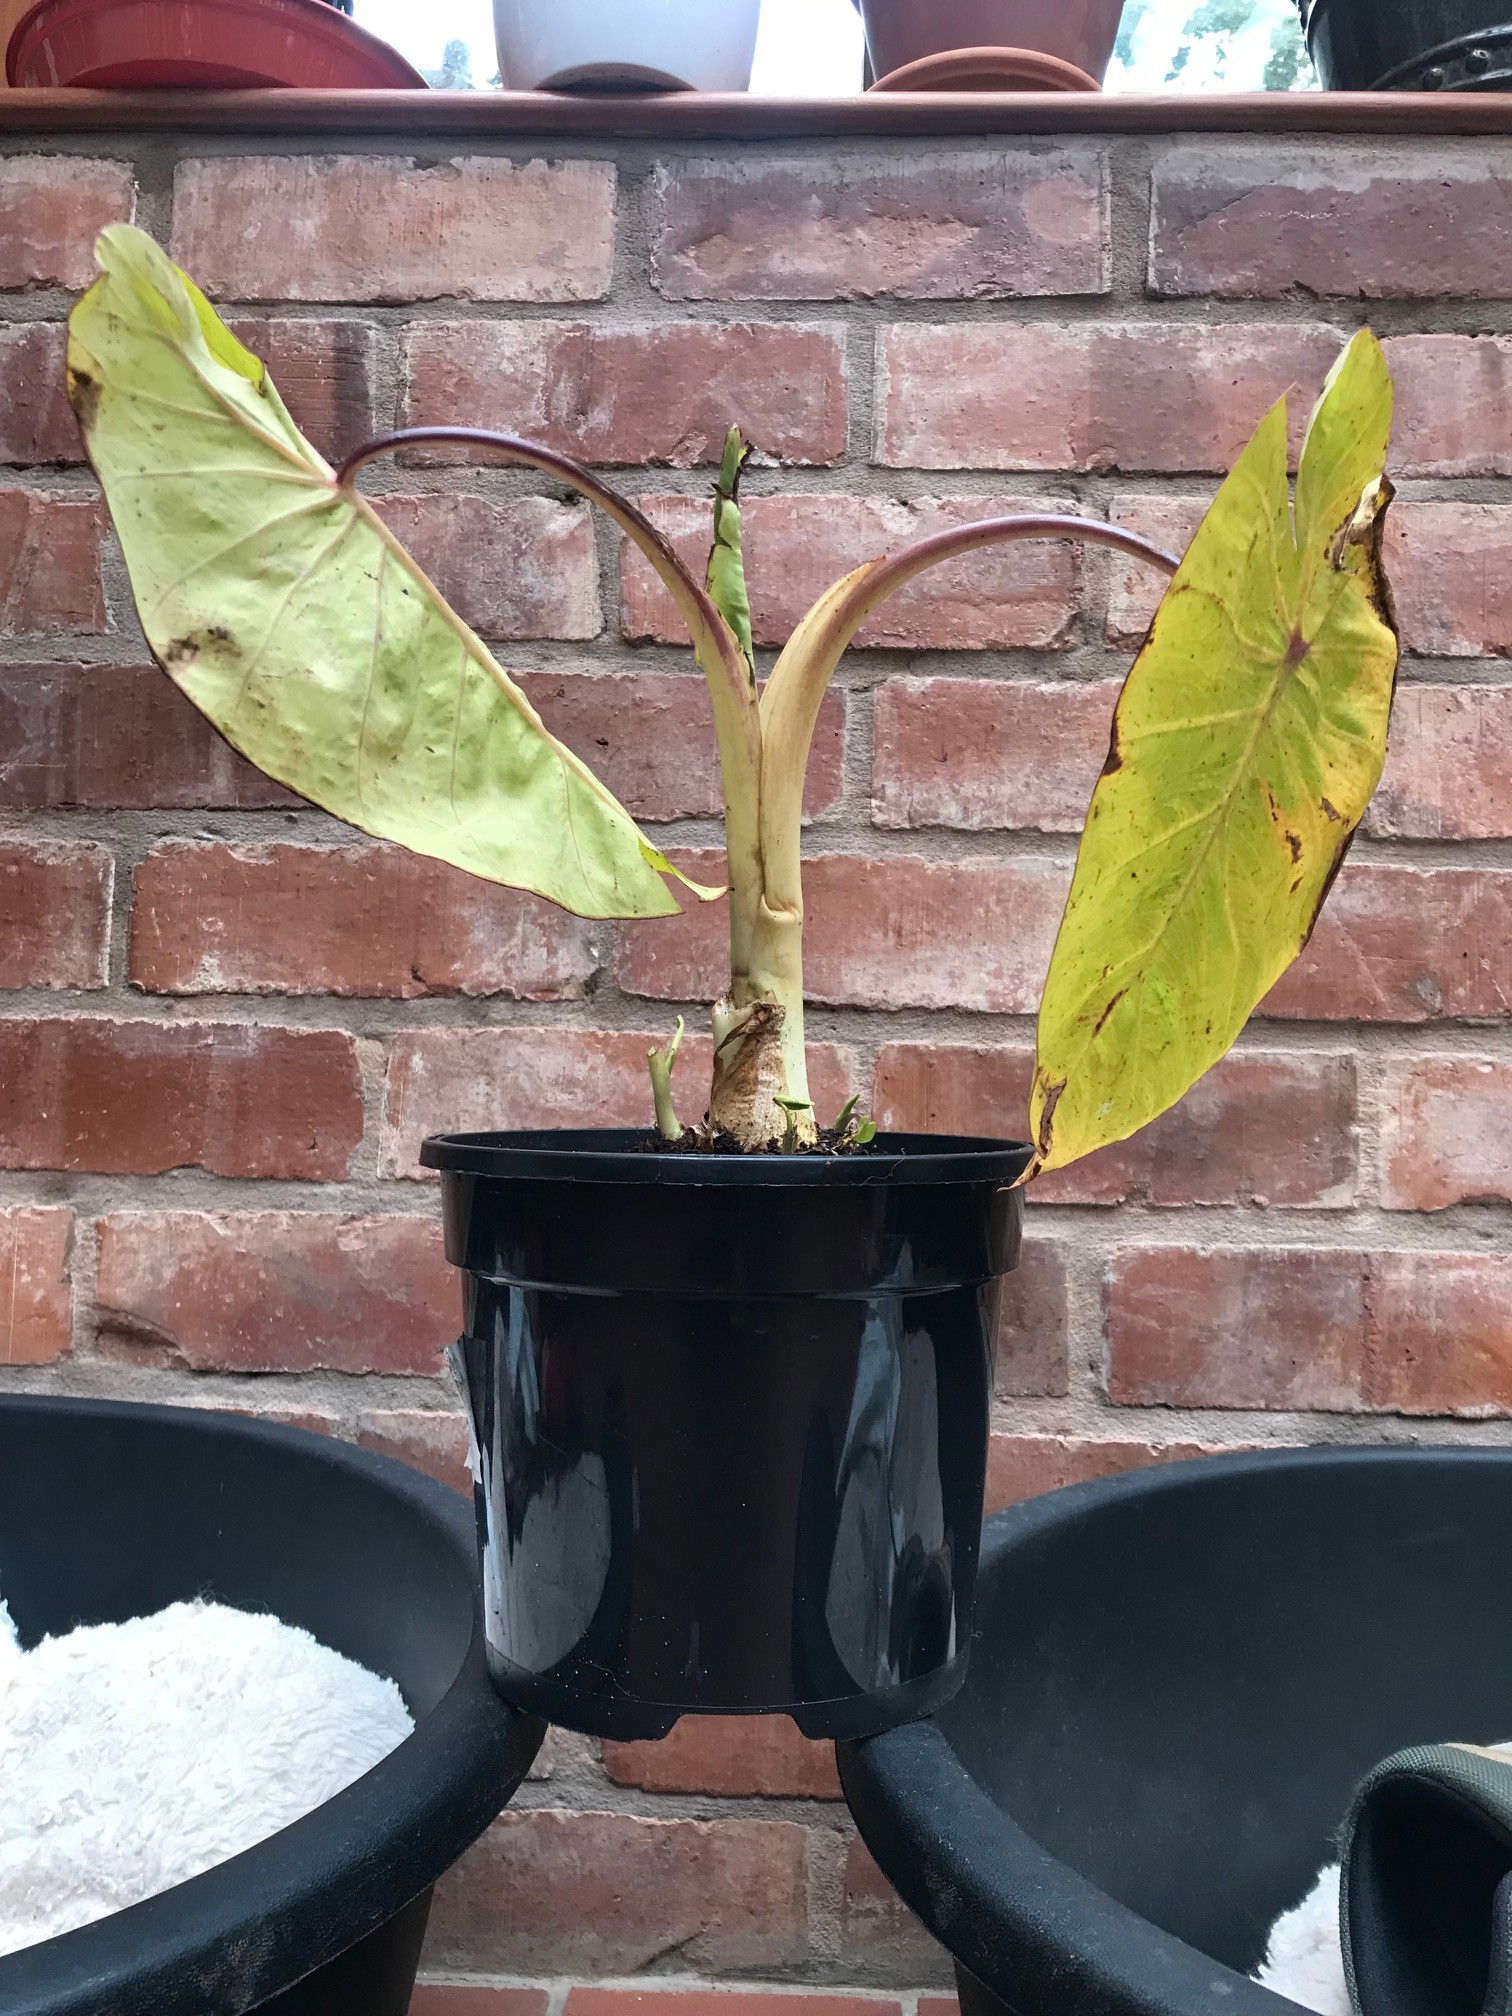 A very poorly Colocasia esculenta 'Lemonade'. Scroll down to see its progress just three months later.
Dormancy Care for Colocasias
Step 1. At any point of the year, your Colocasia may begin to wilt, curl, or suddenly begin to brown over. This is a normal phenomenon and is purely down to the fact that a Colocasia is a 'perennial bulb'. Once the plant is beginning to look past its best, remove it from the pot and remove the soil from the roots. Then, prune off the roots to leave you with just its bulb (which will look like a hairy coconuts but slightly squishy). THE HOUSEPLANT DOCTOR™ recommends to keep this loose bulb on old newspaper or a breathable material in a cool, dark location. Areas like a garage, drawers or cabinets are good! Check the health of the bulb by pinching it; a hardened bulb is healthy, with a squishy one meaning it's rotting and must be discarded.
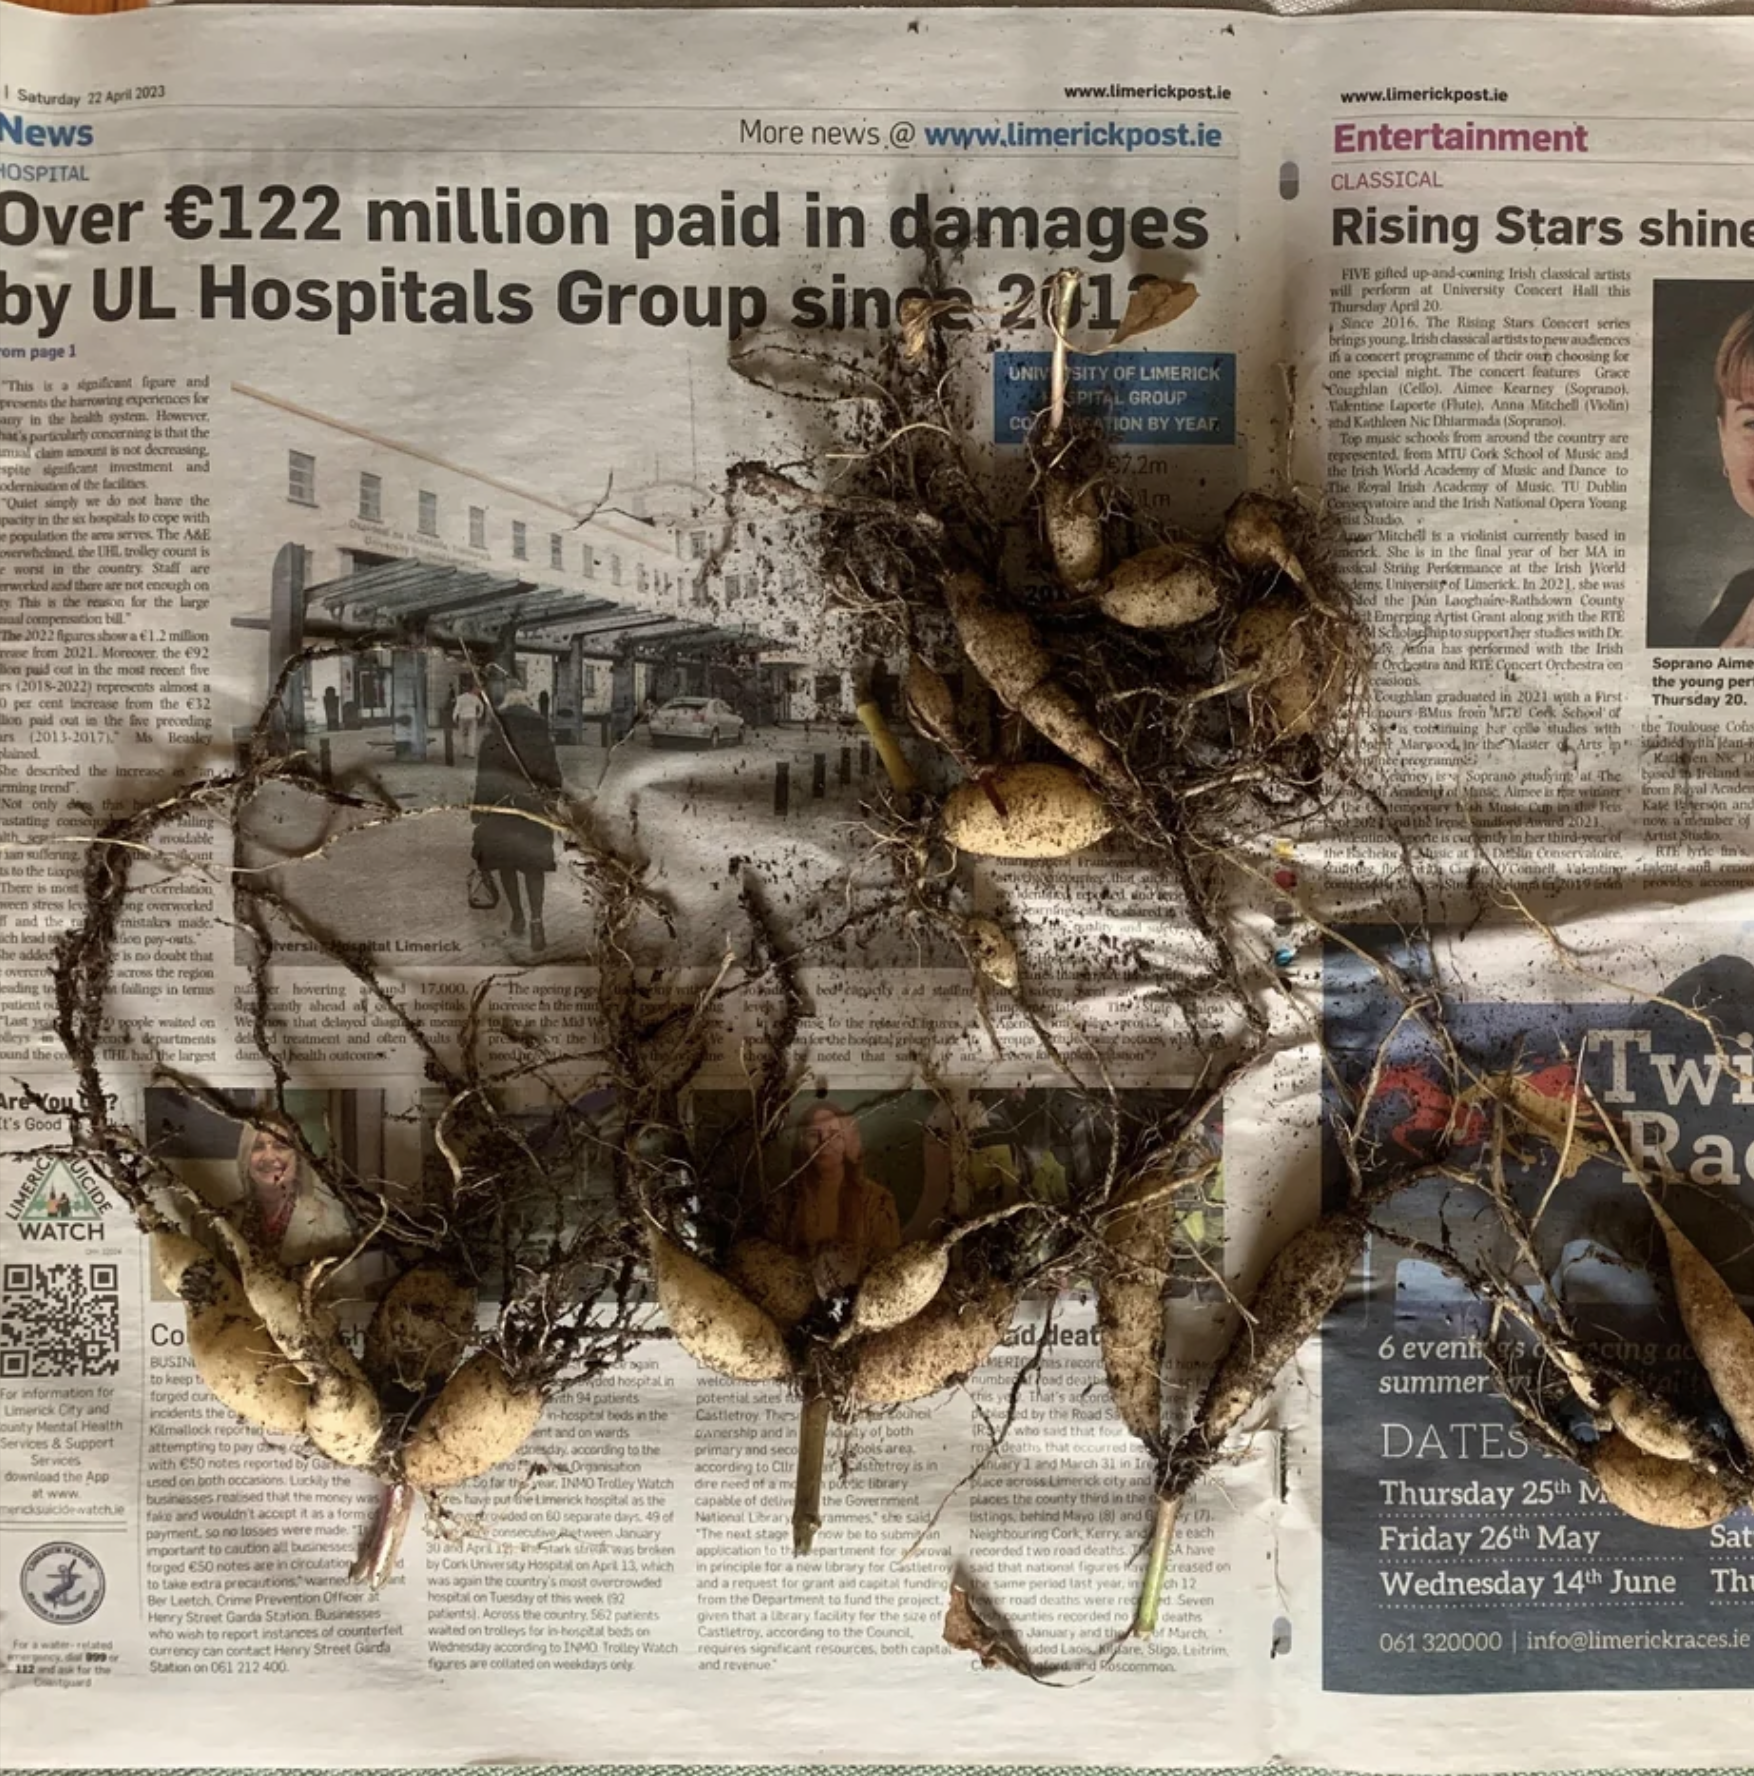
Simply place your Colocasia bulbs (known as 'tubers') on an old newspaper and wrap them up loosely with string. Not too tightly, just enough so you can still slide your finger in between the bulb and the paper! Credit: Reddit
Step 2: From mid March (or mid September for southern-hemisphere countries), pot the plant back into its original pot with a fresh batch of 'Houseplant' potting mix. Plant the bulb around 8cm (3 inches) into the soil and over it fully with soil. Keep the potting mix moist and provide a sunny, bright windowsill. You can also keep the potted bulb on an operating radiator until leaves begin to emerge, before placing it into a window. Keep the soil moist and feed every three waters using a 'Houseplant' labelled fertiliser once the first leaf begins to emerge from the soil.
And there you have it! Colocasias need a little extra work due to their dormancy needs, but as long as you give them this hard-earned rest outside of soil, they'll come back each year!
Common Issues with Colocasia
Older leaves that rapidly become yellow are a clear sign of over-watering, usually caused by too little light, with other symptoms include mouldy or heavy soil, stunted growth and a rotten base. Although Colocasia can be placed in darker locations, the frequency of irrigations must be reduced to counteract the chance of root rot. People don't realise that a plant's root system needs access to oxygen too; when soil is watered, the air will travel upwards and out of the potting mix. A lack of accessible oxygen will cause them to subsequently breakdown over the oncoming days. Click on this link to learn more about root rot and how to address it.
Small flies hovering around your plant or soil is entirely natural and may just indicate you're watering a little too often. Fungus Gnats are a common 'pest' with Colocasia varieties due to their dependency to reliable soil moisture, but won't pose any risk to the plant's health. Simply replace the top quarter of the plant's potting mix for a fresh batch of 'Houseplant' labelled compost, typical found at most garden centres.
Curled leaves and brown leaf-edges are the result of too little water and over-exposure to the sun. Colocasia are best located in bright, indirect settings, and those that haven't acclimatised to the harsh rays will show signs of sun-scorch and environmental shock. A splash of winter sunlight is acceptable as long as the soil moisture is regularly observed, with complete avoidance once summer comes along.
Due to the species' sensitivity to chemicals, Leaf Shine shouldn't be used to improve the appearance of the foliage, and instead should be cleaned via a rinse of lukewarm water. Failure to do so may cause yellowed, mottled spots that cannot be undone.
 Colocasia can be riddled with pests due to its thin, broad leaves. In the image above, there's a third point of interest to look at - mineral/calcium deposits. This is a natural part of a Colocasia leaf's lifecycle, so don't worry about removing them!
Yellowing sections along its leaves could be the product of many issues, ranging from spider mite to chemical burns. Think about its recent cultivation of how frequently you rehydrate its soil, along with a quick scan over the foliage's undersides. The use of 'Leaf Shine' or other chemical-based products may also have a detrimental effect on its health, as Colocasia are particularly sensitive to inorganic substances. When removing the affected leaf or leaves, be sure to avoid puncturing the yellowed/browned tissue as it may lead to further decline. Prune the entire leaf off via the petiole and investigate the rest of the plant for a potential spread of the problem.
Clean the leaves regularly. Although this isn't too much of an issue, a build-up of dust particles can clog up the plant's pores, causing lowered light capturing-efficiency. Rinse the topsides of the leaves down once a month to keep levels down and improve growing conditions.
Too low humidity can cause browning tips with yellow halos on juvenile leaves. Although this won't kill your specimen, you may want to increase the local moisture to prevent the new growth from adopting these symptoms. Mist or rinse the foliage from time to time and create a humidity tray while the heaters are active to create a stable environment. The browning of leaf-tips on older leaves is wholly natural and is the product of extensive photosynthesis during its life.
Mould developing on the soil means two things - too little light and over-watering. Despite the harmlessness of the mould, it'll prove unsightly to most gardeners and is therefore removed once known. To remove, replace the top two inches of the soil for a fresh batch of 'Houseplant' compost. Either increase the amount of light received (no direct sunlight for the first few weeks to prevent environmental shock) or decrease the frequency of waters slightly. If the mould is accompanied by yellowing lower leaves, you may also have a case of root rot.
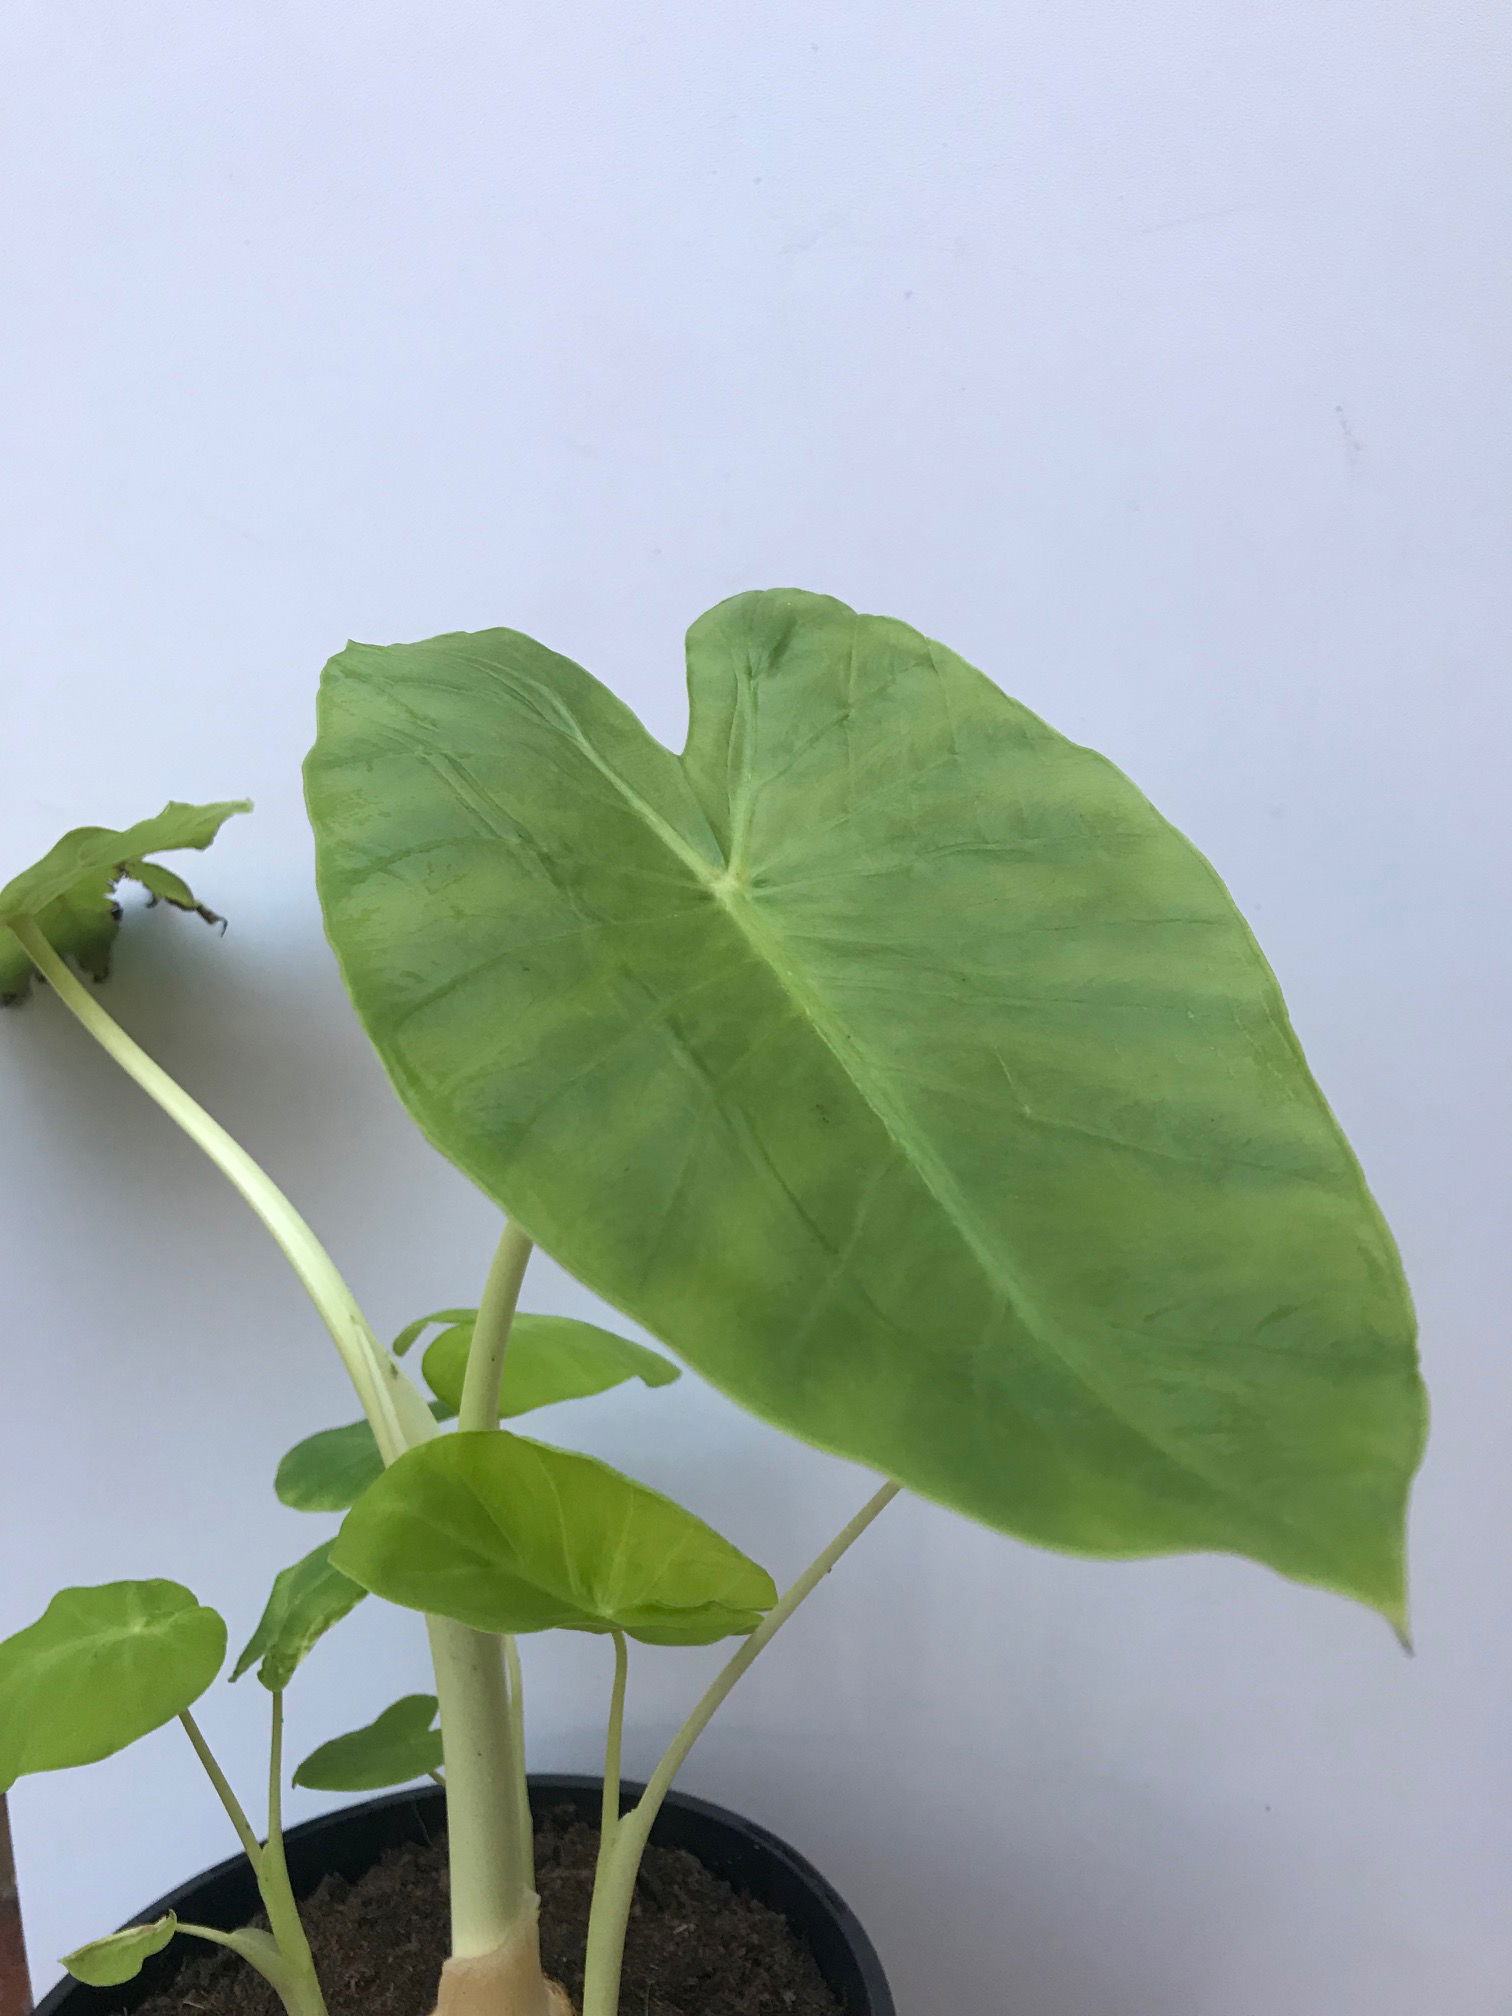 An exceptional change of health in such a short period of time. Maintain good humidity, a splash of direct sunlight and regular waters to rejuvenate any Colocasia!
Origins
Colocasia grows by nearby rivers in Southeast Asia, consisting of around 14 species. The name first came about in the first century AD by Greek botanist Dioscorides, who mentioned the word 'kolokasion', referring to the edible roots of the genus. Schott initially classified as Leucocasia in the mid 19th century, possibly referring to the white flowers that appear each year with matured specimens.
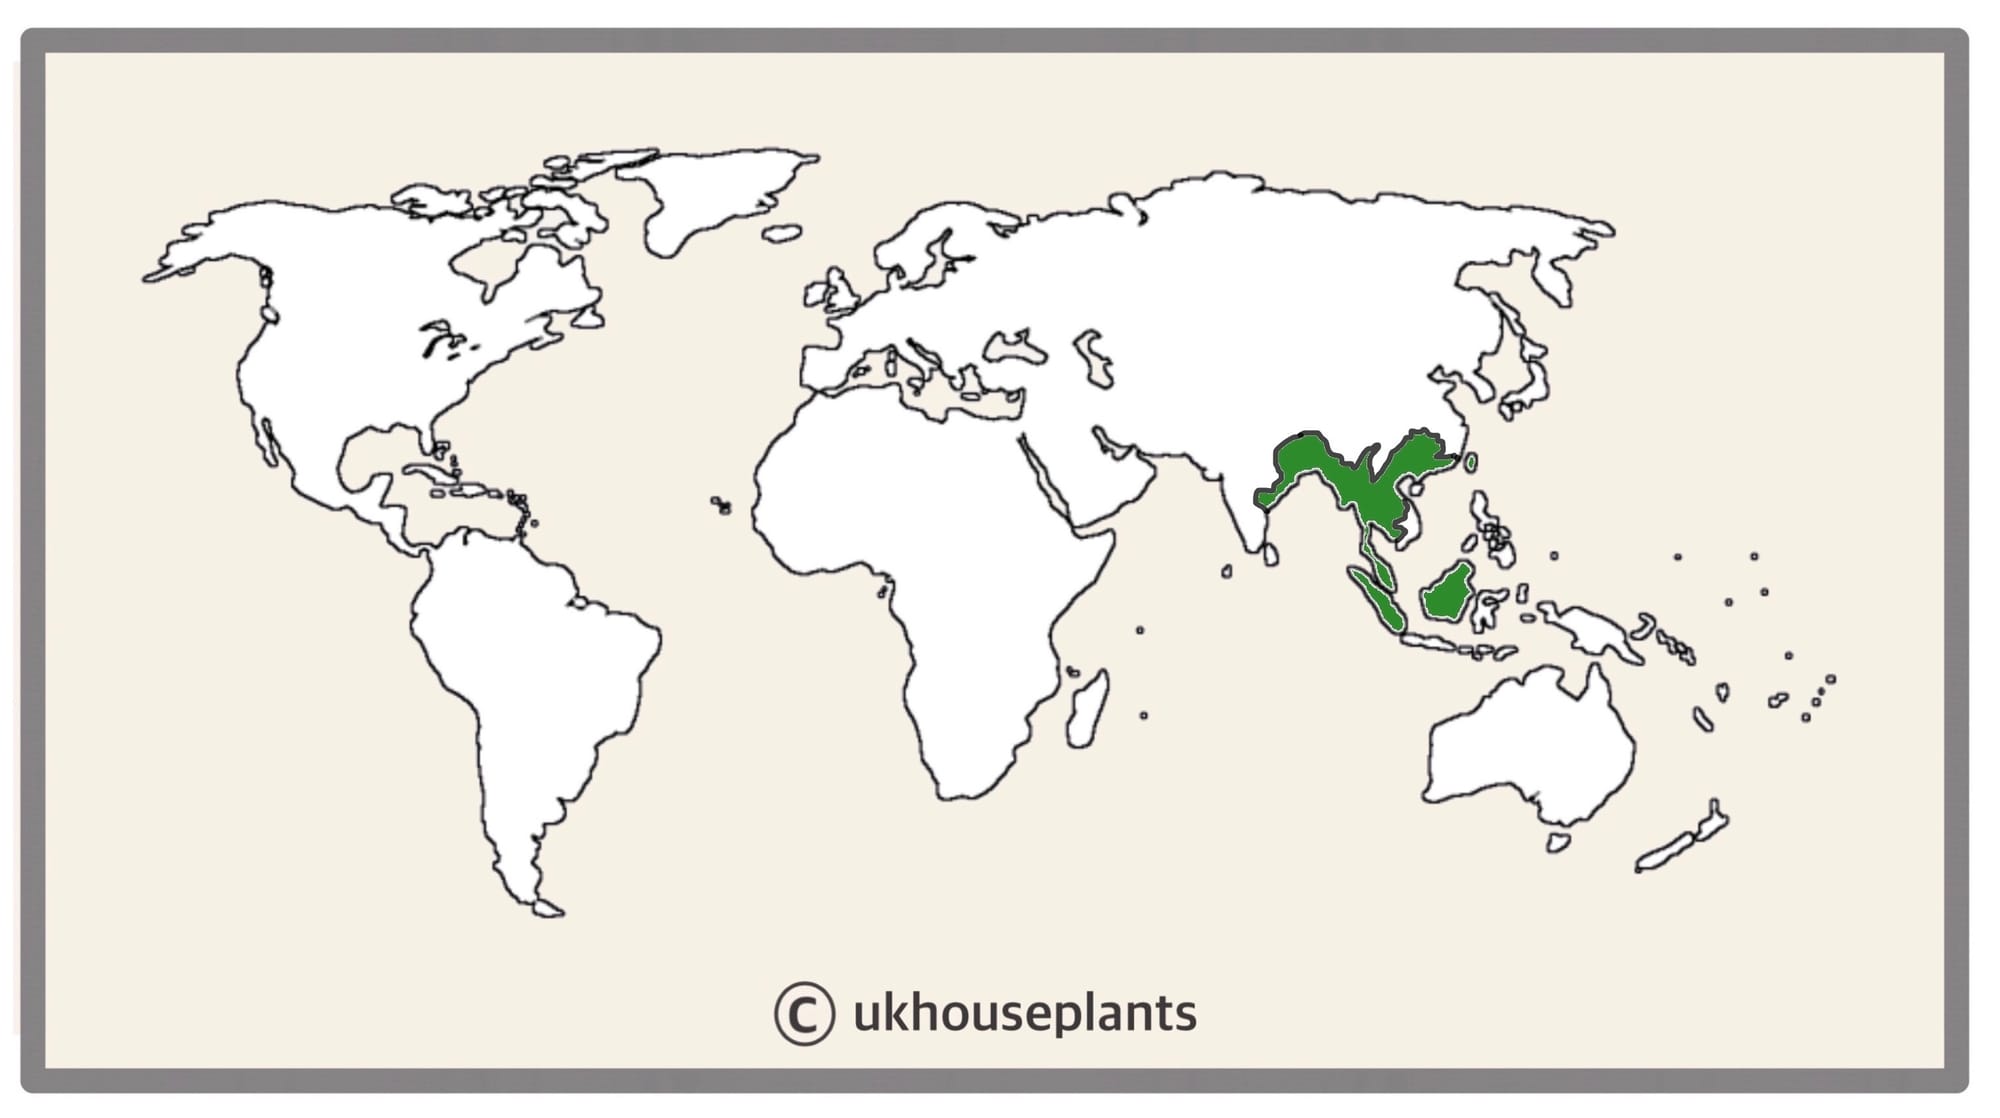
The Distribution of Colocasia
Temperature
10° - 30°C (50° - 86°F)
H1b (Hardiness Zone 12) - Can be grown outdoors during the summer in a sheltered location with temperatures above 12℃ (54℉), but is fine to remain indoors, too. If you decide to bring this plant outdoors, don't allow it to endure any direct sunlight as it may result in sun-scorch and dehydration. Regularly keep an eye out for pests, especially when re-introducing it back indoors.
Spread
Most species won't grow above 2m in height (if grown in a pot) and 1.5m in width; however, some larger specimens (Colocasia gigantea) can easily surpass this target. The ultimate height will take between 5 - 10 years to achieve, with up to six new leaves developed per season.
Pruning & Maintenance
Remove yellow or dying leaves, and plant debris to encourage better-growing conditions. While pruning, always use clean utensils or shears to reduce the chance of bacterial and fungal diseases. Never cut through yellowed tissue as this may cause further damage in the likes of diseases or bacterial infections. Remember to make clean incisions as too-damaged wounds may shock the plant, causing weakened growth and a decline in health.
Propagation
Via Seed, Corms or Basal Offset Division.
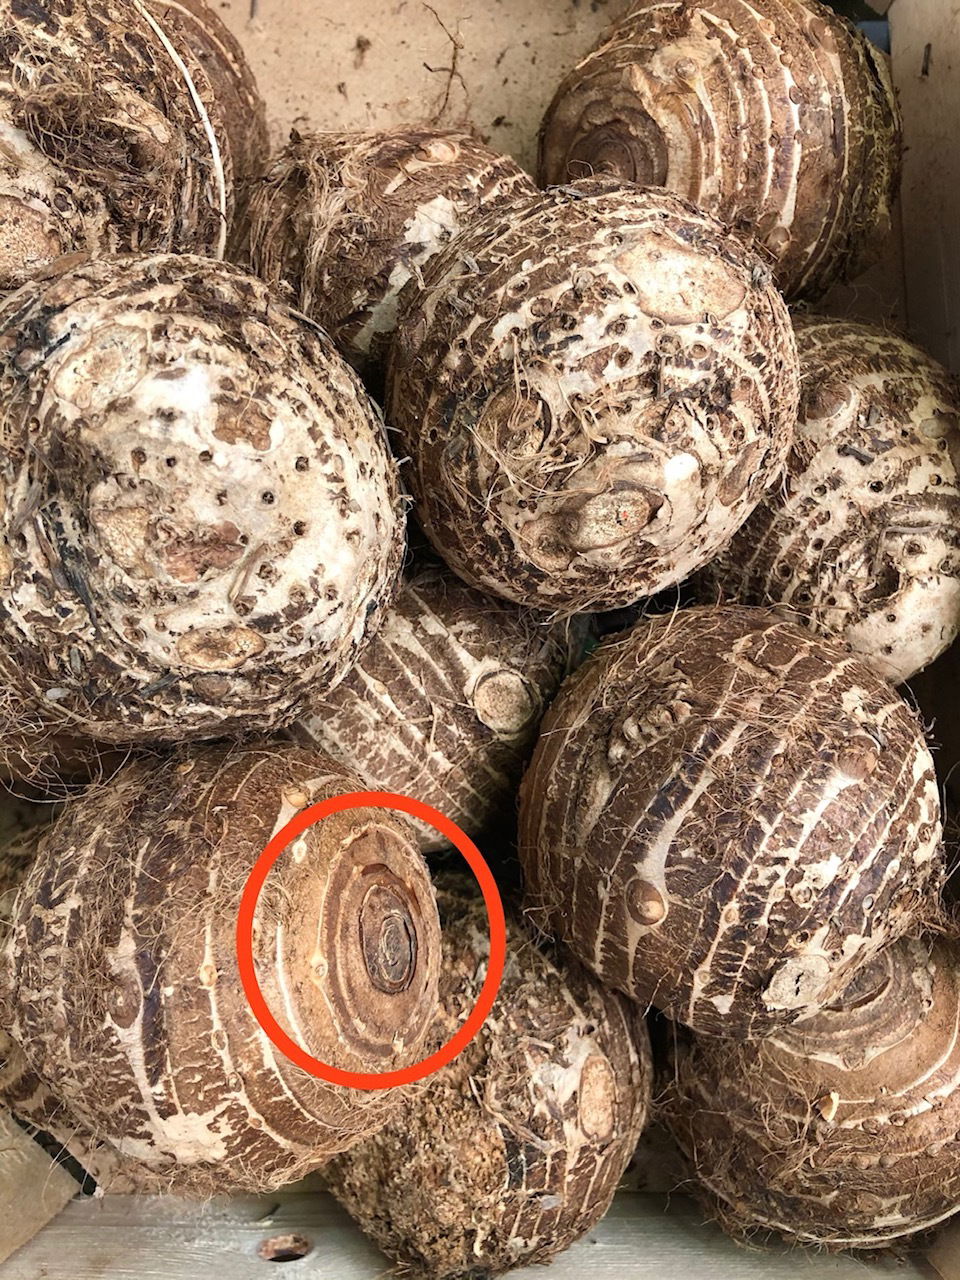 The basal plate is where the roots and the 'cormlets' (basal offsets) will be housed; be sure to plant this side downwards to optimise root development.
Corms (Very Easy) - Planting corms are largely similar to the sowing of seeds, except the former is much bigger. Use a pot that's twice the corm's diameter in width, and three times the depth so that its roots have sufficient room to grow. Be cautious of which way to plant the corm, as its basal plate (which will be slightly flatter) appears rather similar to the node at the top. - have a look at the image above for a visual reference. Fill the bottom half of the pot with a well-draining potting mix; we'd recommend using either 'Houseplant' soil or a multipurpose compost with an extra splash of perlite. Place the corm into the pot and fill with compost until there are around 4cm (2 inches) of soil covering its top. Irrigate thoroughly to consolidate the soil and refill any sunken creators with more compost. Situate the potted corm in a bright, indirect location with temperatures above 16℃ (61℉) to stimulate root growth. Keep the soil evenly moist, allowing the top third to dry out in between waters. Continual warmth and moisture are what's needed to ease a corm out of its dormancy period - so always be sure to keep local its environment this way! After around six to twelve weeks, a pointed foliar bud will appear through the soil line, kickstarting the season of growth before it. After that, you can either grow it indoors in a bright location or outside in a semi-shaded area - but be aware that Colocasia are tender, meaning that they must either be protected or brought in once the nighttime temperatures dip below 5℃ (40℉). Those kept indoors with temperatures above 15℃ (59℉) will become more or less evergreen, with a slight foliage decline in the autumn and winter months, before bouncing back in the following spring.
Basal Offset Division (Easy) - Your plant will produce several basal offsets that can be separated once they have a sufficient root system with at least three leaves. If possible, water the soil 24hrs before the main event to reduce the risk of transplant shock, when its dry root systems are over-fingered. Take the plant out of its pot and place your fingers close to the nodal junction - compost may have to be removed for better access. Push the chosen offset downwards until you hear a snap. Separate the foliage and its root system away from the mother plant, mentally noting the high risk of damage. Transplant in the appropriate sized pot with a fresh batch of 'Houseplant' compost. Maintain evenly moist soil and situate it in a bright, indirect location away from any direct sunlight. After six weeks, treat it like a normal specimen, following the care tips above!
N. B. - After several years, your specimen will produce basal offsets along the stem itself - wait for the plantlet's base to swell slightly before splitting it with a knife. Follow the steps above when placing it in the soil. Don't worry if there aren't any roots, as it'll eventually produce them once the plant senses that it has been separated from its primary water-source (i.e. the mother plant).
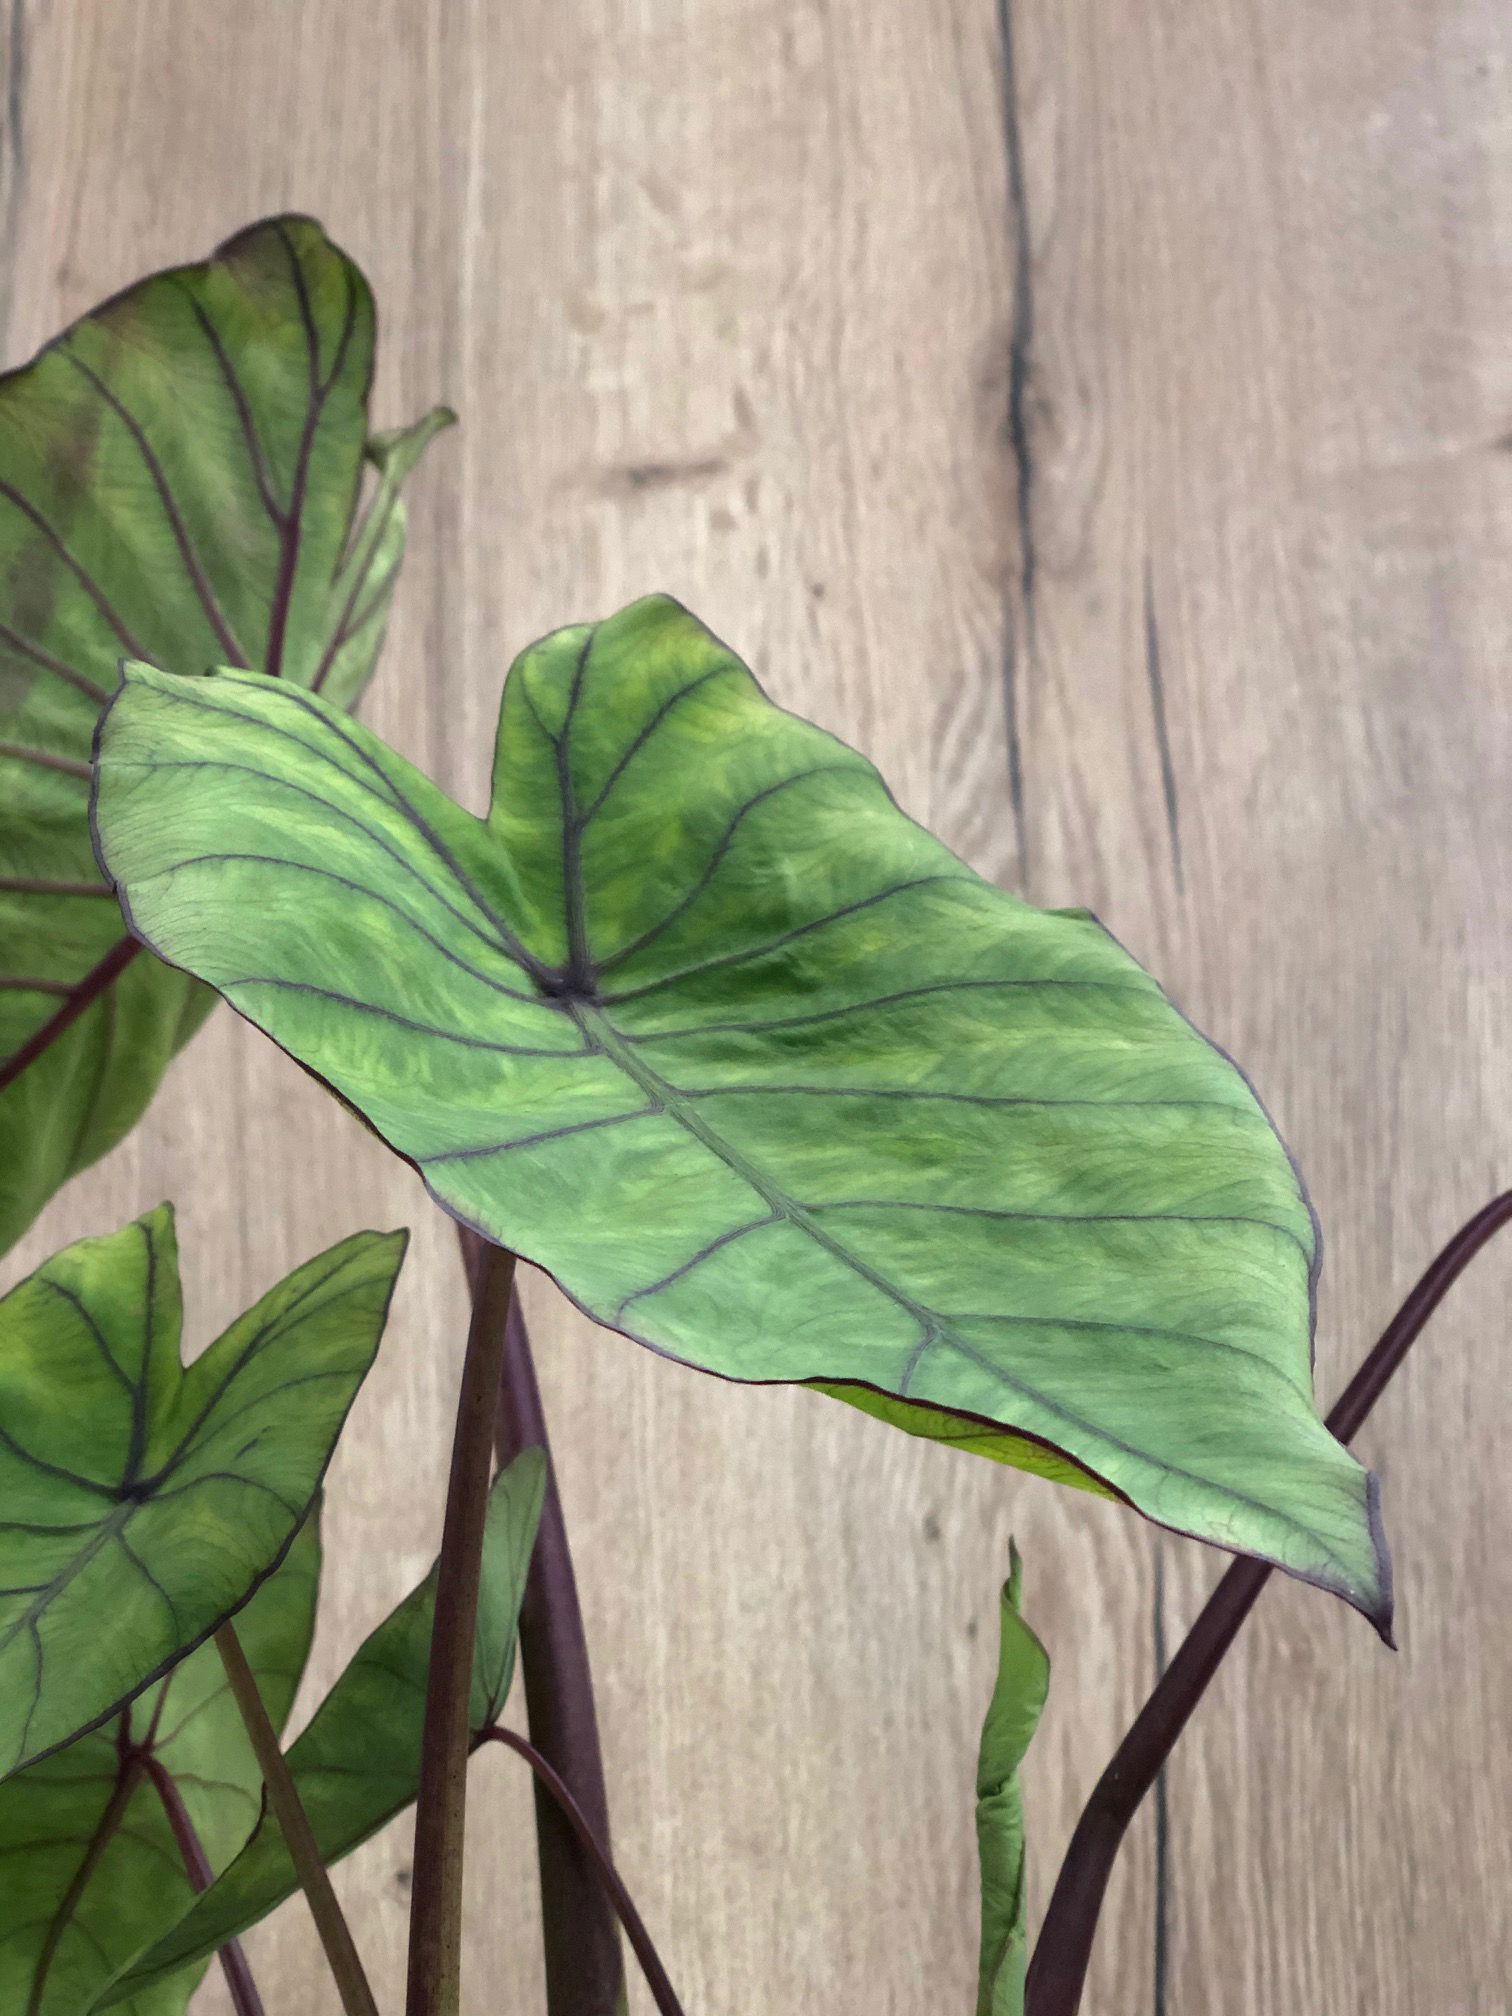
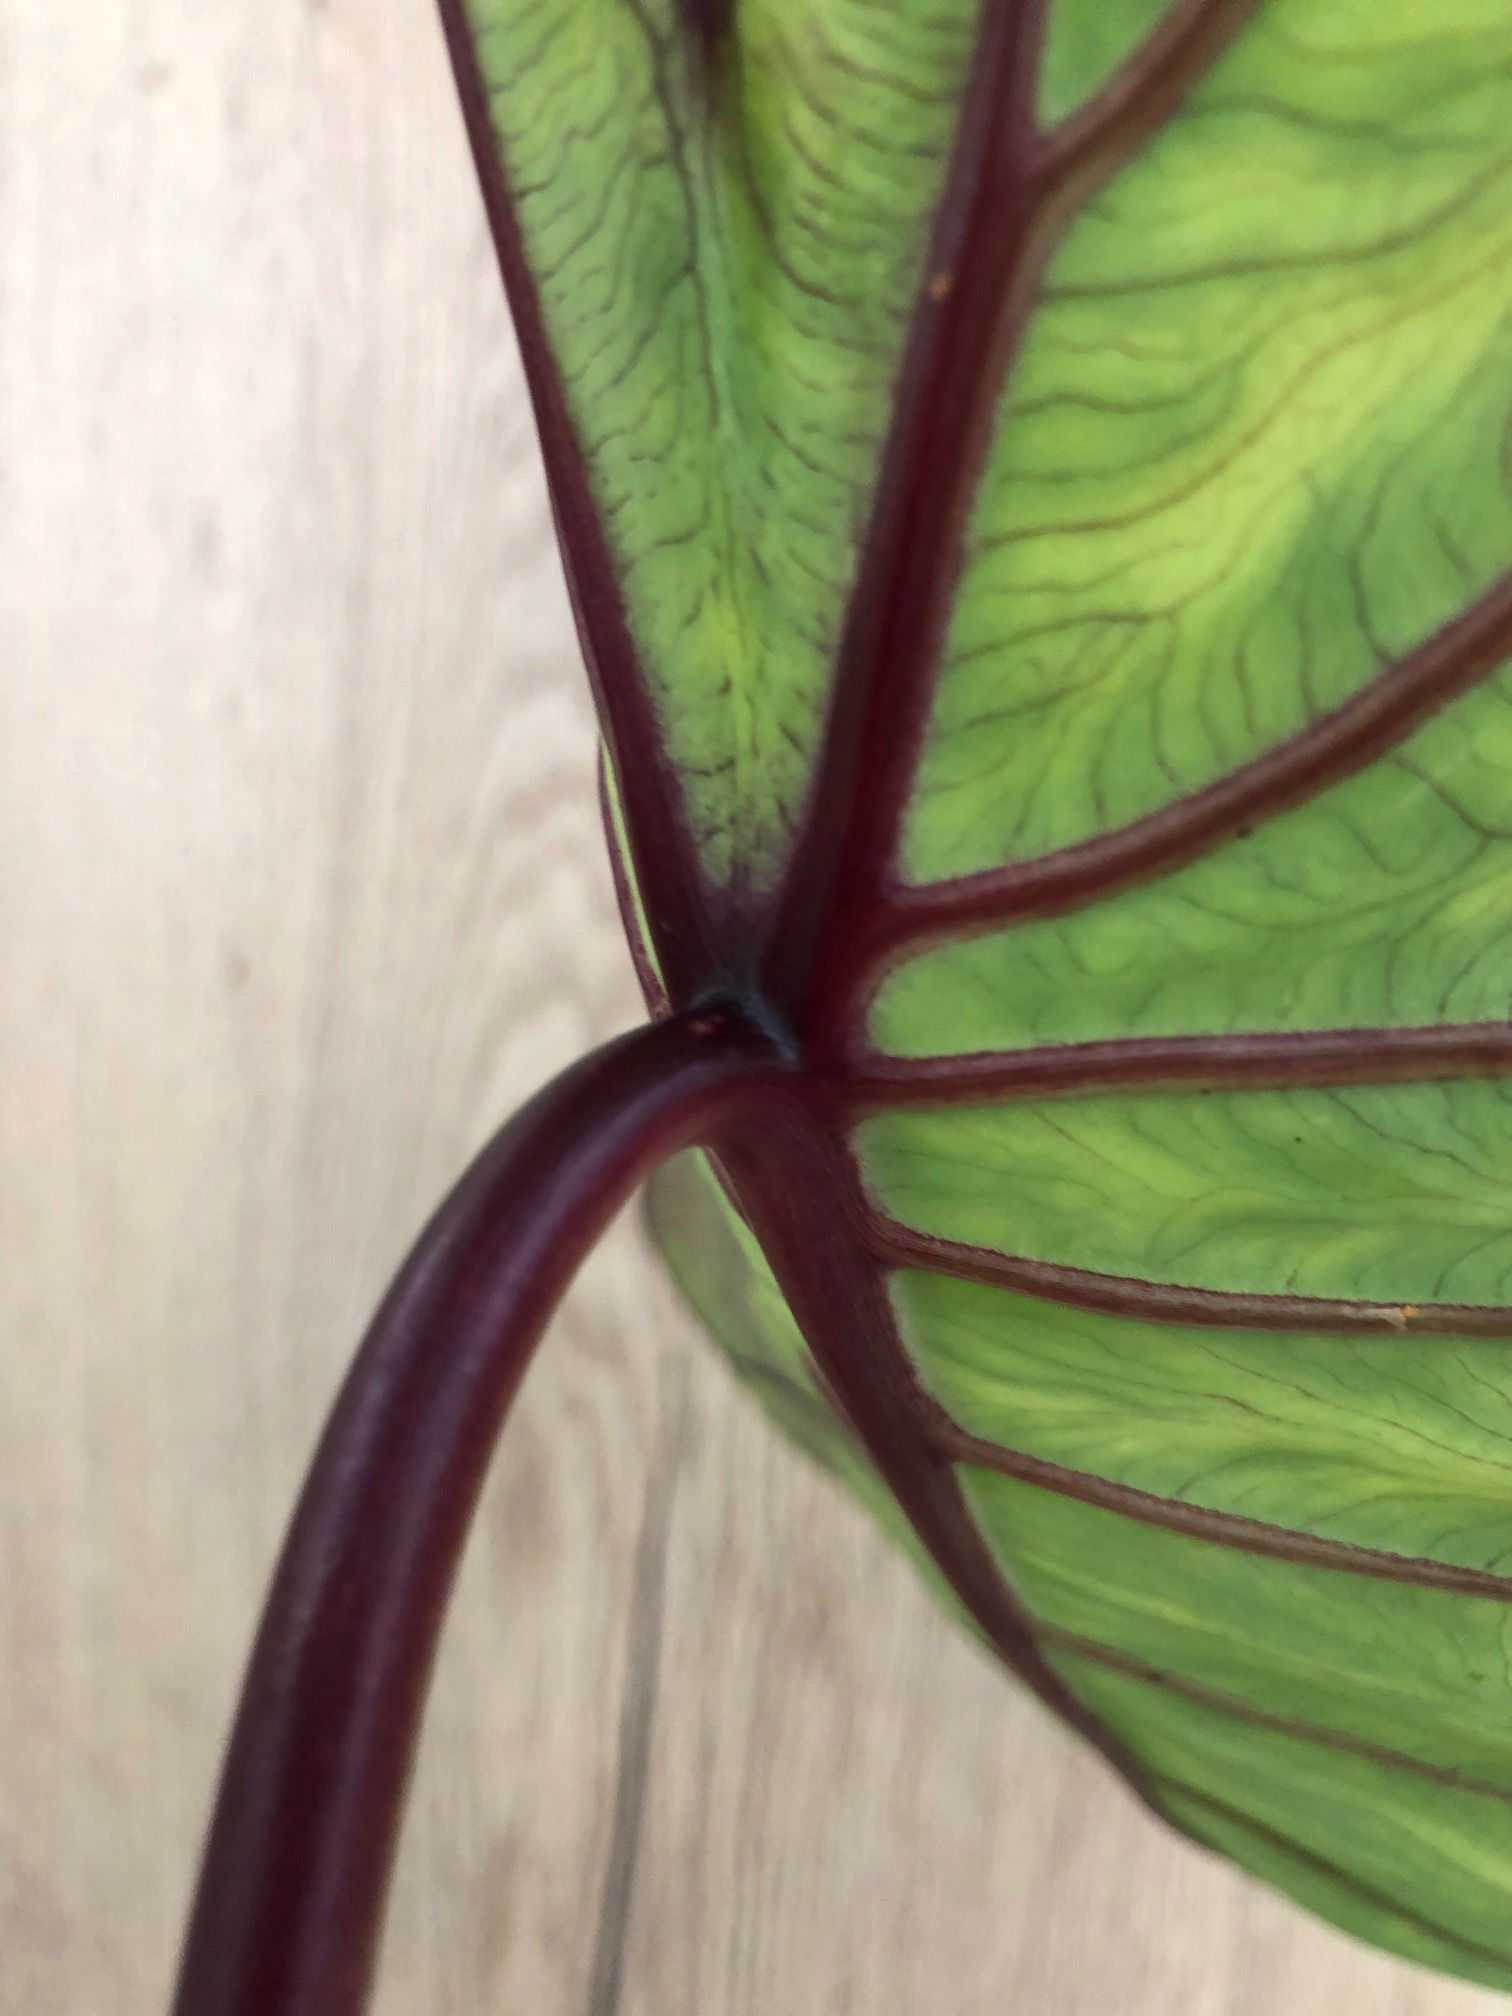 The Colocasia esculenta's main attraction is its elongated veins on the under-leaves.
Flowers
As Colocasia is part of the Araceae family, its flowers aren't particularly intriguing. Much like a Peace Lily's inflorescence, their flowers consist of a white or green spathe (the spoon-like shell) with the spadix being the site of pollination. Blooms can last up to five days and are usually visible during late spring or early summer around 30cm+ from the soil line. Unfortunately, domestic specimens will rarely flower indoors due to the insufficient growing conditions.
Repotting
Repot every three years in the spring, using a 'Houseplant' labelled compost and the next sized pot with adequate drainage. Hydrate the plant 24hrs before tinkering with the roots to prevent the risk of transplant shock. For those that are situated in a darker location, add a thin layer of small grit in the pot's base to improve drainage and downplay over-watering. Click here for a detailed step-by-step guide on transplantation, or via this link to learn about repotting with root rot.
Book a 1-to-1 video call with THE HOUSEPLANT DOCTOR™ if you'd like a personal guide to repotting your houseplant. This will include recommending the right branded-compost and pot size, followed by a live video call whilst you transplant the specimen for step-by-step guidance and answer any further questions!
Pests & Diseases
Keep an eye out for mealybugs, spider mites, aphids, scale, thrips & fungus gnats that'll locate themselves in the cubbyholes and undersides of the leaves. Common diseases associated with Colocasia are root rot, leaf-spot disease, botrytis, rust, powdery mildew & southern blight - click here to learn more about these issues.
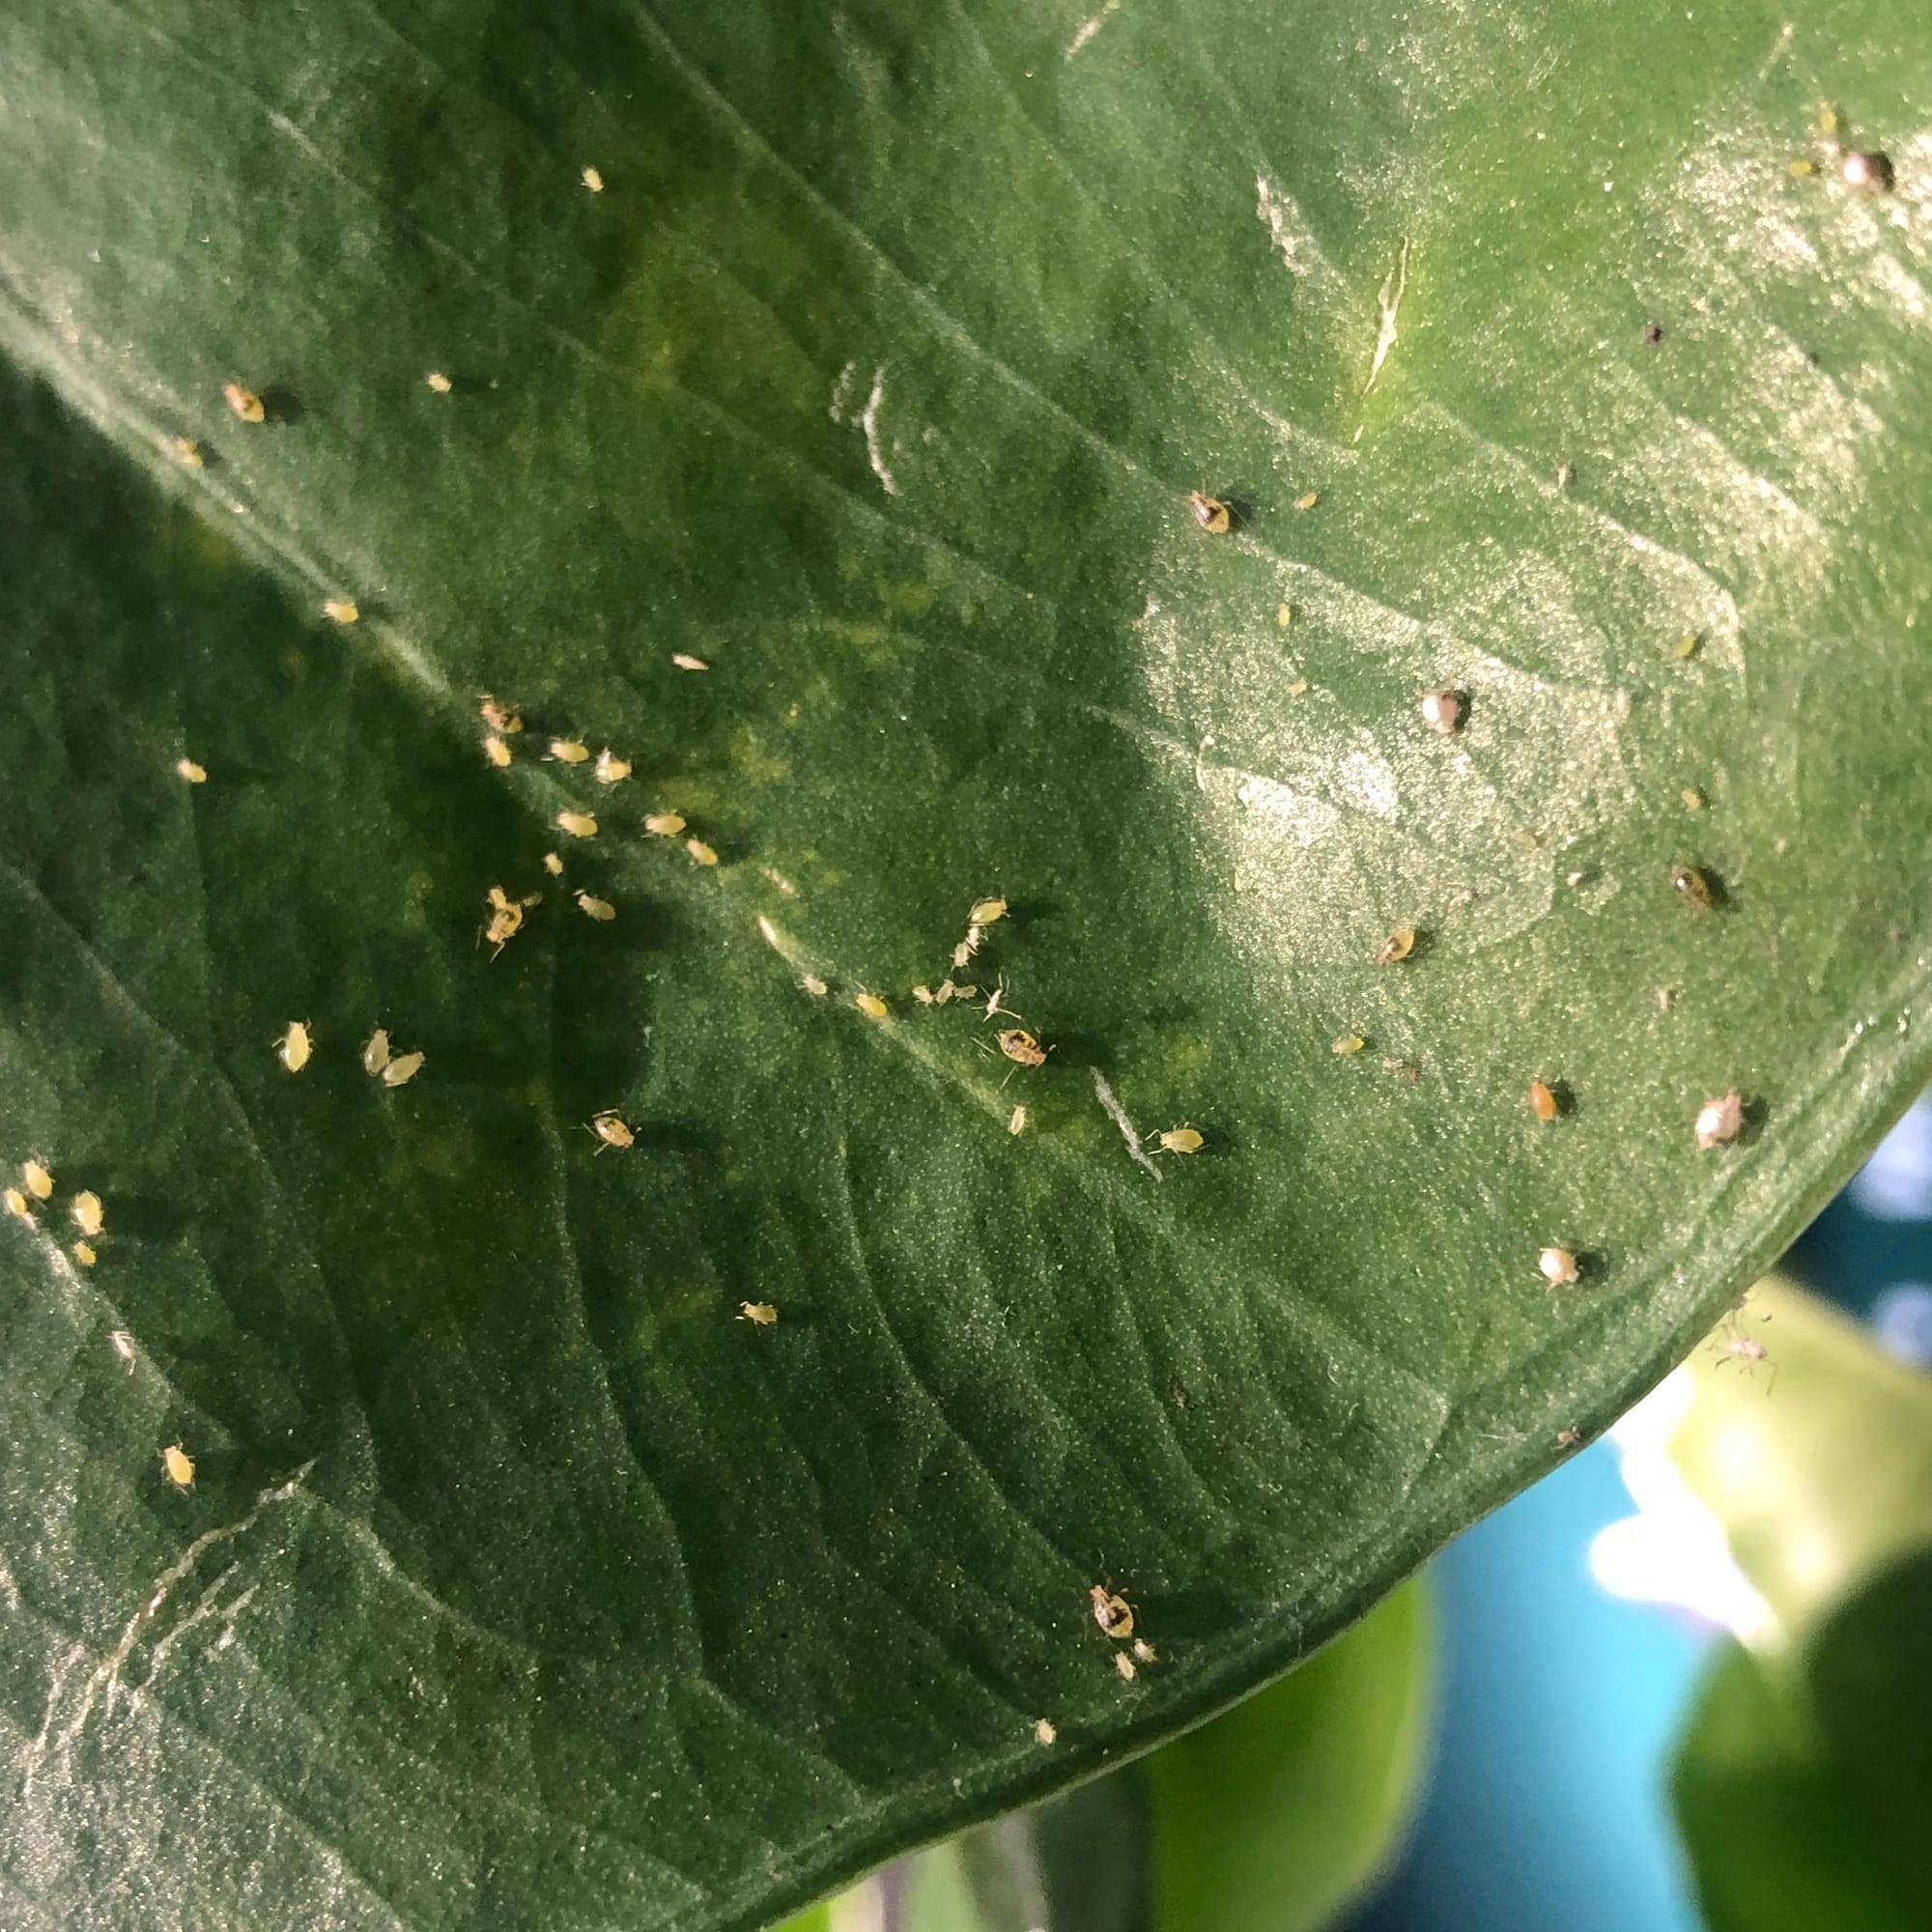 Although quite rare, Aphids & Greenfly may infest the youngest leaf while it unfurls, especially in the spring months. Click on the image to learn more about eradicating them!
Toxicity
This plant is classified as poisonous due to varying concentrations of calcium oxalate crystals found around the plant's body. If parts of the plants are eaten, vomiting, nausea and a loss of appetite could occur. Consumption of large quantities must be dealt with quickly; acquire medical assistance for further information.
Retail Locations
Colocasia can be bought either by rooted specimens (in soil) throughout the year, or as a dried corm in the early spring. Many mainstream garden centres and online stores will sell both, with the latter being the cheaper option.
Book a 1-to-1 Call with THE HOUSEPLANT DOCTOR™
If you need further advice with your houseplants, book an advice call with ukhouseplants' friendly and expert writer today! This can be done via a video or audio call on most apps, including Facebook, FaceTime & Skype. A ten-minute call costs £5.99 (US$7), or £15.99 for thirty minutes. You can ask multiple questions, including queries on plants, pests, terrariums, repotting advice and anything in between. Please consider supporting this service to keep ukhouseplants thriving!
Comments