Phalaenopsis ssp.
Contents
- Top Tips
- Location, Water, Humidity & Fertilisation
- Common Issues
- Origins, Temperature, Propagation, Repotting & Toxicity.
- Eradicating Mealybugs off Orchids
- Click here for information on re-flowering Orchids!
Need the answer to a specific plant query? Book a 1-to-1 video call with THE HOUSEPLANT DOCTOR™, the website's friendly author to overcome and address your niggling problem! Available on iMessage, WhatsApp, Facebook Messenger & more.
Top Tips & Info
- Care Difficulty - Easy (When Learning the Root Colours)
- When choosing its decorative pot, ensure you use either a clear glass/plastic pot to lower the risk of root rot.
- Situate your Orchid in bright location like a windowsill or nearby table. If it's too dark to read a newspaper, it'll be too dark for the plant, too.
- A thirsty Orchid will have silver roots (in the pot), whilst a green root system signifies the plant is still hydrated.
- Submerge three-quarters of the pot's depth into standing water for several minutes to aid thorough hydration. Scroll down to 'Water' for a detailed description on what to do.
- Good humidity will result in longer-lasting flowers, guaranteed, so avoid operating radiators/heaters within 2m (6 foot).
- Use an Orchid leaf spray/mist product every two weeks to maintain good health.
- Reduce the temperature to around 12° - 15°C (54° - 59°F) during the autumn & winter to force the plant into a dormancy. By mid-spring, the natural room temperatures and hours of light will encourage the Orchid to produce flowers in time for growing season.
- Keep an eye out for Mealybugs that are usually located in the cubbyholes of the stem or flowers. Scroll down to the bottom of this article for more on this issue.
- Repot into the next sized-pot every three years, using a transparent plastic pot and either Orchid-Bark or Sphagnum Moss (we prefer using moss!). Trim away any brown, rotten and/or hollow roots to improve the overall growing conditions whilst you repot it.
Location & Light - 🔸🔸
Perfecting the amount of light an Orchid receives is crucial for a long-lasting specimen. During the spring and summer, be sure to provide a brightly lit spot away from any direct light. Excessive exposure during this time will negatively affect the plant in the likes of sun-scorch and dehydration. Once the autumn kicks in, be sure to include an hour or two of direct light per day to get it through the dormancy period, lasting until the following spring.
The amount of light and current season of the year will directly govern the frequencies of waters per month. Specimens placed in darker areas must be kept on the drier side to life, whereas brighter locations will require more soil moisture to lubricate photosynthesis.
Two metres within a north, east or west facing window is acceptable, or in a location that offers good over-head lighting. Avoid placing it next to a single-glazed window or draughts due to the heightened chance of sudden flower loss and brown spots developing on the leaves.
Water - 🔸🔸
The colour of its roots can tell a lot about the overall health of an Orchid. There are four main colours to remember - silver, green, brown & yellow.
- Silver roots indicate another hydration is needed. Especially whilst in bloom, it's important to prevent the roots becoming this colour too often, as lower flower loss is a common symptom.
- Green roots denote sufficient hydration. Green algae growing on the inner-face of the pot is also a sign of good health - do not wipe it away as they are highly beneficial, and refrain from rehydrating the bark until half of the roots turn silver.
- Brown indicates root rot, a direct product of over-watering. Situating it in too little light will greatly increase the chance of over-watering, due to the slowed rate of water-absorption in the bark. Another key point with browning roots is the amount of light that they receive. Although there's no photosynthesis, placing an Orchid in a white-coloured or glass decorative pot will considerably reduce the chance of root rot. If you think for a moment, if the roots are in complete darkness and sit in too moist soil, the chance of rot is very high.
- The final root colour is yellow, commonly caused by periods of droughts or too much sunlight. In the wild, Orchids are found in moist nooks of jungle trees, meaning that persistent dry spells and direct sunlight are a rare sight. If the foliage also sports a yellowy-green appearance, it's the direct product of sun-scorch. Increase the amount of water slightly and relocate it to a more sufficient location around the house - do NOT over-fertilise. Scroll down to learn more about how to water an Orchid correctly.
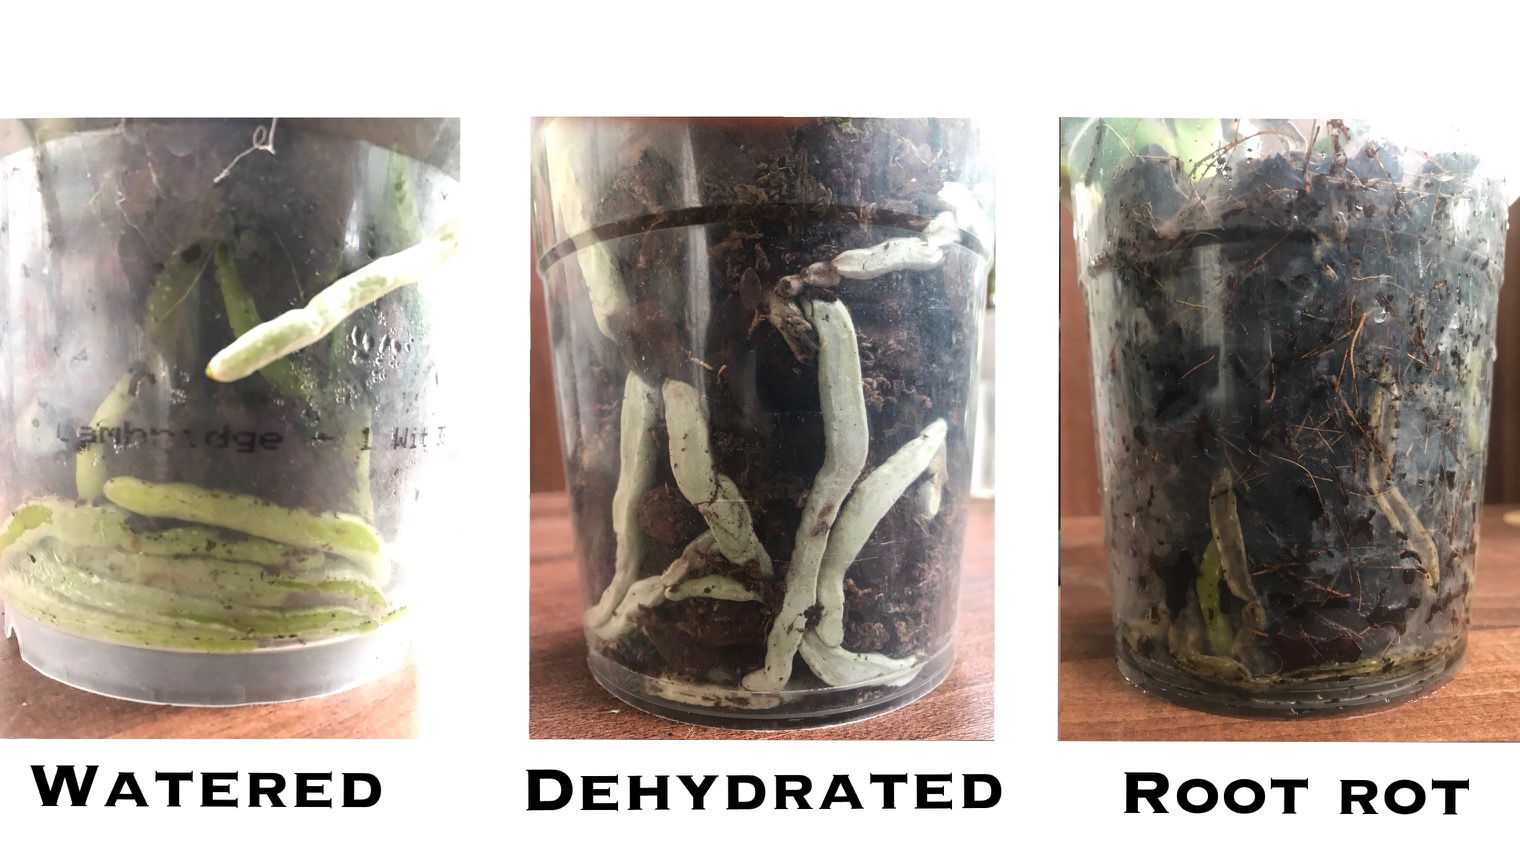 Image 1: Allow half of the roots to become silver in between irrigations to avoid root rot.
- Avoid the use of cold water. Most houseplants can be sensitive to sudden temperature changes in the soil, with Orchids being no exception. Constantly shocking the roots will greatly increase the risk of sudden flower or bud loss, so if it's too cold for your teeth, it'll be too cold for the roots, too!
- Keep the central cubbyholes of the stem dry. Have a look at the Image 7; this is a typical issue among growers where messy irrigations will allow excess moisture to sit in the centre of the stem. When remained wet, especially in darker locations or at night, the chance of 'Basal / Crown Rot' or 'Southern Blight' is very high. An easy way to bypass this issue is to use the bottom-up method of submersion, pictured in the image below.
- Submerge the bottom three-quarters of the pool in tepid water for a minute or two. Gently shake the pot to allow the excess water to freely drain away from the roots before placing back into its decorative pot. Although the use of over-head watering is acceptable, it's far more likely to fall into the trap of crown rot, compared to the submersion method.
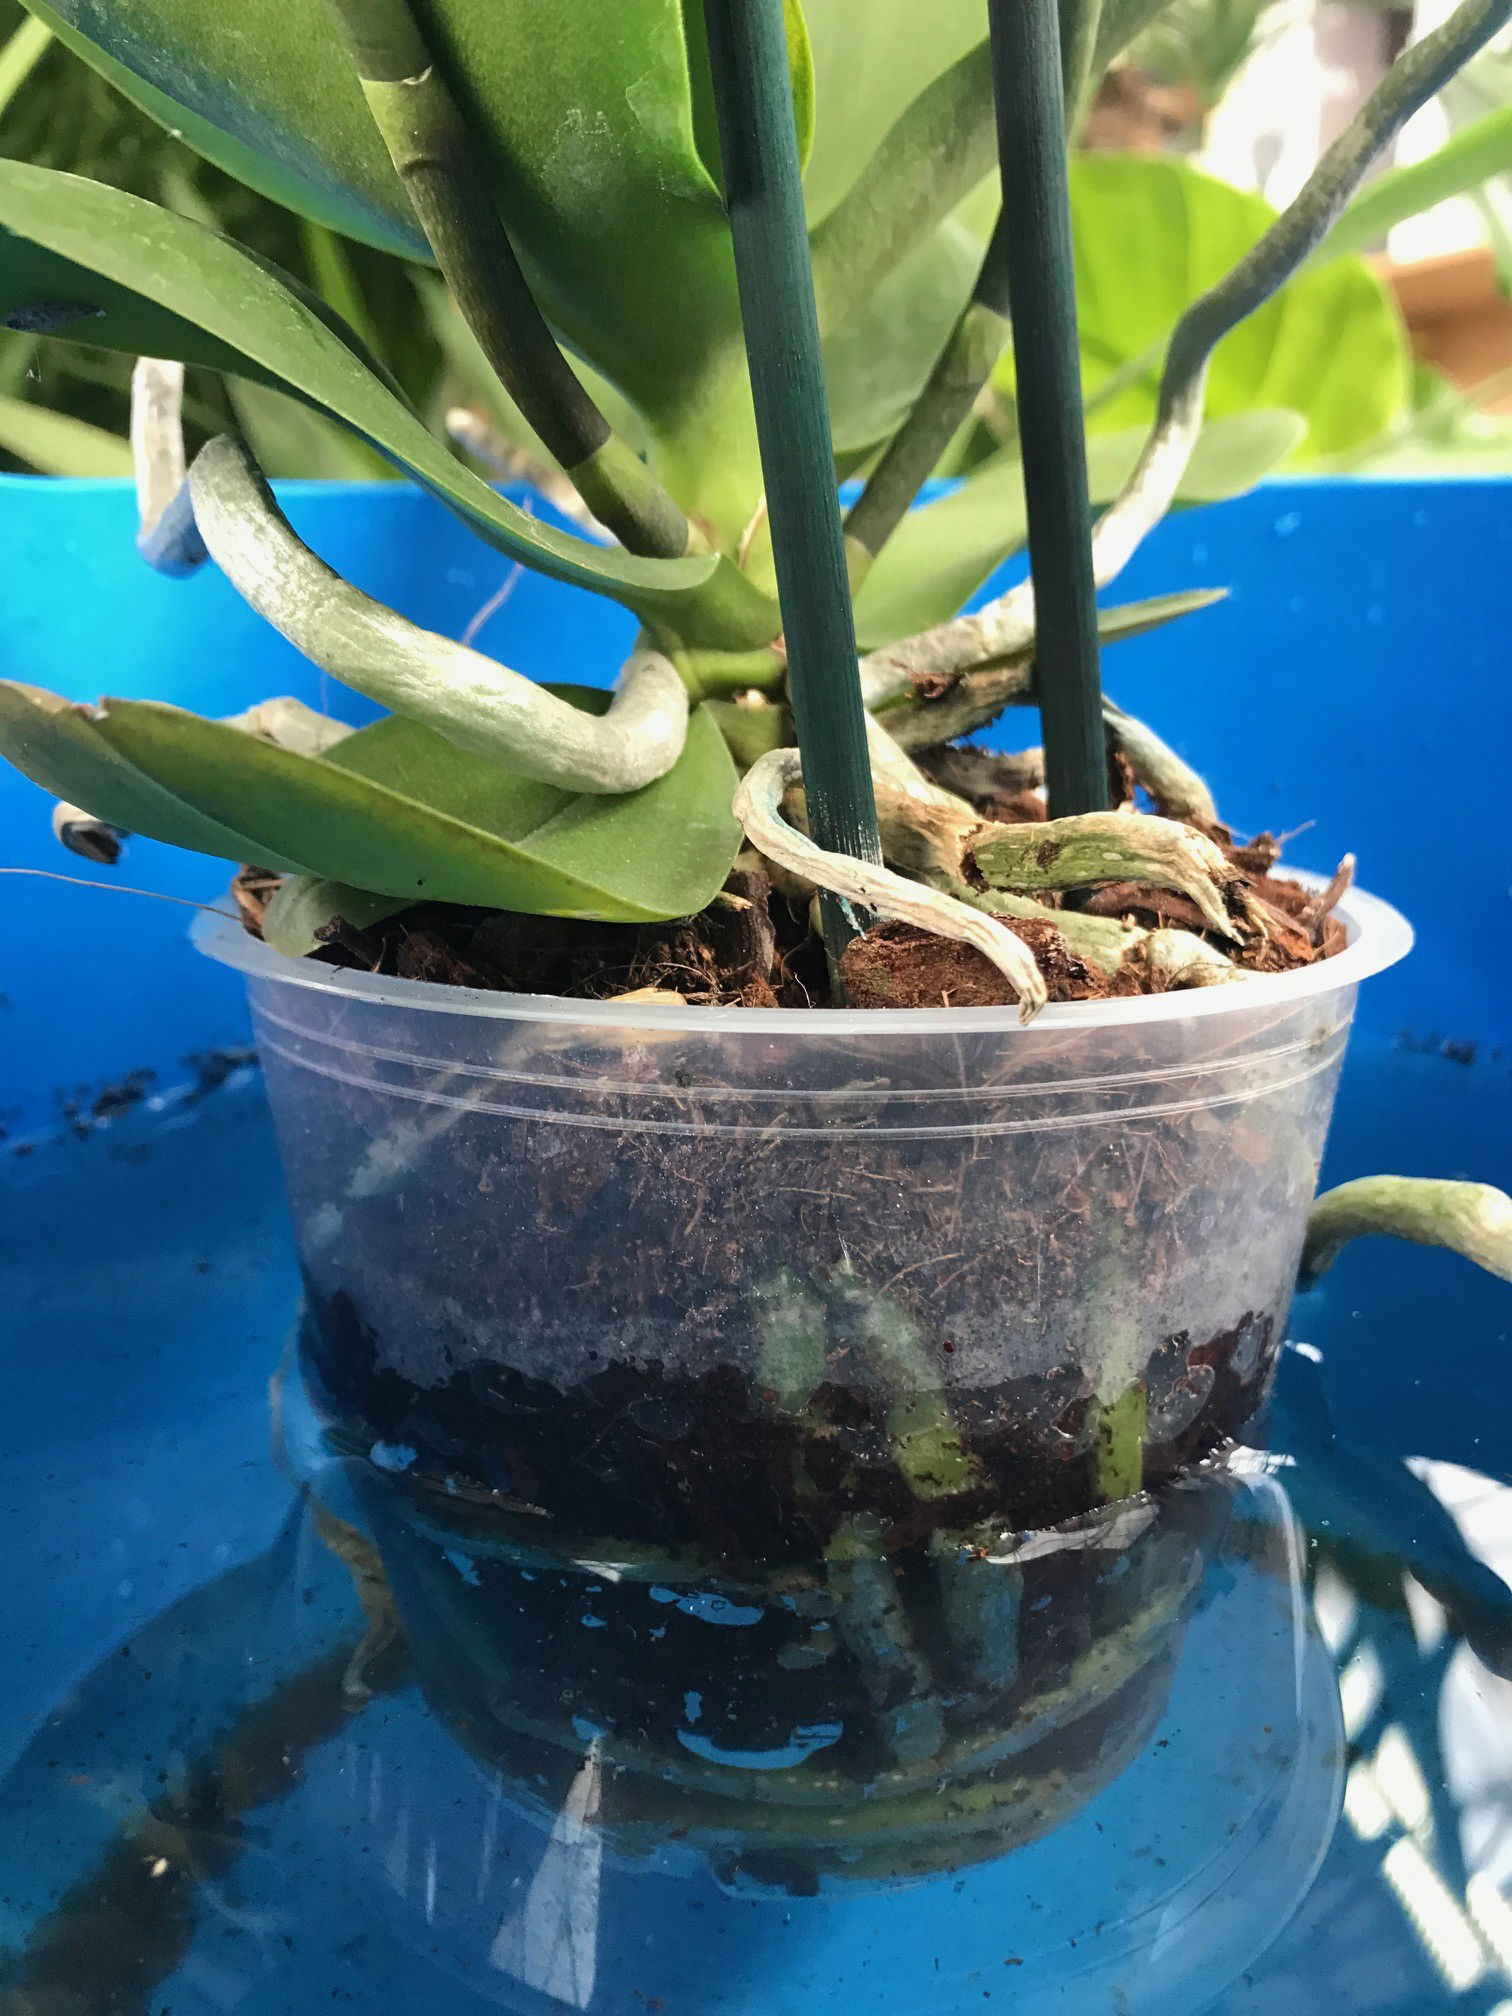 Image 2: The BEST way to irrigate a Moth Orchid is via the bottom-up method, due to the tendency for diseases to develop when excess moisture settles in the body's cubbyholes (pictured above).
Humidity - 🔸🔸🔸
Dry air will cause the yellowing or browning of leaf-tips, commonly caused by operating radiators. Place the plant on a pebble tray to increase the surrounding air moisture, avoiding the use of misters. Keep the resevoir topped up with water to provide a humid AND stable environment. The use of artificial humidity methods aren't needed in summer.
Fertilisation - 🔸🔸
Orchids have open stomata, meaning that fertilisation are best achieved via foliar feeds. Spray the solution onto the leaf's topside to provide the two key ingredients for good quality blooms (nitrogen & phosphorous). THE HOUSEPLANT DOCTOR™ only recommends using an 'Orchid' labelled fertiliser as it'll contain a more expensive form of nitrogen that the plants will prefer.
Although not as affective, you can still use a traditional Orchid fertiliser (that is applied to the roots/potting medium) as an alternative to the foliar spray feeds.
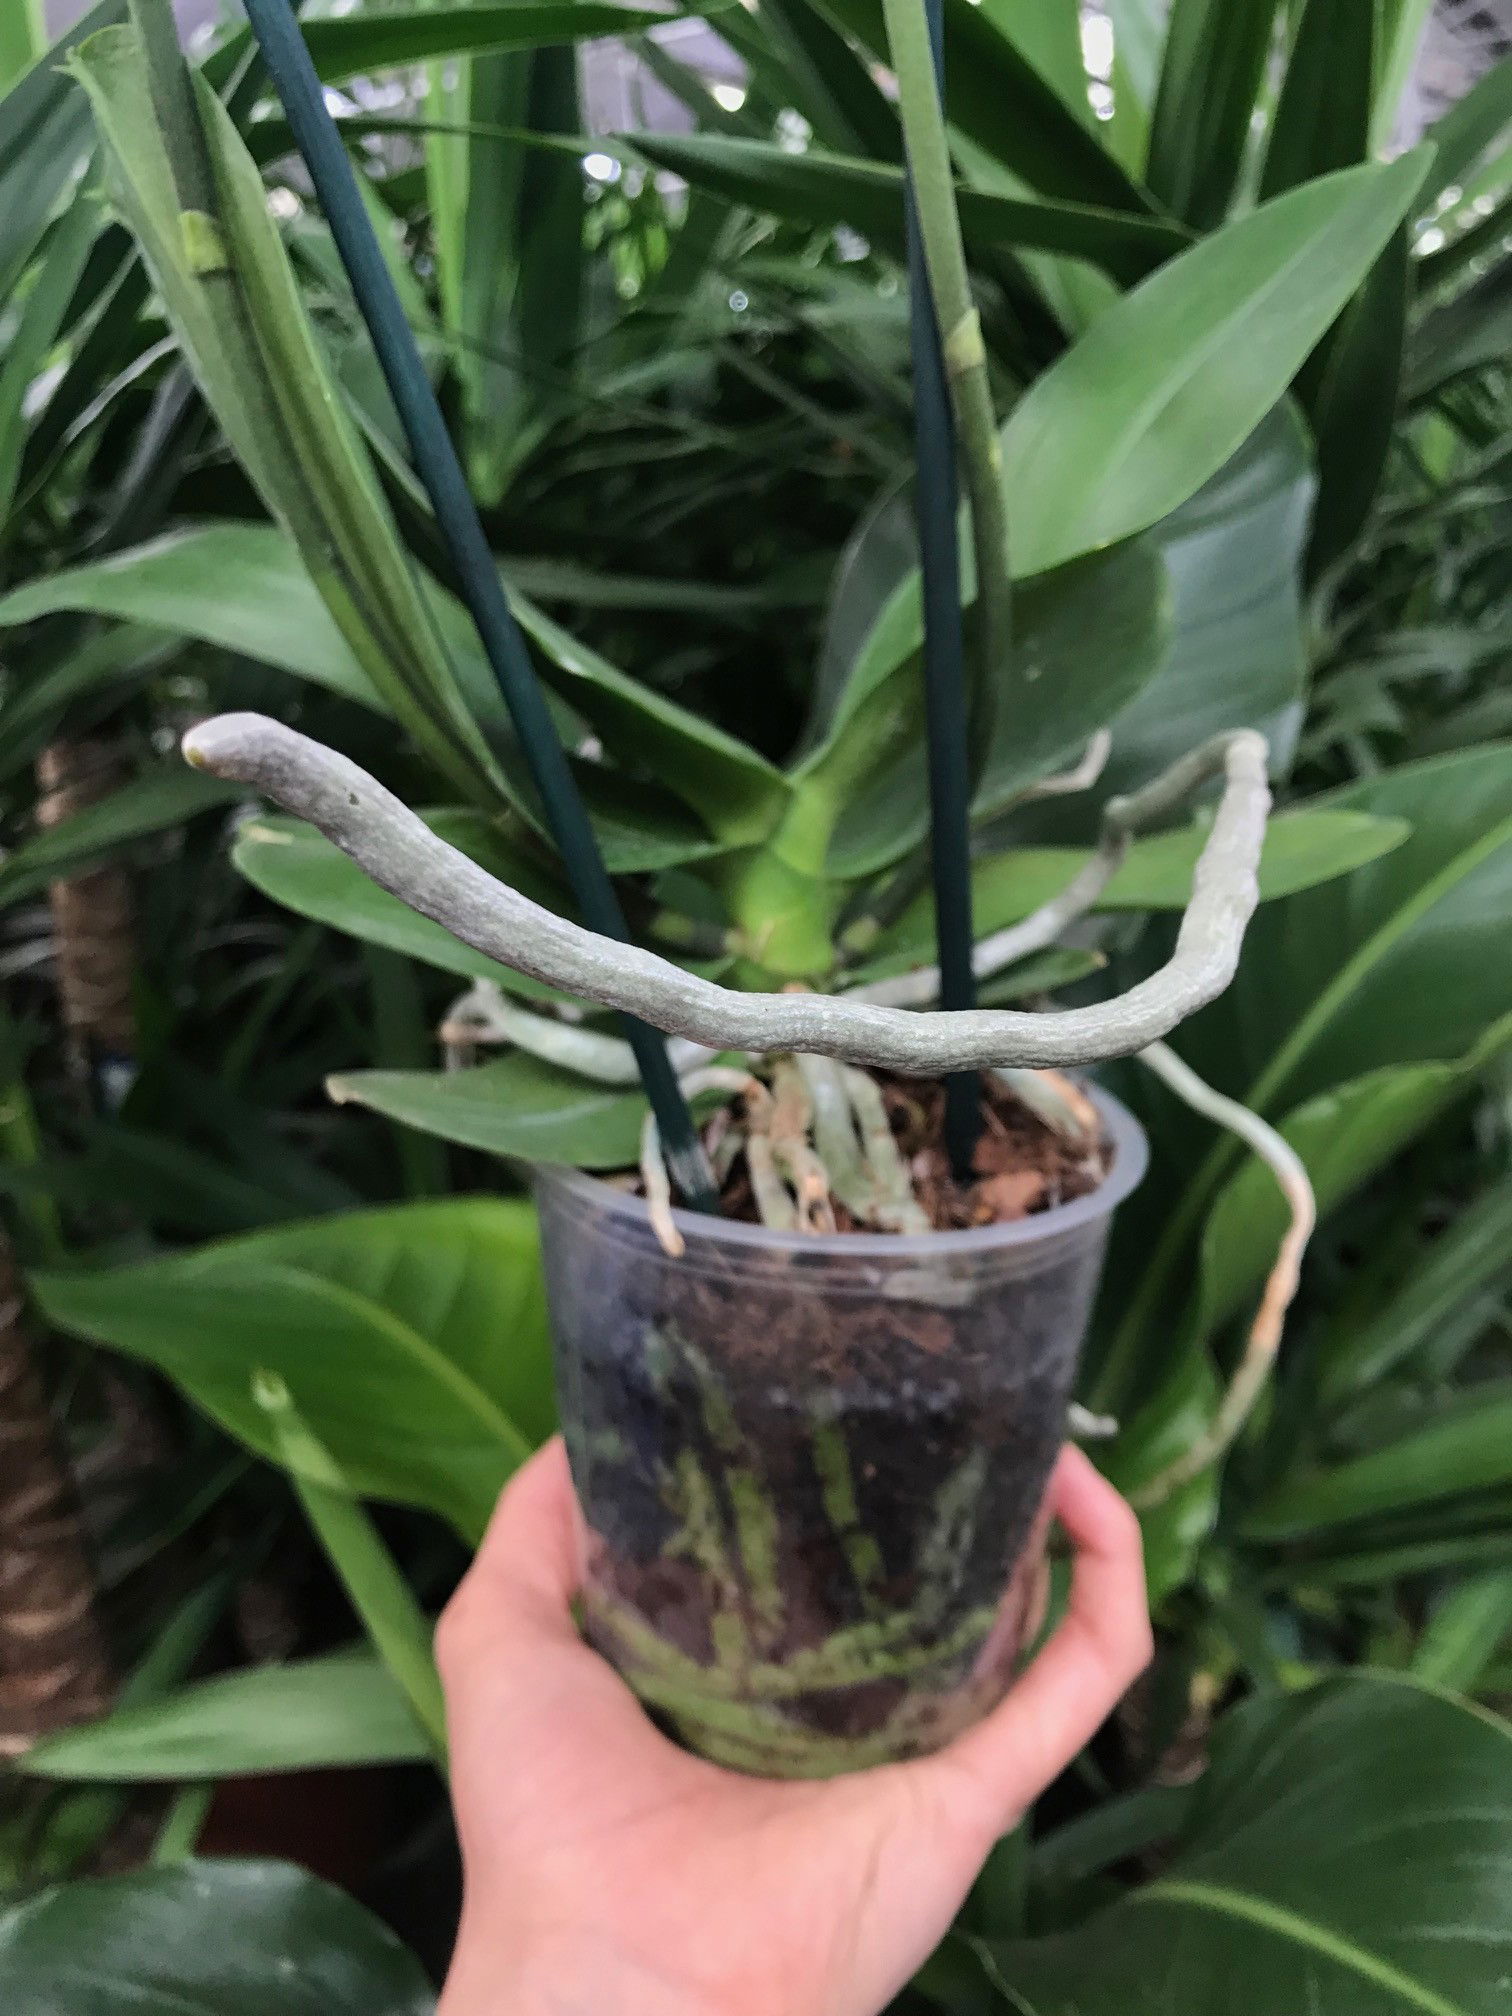 Image 3: Don't forget to mist the airbourne roots! Under-watered roots will quickly turn yellow with the Velamen (white casing) beginning to split after prolonged dehydration.
Common Issues with Moth Orchids
N. B. - For addressing Mealybugs, scroll to the article's bottom.
Directly pinpointing yellow leaves is quite hard, due to the many different issues that could be at fault. Problems include watering-related abuse, too much or too little light, and fertilisation issues (using a generic 'Houseplant' labelled feed instead of an 'Orchid' labelled product). If you'd like to speak to ukhouseplants in regards to this issue, be sure to book a 1-to-1 video call with THE HOUSEPLANT DOCTOR™ for personalised advice.
Specimens that develop purple or reddened foliage are located in too intense sun. Although this isn't too much of a concern, we'd recommend reducing the amount of light slightly, so that the Orchid doesn't develop signs of sun-scorch.
Orchids that produce lots of roots, but a lack of flowers could be caused multiple factors such as; not enough light (a partially-sunny window on the second or third floor is best!), over-watering, too high heat or an absence of regular fertilisations (use an 'Orchid' feed for enticing flowers). Don't worry about potbound Orchids with lots of roots, this is normal and don't need to be prune off!
Short-lived flowers could be the product of low humidity. Place the Orchid on a humidity/pebble tray, keeping the reservoir topped up with water while the heaters are operating. Never mist the flowers due to the high risk of developing Botrytis.
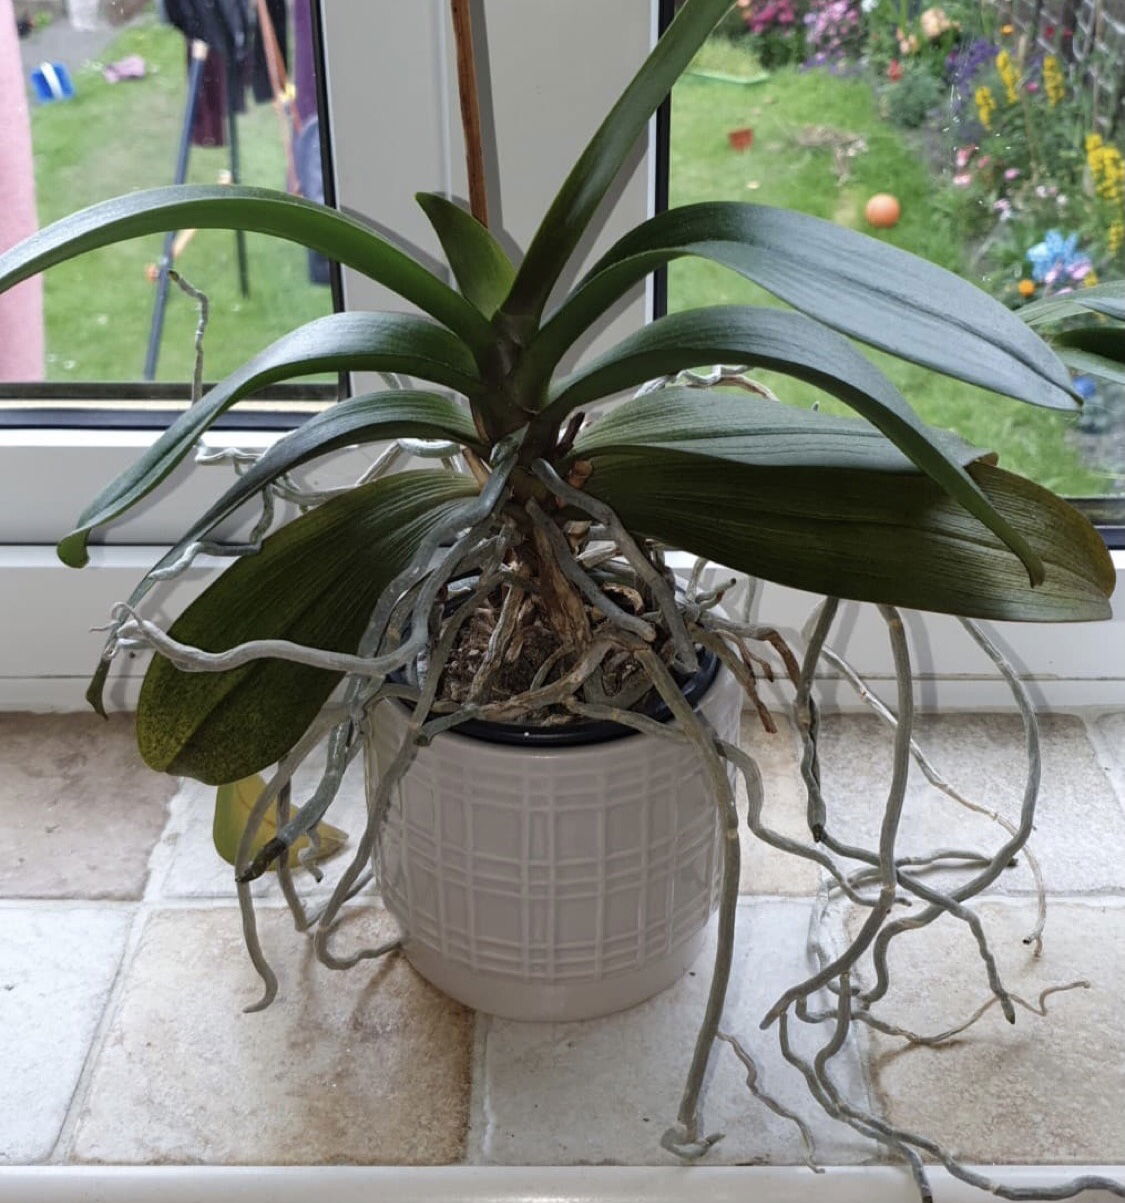 Image 4: Does a Moth Orchid with lots of roots mean it's unhealthy? No! Just repot it into a bigger transparent pot in spring with fresh Orchid Bark. If the specimen is currently in bloom, do not touch the roots until the final flower drops off. Excess aerial roots growing over the pot (like above) is a sign of good health and brilliant horticultural skills!
Total flower loss can be caused by an array of different issues, including a change in location, too little hydration, too hot or cold temperatures or droughts and pests. While the plant is in bloom, keep the bark evenly moist to hydrate the thirsty work of producing flowers. Locations that are outside of the recommended temperature bracket (below), or have drastic fluctuations must also be kept off the cards. Alternatively, a setting that offers similar temperatures all year round can inhibit blooms. They'll respond very well if the autumn and winter months are a couple of degrees cooler than in summer. In essence, this will not only winterise the plant, but it'll also force it into a dormancy period which is a crucial ingredient for successful flowers. The final issue is pests. Although it's highly unlikely that an infestation will cause a sudden change in health, have a quick inspection for Aphids and Mealybugs.

How to fix root rot on an Orchid? Roots will start to turn brown that can be seen through its transparent pot, and if not treated in time, it can result in the plant dying. The roots won't uptake water to 'power' the plant, thus causing the leaves to wilt and wrinkle (two more common signs of root rot). If you Orchid has developed root rot, THE HOUSEPLANT DOCTOR™ recommends to prune any dead roots (with scissors) and remove all the bark from the roots and pot. Then, half-fill the now empty pot with damp sphagnum moss and place the Orchid on top. Fill the remaining gaps with more moss until the plant feels secure. The Orchid might be a little wobbly to begin with, but as long as you keep the moss reliably moist and provide a bright sunless windowsill, it'll soon produce new roots. You can keep the Orchid in moss indefinitely, so there's no need to repot it back into bark once the plant begins to look better!
Large quantities of aerial roots that cascade over the pot shouldn't cause concern. Once the flowers have fully elapsed, take the plant out of its pot and remove any brown roots when repotting into a bigger transparent pot. If there are a couple still above the soil, either direct them face-down into the bark or allow them to carry on cascading. Be sure to mist the aerial roots while watering the bark to ensure sufficient hydration. If they begin to split, it's the result of too little water or humidity or sun-scorch. Remove once they've fully yellowed over.
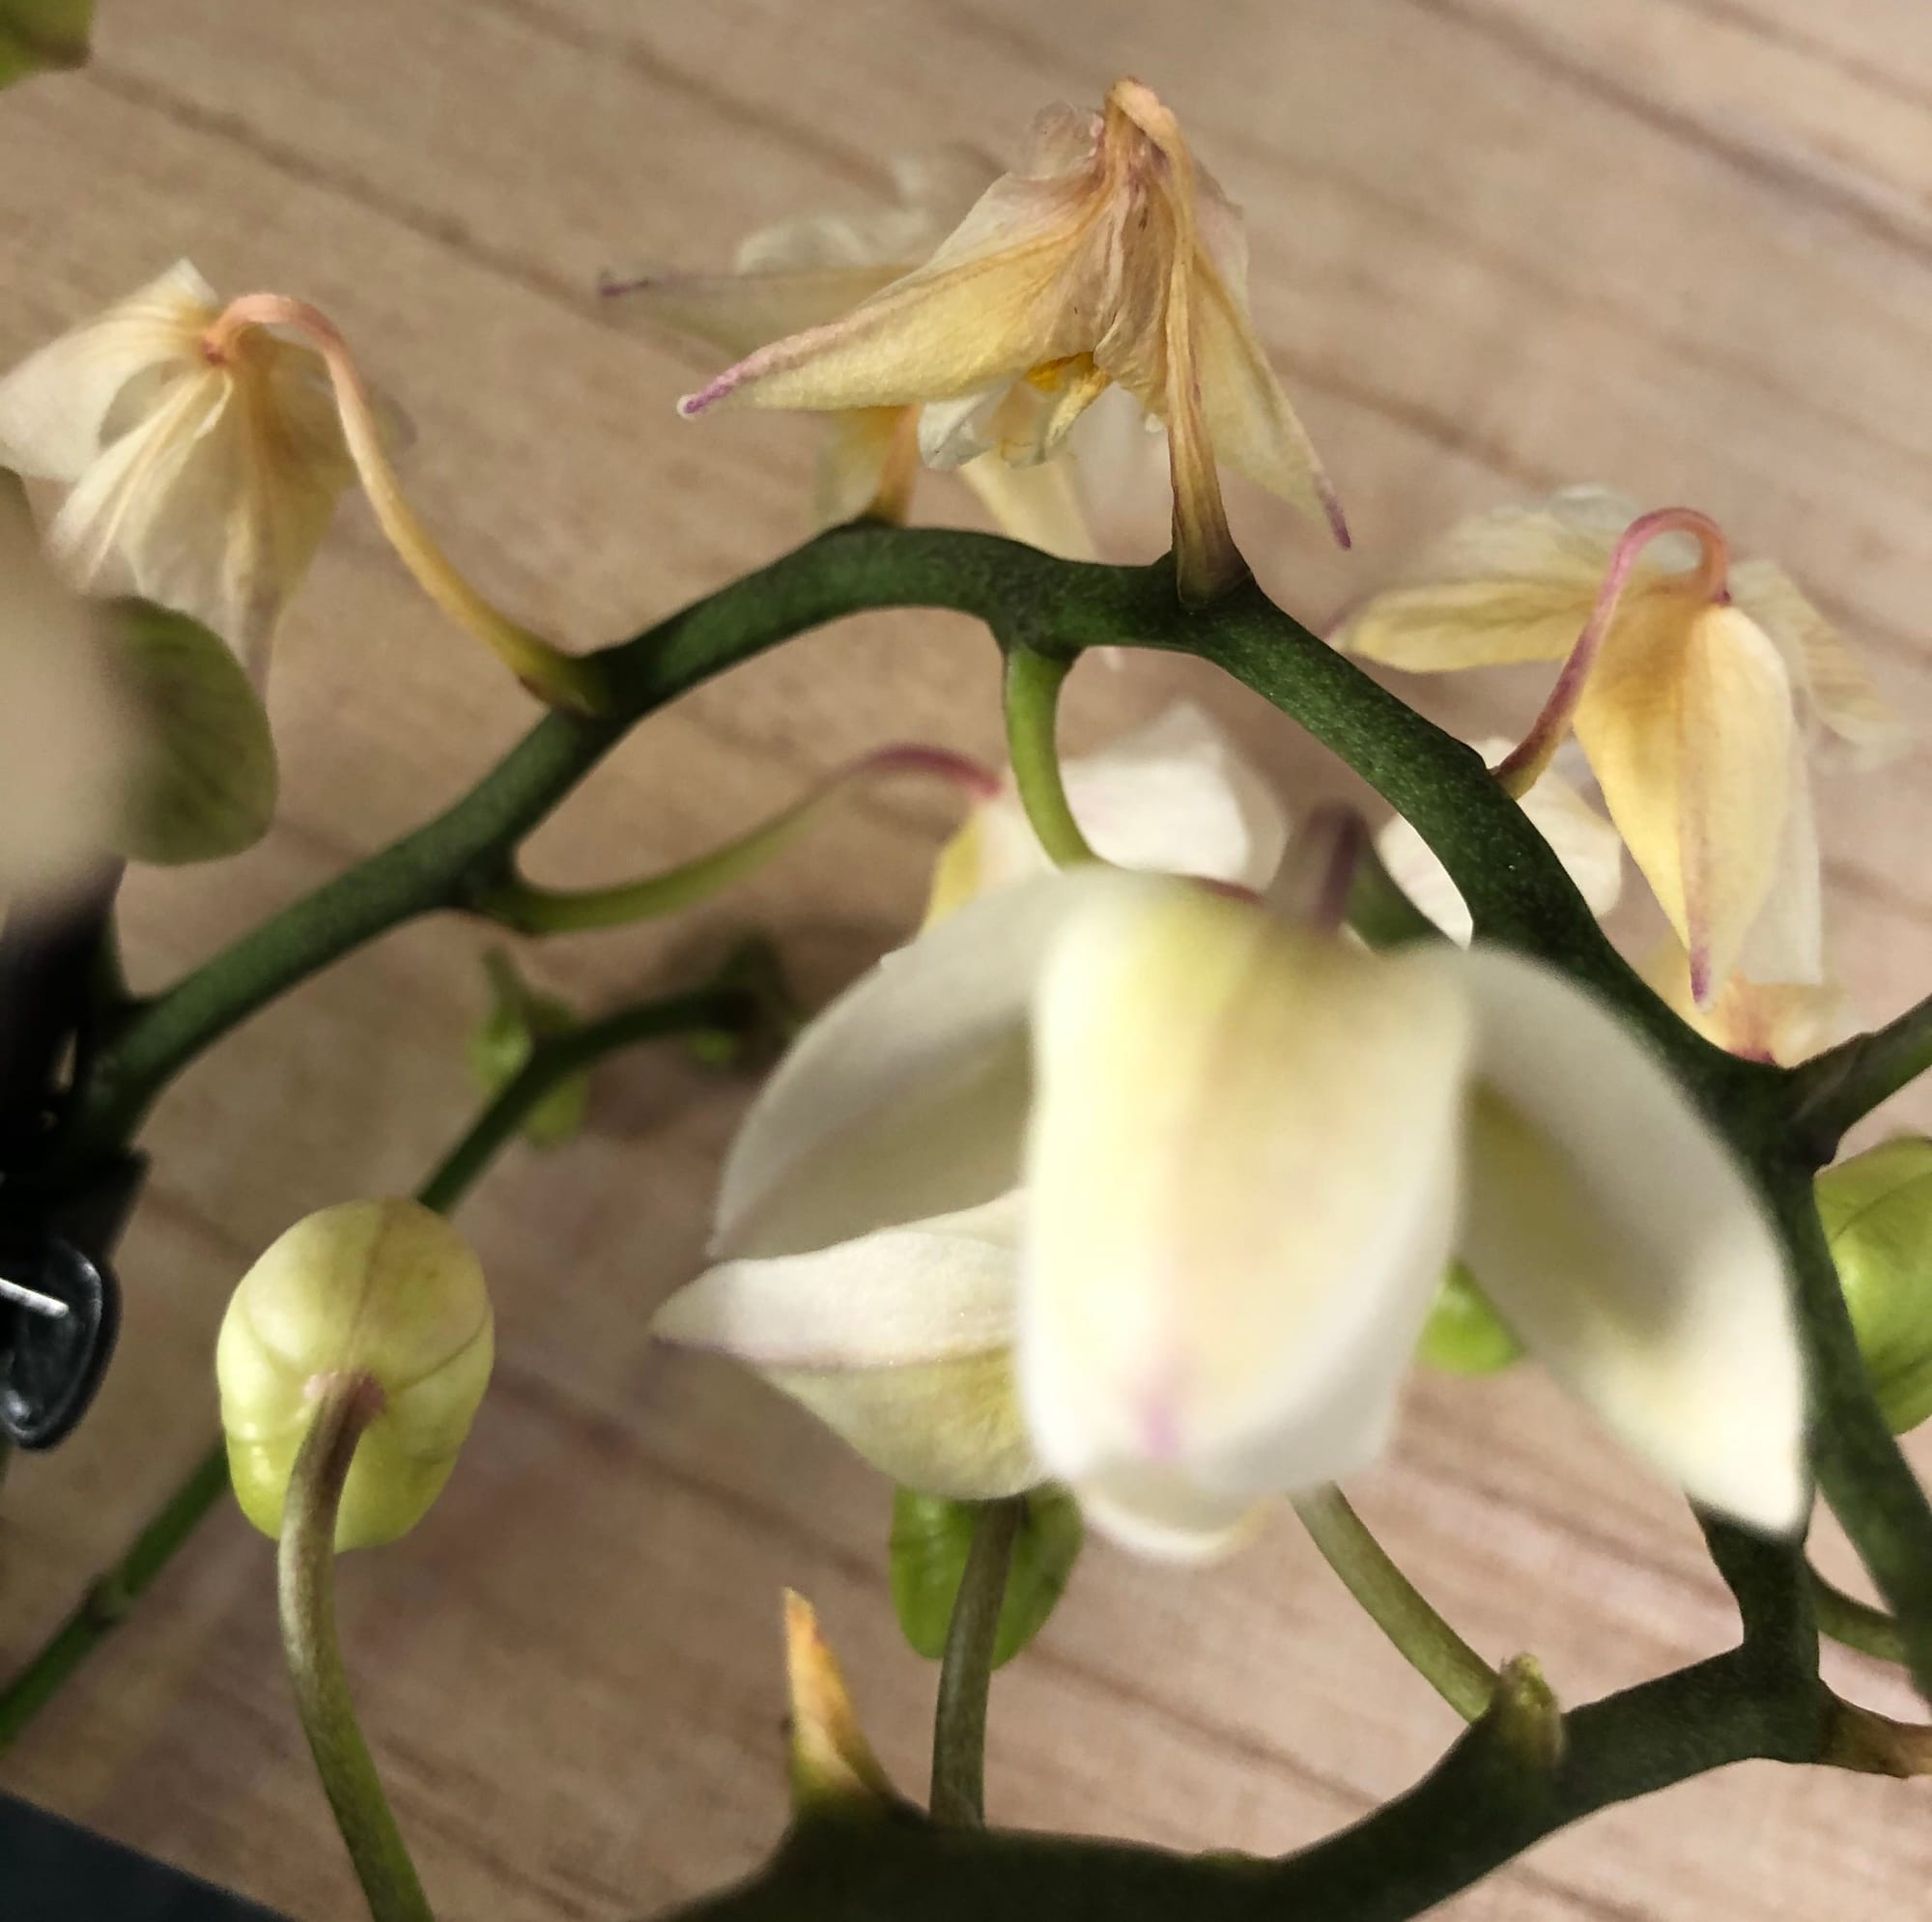 Image 5: Randomly yellowing flowers are a normal behaviour with Orchids. Scroll down to 'Pruning & Maintenance' to learn more about pruning your flower stalk, which may stimulate another show of colourful blooms! Example 1. Scroll down for Example 2!
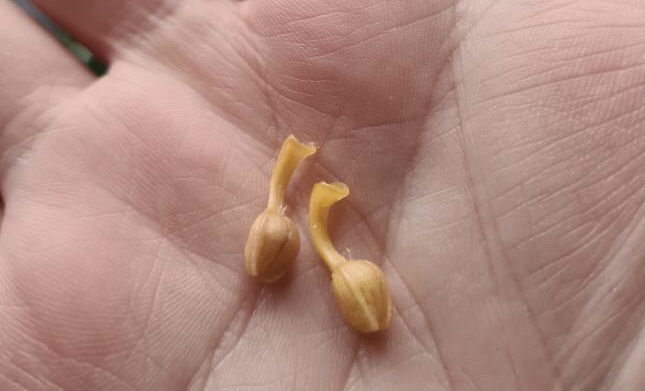 Image 6: Example 2.
If your Orchid begins to develop long, leggy leaves, this could be a sign of not enough light. THE HOUSEPLANT DOCTOR™ recommends relocating your plant to a sunless windowsill to increase the light, but without shocking it. (Never replace an Orchid from a dark area straight to a full-sun location due to sun scorch risks.
If your Orchid has lots of flowers but no leaves, the chances are it may die. THE HOUSEPLANT DOCTOR™ recommends to keep watering the pot (once its roots turn silver again) and wait a few months. Keep an eye on the plant's centre for any signs of new leaves emerging. If no new growth emerges after six months, the plant has died as its roots can survive for up to year without any leaves.
(Crown rot is another big issue among growers - have a look at Image 7 (below) to see what the disease looks like. Saturating the foliage each time you come to water an Orchid (especially during the night), will significantly increase the chance of this disease. For those who have this issue, remove the affected leaves and blow the excess moisture from its crown. If the whole base has softened over - it's game over.
 Image 7: Basal Rot (Sometimes referred to as 'Crown Rot')
Botrytis Petal Blight are small spots or patches that'll develop on the flowers' bodies, usually caused by misting or an over-humid location with poor air circulation. Remove the infected flowers or the complete stalk with sterile utensils to put a stop the airborne disease. Improve the air circulation and move to a slightly brighter location with no direct sunlight. Be careful not to saturate the flowers from there on in, and regularly inspect to see if it has spread. Click here for more info - Common Orchid Diseases
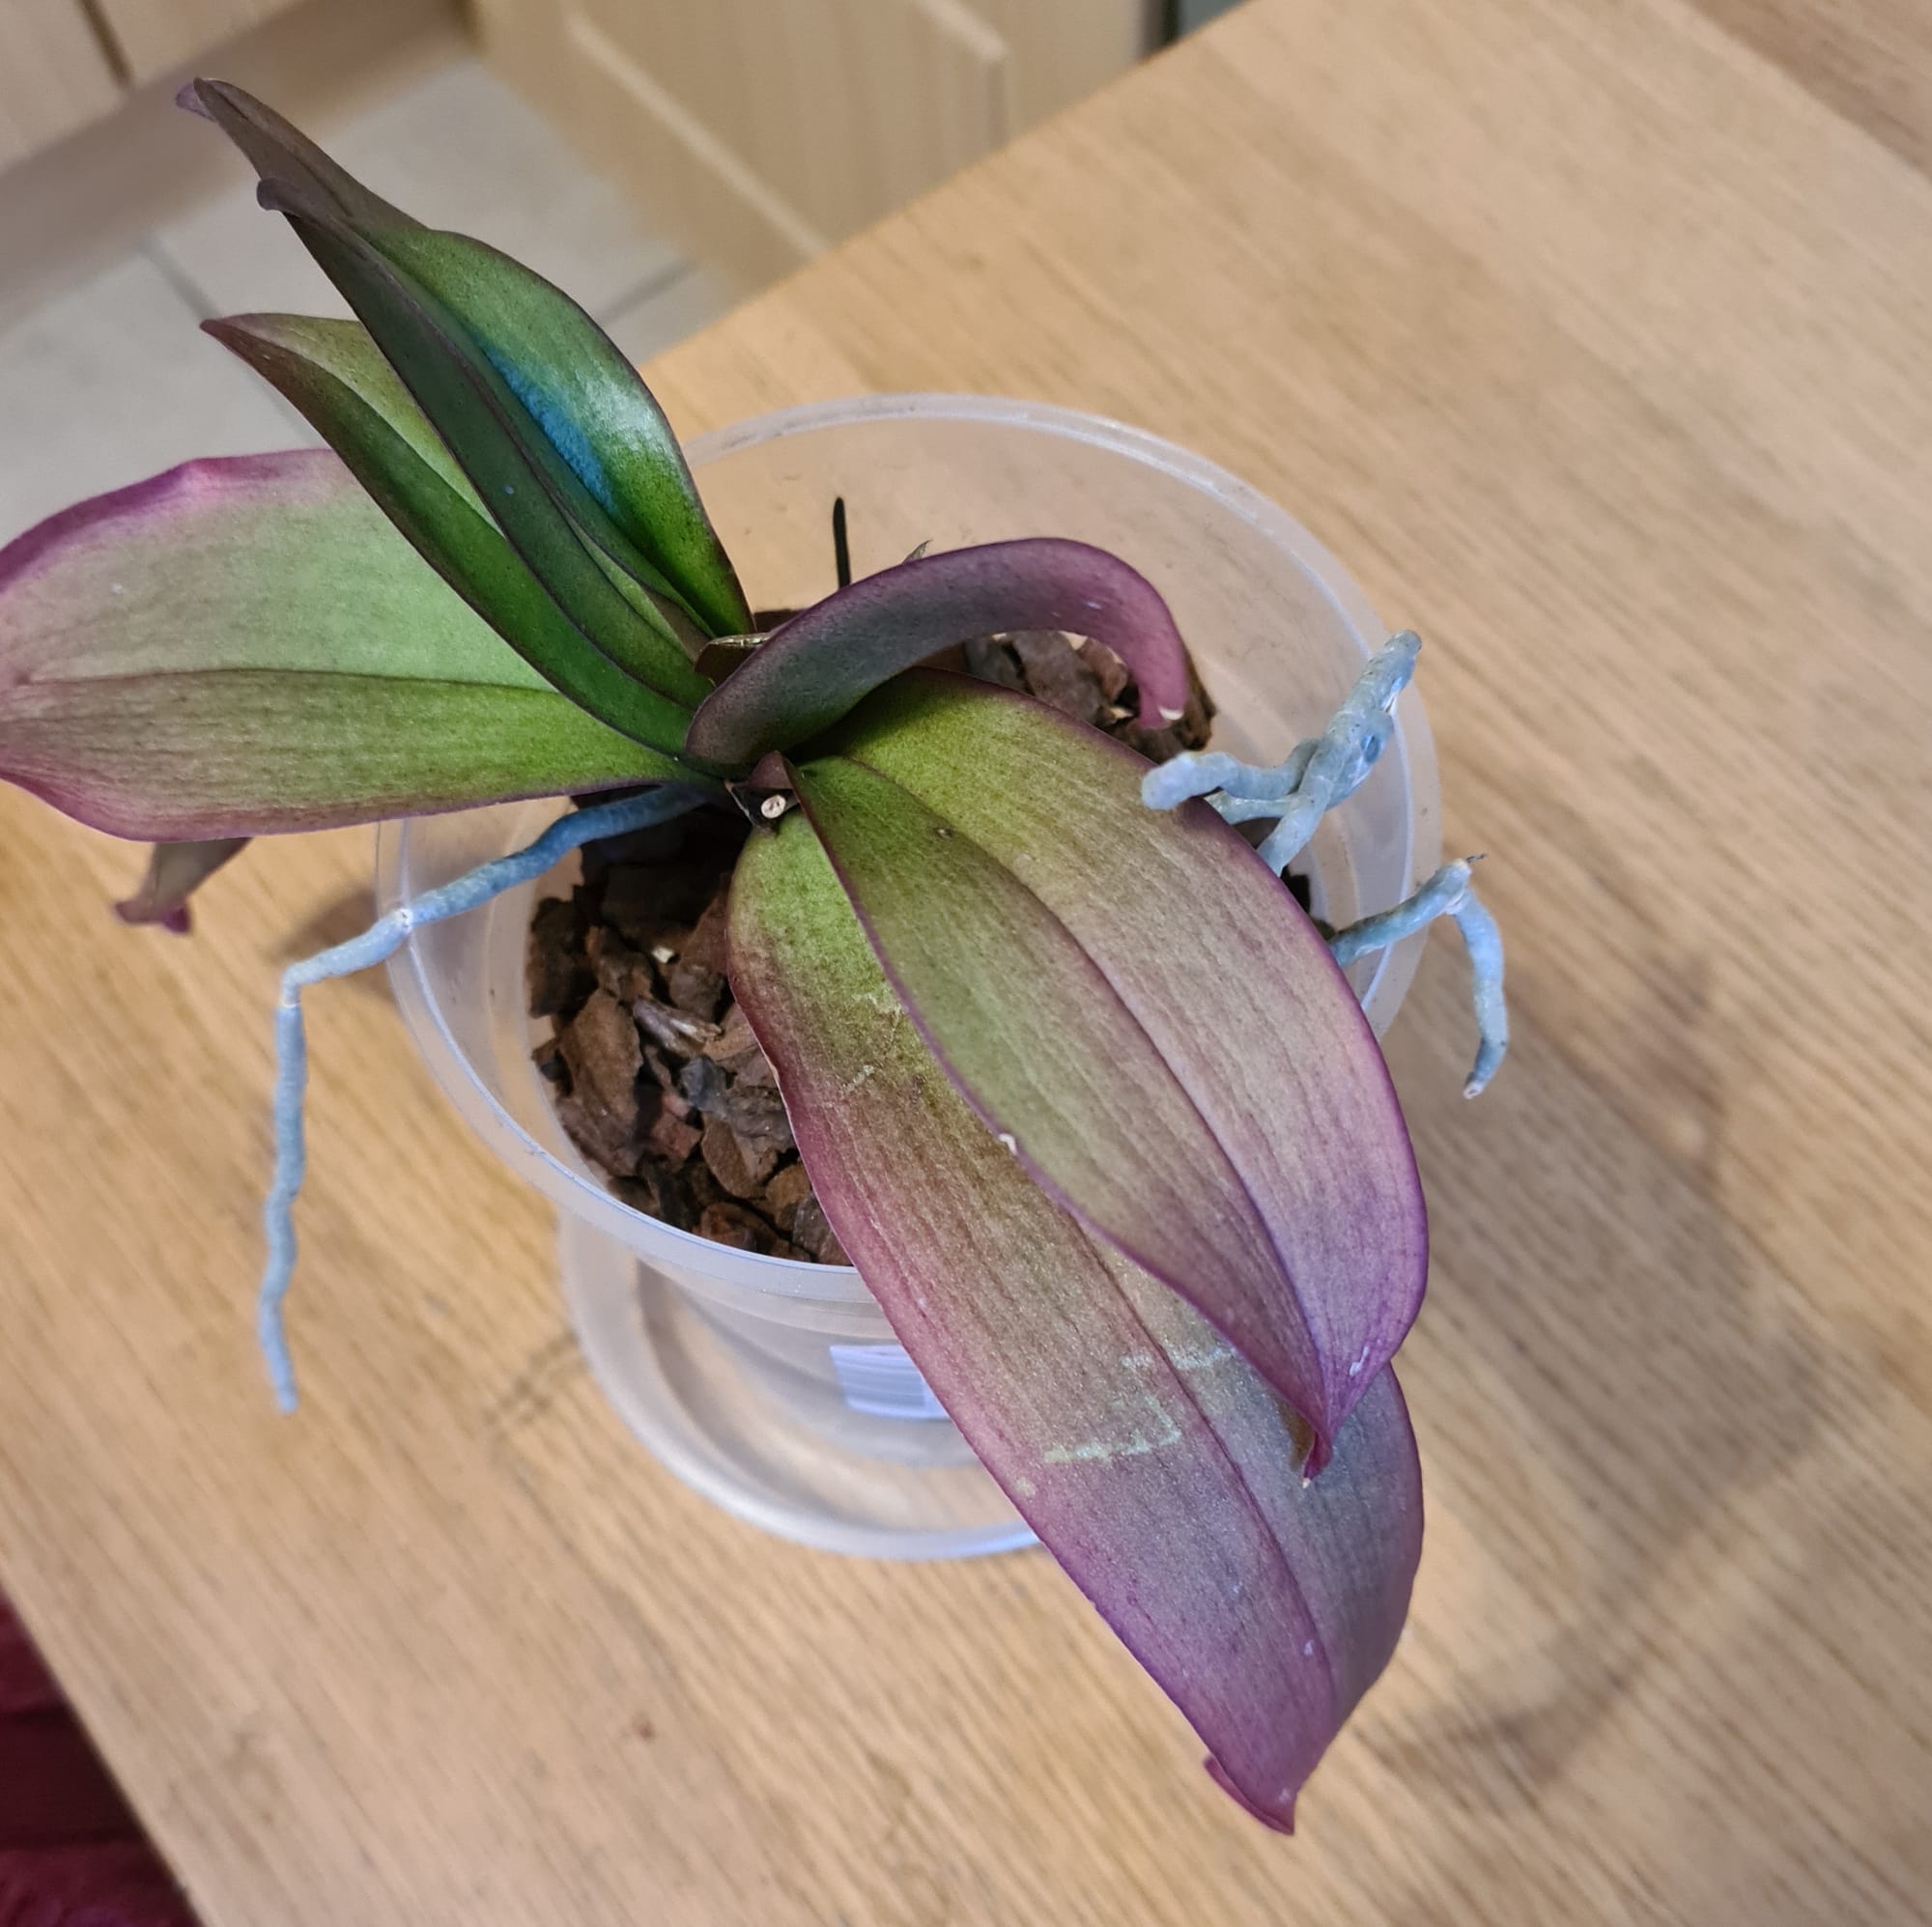 Image 8: Sun-scorch is a common problem with Orchids where the foliage turns red, purple and/or wrinkly, While still maintaining a bright windowsill, ensure your specimen doesn't receive any sunlight for recovery.
Yellowing leaves with small black patches or blotches are caused by the cold. Although this could just be a simple case of too low temperatures, other factors like draughts or a leaf resting against a cold window could also be at fault. Always provide a location that's above 12°C (54°F). For those who have kept the 'Keiki' attached, remove it once the roots surpass 3cm (2 inches) in length. Pot it into an Orchid Bark and immediately give it a splash of water, preventing excess moisture from settling on the foliage or cubbyholes. Provide a bright indirect setting with good air circulation and a humidity tray. Follow the care requirements mentioned at the top of the article.
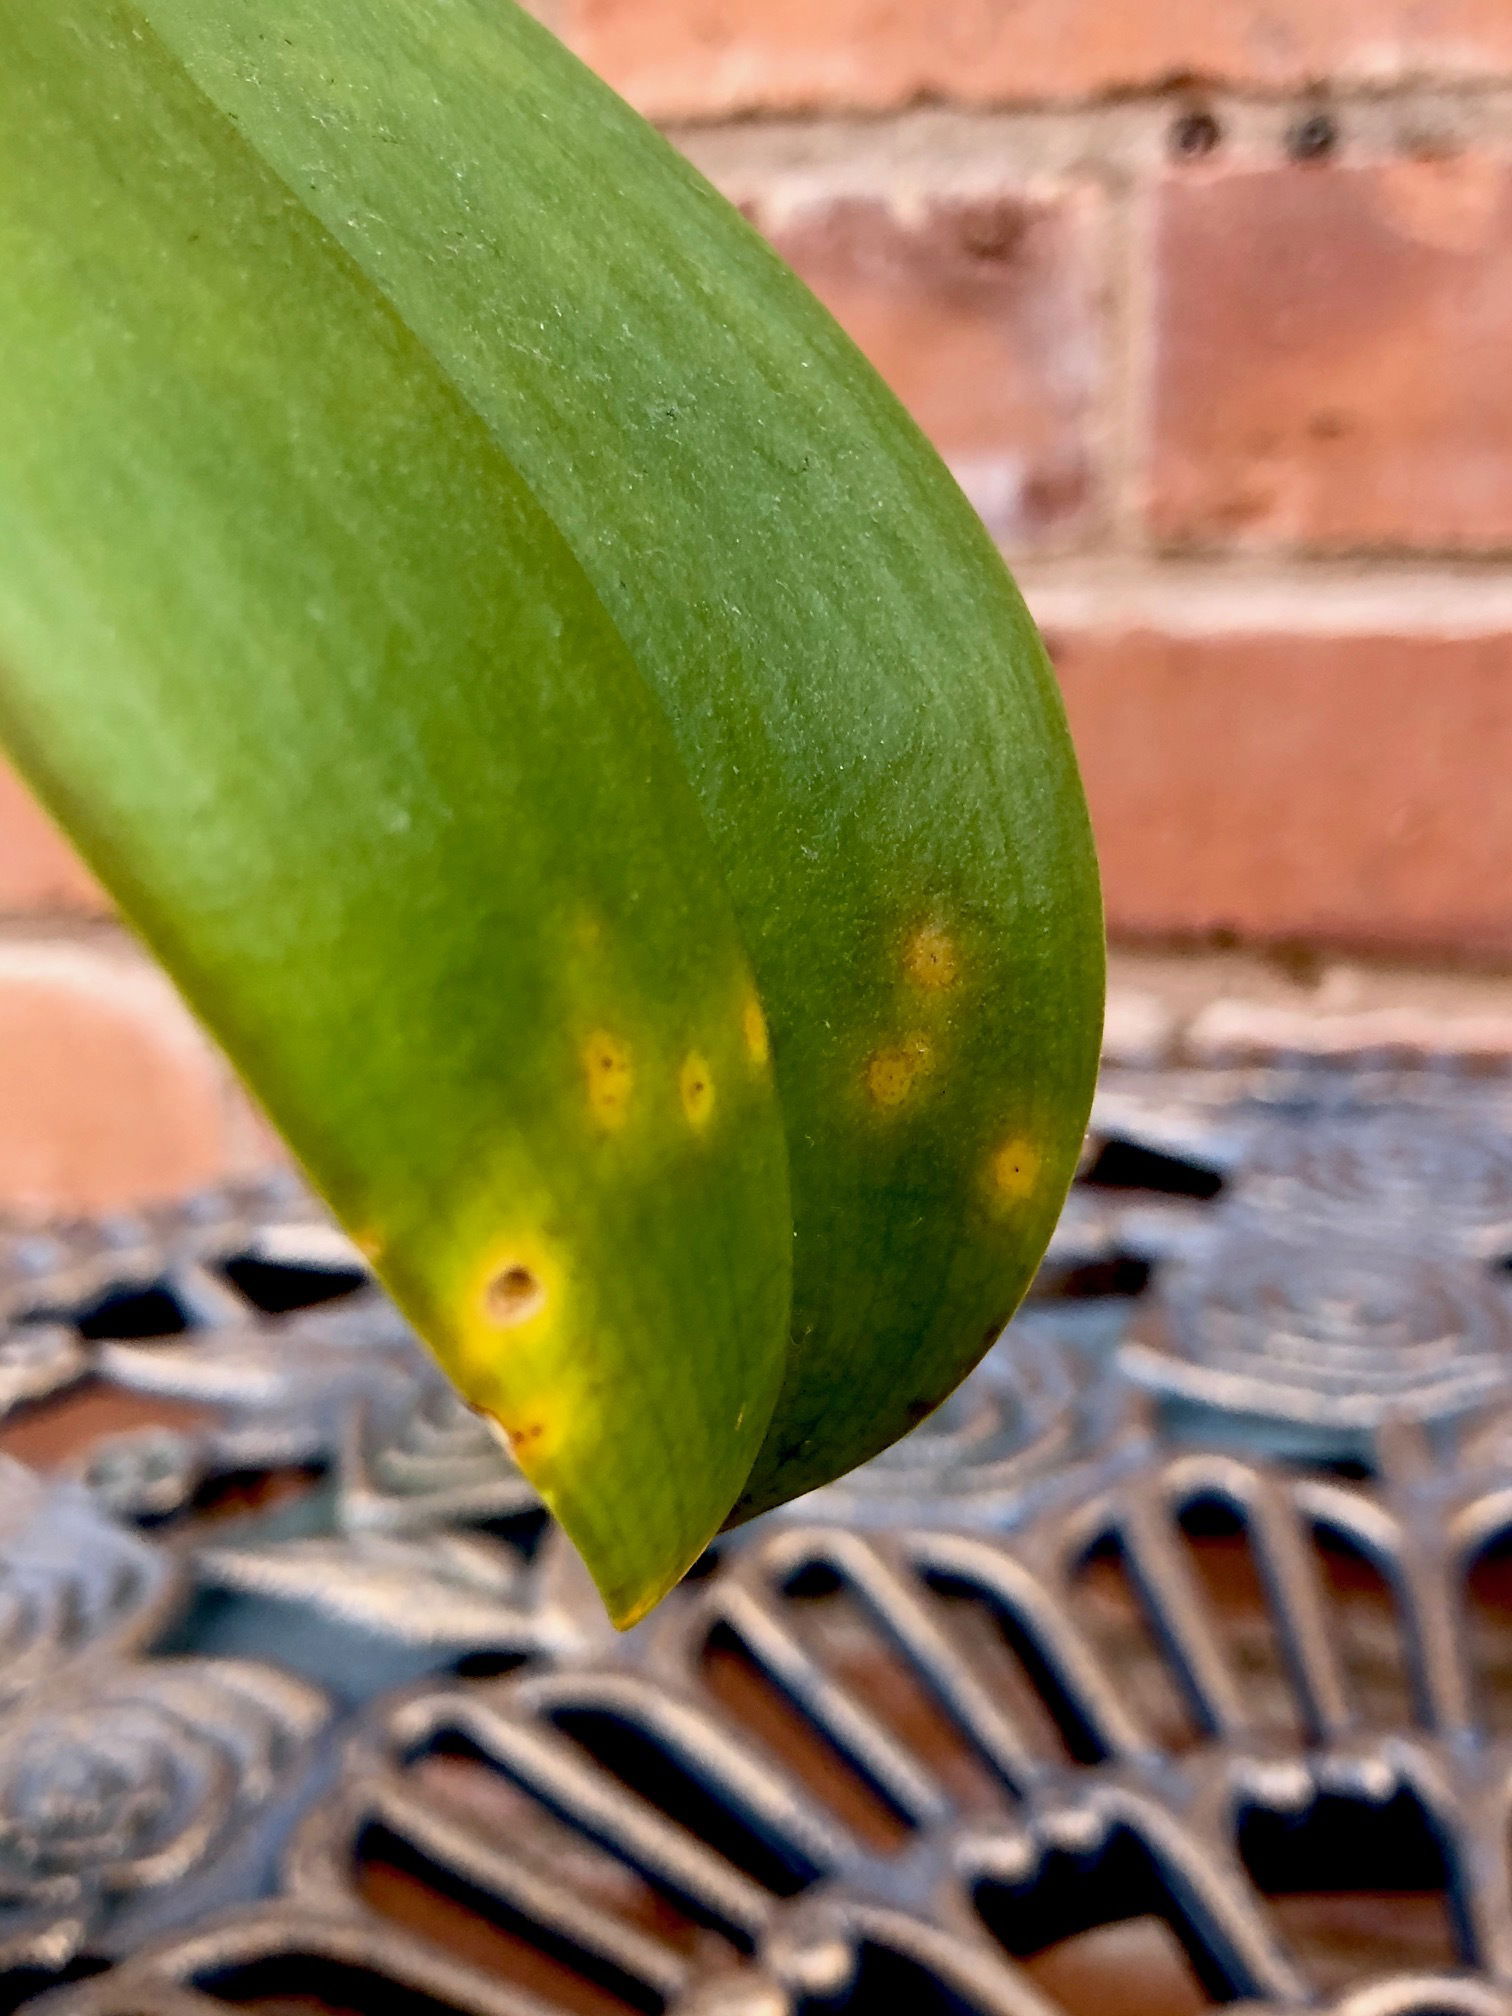 Image 9: These blotches are caused by the leaf resting against a cold window.
Related Articles - How to Achieve Yearly Orchid Blooms!
Origins
Phalaenopsis is a genus of over seventy species, mostly epiphytic (grows on trees) or lithophytic (grows on rocks) that originate from South East Asia and Northern Australia. Carl Ludwig Blume first described the Orchids back in 1825 in his book 'Bijdragen tot de flora van Nederlandsch Indië'. The botanical name, Phalaenopsis, derives from Ancient Greek, with phalaina meaning 'kind of moth' with the suffix, -opsis, 'having the appearance of'. The word 'Orchid' originates from the Latin word for testicle (Orchis), in reference to the swollen tubers/pseudobulbs on many species!
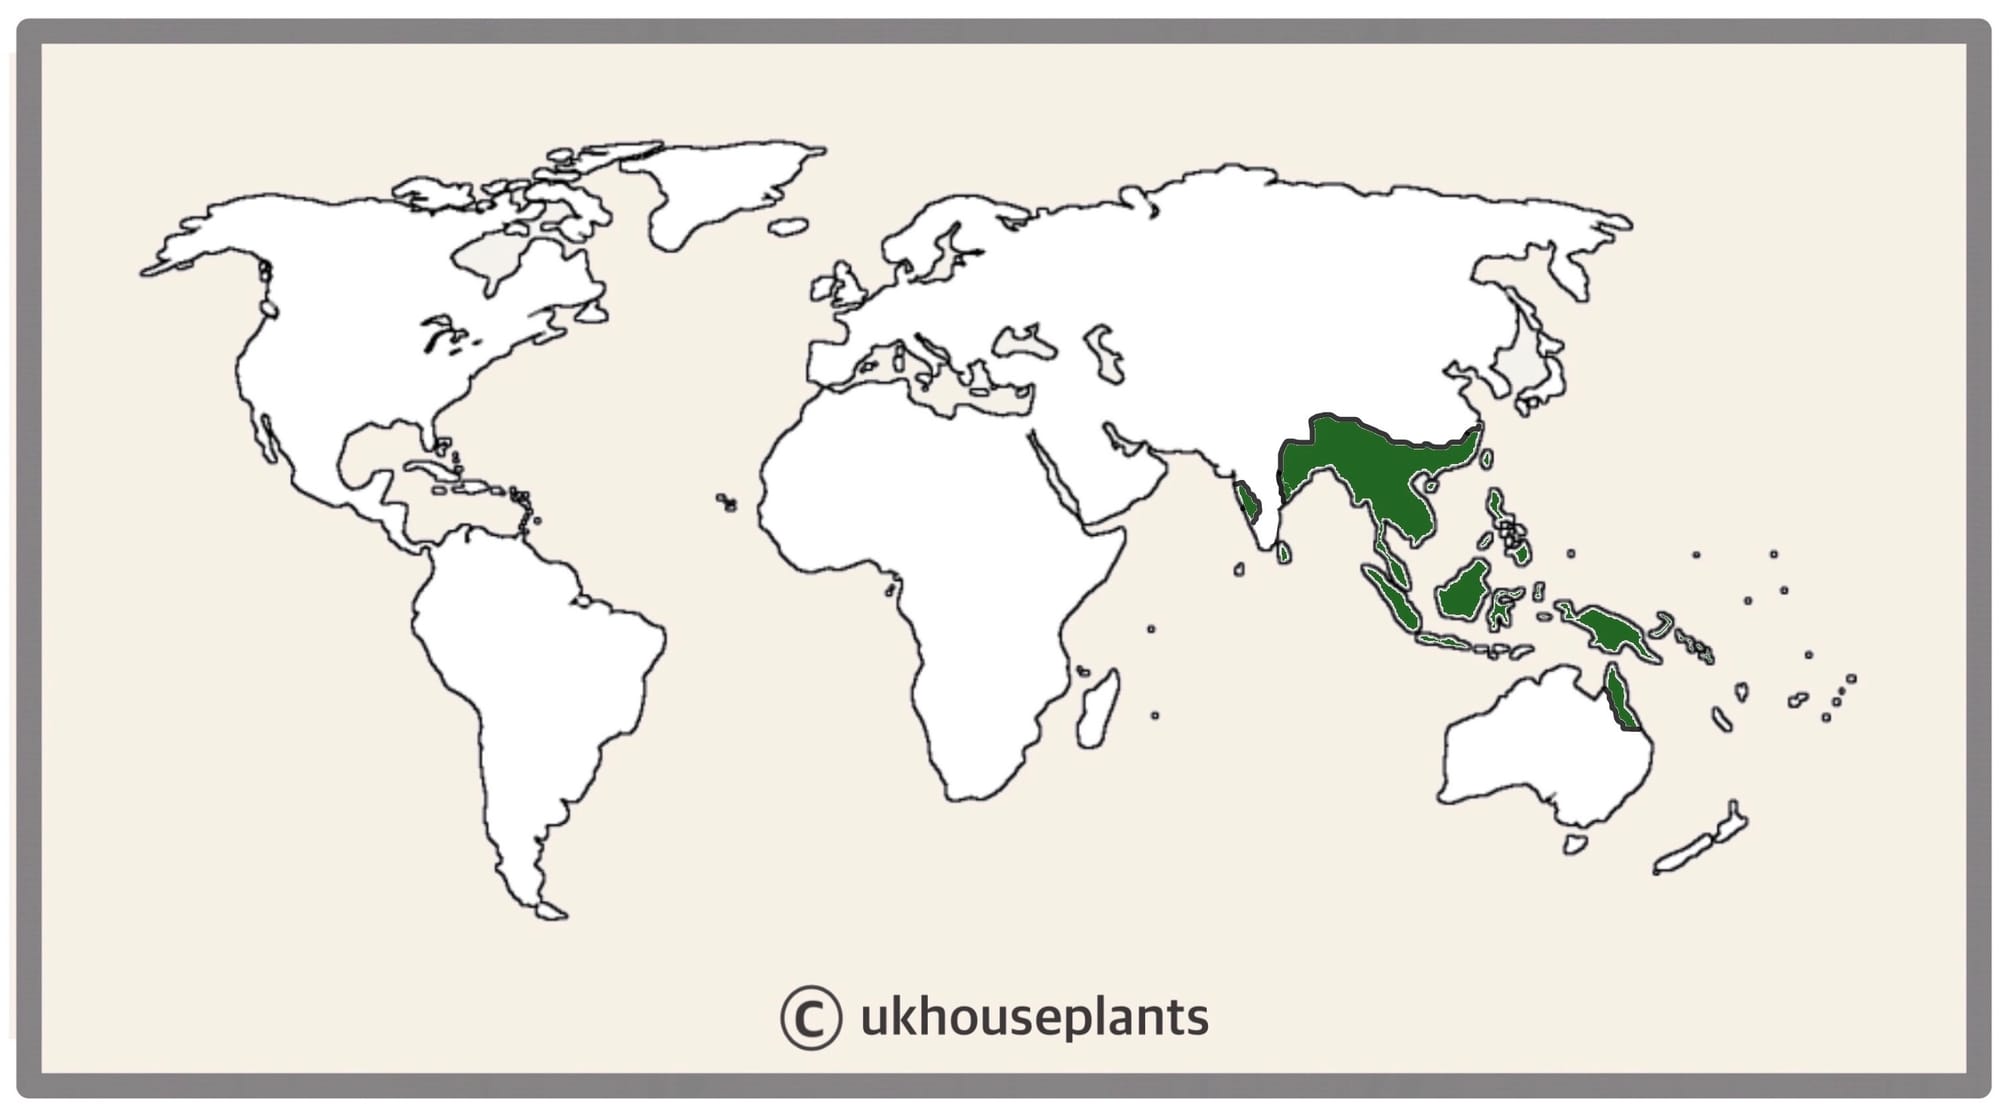 Image 10: The Distribution of Phalaenopsis.
Temperature
12° - 32°C (54° - 95°F)
H1a (Hardiness Zone 13) - Must be grown indoors or under glass all year round. Never allow temperatures to dip below 15℃ or permanent damage may occur in the likes of flower loss, stunted growth and yellowed leaves.
Reduce both the temperature by a couple of degrees, and frequency of waters to entice the Orchid to bloom from spring onwards.
Spread
The mature spread of an Orchid's foliage can be up to 30cm in height and 30cm in width. The ultimate height will take between 4 - 8 years to achieve, with one or two new leaves per season.
After ten years or so, you may see signs of slowed or dying growth on your Orchid. Why not have a go at taking stem cuttings to start a new root system? This method should lengthen your plant's lifespan by a few extra years! (See the 'Propagation' section below for more information on this!).
 Image 11: If the flower stalk's tip begins to decline, but with its lower flowers still healthy - prune off the top as shown above. Although this won't help the Orchid produce new blooms, it'll significantly prolong the lifespan of its current flowers!
Pruning & Maintenance
Remove yellow or dying leaves, and plant debris to encourage better-growing conditions. While pruning, always use clean scissors or shears to reduce the chance of bacterial and fungal diseases. Never cut through yellowed tissue as this may cause further damage in the likes of diseases or bacterial infections. Remember to make clean incisions as too-damaged wounds may shock the plant, causing weakened growth and a decline in health.
When the flowers start to die back at the top of the shaft, cut the stalk back down to a non-flowering node to promote a new source of flowers. This trick is regularly used by professionals to get the most out of an Orchid spike, so why not have a go yourself? Have a gander at the image below to learn more.
Note: If the flower stalks fully yellows over (from the tip to its base), prune it off as there won't be any new flowers developing. Only stalks that are still green will have the ability to produce new branches of flowers.
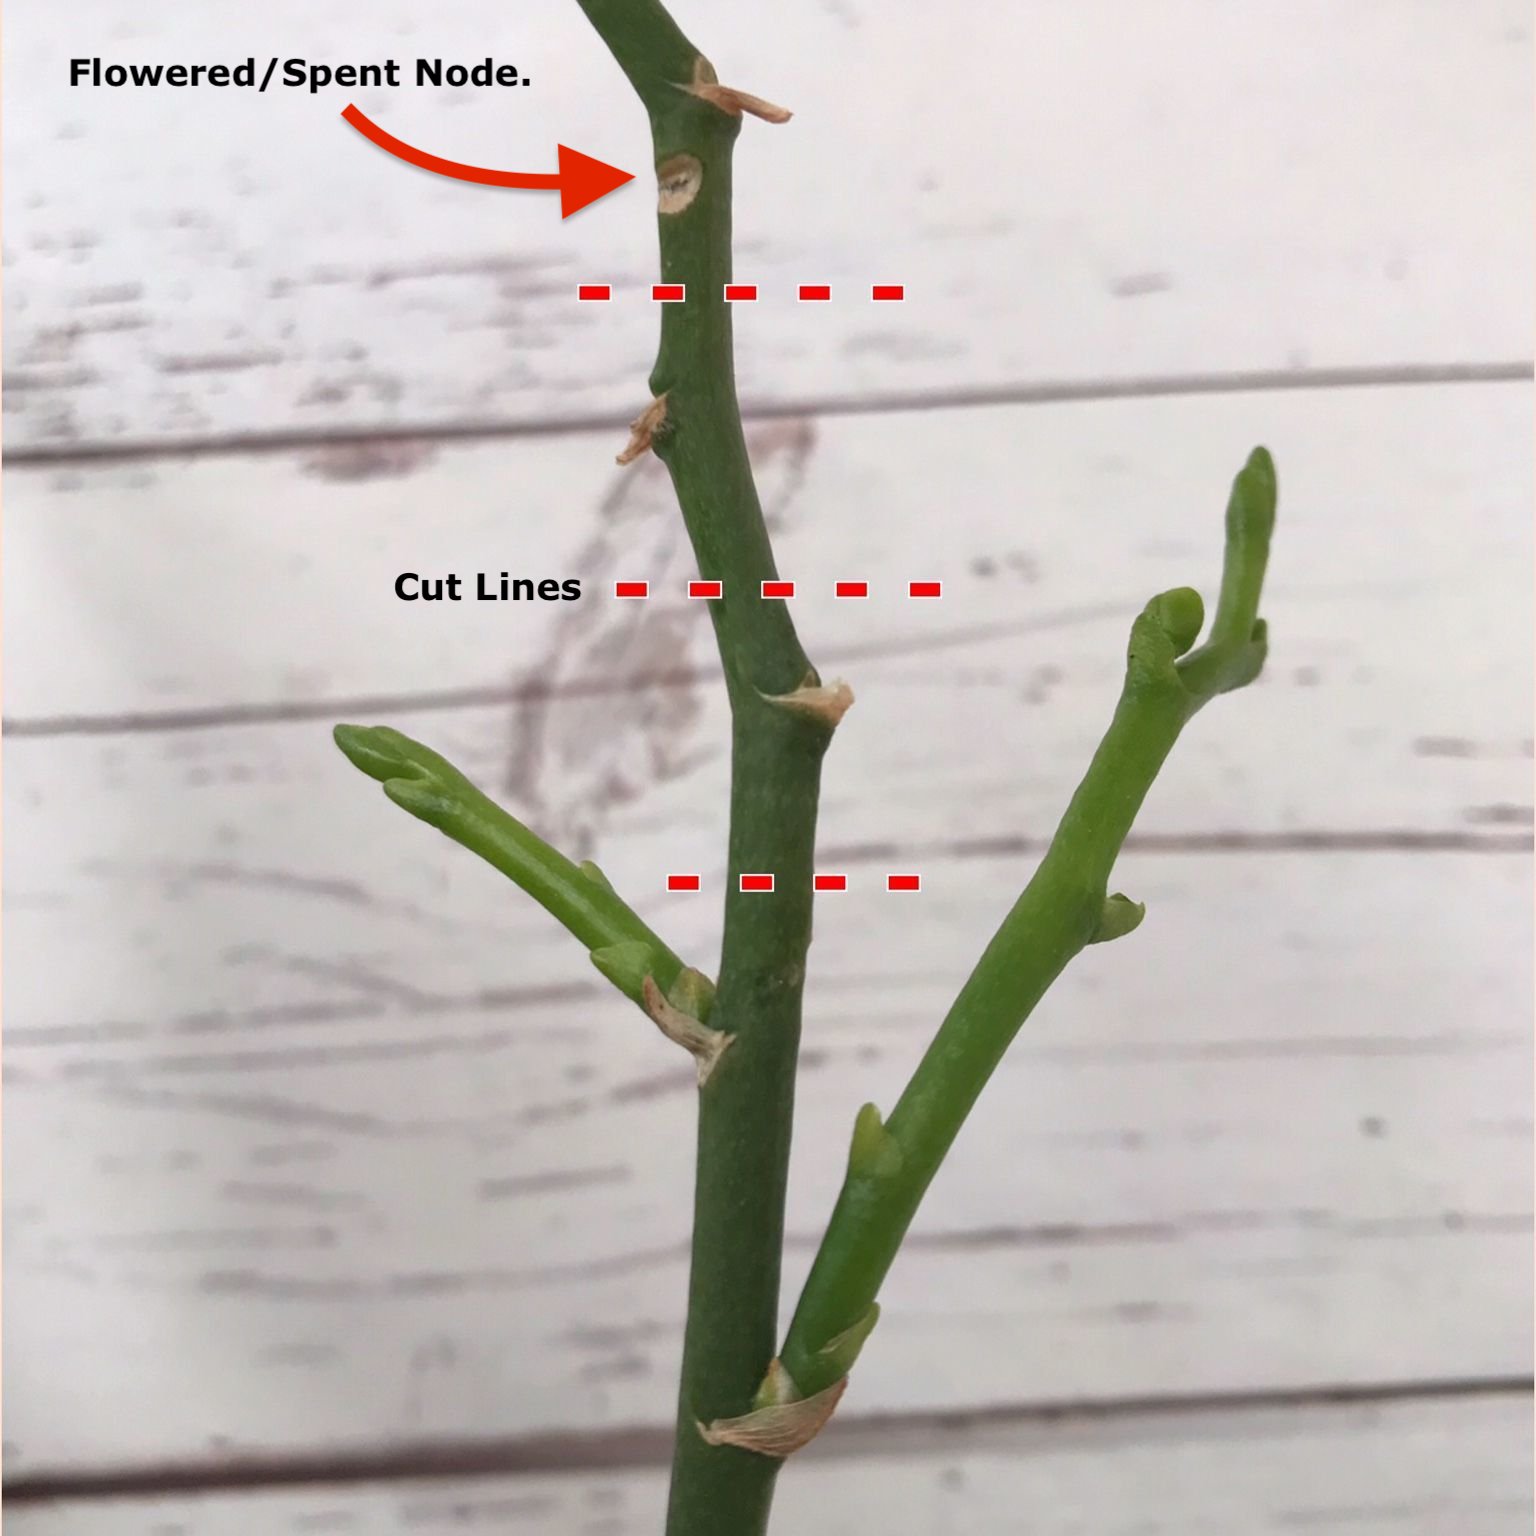
Image 12: Once the flowers eventually die at the top, cut the stalk to a non-flowering node (red dotted lines) to promote a cluster of new blooms below. This method is exactly the same for foliage-pruning garden plants to maintain a compact appearance.
Propagation
Via Seed, Plantlet Division (only some species) or 'Keiki' Cuttings. The obtaining and sowing of Orchid seeds is a difficult task that only horticulturists can achieve when using specialist equipment - so it's best to propagate with other methods.
Seeds (Difficult & Long-Winded) - Place the seeds on some seaweed agar in a transparent tub (with a lid). Close the lid to maintain high humidity and situate the tub in a bright, indirect setting with bottom-heat of 25℃ (77℉). Germination may take up to three months, so don't discard any unsuccessful seeds until this threshold has been exceeded. Don't open the tub until they reach a maturity state (up to a year) for the prevention of disease. Remove the seedlings once they surpass 5cm (2 inches) in height, along with an adequate amount of roots. Add water to the agar to remove it from the plant and set them in a 5cm bed of Orchid Bark. Maintain high humidity and bright indirect light to alleviate the severity of environmental shock, which can be achieved using a pebble tray. Follow the care requirements mentioned at the top.
Stem Cuttings (Easy) - This process is best performed when your Orchid is suffering from Root Rot or coming to the end of its life. Ensure its bare stem (between the leaves & above the bark/soil) is at least 5cm (2 inches) in length as too-small specimens may not have enough nodes to survive. Horizontally cut off the base of the Orchid around 2cm (1 inch) above the bark/soil line & discard the rest of the plant. In essence, you should aim to be holding the top half of the loose Orchid (the leaves) with its base that may or may not be holding roots, but now shouldn't be connected to the previous potting medium (pine bark or soil, etc.). Prune off any yellow, brown or hollow roots, whilst keeping any silver or green roots to quicken rehabillitation. (Don't worry if there are no roots as they will re-emerge when repotted). Check for any issues of basal rot by looking at the colour of the cutting's open wound (cream coloured & moist signifies good health so continue to the next step. A brown or dried wound means that part of the stem has died, so horizontally trim/reduce the Orchid's base until it shows signs of health). With a 12cm transparent plastic Orchid pot, fill the bottom quarter with Sphagnum Moss before resting the plant's base (& any roots) on top and continue to fill until it's full. Pour 100ml of tepid water and place the plant in a bright windowsill, avoiding dehydration at all costs. If there's an issue of wilting, wrap the plant (& its pot) in a transparent shopping bag to increase the humidity and downplay dehydration symptoms.
Plantlet Division (Easy) - It's best to divide between spring and summer with plantlets that are at least a third of the size of the mother plant with several developed roots. Take the plant out of its pot and place your hand in between the two plants; soil may have to be removed to get a better grip. While placing your hand as close to the nodal junction, gently push the pup downwards, while supporting the mother plant - you should hear a snap. Cautiously separate both the mother plant and pup's roots systems, keeping great empathise in keeping the roots intact and undamaged. Place the new plantlet in an Orchid compost, much similar to the original soil, and maintain the same care routines. Don't use a pot that is too big as a ratio of roots-soil that much leans towards the latter will cause root rot.
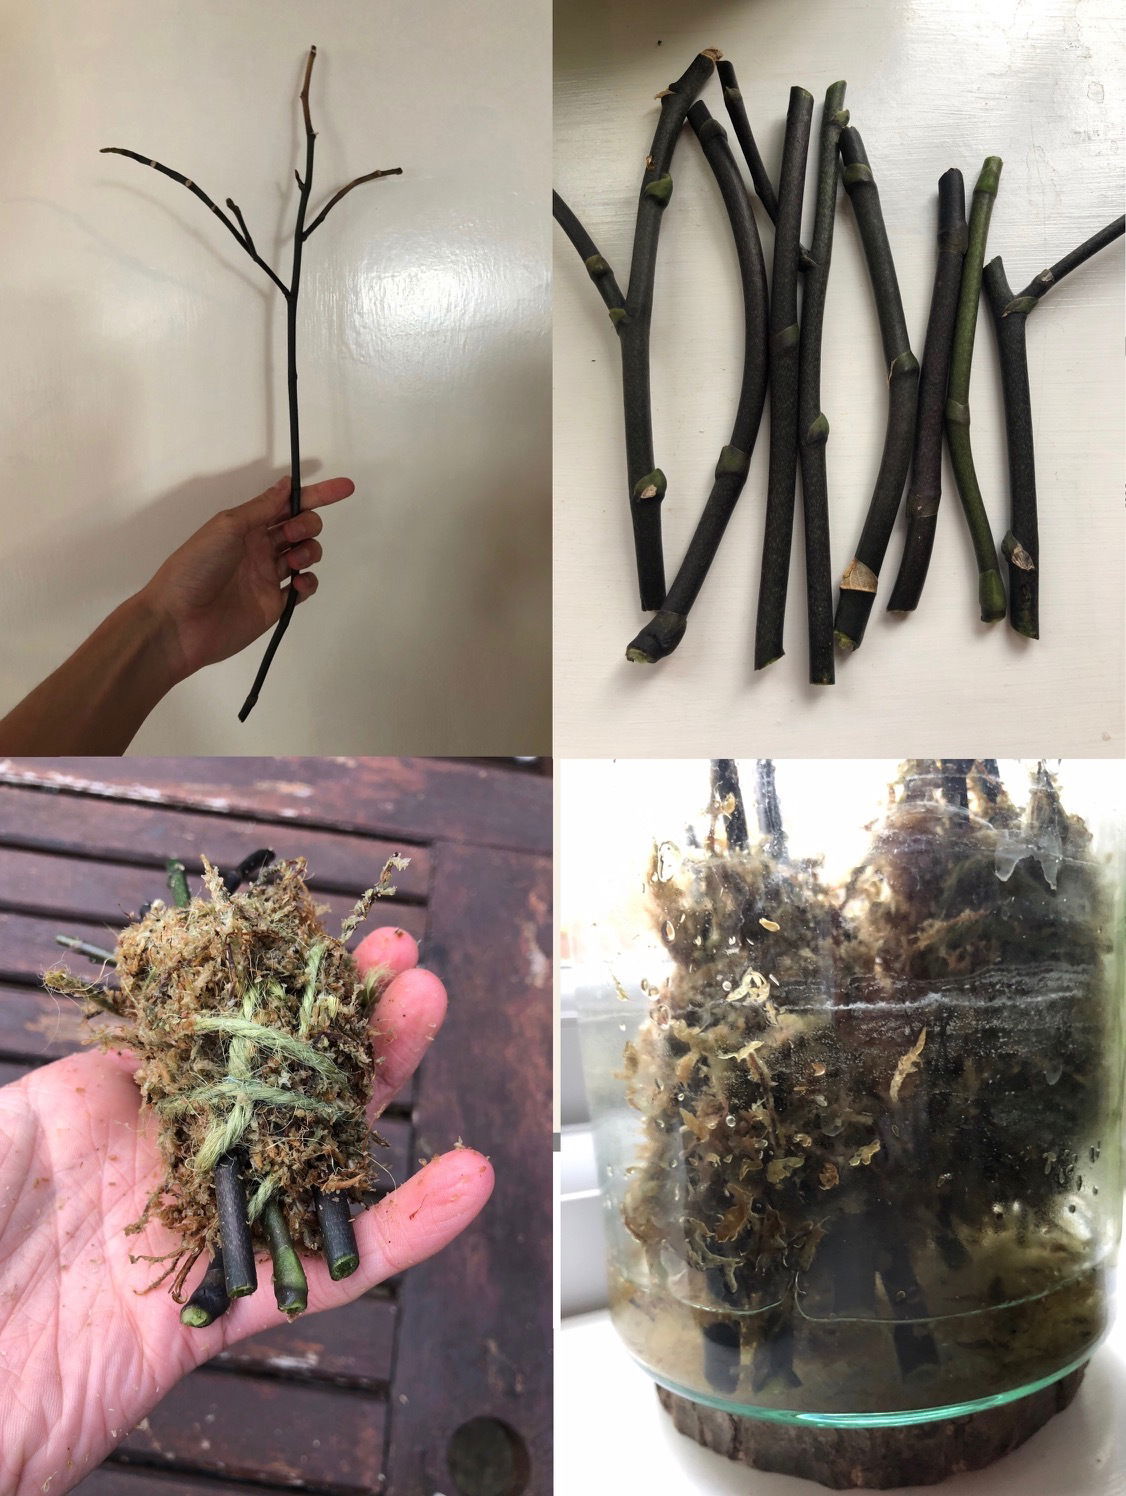 Image 13: Flower Stalk Cuttings for the Development of 'Keiki''s.
'Keiki' Cuttings (Easy) - Small offsets, or 'a Keiki', will develop along the mother plant's flower stalks on various non-flowering nodes. You can either leave the bare stems attached to the mother plant for one to develop, or remove a whole stem to cut into 20cm intervals that have at least two nodes.
For those who choose the latter method, tightly wrap the bottom half in sphagnum moss and place it in a tall transparent container (a vase, etc.). Pour water into the container so that the stem's bottom quarter is submerged, along with the moss' lower portion. Attach a perforated sheet of plastic on top of the container to provide steady airflow with more oxygen. New pointed buds should develop within a few weeks. Keep the container in a warm, bright location with temperatures above 25℃ (77℉) along with an hour of morning sun. You may have to mist the moss' top infrequently to maintain high humidity and hydration. Once the 'Keiki' has three inches of roots, cut the stem around two inches below the node, and place it a 5cm transparent pot with Orchid Bark. This method should only take around four months in total.
If you've kept the 'Keiki' attached, remove it once the roots surpass 3cm (2 inches) in length (see IMage 15). Pot it into an Orchid Bark and immediately give it a splash of water, preventing excess moisture from settling on the foliage or cubbyholes. Provide a bright indirect setting with good air circulation and a humidity tray. Follow the care requirements mentioned at the top of the article.
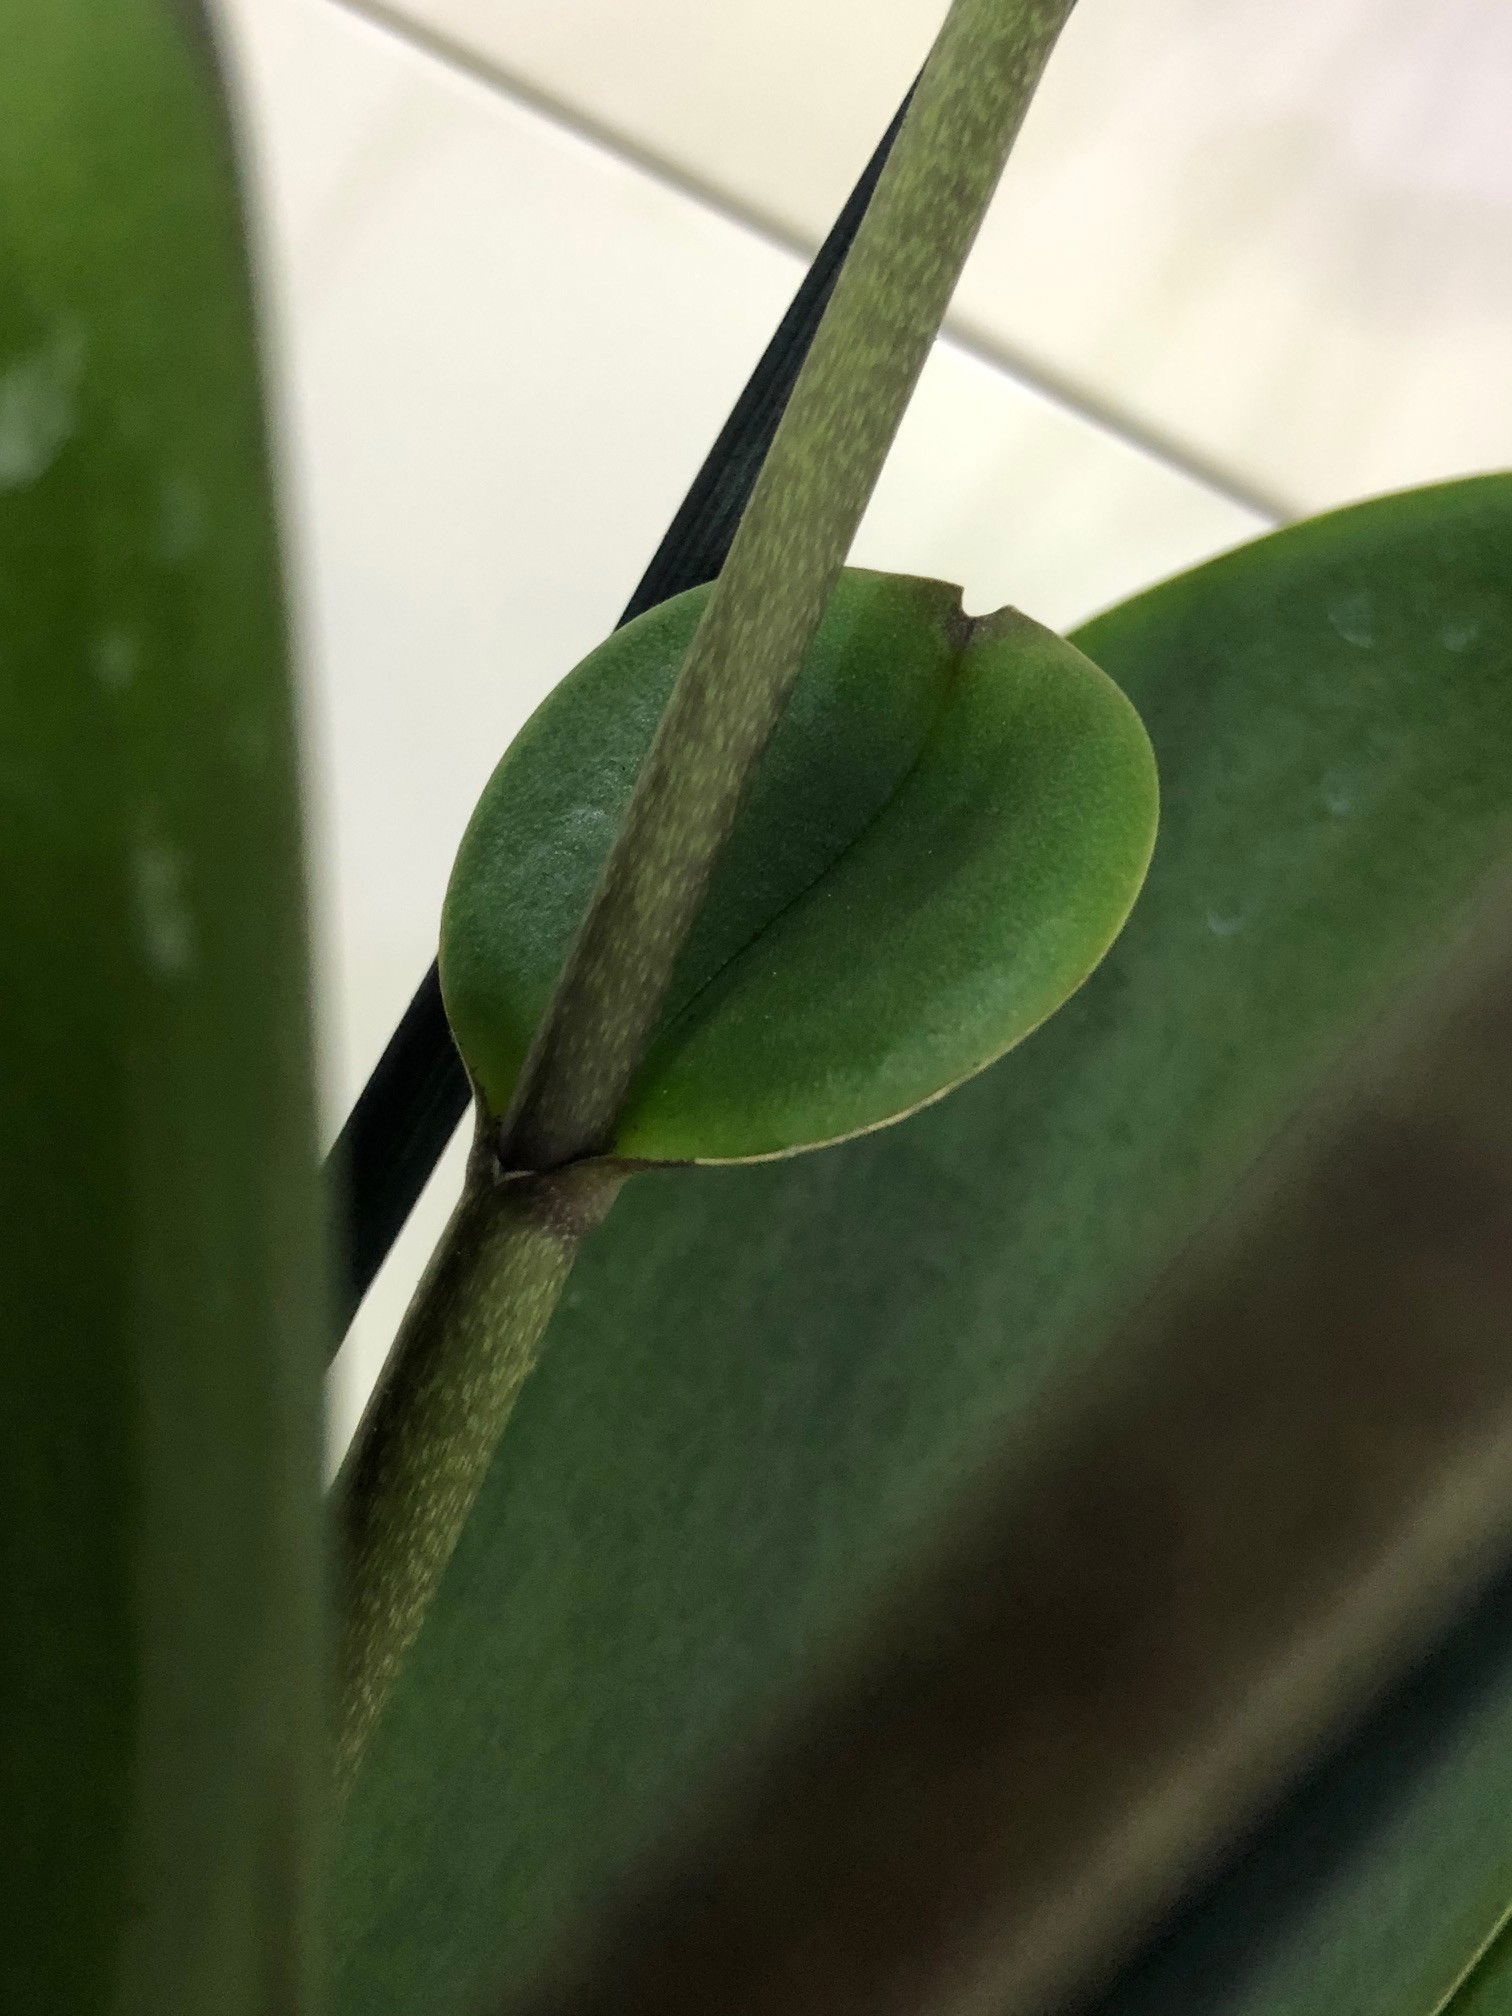 Image 14: A juvenile 'Keiki' that can be propagated once two inches of roots have appeared which can take up to two years. See the image below for a matured Keiki!
 Image 15: A matured Keiki that's ready to be split from the mother plant into its own 7cm pot of Sphagnum Moss or Orchid Bark.
Flowers
Each individual flower can last up to three months with the overall show lasting two months+. Although naturally they'll bloom in the winter and early spring months, specimens can flower at any given time if the ambient temperature is low enough (with slight under-watering). Its genus name, Phalaenopsis, directly refers to its enlarged petals that look like moths.
Remember to use an Orchid-labelled feed to enhance the flowering process. This contains high levels of phosphorus that'll both lengthen the blooms and keep the individual flower healthier looking!
Repotting
Want to know a secret of ours? Keep your Orchid pot bound to restrict its growth for future flowering sessions. They'll be under threat by the challenging environment and because of the Orchid's perception of stress, a flower shaft will eventually be produced to pass on its genes to the next generation.
But when it is time for a transplant, do so in the spring months and whilst the plant ISN'T flowering. Tinkering with its root system during this time will shock the roots and lead to a potential shedding of flowers. Don't worry if you snap the roots whilst repotting as it'll re-fuse again within the following few weeks.
Orchid Repotting Steps
1. Always repot your Orchid in the next sized pot (i.e. from a 12cm pot to a 15cm) that's transparent and choose between using either our Orchid-Bark or Sphagnum Moss. We prefer the latter as the root systems can form a symbiosis relationship with the live moss that promotes a more root-encouraging environment for your plant.
2. Remove the Orchid from its current pot and prune away the yellow, brown or hollow/squishy roots back to the plant's stem. While holding the stem and foliage, shake the Orchid's base to release any old bark that's become mushy and redundant. Any bark that is fused onto the roots can remain on the plant.
3. With your new transparent pot, fill the bottom quarter with the new bark or moss and sit the orchid in the middle. Don't cover the foliage with the potting medium as this increases the risk of leaf rot. Fill the remaining gaps between the roots in the pot and give the potting medium a good soak of tepid water with Orchid Feed. If your specimen has considerable Root Rot, be sure to read our tips on Stem Cuttings in the 'Propagation' section above.
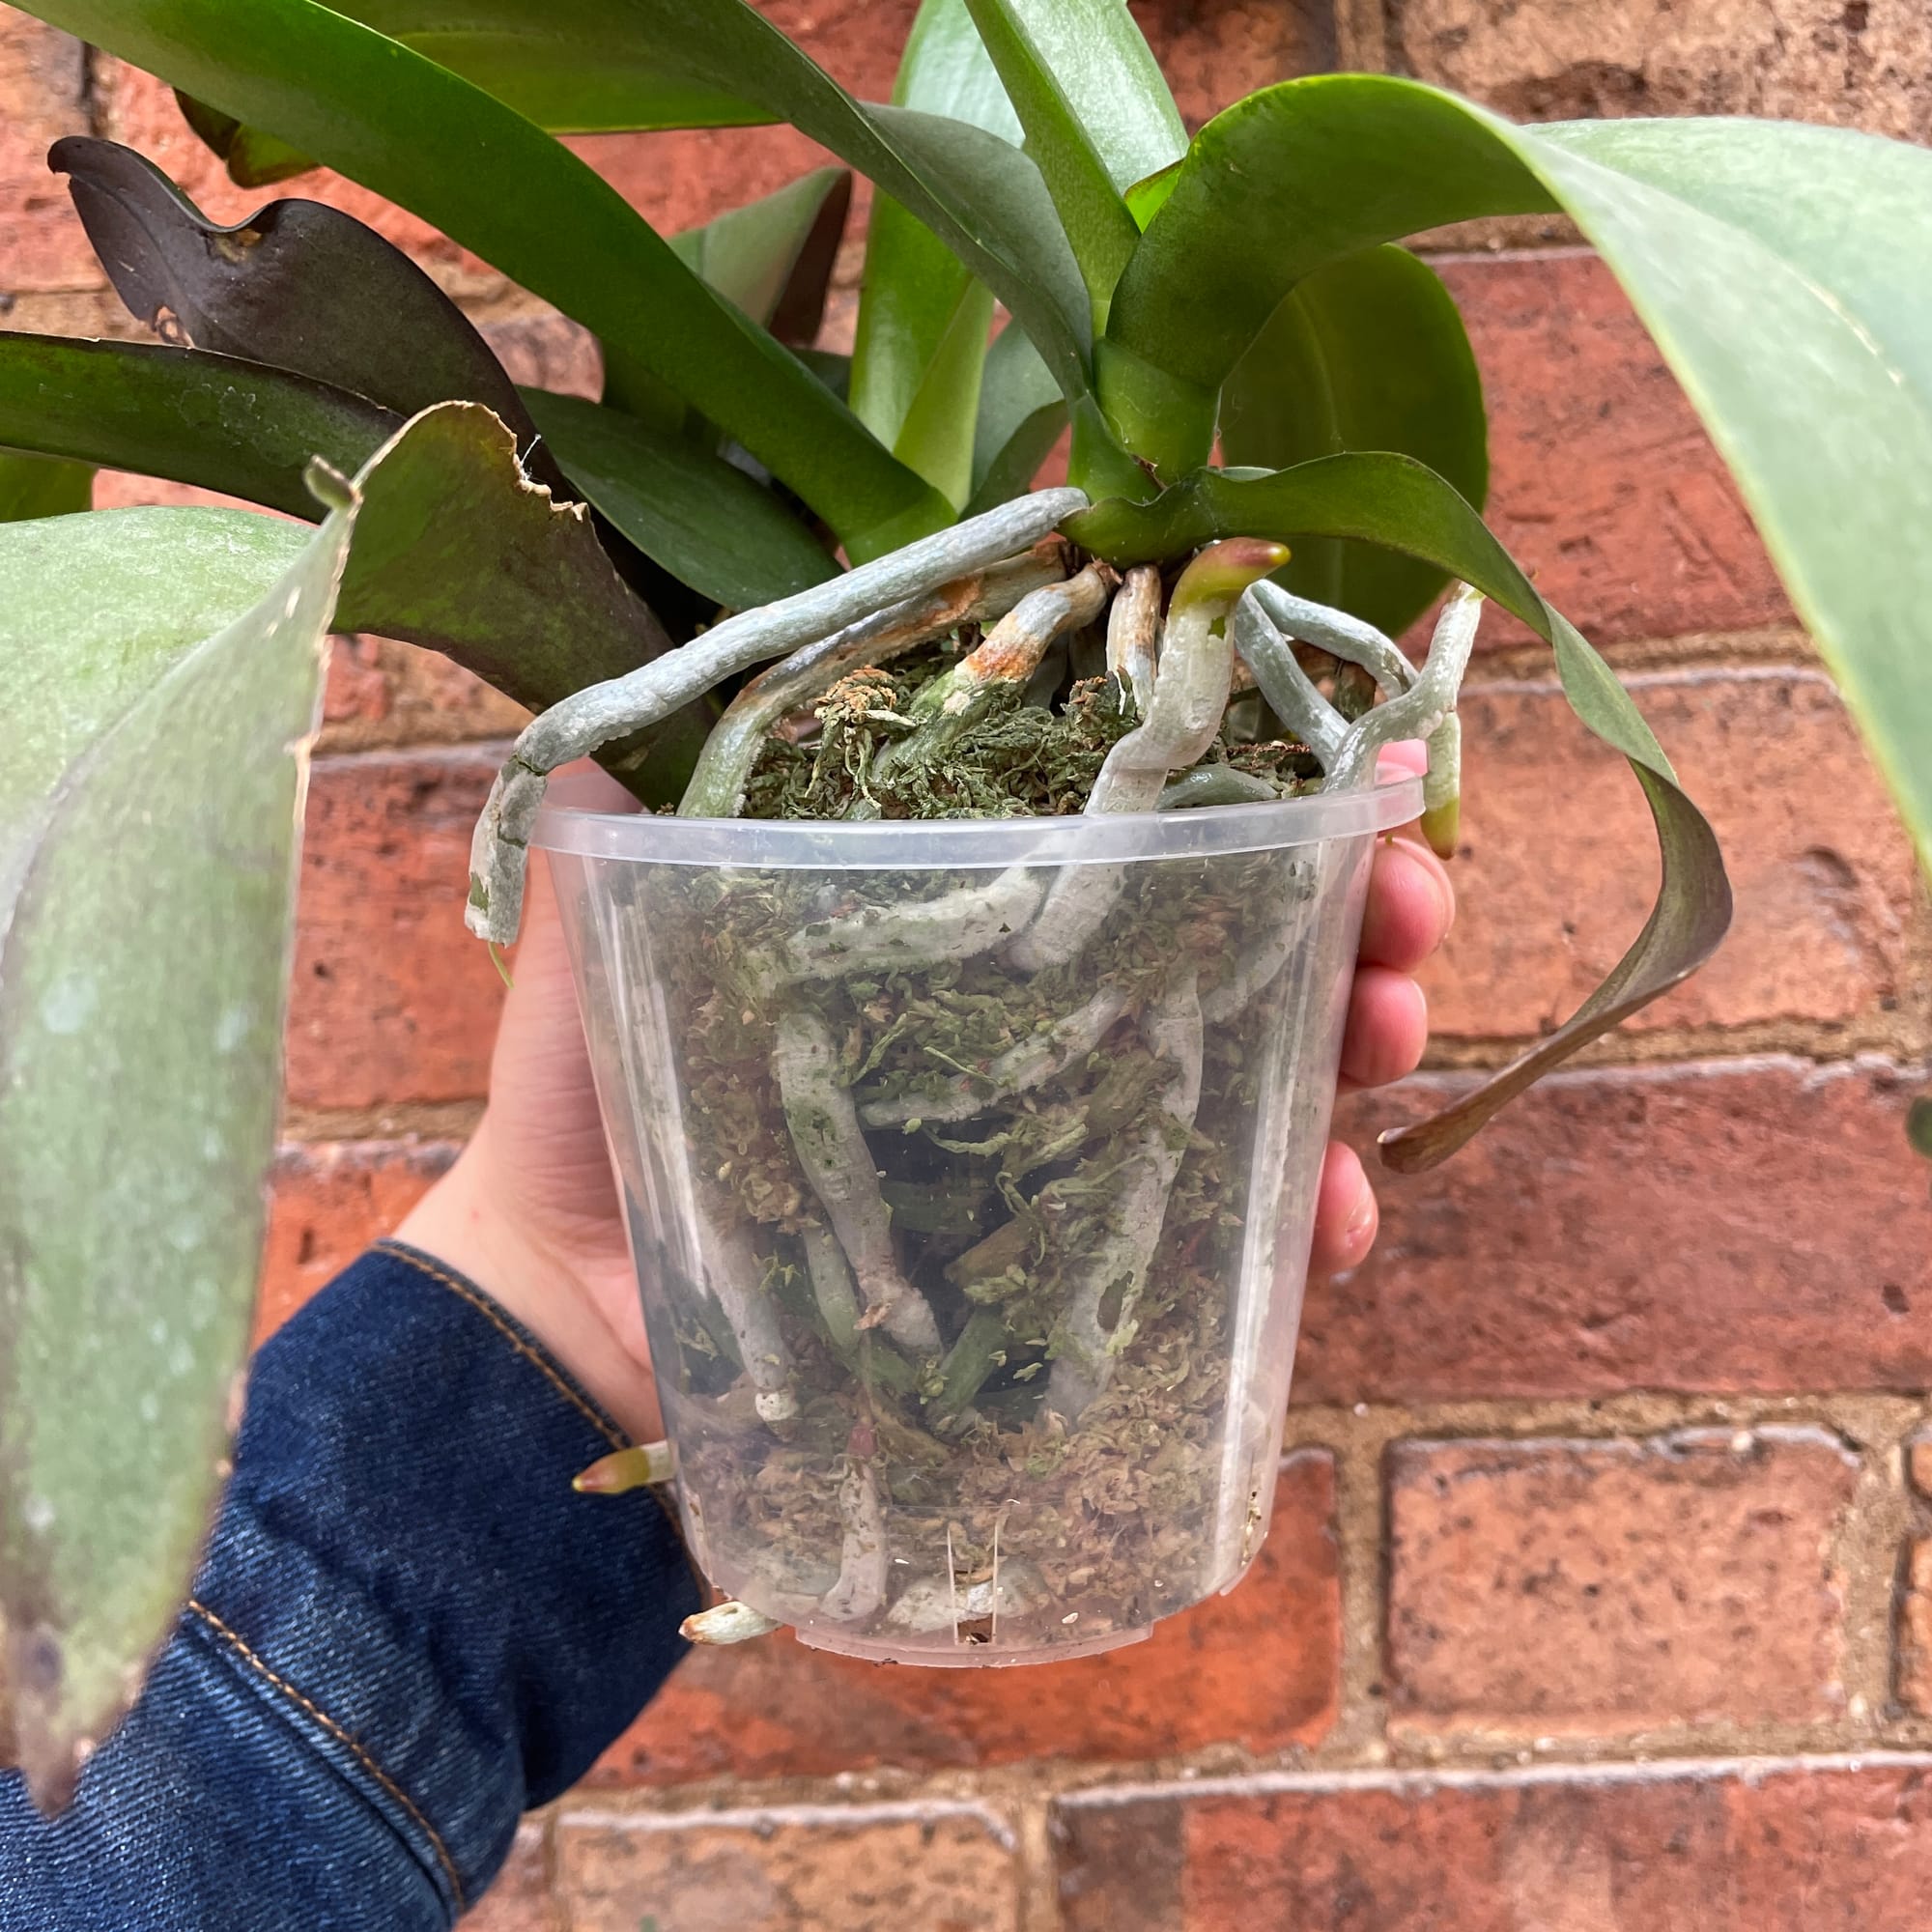 Image 16: We prefer to repot our Orchids with Sphagnum Moss as it can form a symbiosis relationship with the root system. Click on the image to purchase moss from our online store! (UK only)
Pests & Diseases
Keep an eye out for mealybugs (the most common pest), scale, aphids (on the flowers), slugs & vine weevils. Common diseases associated with Orchids are collar rot, root rot, botrytis (grey mould), guignardia, black rot & anthracnose. Scroll down for more information on Mealybugs on Orchids.
Be aware that due to the leaf's open stomata, the application of a chemical-based pesticide may burn the plant's leaves & flowers. Always use pesticides that are designed for Orchids, or have a go at making your own anti-pest solution with 1 part washing detergent (Fairy Liquid, etc.) and 8 parts warm water. Wipe both sides of the leaves and the plant's crown with a damp cloth once a week.
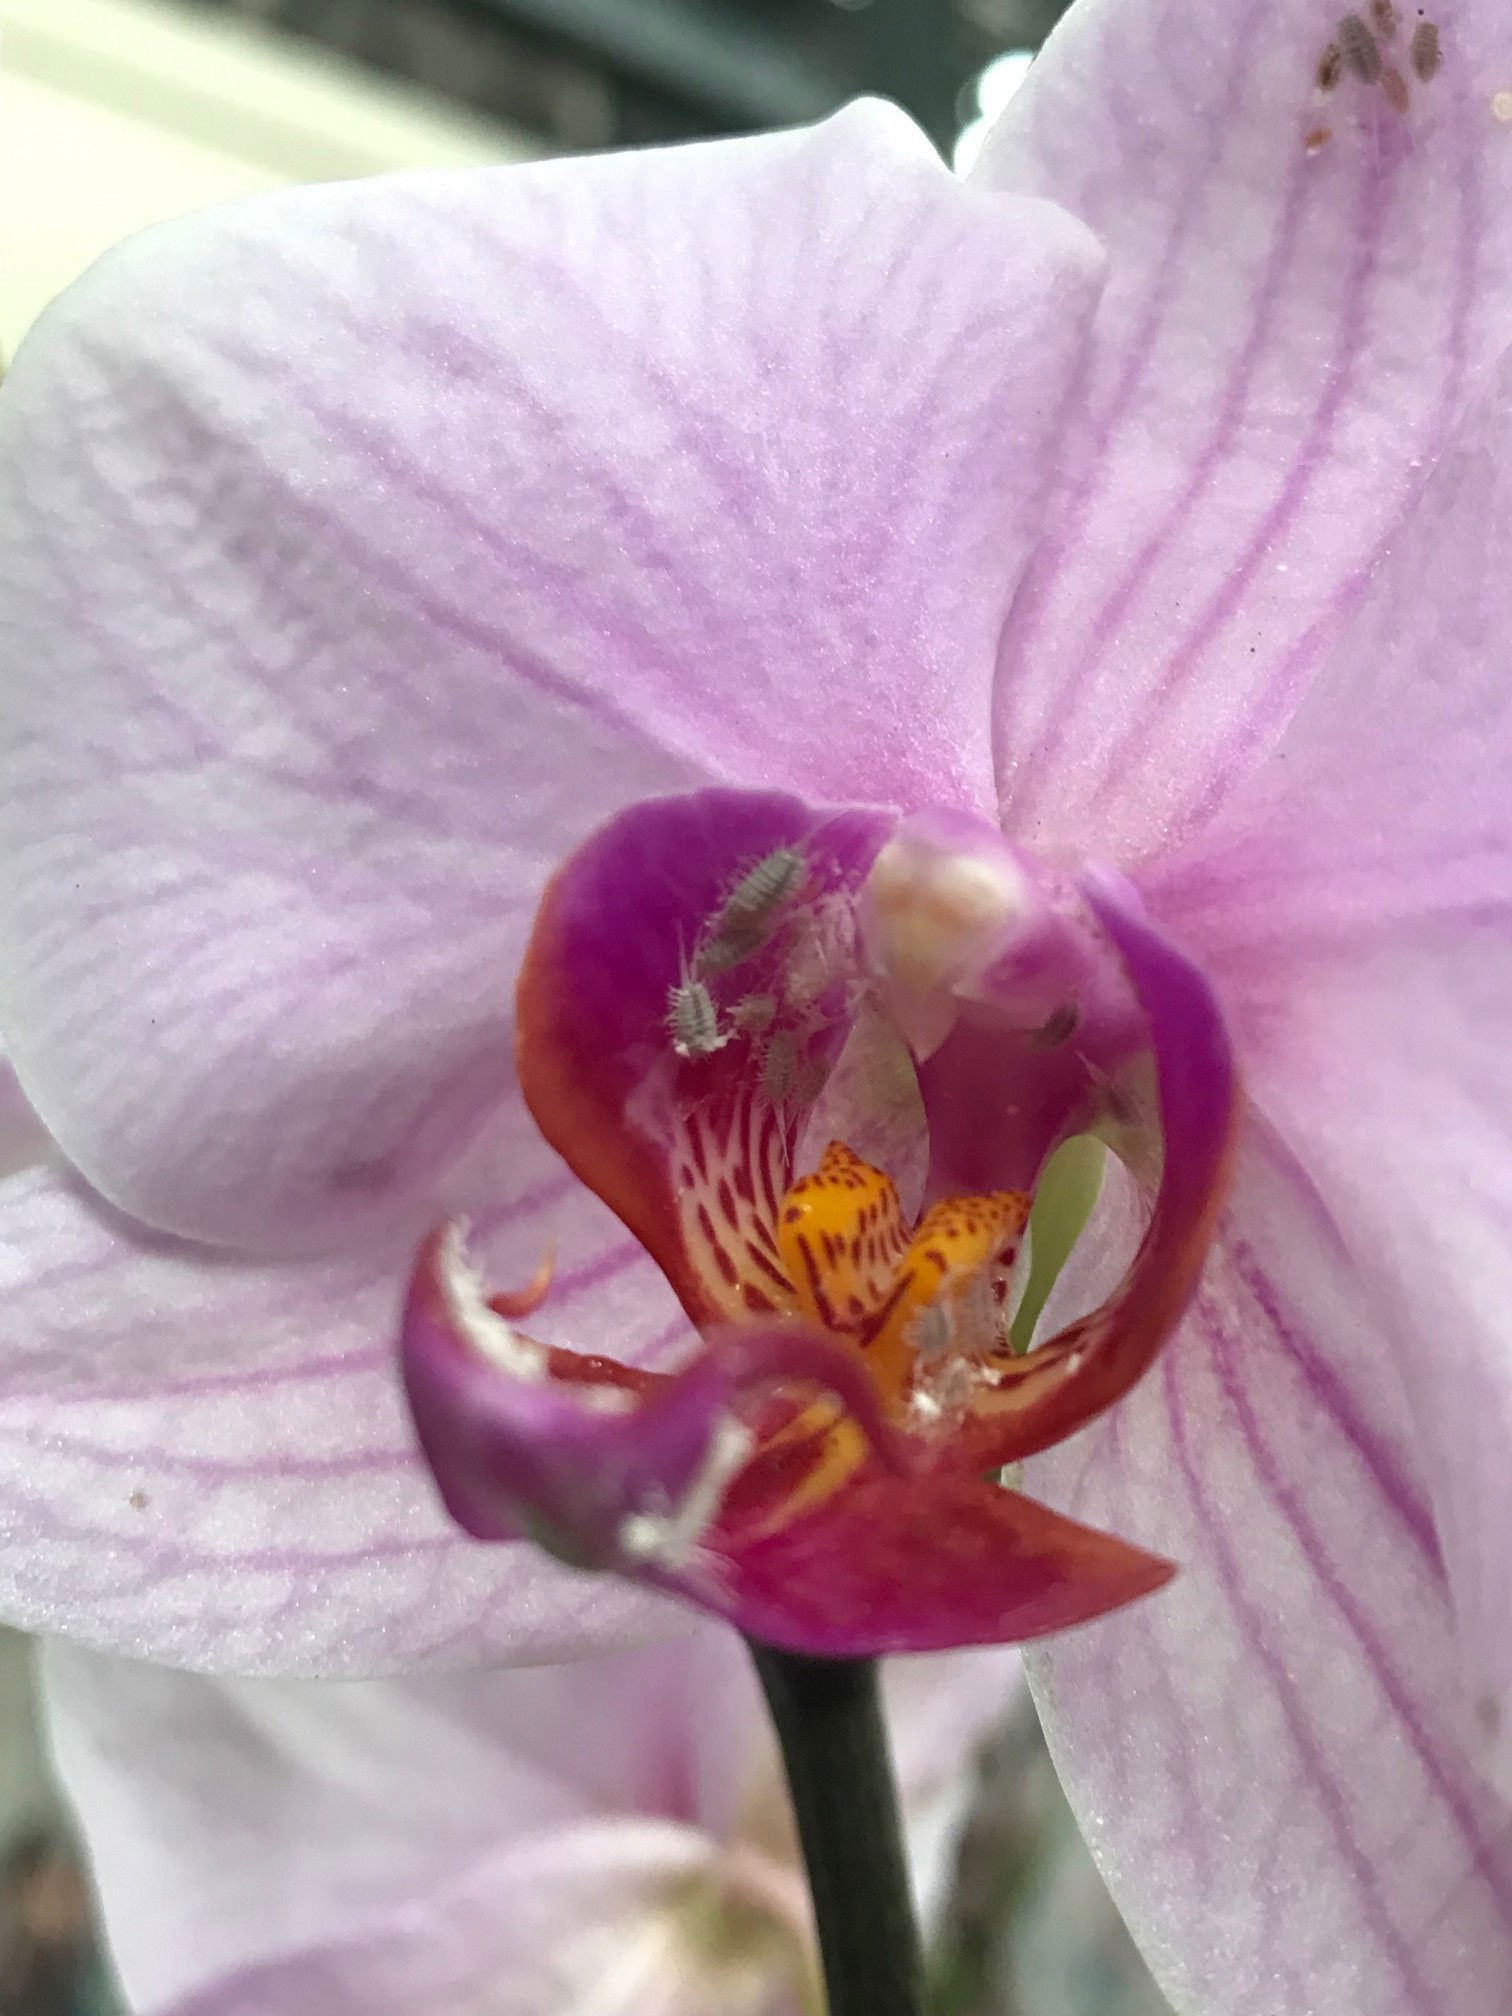 Image 17: How many critters can you spot?
5. Mealybugs
Mealybugs are a common pest found on Orchids. At first, they'll go on noticed with small cottony webs accompanied by sticky residue, but after a few weeks or months, their dominance will soon take over.
- As the eggs are tiny and can be implanted deep into the flowers' bodies, it's best to remove the whole flower stalk. Prune the stalk back to just above a non-flowering node so that lateral flower growths can re-emerge. Have a look at Image 16 above for more information on where to cut. Once the flowers are removed, use your fingers to crush any signs of an infestation along the leaf-undersides and cubbyholes of the stem. Optional: Use a warm soapy cloth with 7 parts water to 1 part detergent (Fairy Liquid, etc.) and wipe both sides of the leaves.
- Take the plant outside and gently hose the foliage, angling the nozzle around its crown/base. Do a couple of laps around the foliage to ensure destruction; even if you can't see an infestation, still follow this step as you can never be too safe!
- Once the plant has been hosed, bring it indoors into a warm, bright location to dry off. Excess moisture that sits in the cubbyholes for extended periods will cause the 'Southern Blight' or 'Basal/Crown Rot', as seen in Image 7. Ensure the moisture has evaporated within two hours - or use a dry cloth to soak-up the water droplets from the base.
- The next step is optional - choose between using organic or chemical pesticides, or none at all.
- Of course, organic pesticides (like Neem Oil) are better suited and natural for the plant's health, but they'll generally take longer than synthetic alternatives. If you want the infestation to be eradicated quickly, chemical pesticides are the best option. There are several different varieties on the market, but if ukhouseplants could recommend the best (& one that we use), it has to be 'Provado Ultimate Bug Control'. This product works overnight and can be purchased as an RTU (ready to use) or concentrated for relatively low prices. The final option is just to follow these first three steps of eradication without the use of any harsh chemicals/products. Although it may take longer in the bigger picture, the act of being hands on will keep the plant well away from synthetic chemicals and control the infestation until fully complete.
- Mealybugs can be a tricky pest to remove, but repeating Steps 1 - 3 will begin to reduce the bugs on the plant. The whole ordeal should take up to six weeks to fully subsidise - but may take longer if the situation is severe. Keep the affected Orchid away from other plants throughout this period for the prevention of it spreading. If you'd like further help with your Orchid pest problems, be sure to book your 1-1 Video/Messaging session with THE HOUSEPLANT DOCTOR™ for quick answers and remedies.
Toxicity
Not known to be poisonous when consumed by pets and humans. If large quantities are eaten, it may result in vomiting, nausea and a loss of appetite.
Retail Locations
Dobbies, Blue Diamond, B&Q, Tesco's, ASDA, IKEA, Homebase, Morrisons, Sainsbury's, most florists/plant shops & online stores.
Book a 1-to-1 Call with THE HOUSEPLANT DOCTOR™
If you need further advice with your houseplants, book an advice call with ukhouseplants' friendly and expert writer today! This can be done via a video or audio call on most apps, including Facebook, FaceTime & Skype. A ten-minute call costs £5.99 (US$7), or £15.99 for thirty minutes. You can ask multiple questions, including queries on plants, pests, terrariums, repotting advice and anything in between. Please consider supporting this service to keep ukhouseplants thriving!
Comments