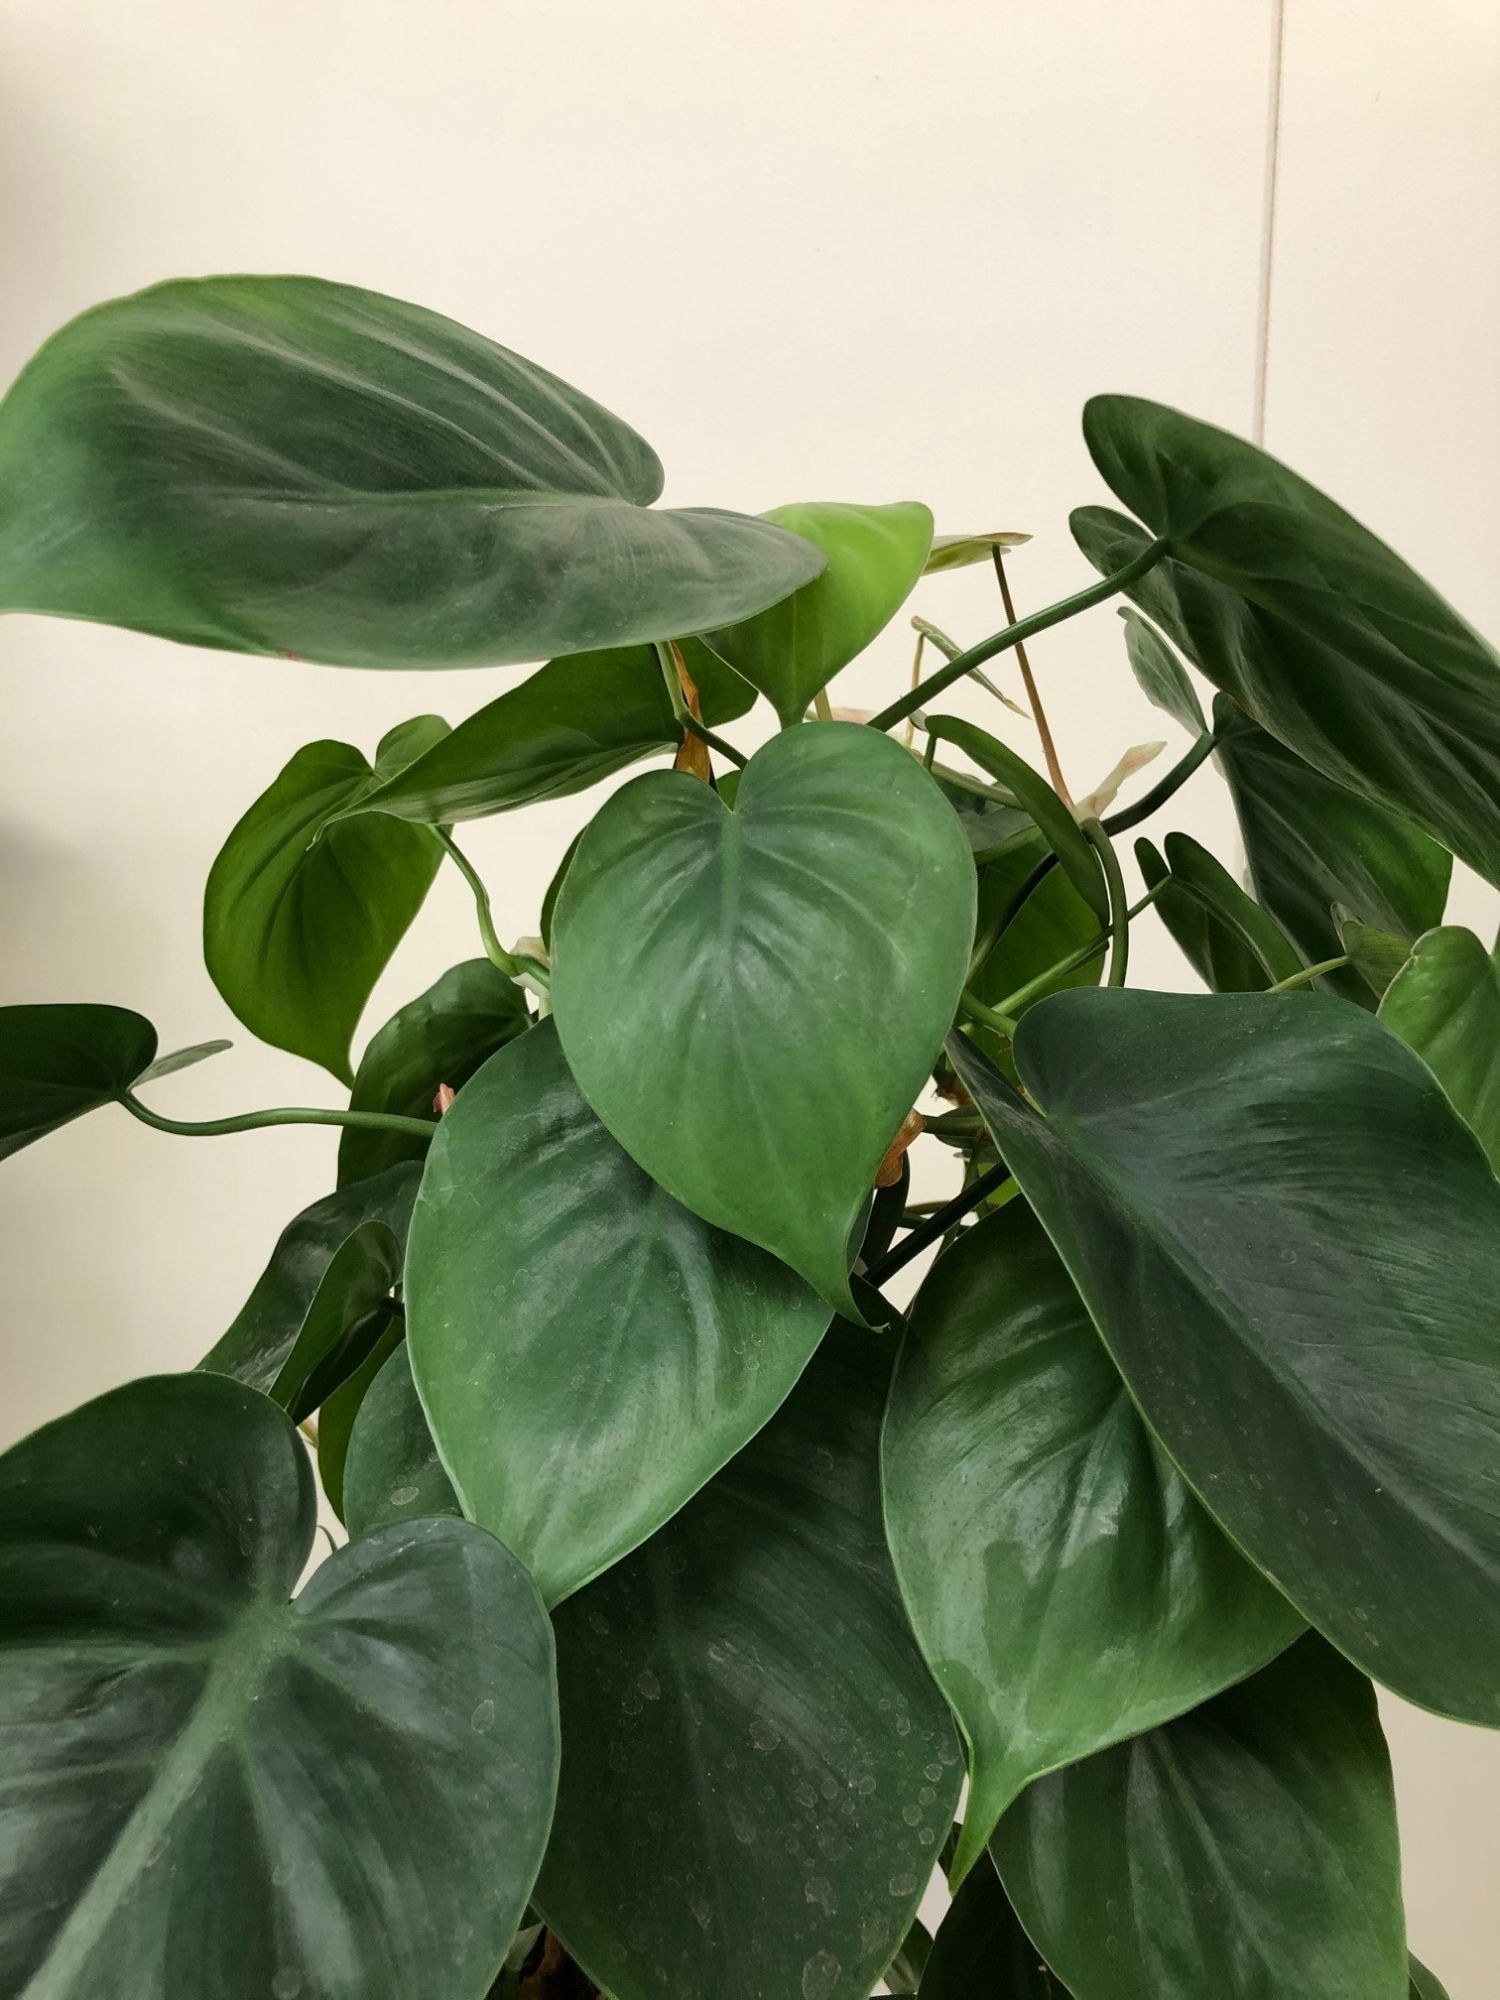
Philodendron hederaceum
Contents
- Top Tips
- Location, Water, Humidity & Fertilisation
- Common Issues
- Origins, Temperature, Propagation, Repotting & Toxicity.
Need the answer to a specific plant issue? Book a 1-to-1 video call with THE HOUSEPLANT DOCTOR™, the website's friendly author, to overcome and address your niggling problem! Available on iMessage, WhatsApp, Facebook Messenger & more.
Top Tips & Info
- Care Difficulty - Easy
- Provide a bright, indirect setting with adequate warmth and humidity. Although Heartleaf Philodendrons can thrive in average room humidity, be sure to mist the foliage weekly while the heaters are operating, or introduce a pebble tray to promote a moister environment.
- Allow the top third of the soil to dry out in between irrigations and always be cautious of water-logging. If the compost still looks saturated, leave it! You're far better off keeping it under-watered than over-done, so always bear that in mind when irrigating.
- Fertilise using a 'Houseplant' labelled feed every four waters in the spring and summer, reducing this to every six in the colder months.
- Keep an eye out for any loss of pre-existing variegations (patterns), as locations that are too dark will cause them to fade & disappear. Settings that are too bright may develop exaggerated variegations with little to no green tissue.
- Although pests aren't usually an issue with this species, always be wary of Mealybugs & Spider Mites that'll locate themselves in the cubbyholes and undersides of the leaves.
- Repot every few years using a 'Houseplant' labelled potting mix in the next sized pot. Scroll down to the 'Repotting' section to learn more about repotting a specimen that's attached to a moss pole.
Location & Light - 🔸🔸
A brightly lit location with little or no direct sun is best; however, a darker position is still acceptable, too. One word of advice to mention is that vines grown in a darker setting will significantly increase the chance of root rot, as well as variegated plants losing their colourful patterns. Strong all-day sunlight should be avoided at all costs, due to the combination of too little soil moisture and over-exposure significantly damaging the plant's health over time.
Remember - The amount of light and current season of the year will directly govern the frequencies of waters per month. Specimens placed in darker areas must be kept on the drier side to life, whereas brighter locations will require more soil moisture to lubricate photosynthesis.
Water - 🔸🔸
During the spring and summer, allow the top third of the soil to become dry in between waters, reducing this further to replicate its dormancy period in the autumn and winter. Due to the sensitivity of their root systems, never apply cold water as it may weaken its health and well-being over time. For those that use tap water (instead of rainwater or fresh bottled water), allow it to stand for at least 24hrs to eliminate the high levels of chloride and fluoride found from the tap. Under-watering symptoms include stunted growth, crispy brown patches developing on the foliage and leaf curling. If your plant receives prolonged periods of direct sunlight, relocate it immediately; over-exposure to the sun will continue to contribute to its dehydration, slowly destroying the plant from the inside-out. Over-watering symptoms include a rotting stem, mould developing on the soil and rapid lower leaf loss. These issues are typical for those situated in darker locations; if abnormal leaf loss occurs, especially at its base, it is most likely to be a case of root rot. For further advice on this issue, be sure to click on the following link.
Humidity - 🔸🔸
Although average room humidity is acceptable, be sure to introduce a pebble tray to increase the local humidity while the heaters are operating. Then at monthly intervals, gently hose the foliage down to hydrate the leaves and wash away the thin layer of dust from its pores. Keep the tray topped up with water to maintain this necessity over the colder months of the year.
Fertilisation - 🔸🔸
Feed every four waters during the growing period and every six in the autumn and winter, using a 'Houseplant' labelled fertiliser. Never apply a 'ready to use’ product into the soil without a pre-water first, as it may burn the roots and lead to yellowed leaves.
Common Issues with Heartleaf Philodendrons
Root rot is a common issue with specimens sat in too moist or waterlogged soil for long periods. Symptoms include rapidly yellowing leaves, stunted growth and a rotten brown base. Take the plant out of the pot and inspect health below the soil line. If the roots sport a yellow tinge, you're good to go, but if they're brown and mushy, action must be taken immediately. More information about addressing root rot can be found on this link.
Pests could arise at any time, with infestations starting from the original nursery or via contamination in your home. With Philodendrons, Spider Mites and Mealybugs tend to be the usual inhabitants, with the first being minute and almost transparent, roaming the leaves in search of chlorophyll and a site to hide its eggs. The latter, however, will stand out much more, with white cottony webs developing across the foliage and stems. Thoroughly check the plant's cubbyholes before giving it the all-clear, or click on the appropriate links to learn more about eradicating these issues.
Always use lukewarm water, and if you choose to use tap water, allow it to stand for at least 24hrs before application. Philodendrons tend to be quite sensitive to temperature change, so pouring cold tap water immediately into the pot will not only add fluoride into the soil, but it could even lead to yellowed leaves over time!
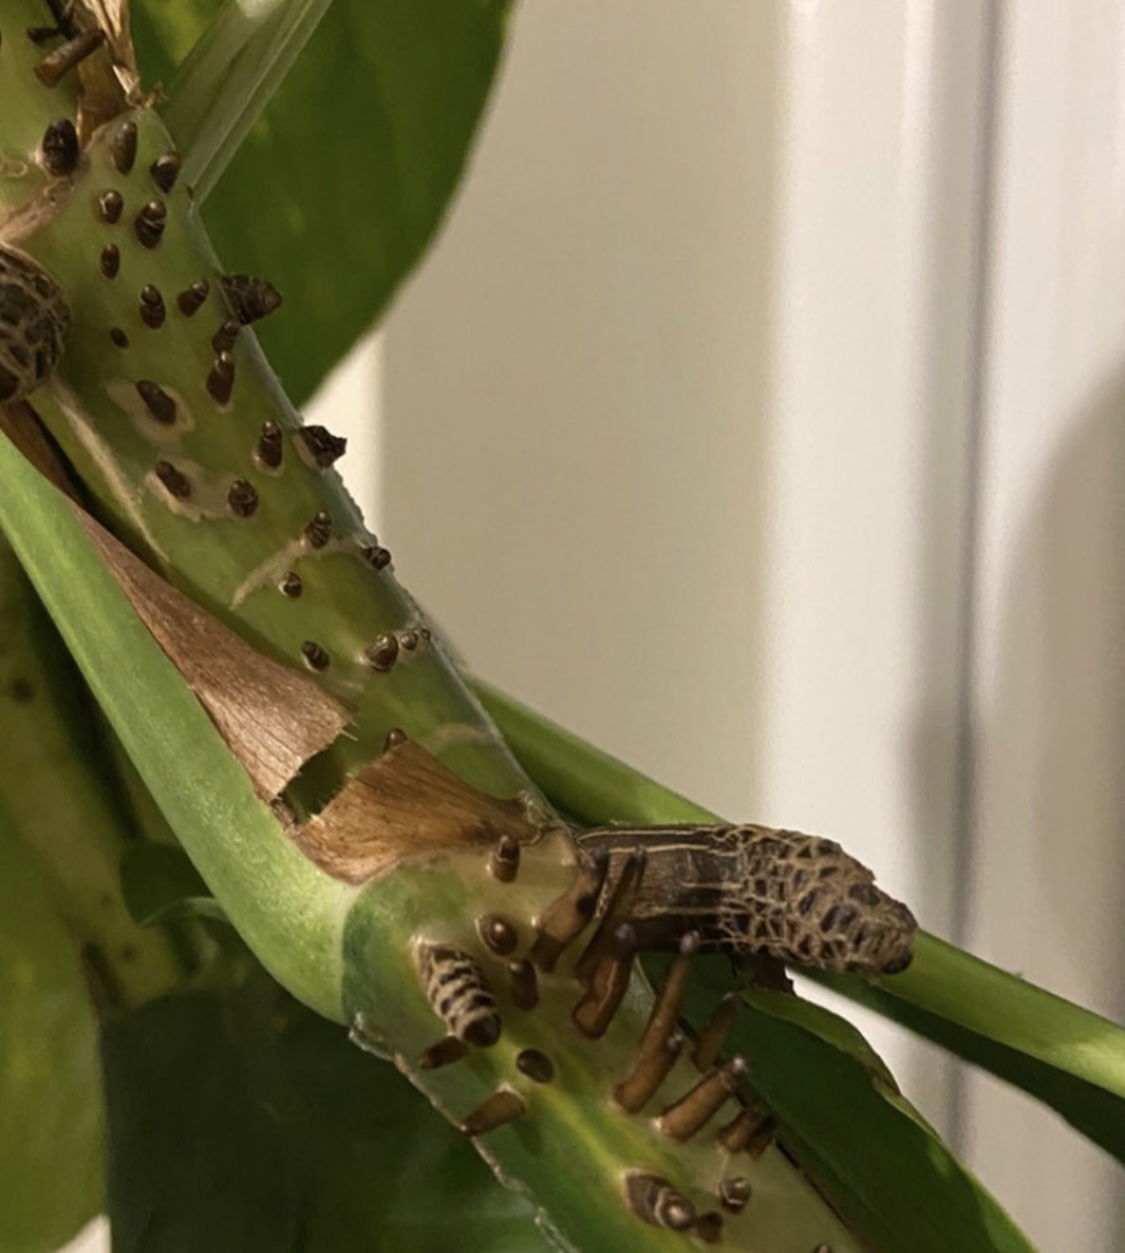 Short brown bumps on your plant's vines are dormant root nodes that'll spring into life when exposed to moisture. In the wild, these root nodes will emerge and stick onto the nearest tree or structure, allowing the plant to reach the tree's canopy in record time.
Is your Heartleaf Philodendron producing smaller leaves or just naked, leggy stems each time it grows? It's most likely to do with its light levels or low temperatures. We recommend improving its location by placing it in a sunless windowsill or under a grow light for better, more reliable growth. You can also consider pruning any leggy, leafless stems back to the first leaf to promote a new cluster of foliage in months to come. Other reasons for its reduction of leaf size could be: an absence of a moss pole or plant to climb up, a lack of fertilisation and/or root rot.
Transplant shock is a big issue when it comes to heavy-handed repots. Give the plant a good soak 24hrs before the action and never tinker with the roots, unless it has been affected by root rot. Typical signs of transplant shock are largely similar to under-watering, with wilting, yellowing leaves and stunted growth among the most common symptoms. Click here to learn more about addressing transplant shock, and a step-by-step guide on performing the perfect transplant.
Curled leaves and brown leaf-edges are the result of too little water and over-exposure to the sun. Philodendrons are best located in bright, indirect settings, and those that haven't acclimatised to the harsh rays will show signs of sun-scorch and environmental shock. A splash of winter sunlight is acceptable as long as the soil moisture is regularly observed, with complete avoidance once summer comes along.
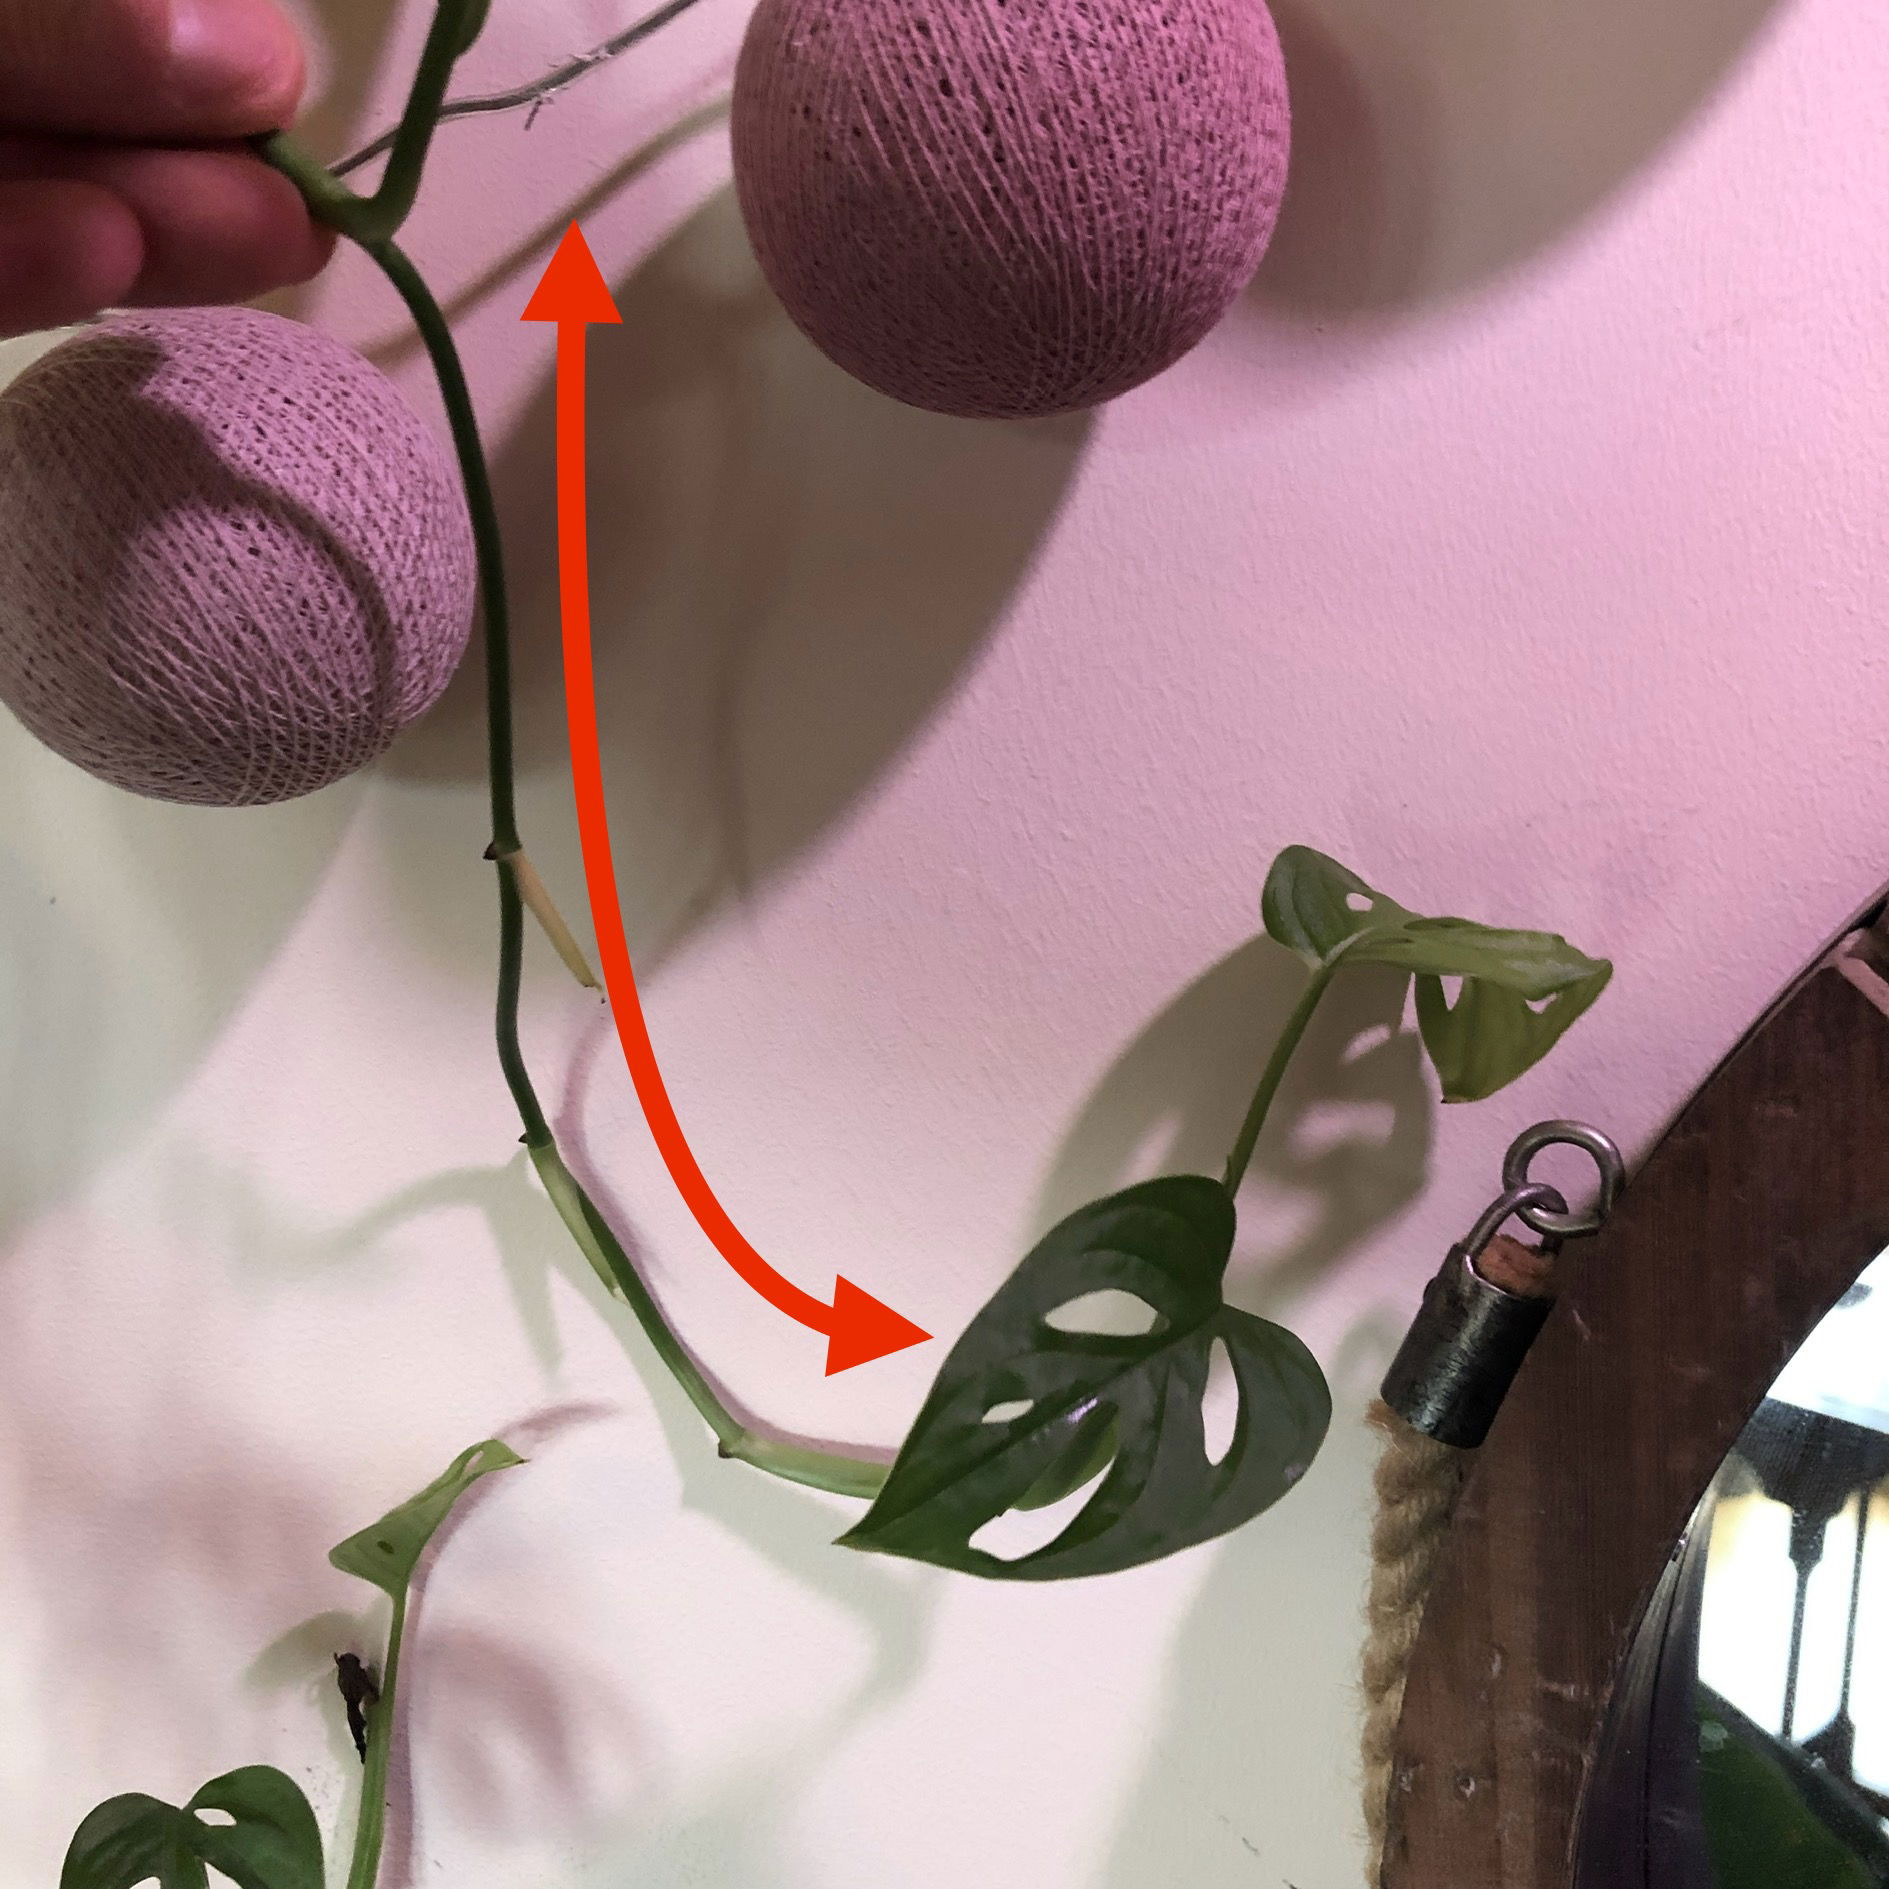 If your Heartleaf Philodendron has lost leaves in a certain area of its stem (or is growing long stems with no leaves), this is to do with too little light. Consider pruning the stem(s) back to promote a bushier appearance and propagate the cuttings in water. Transplant them into the original plant's soil once the roots are 5cm (2 inches to further thicken the overall foliage. (Although the plant is a Monstera adansonii, the principle is identical).
Too low humidity can cause browning leaf tips with yellow halos. Although this won't kill your specimen, you may want to increase the local moisture to prevent the new growth from adopting these symptoms. Mist or rinse the foliage from time to time and create a humidity tray whilst the heaters are active to create a stable environment for your specimen.
Rapidly yellowing lower leaves (closest to soil) are a clear sign of over-watering, usually caused by too little light. Although they can do well in darker locations, the frequency of irrigations must be reduced to counteract the chance of root rot. People don't realise that a plant's root system needs access to oxygen too; when soil is watered, the air will travel upwards and out of the potting mix. A lack of accessible oxygen for the roots will cause them to subsequently breakdown over the oncoming days. Click on this link to learn more about root rot and how to address it, and always feel the pot's weight for confirmation (heaviness = good soil moisture, & vice versa).
The browning of the cataphyll shouldn't of be a concern, as it's a wholly natural process which affects all specimens across the world. Remove the brown section once it becomes dry and crispy, using a clean pair of scissors or peeling it back by hand.
Failed propagated stem cuttings - There are several reasons why the cuttings haven't rooted well, including: the time of year (spring or summer is best), its size (Phildendron cuttings should have at least three leaves), poor growing conditions (replace water weekly for water-propagated cuttings, and avoid over-watering for soil-grown plants), and its growing environment (a bright sunless windowsill and warmth is important).
Origins
Philodendrons form part of the Araceae family that holds genera such as Peace Lillies, Alocasia and ZZ Plants. Since its initial classification by Nicolaus von Jacquin in 1775, the species has had many names including Arum hederaceum and P. scandens. The latter synonym, P. scandens, was created by a German botanist named Karl Koch in the mid 19th century with 'scandens' being the Latin word for 'climbing', in reference to its epiphytic nature. It's current name, P. hederaceum is a direct nod to the genus, Hedera, that consists of woody hemiempiythic species native to Europe and Asia.
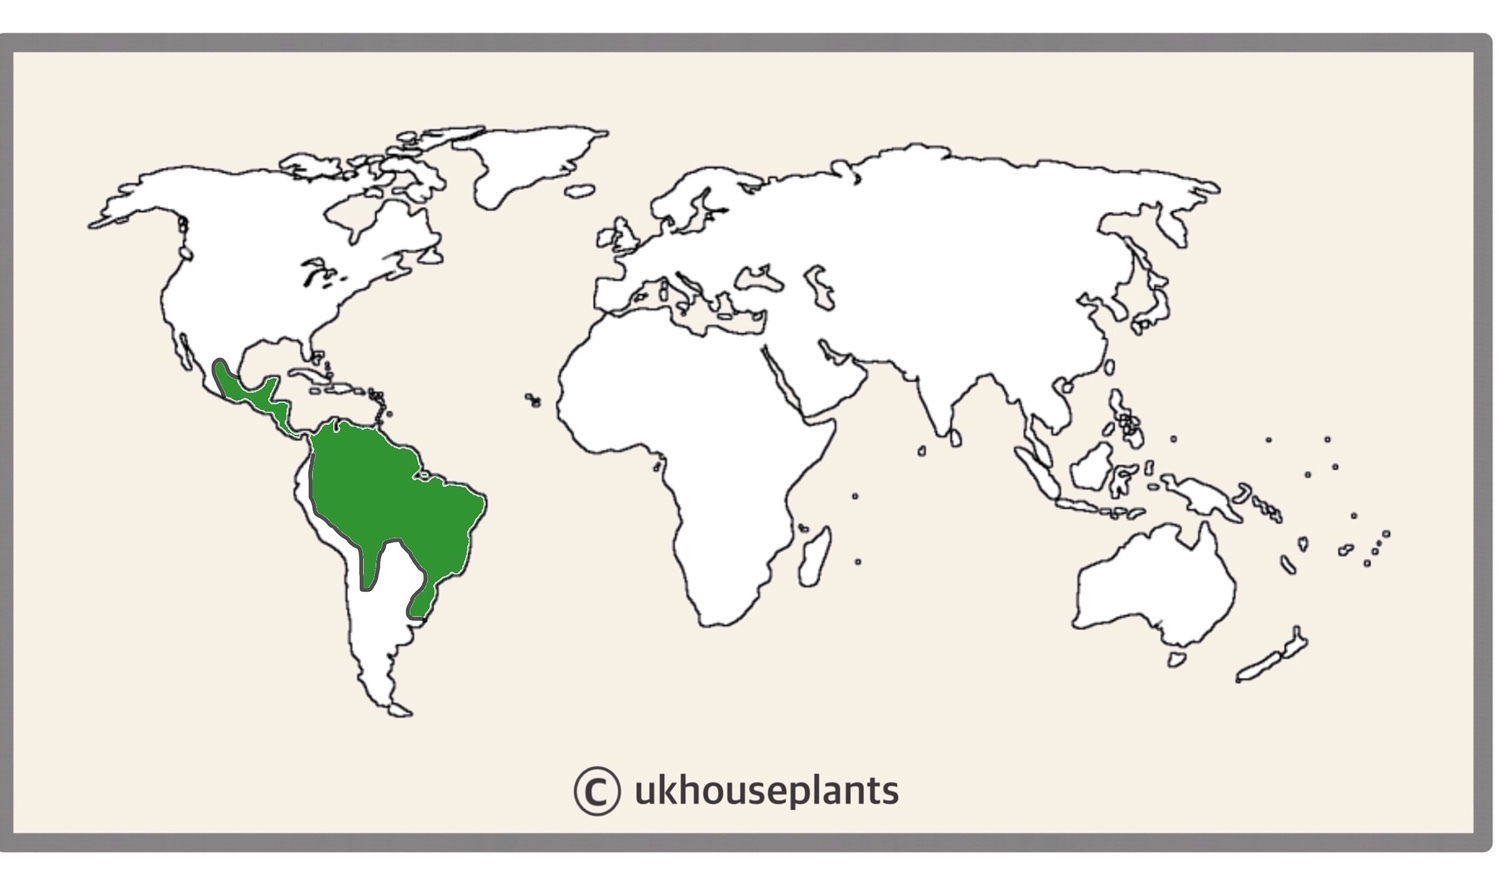 The Distribution of P. hederaceum
Temperature
12° - 30°C (54° - 86°F)
H1b (Hardiness Zone 12) - Can be grown outdoors during the summer in a sheltered location with temperatures above 12℃ (54℉), but is fine to remain indoors, too. If you decide to bring this plant outdoors, don't allow it to endure more than an hour of direct sunlight a day as it may result in sun-scorch. Regularly keep an eye out for pests, especially when re-introducing it back indoors.
Spread
Up to 2m in height and 3m in width, when given a structure to climb up. The ultimate height will take between 3 - 6 years to achieve with up to 40cm of new growth per year. Specimens that naturally grow in the wild can reach heights of up to fifteen metres; however, with smaller root systems and less favourable growing conditions, they'll only grow to three metres, give or take.
Pruning & Maintenance
Remove yellow or dying leaves, and plant debris to encourage better-growing conditions. While pruning, always use clean scissors or shears to reduce the chance of bacterial and fungal diseases. Never cut through yellowed tissue as this may cause further damage in the likes of diseases or bacterial infections. Remember to make clean incisions as too-damaged wounds may shock the plant, causing weakened growth and a decline in health.
Although the aerial roots aren't exactly appealing, do not remove them as it may put stress upon the plant and potentially could weaken it with potential diseases.
Propagation
Via Seed or Vine Cuttings.
Vine Cuttings (Easy)
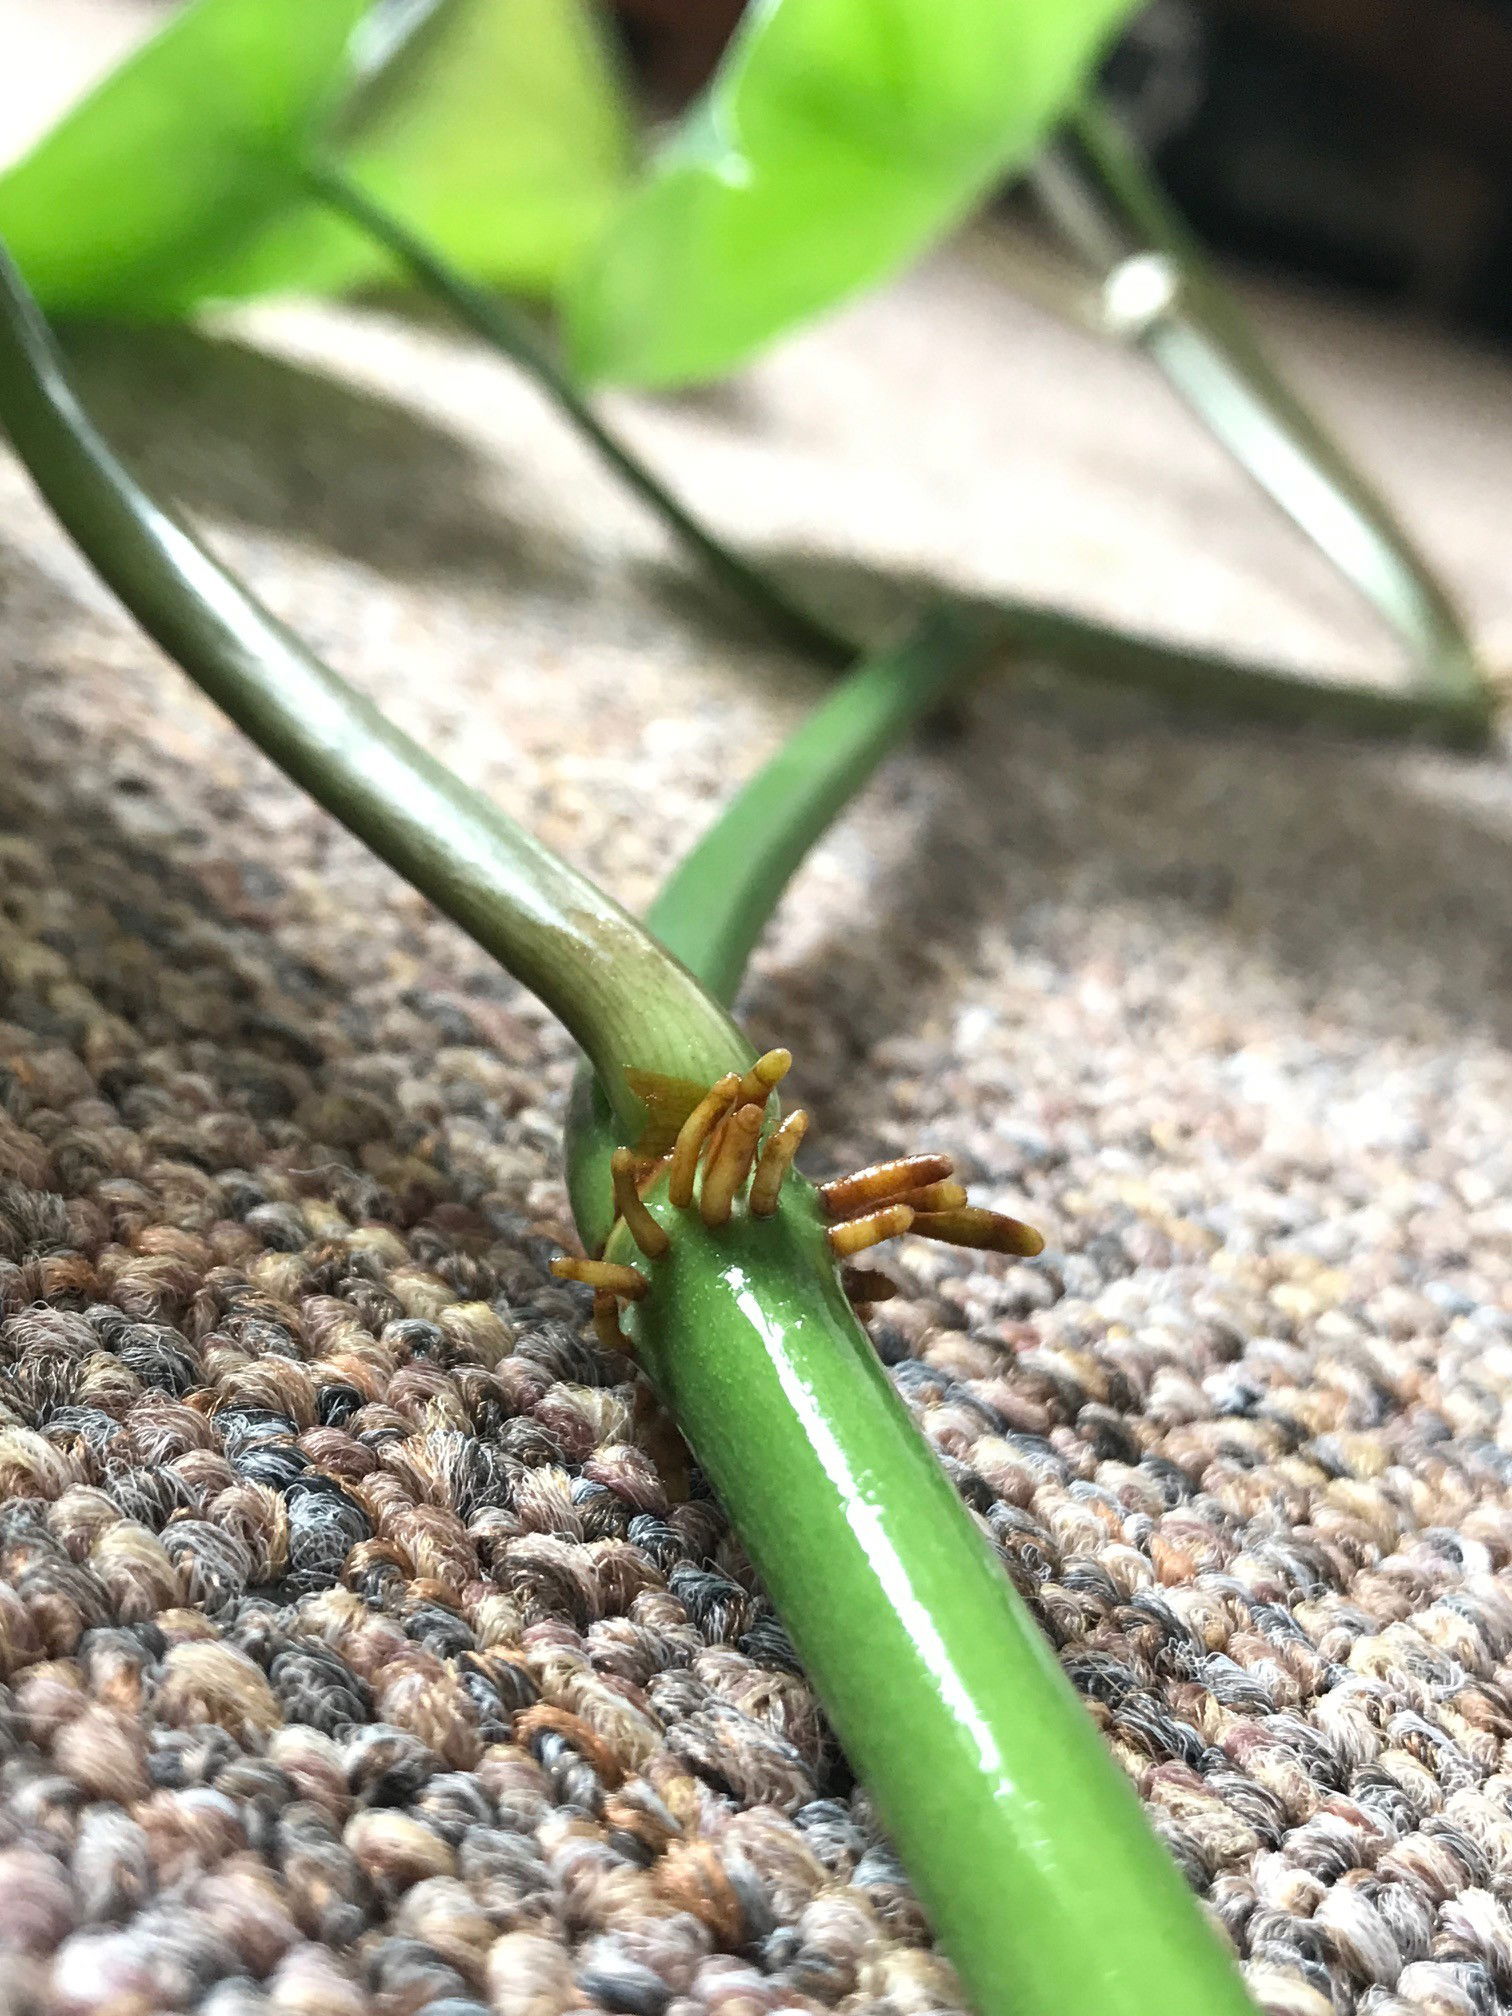 Nodes - Adventitious roots that'll develop below the nodal junction, to anchor the plant to its host. This is where the cutting will root from.
Stem Cuttings via Water Propagation (Easy)
- Choose the healthiest, most established vines. This propagation method can be taken from spring to summer, using between two to five leaves, with the vine being at least 8cm (2.5 inches) in length with two nodes (one for foliar development and the other for root growth). Although more nodes are fine, be sure only to submerge the bottom ones in water to avoid unneeded rooting elsewhere on the stem. (More on this later)
- Cut directly below a node using a clean knife to reduce bacteria count. Remove the lower half of the leaves and place the vines into a container of lukewarm water. Be sure to submerge at least one node into the water, or else the root development will be hindered.
- The leaves must stay above the waterline for the prevention of disease.
- Replace the water weekly, using lukewarm water to avert shocking the cutting with cold temperatures.
- Once the roots surpass 4cm (2 inches) in length, it's time to pot the cutting.
- Choose a potting mix - as long as it has a well-draining nature, most soils are fine. Either 'Houseplant' labelled compost or our Monstera & Philodendron Potting Mix is suitable for potting up.
- Use a 7cm (2 inch) plastic or coir pot that has suitable drainage holes. Try not to transplant the cuttings too deeply in the soil as rot may occur.
- Fill the bottom quarter of the pot with soil, before sitting the cutting on top. Fill the remaining gaps with compost until the soil line reaches four-fifths of the pot's height. Lightly tap the pot's side to consolidate the soil into place. (Don't press down on the soil!)
- Provide bright, indirect light in a windowsill or under a grow light, along good humidity by placing the potted plant into a transparent plastic bag for the first couple of weeks.
- Open the bag every two days for an hour for the prevention of disease. After a month of being placed in soil, remove it from the bag and follow the care tips provided above.
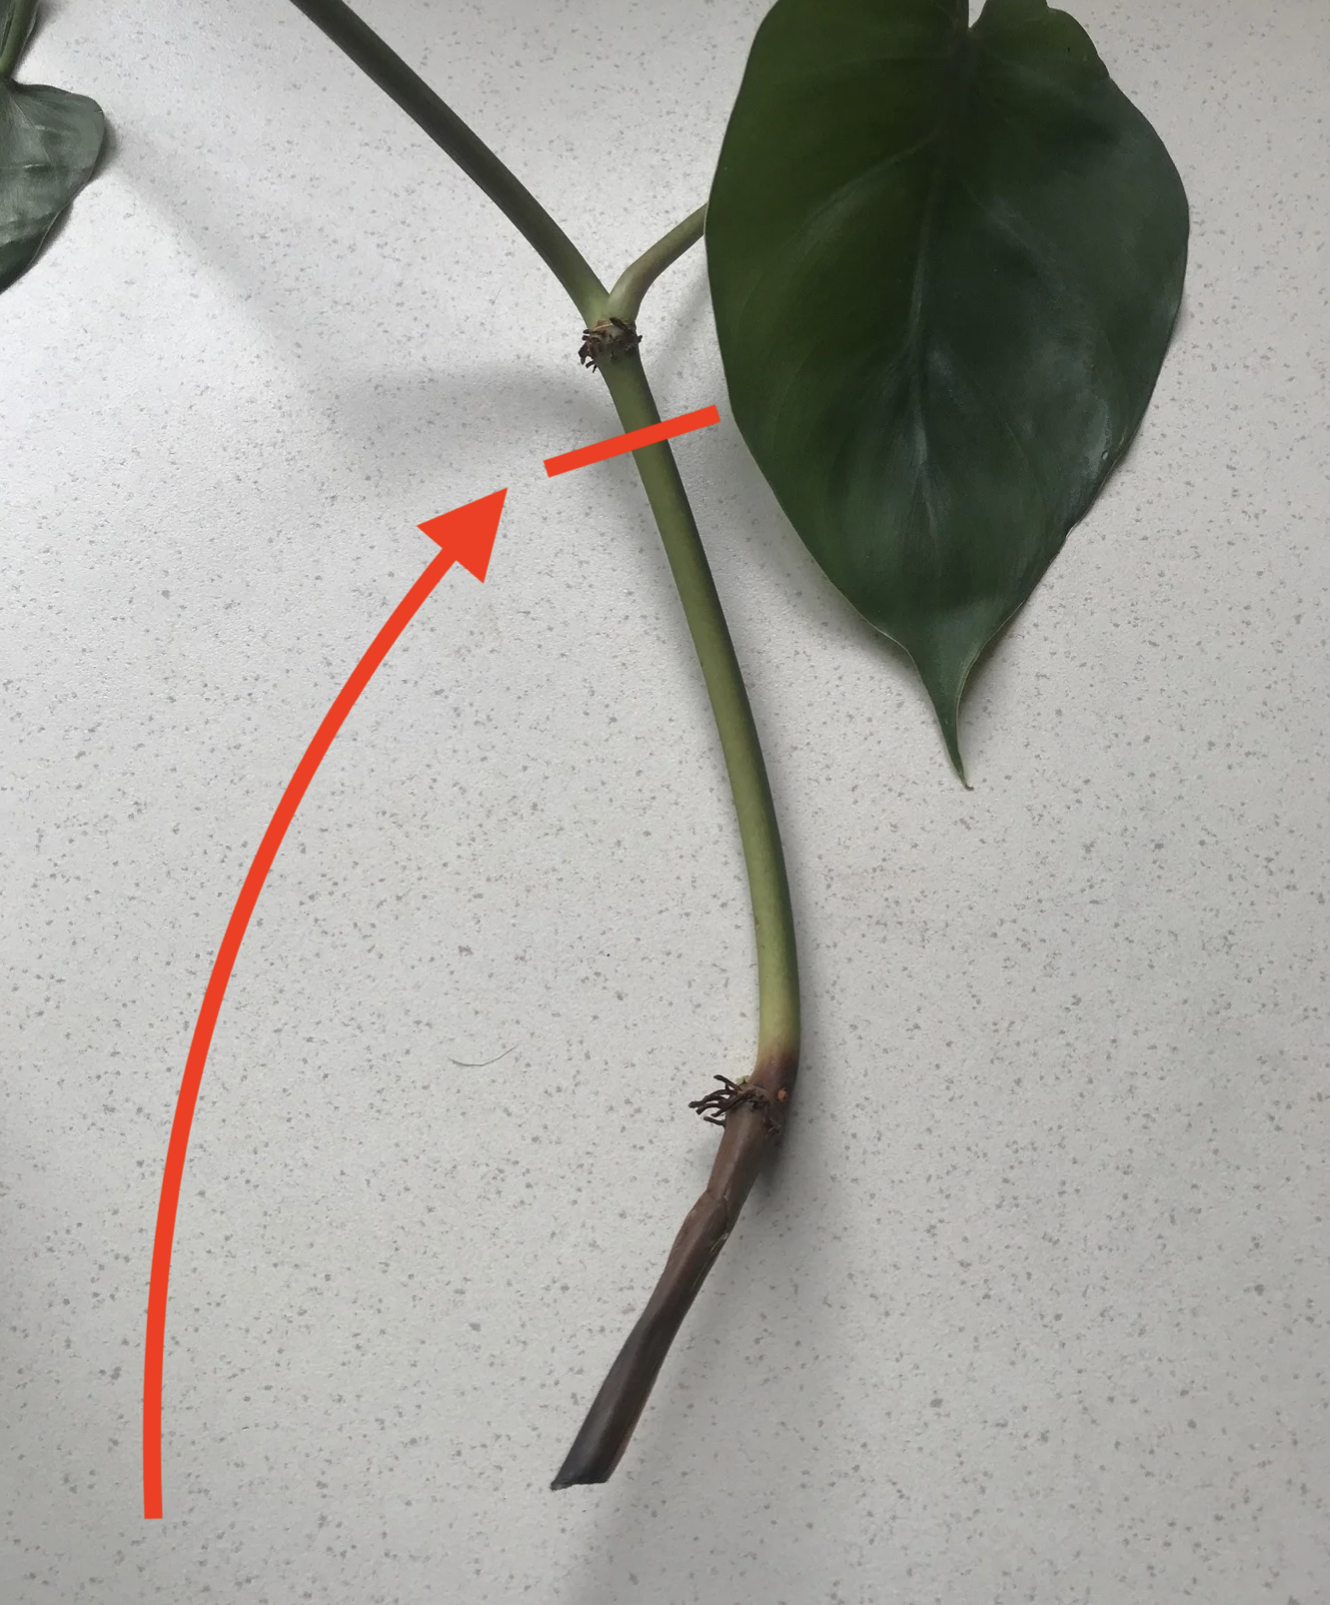 'Blackleg' can occur when a water-propagated cutting becomes diseased due to unsanitary conditions. We would recommend replacing the water twice weekly and to prune via the red line to discard the cutting's affected area.
Stem Cuttings via Soil Propagation (Moderate)
This second option is still easy to perform, but it'll need some extra steps to avoid dehydration while the cutting roots in the soil.
- Choose the healthiest, most established vines. This propagation method can be taken from spring to summer, using between two to five leaves, with the vine being at least 8cm (2.5 inches) in length with two nodes (one for foliar development and the other for root growth). Although more nodes are fine, be sure only to submerge the bottom ones in water to avoid unneeded rooting elsewhere on the stem. (More on this later)
- Cut directly below a node using a clean knife to reduce bacteria count. Remove the lower half of the leaves and place the vines into a container of lukewarm water. Be sure to submerge at least one node into the soil, or else the root development will be hindered.
- Choose a potting mix - as long as it has a well-draining nature, most soils are fine. Either 'Houseplant' labelled compost or our Monstera & Philodendron Potting Mix is suitable for potting up.
- Use a 7cm (2 inch) plastic or coir pot that has suitable drainage holes. Try not to transplant the cuttings too deeply in the soil as rot may occur.
- Fill the bottom quarter of the pot with soil, before sitting the cutting on top.
- Fill the remaining gaps with compost until the soil line reaches four-fifths of the pot's height. Lightly tap the pot's side to consolidate the soil into place. The leaves must always stay above the soil-line for the prevention of disease.
- Provide bright, indirect light in a windowsill or under a grow light, along good humidity by placing the potted plant into a transparent plastic bag for the first couple of weeks. Humidity will be your cutting's best friend, so ensure the plant doesn't dehydrate because of dry air.
- Open the bag every two days for an hour for the prevention of disease. After a month of being placed in soil, remove it from the bag and follow the care tips provided above.
Flowers
As Philodendrons are part of the Araceae family, they'll produce toxic flowers that can be boiled and ate once ripe. Despite its readiness to flower in the wild, those grown domestically will rarely flower.
Repotting
Repot every two years in the spring, using a 'Houseplant' labelled compost and the next sized pot with adequate drainage. Hydrate the plant 24hrs before tinkering with the roots to prevent the risk of transplant shock. For those that are situated in a darker location, add a thin layer of small grit in the pot's base to improve drainage and downplay over-watering. Click here for a detailed step-by-step guide on transplantation, or via this link to learn about repotting with root rot.
If you're thinking of repotting a specimen that's growing up a moss pole, never remove the attached aerial roots as the disturbance could put further stress on the plant. Extend by purchasing another same-sized pole and pushing directly into the hollow hole in the original's top - its moss-like material may have to be cut off from the top to access the hollow centre. Get a long, sturdy stick that has a similar length to the two poles combined and place in the two's centre to support the weight. Always perform the repot BEFORE adding another pole, as it'll prove more challenging due to the weight distribution and overall balance. NEVER remove soil from the roots, or over-touch the root system, as this will cause transplant shock and possible death.
Pests & Diseases
Keep an eye out for mealybugs, spider mites, scale & thrips that'll locate themselves in the cubbyholes and undersides of the leaves. Typical diseases associated with Philodendrons are leaf-spot disease, botrytis & root rot; click here for more information about how to identify and address any of these issues.
Toxicity
This plant is classified as poisonous due to varying concentrations of calcium oxalate crystals found around the plant's body. If parts of the plants are eaten, vomiting, nausea and a loss of appetite could occur. Consumption of large quantities must be dealt with quickly; acquire medical assistance for further information.
Retail Locations
Homebase, B&Q, IKEA, Dobbies, Blue Diamond, Online Stores.
Book a 1-to-1 Call with THE HOUSEPLANT DOCTOR™
If you need further advice with your houseplants, book an advice call with ukhouseplants' friendly and expert writer today! This can be done via a video or audio call on most apps, including Facebook, FaceTime & Skype. A ten-minute call costs £5.99 (US$7), or £15.99 for thirty minutes. You can ask multiple questions, including queries on plants, pests, terrariums, repotting advice and anything in between. Please consider supporting this service to keep ukhouseplants thriving!