Asplenium nidus
Contents
- Top Tips
- Location, Water, Humidity & Fertilisation
- Common Issues
- Origins, Temperature, Propagation, Repotting & Toxicity.
Need the answer to a specific plant query? Book a 1-to-1 video call with THE HOUSEPLANT DOCTOR™, the website's friendly author, to overcome and address your niggling problem! Available on iMessage, WhatsApp, Facebook Messenger & more.
Top Tips & Info
- Care Difficulty - Easy to Moderate
- Provide a bright, indirect location with a splash of morning sun in the autumn and winter months. If your specimen is situated in a shady environment, be sure to avoid over-saturating the central foliage as it may result in crown rot.
- Maintain good soil moisture throughout the growing period, allowing the top third to dry out in between waters; reduce this slightly in the dormancy period.
- Fertilise using a 'Houseplant' labelled feed every four waters in the spring and summer, reducing this to every six in the colder months.
- Repot every three years, using a 'Houseplant' labelled compost and the next sized pot.
- Keep an eye out for Spider Mites that'll locate themselves along the ridges of the under-leaves.
Location & Light - 🔸🔸🔸
Perfecting the amount of light a Bird's Nest Fern receives is crucial for a long-lasting specimen. During the spring and summer, be sure to provide a brightly lit spot away from any direct light. Excessive exposure during this time will negatively affect the plant in the likes of sun-scorch and dehydration. Once the autumn kicks in, be sure to include an hour or two of direct light per day to get it through the dormancy period, lasting until the following spring.
Alternatively, lower-lit areas should only be used if wholly necessary. Although they can thrive in shady locations, the reduced rates of photosynthesis and too-moist soil may lead to root or crown rot. If mould develops on the compost's surface, this is a tell-tale sign of over-watering and too little light.
Water - 🔸🔸
Provide good soil moisture, allowing the top third to dry out in between waters throughout the year. The amount of light and current season of the year will directly govern the frequencies of waters per month. Specimens placed in darker areas must be kept on the drier side to life, whereas brighter locations will require more soil moisture to lubricate photosynthesis. Under-watering symptoms include wilting, greying of leaves, little to no growth, distorted or crispy growth and foliage decline. These issues are commonly due to too much light or heat, forgetfulness or a much needed repot. Over-watering symptoms include wilting, yellowing leaves, soil mould, leaf spots and a rotten crown, which are typically caused by too little light, a too water-retentive soil, over-watering and low temperatures.
Humidity - 🔸🔸
Average room humidity is best as over-misting and poor air circulation may cause the development of powdery mildew or botrytis. At monthly intervals, perform a gentle hose-down to hydrate its leaves and reduce the number of dust particles on its foliage, avoiding the risk of excess moisture settling on its foliage.
Fertilisation - 🔸🔸
Feed every four waters during the growing period and every six in the autumn and winter, using a 'Houseplant' labelled fertiliser. Never apply a 'Ready to Use’ product into the soil without a pre-water first, as it may burn the roots and lead to yellowed leaves.
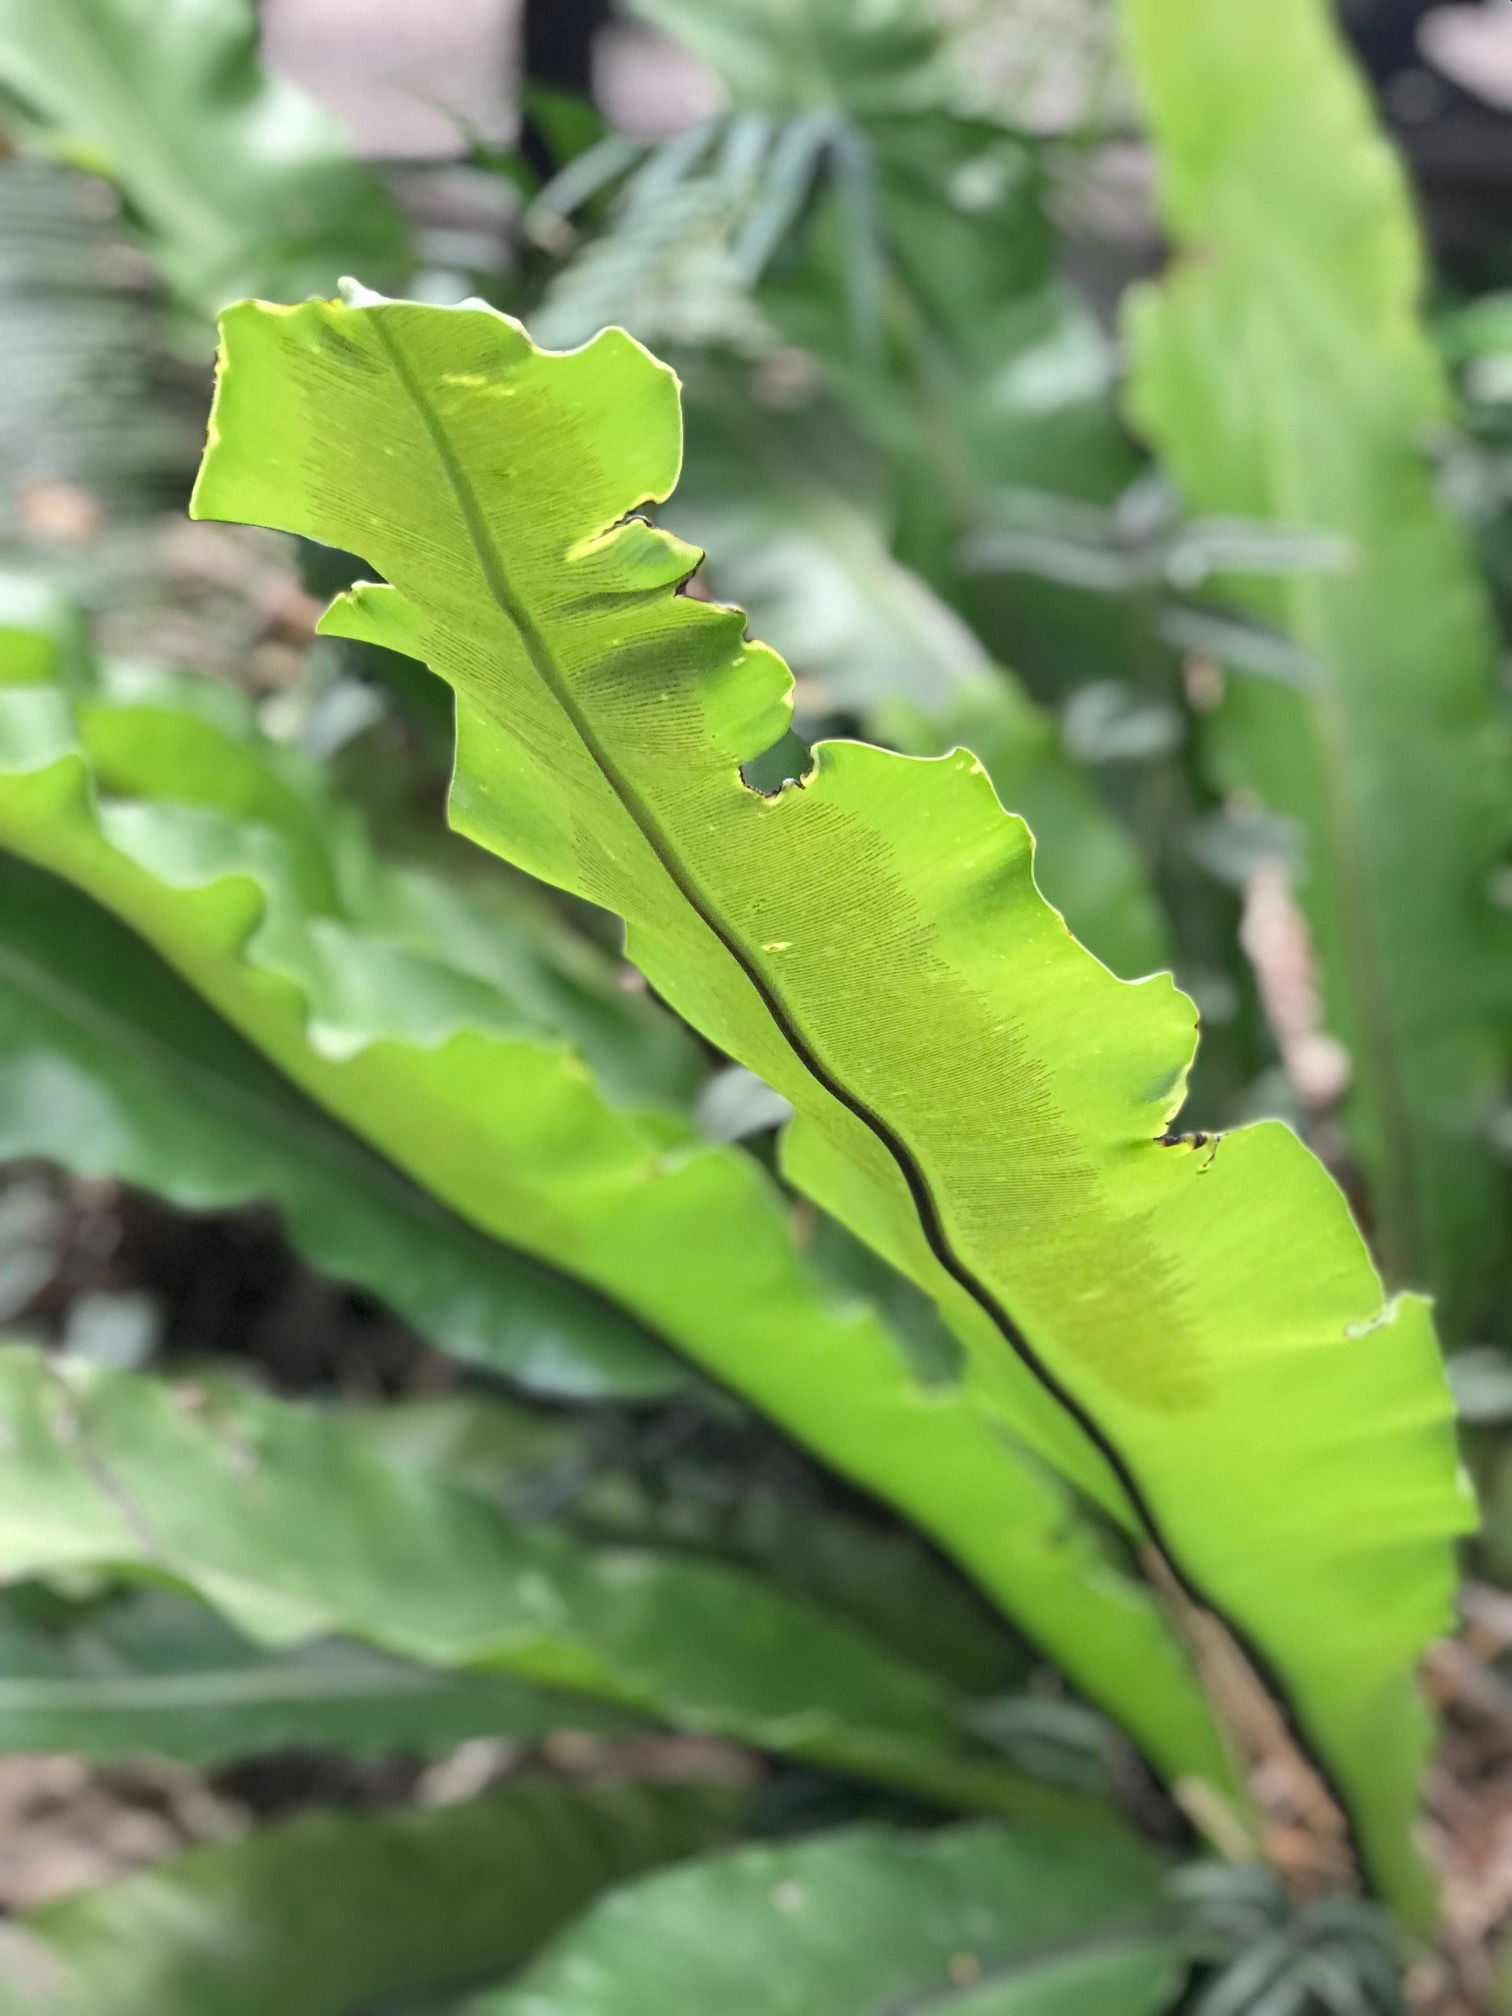
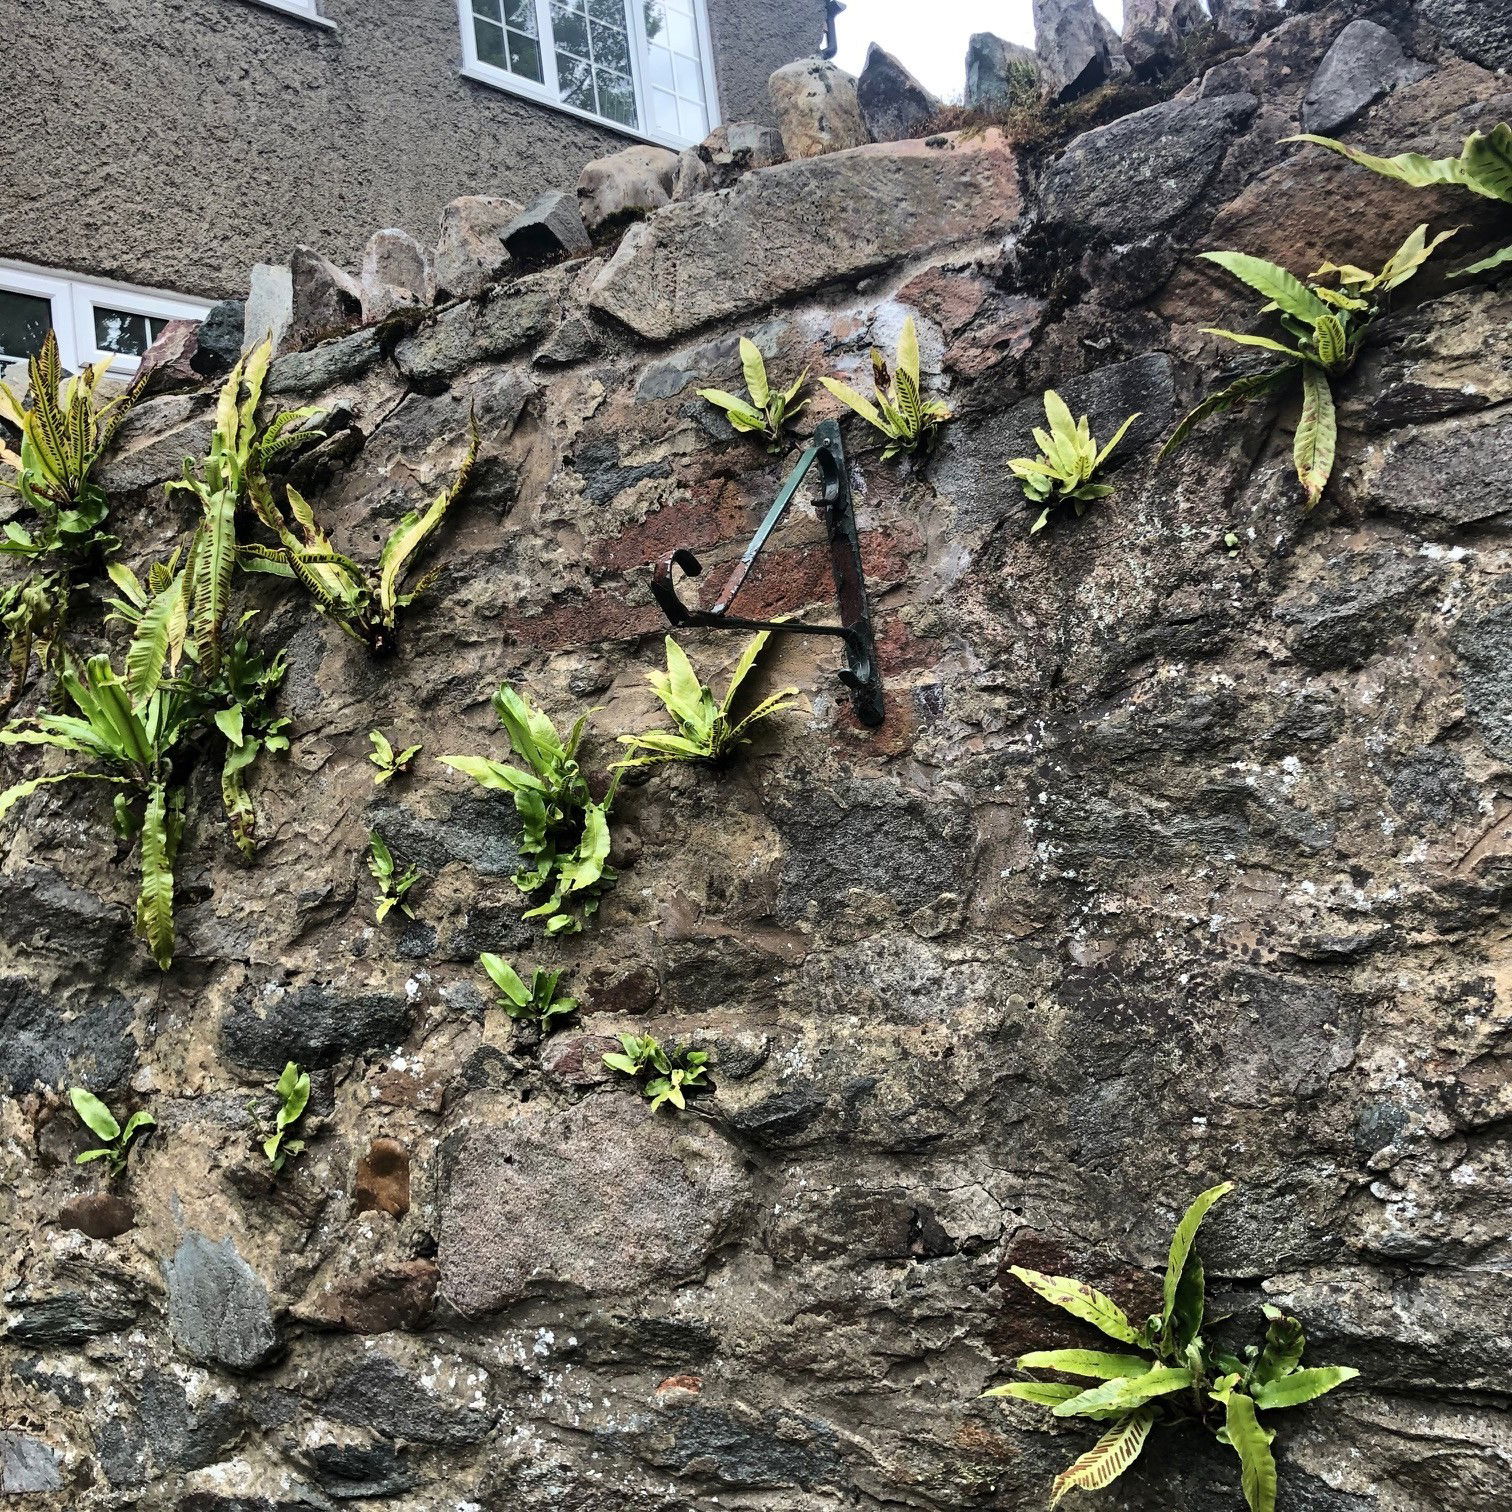 Due to their epiphytic nature, Asplenium are renowned for growing in the most unusual of locations, including the walls of houses, split stones & abandoned cars!
Common Issues with Bird's Nest Ferns
Yellow central leaves are the result of excess moisture settling on the foliage, typically promoted by dark locations. Instead of pouring water directly onto the foliage, irrigate at the soil line by lifting the foliage at the side to prevent wetting the leaves. If symptoms don't improve, cut the fronds back to an inch above the soil line to promote new fronds.
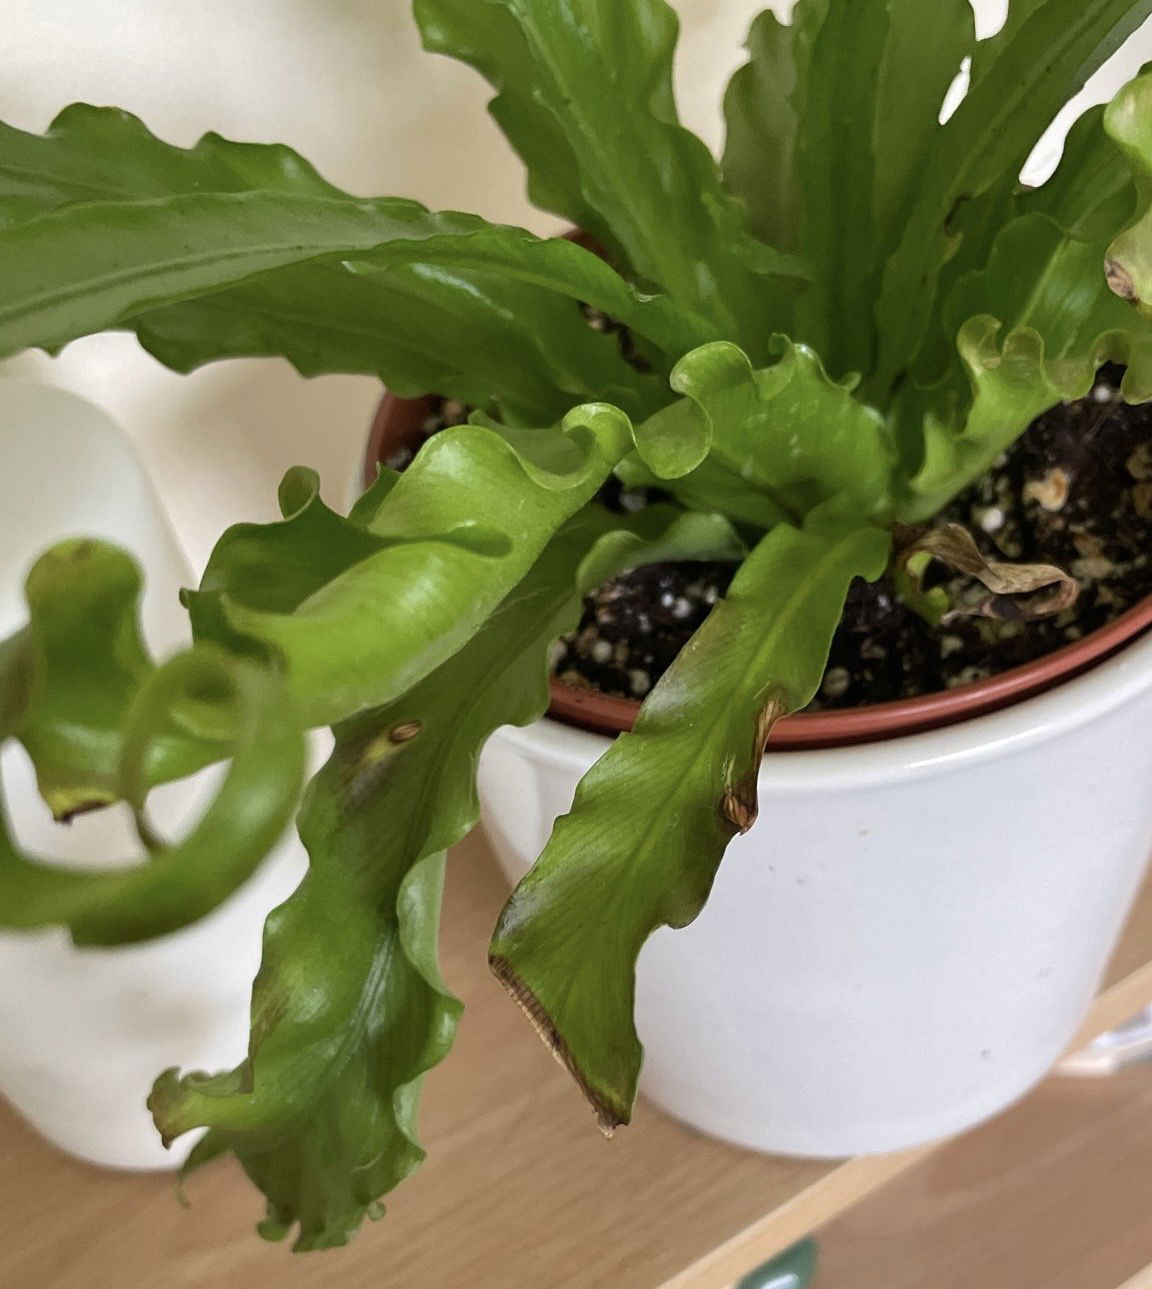
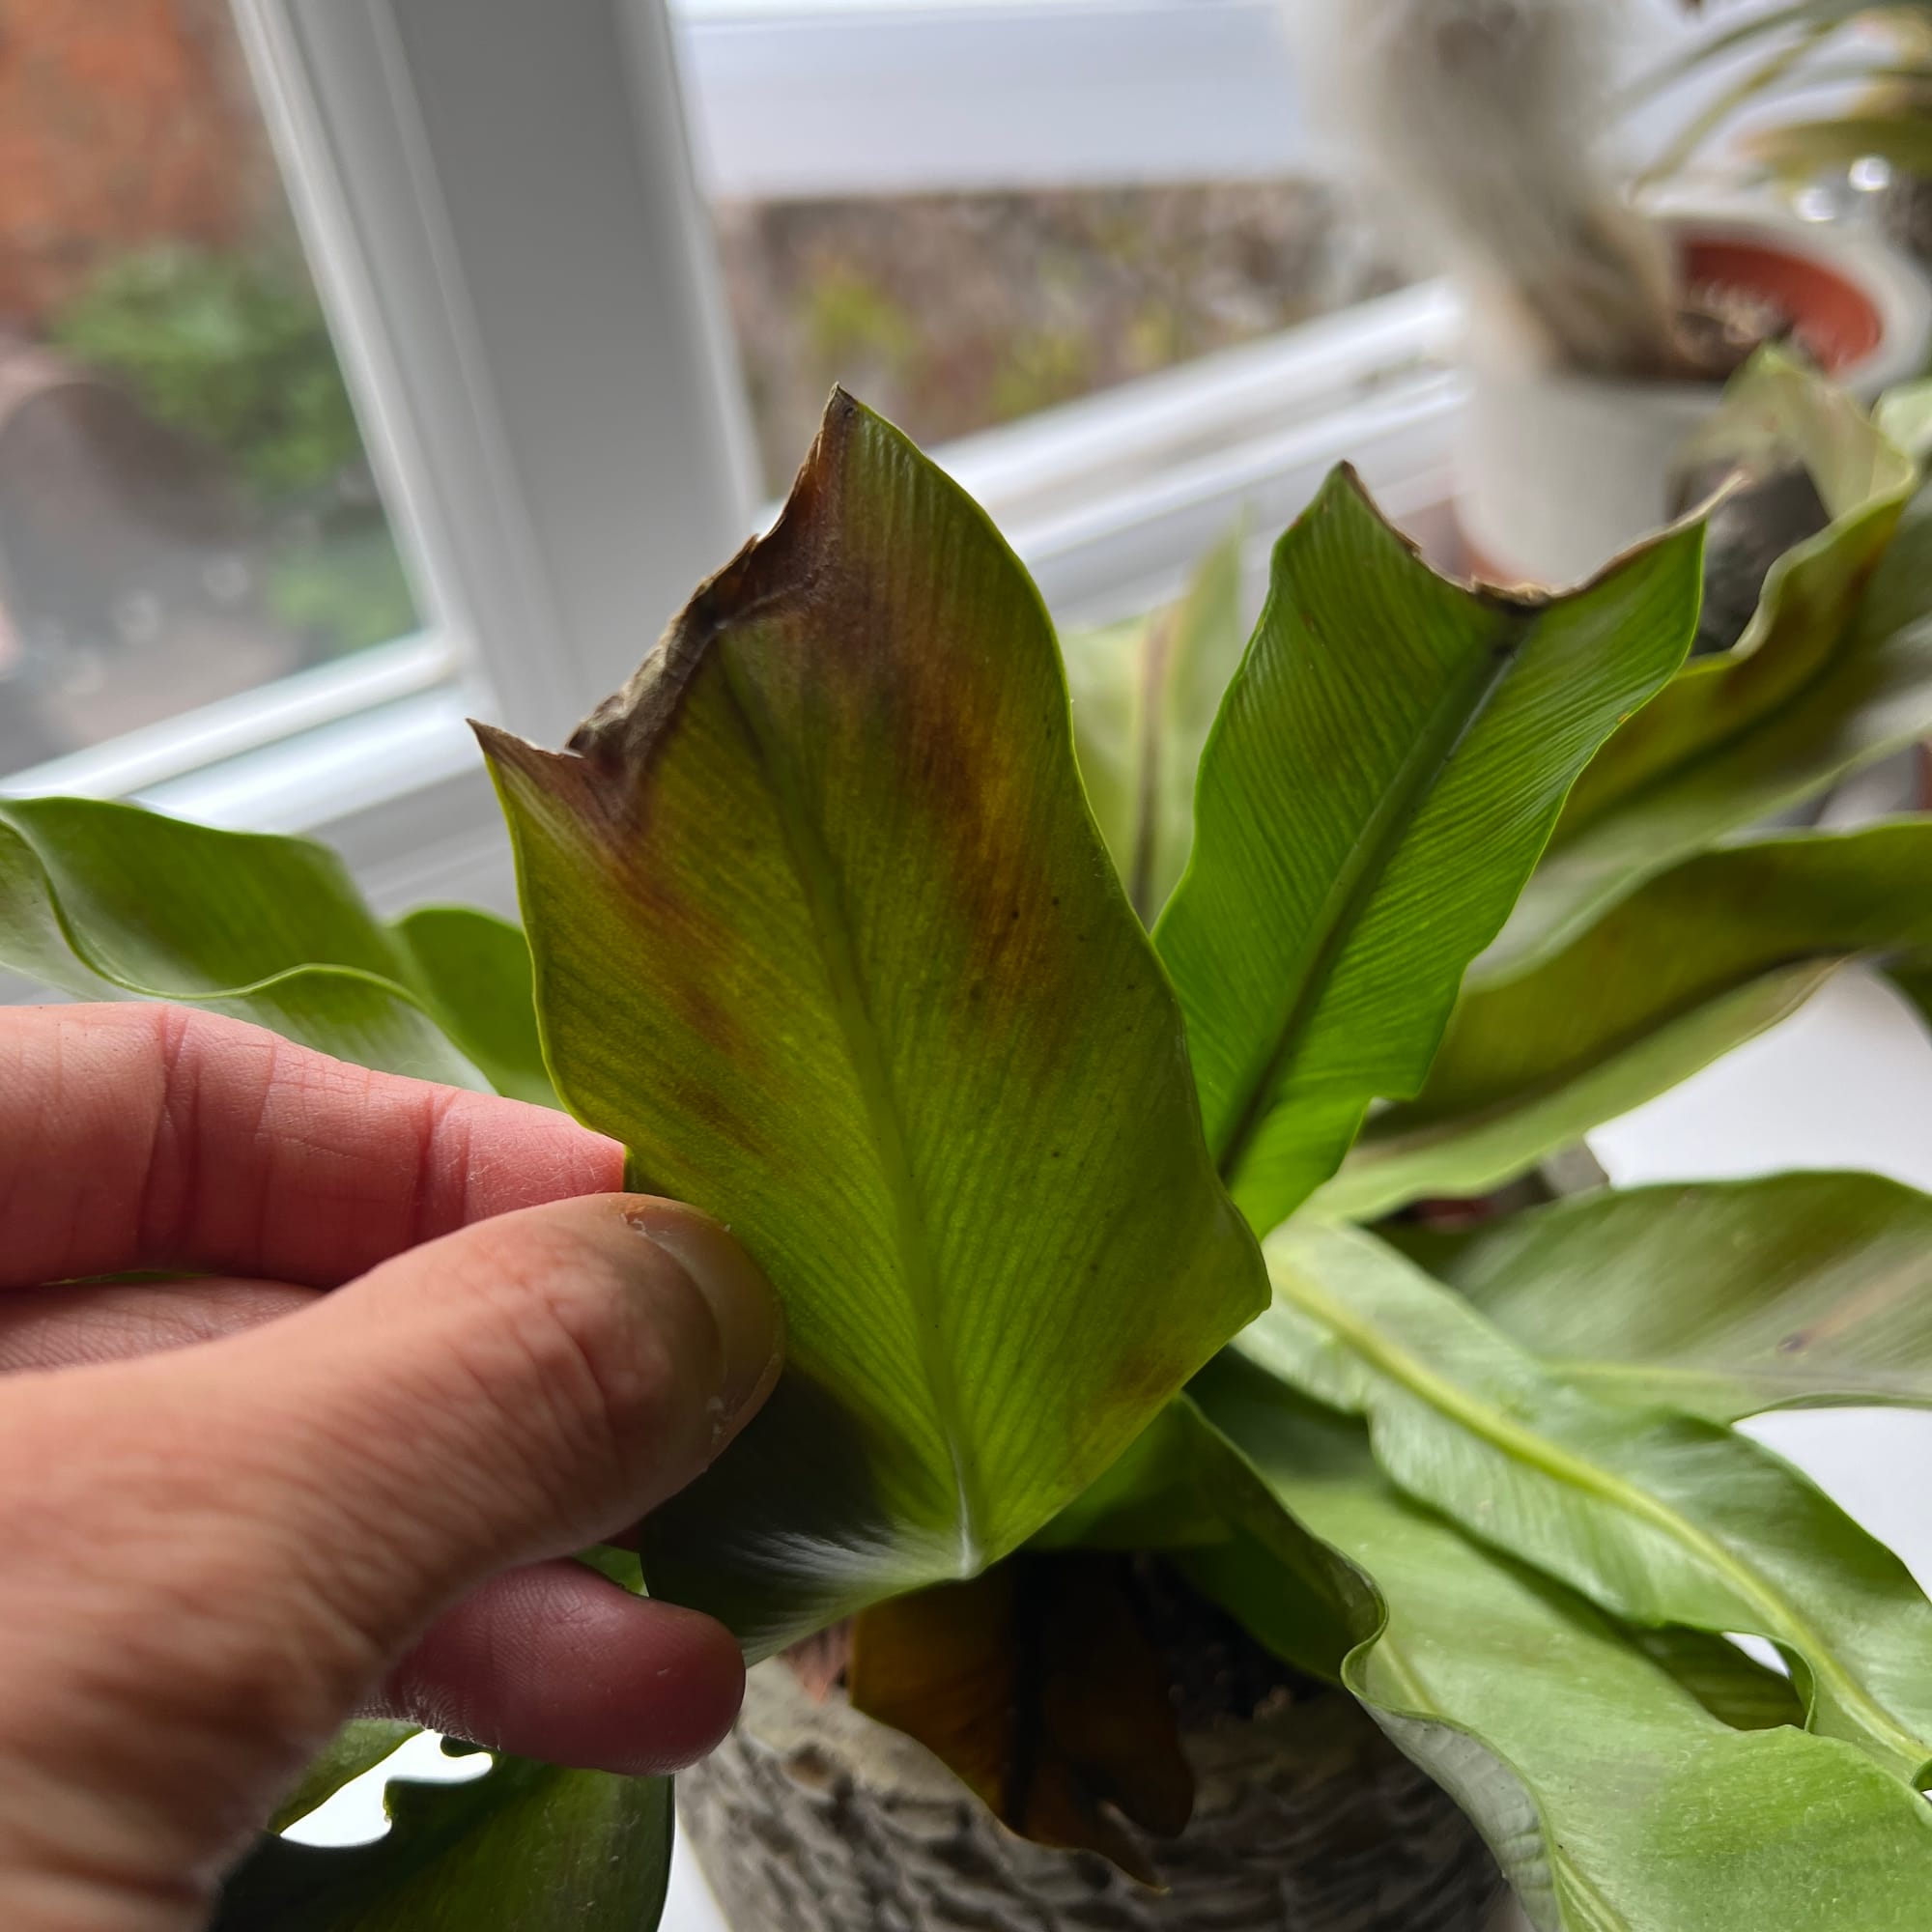 This is an example of what a dehydrated Bird's Nest Fern can look like. Here, the owner pruned the yellow/brown tips off, only for the leaf to redevelop the crispy tips soon after. THE HOUSEPLANT DOCTOR™ recommends to keep the brown tips on, and wait for the entire leaf to brown over before pruning it off.
If your Fern is located in a dark environment with mould developing on the soil's surface, use a chopstick to stab the soil in various areas gently. You should aim to enter the compost between the base of the plant and the pot's edge, as failure to do so may lead to damaging its lower portion. Leave the holes open for a few days before re-surfacing the soil to avoid it becoming overly dry. Not only will the gentle shift in the soil's structure mimic the work of small invertebrates in the wild (worms, etc.), but it'll also add oxygen back into the soil, thus reducing the risk of root rot. Repeat this monthly, or whenever you feel the potting-mix isn't drying out quickly enough.
 An under-humid room will not favour Ferns as it can result in brown crispy tips. Humid air and reliably moist soil are what keeps this species happy, so introduce a humidity tray to keep the local environment constant. Provide a bright, sunless windowsill and the plant should begin to develop healthier foliage soon after.
Curled leaves and brown leaf-edges are the result of too little water, and sometimes over-exposure to the sun, too. They are best located in bright, indirect settings, and those that haven't acclimatised to the harsh rays will show signs of sun-scorch and environmental shock. A splash of winter sunlight is acceptable as long as the soil moisture is regularly observed, with complete avoidance once summer comes along.
Black roots are natural for Bird's Nest Ferns. Only treat for root rot if the soil smells 'earthy' and the roots feel collapsed or squishy. Click on this link to learn about this issue and what to do next!
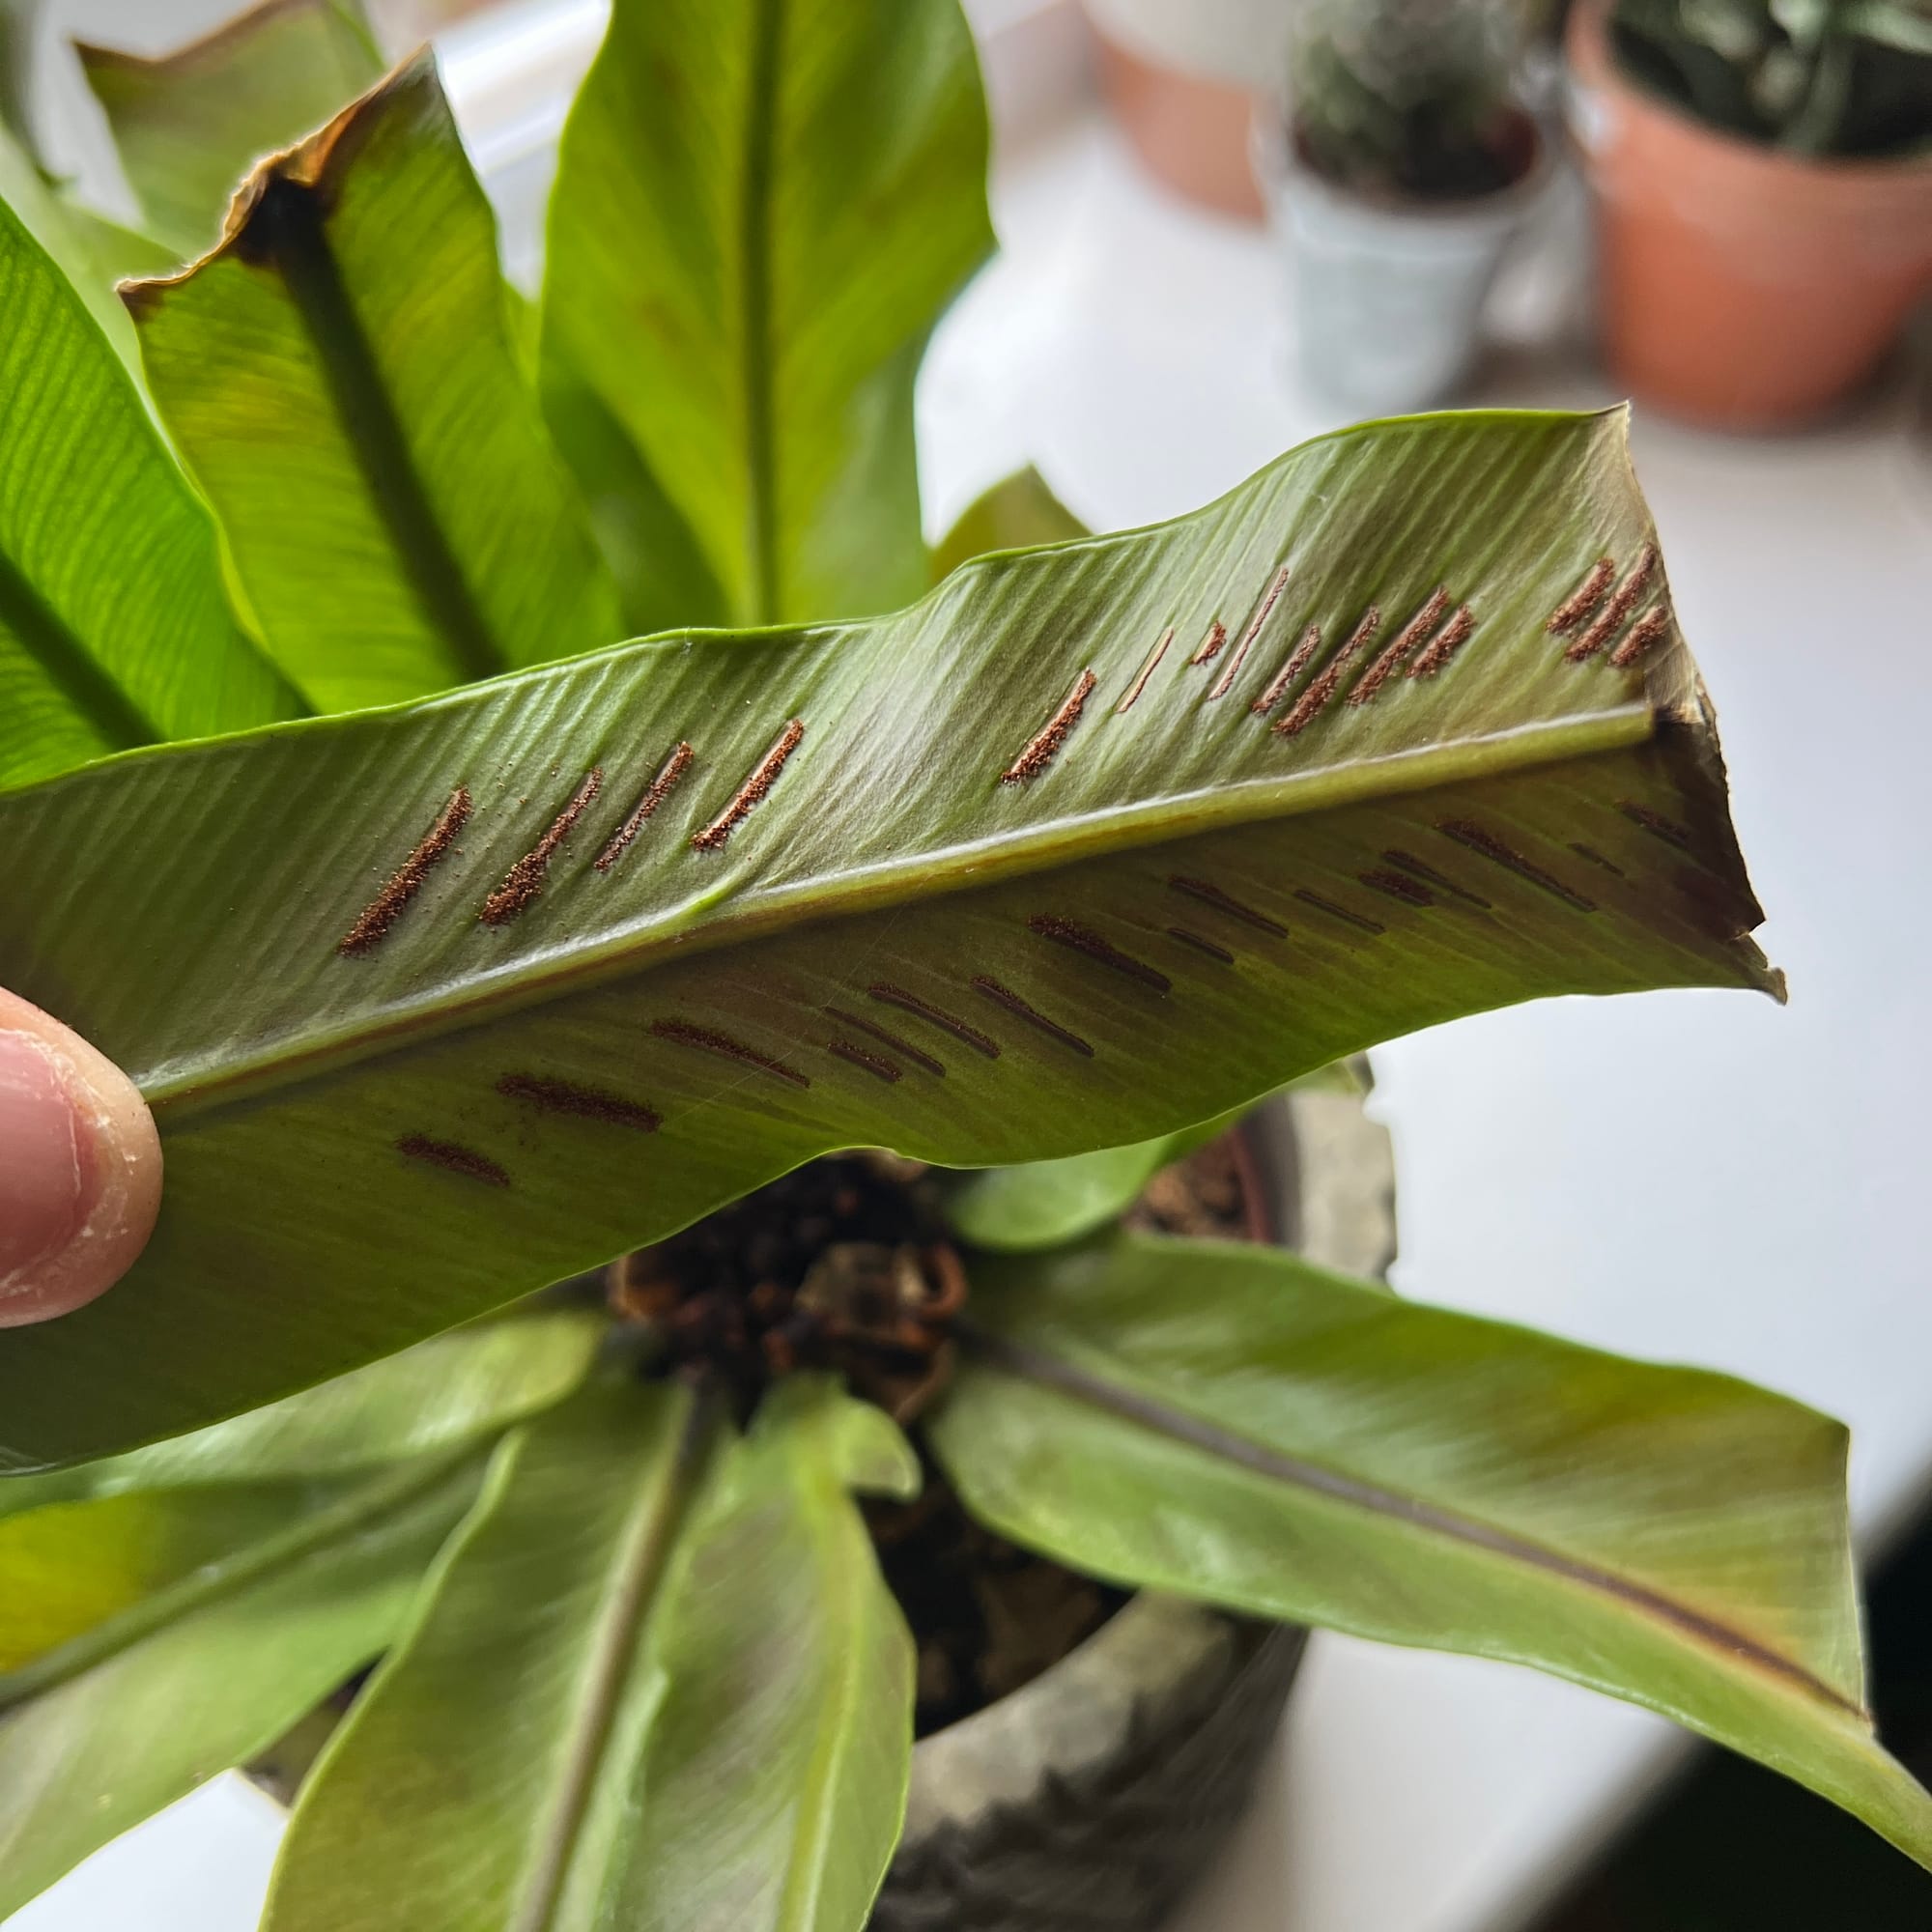
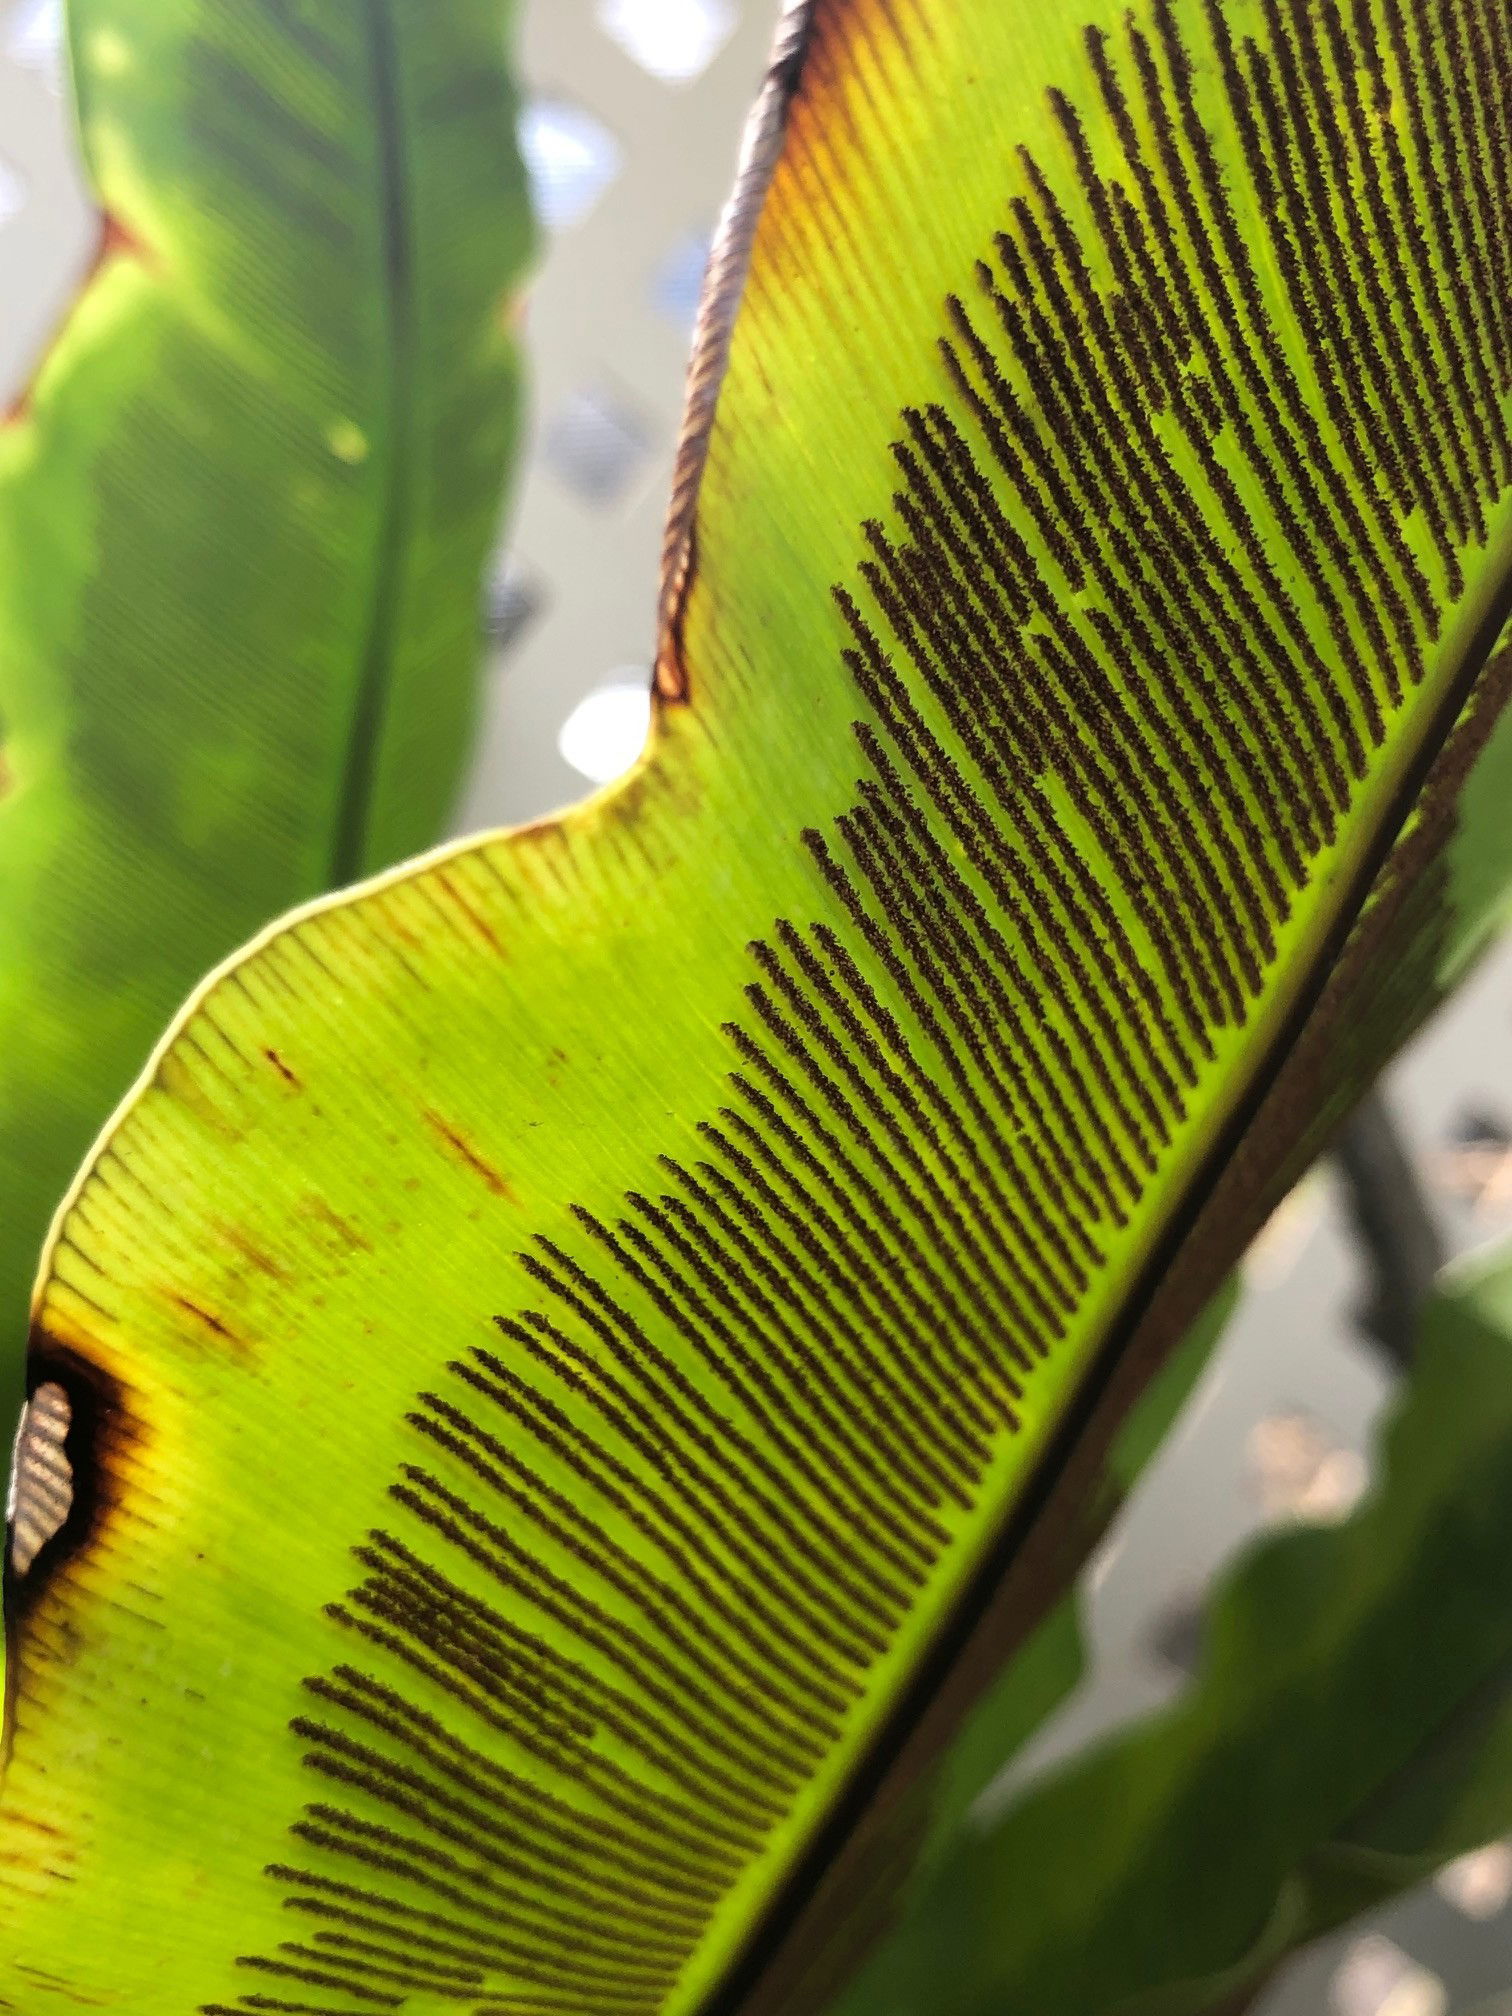
The brown lined markings on the back of the leaves are where the Fern's spores are housed, which is essentially their 'seeds'. Ferns don't flower and therefore will never produce seeds, so its spores are how the plant can 'reproduce'. You shouldn't scrape or remove these markings as it can stress the plant out.
Sudden crispy, grey or wilted foliage shortly after being repotted is a symptom of transplant shock. Increase the humidity around the plant, maintain evenly moist soil and feed every third water with a 'Houseplant' labelled fertiliser. Your Bird's Nest Fern is wilting due a damaged root system that doesn't uptake enough moisture to keep its foliage hydrated. Wrap the plant (& its pot) in a transparent plastic bag and check for drying soil. Provide a bright, sunless windowsill with temperatures above 18 ℃ (64℉) and wait for new growth to emerge in a few weeks. Additional Step: Purchase a 'foliar feed' from a local garden centre and mist the foliage to nourish the plant, thus helping its recovery process.
In some cases (like the above), your Bird's Nest Fern may develop crispy leaf tips like this. But, as long as there is fresh new growth emerging from the plant's centre, please try not to worry. They will naturally 'brown' their older leaves in favour for promoting the energy to the younger growth in spring. Don't prune these dying leaves off until they fully become crispy!
Spider Mites are small, near-transparent critters, that'll slowly suck out the chlorophyll out of the leaves. Have a check under the leaves, most notably along the midrib, for small webs and gritty yellow bumps. Click here to read our article about the eradicating Spider Mites, along with some extra tips that you may not find elsewhere!
A rotten core is usually accompanied by an array of collapsing leaves that can emit a foul odour over time. The usual culprits of this issue are excess of water in between hydrations either on the foliage or in the soil, too little light or a lack of drainage holes. Unfortunately for these Ferns, this can, and often will lead to death. This is because the plant's body is harboured just below the soil line, with short rhizomes acting like its stem. If this plant part begins to rot, it's similar to a collapsed or rotten stem which will spell the end of its life.
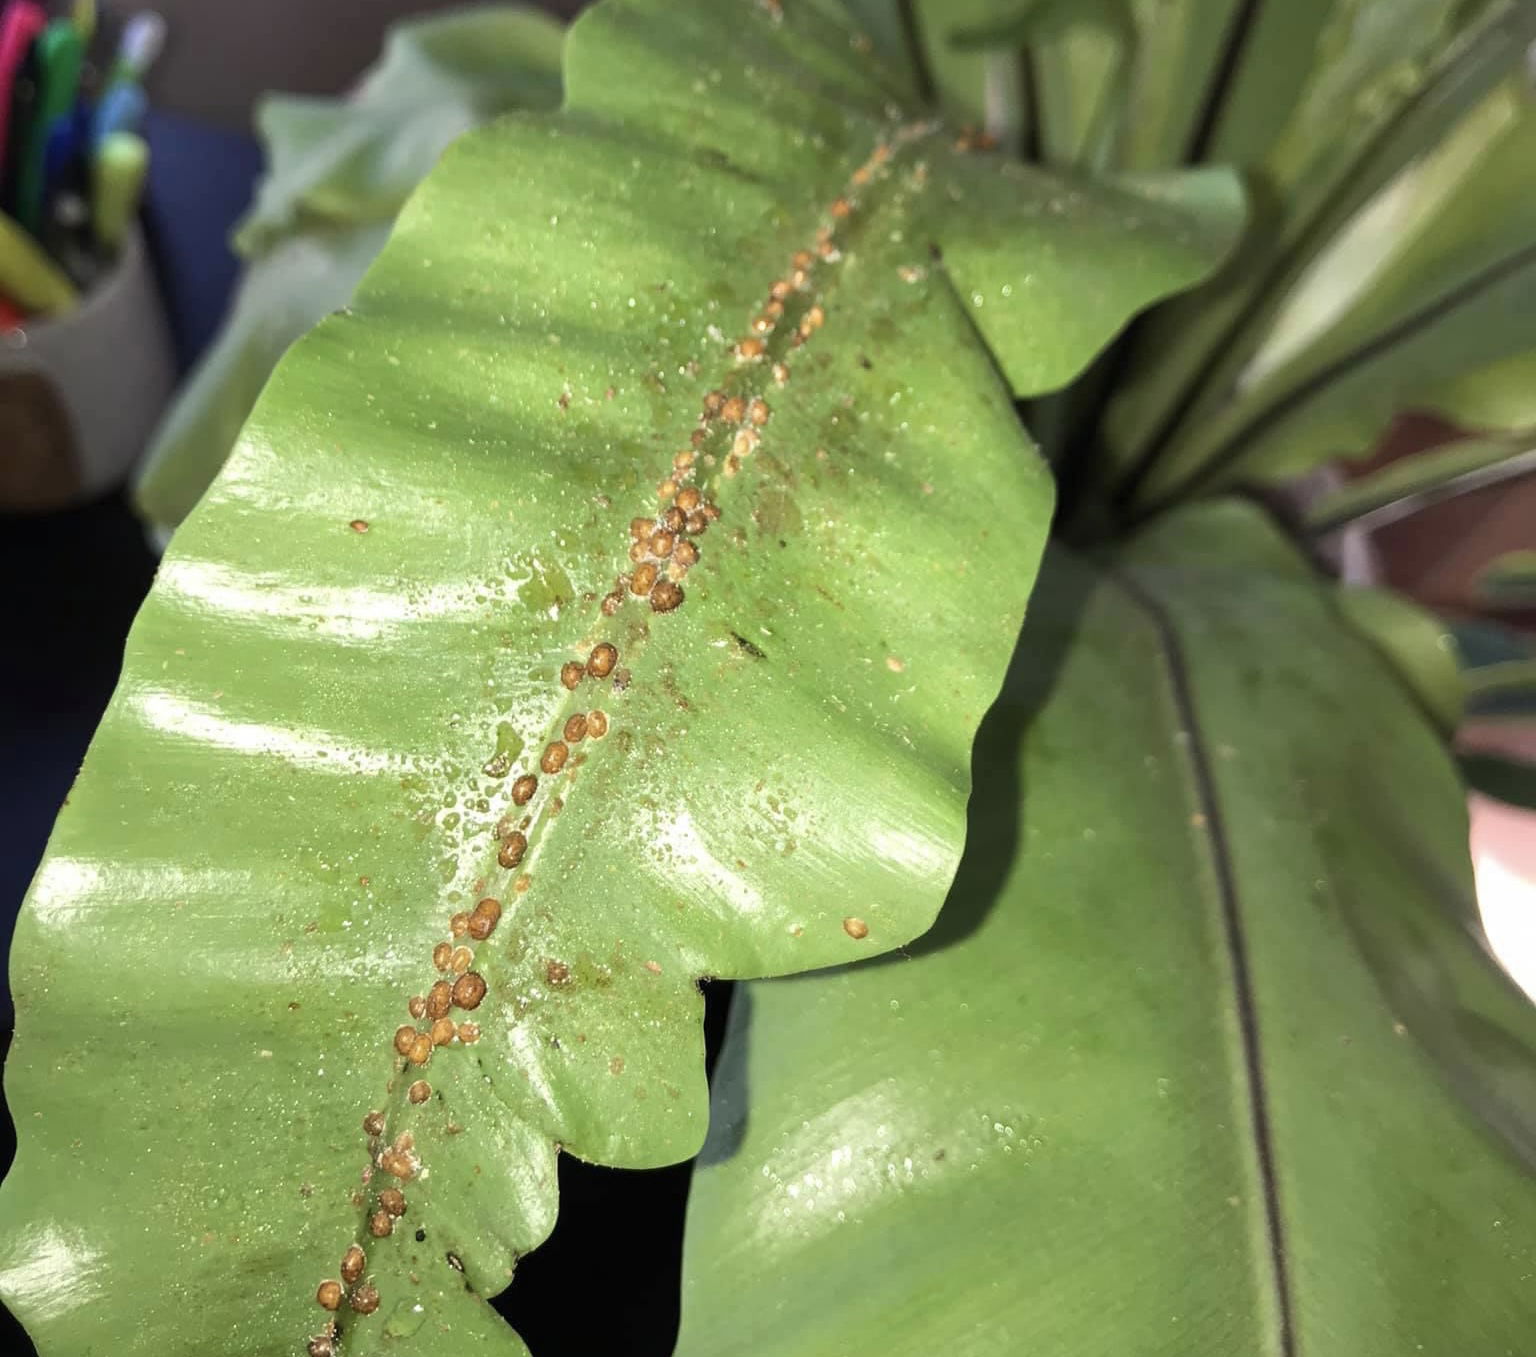 This is what the pest,'Scale', looks like on a Bird's Nest Fern (Asplenium nidus). They can affect both sides of the leaves, along with being in the crown (base) of the plant, too.
Origins
There are over seven hundred species of Asplenium, most of which have natural distributions in Asia, Australia and eastern Africa. The genus comes from the Spleenwort family and can be translated to 'spleen herb' from Ancient Greek. The most popular and recognisable Bird's Nest Fern, the A. nidus, has had multiple human uses over the years, from treating asthma to halitosis, but now serves mainly as a houseplant or a weed on walls around the world.
The genus was first described by Carl Linnaeus in 1753, with the most popular species, A. nidus, following soon after. Its name can be translated from Latin, referring to the 'nest-like' attributes of its foliage.
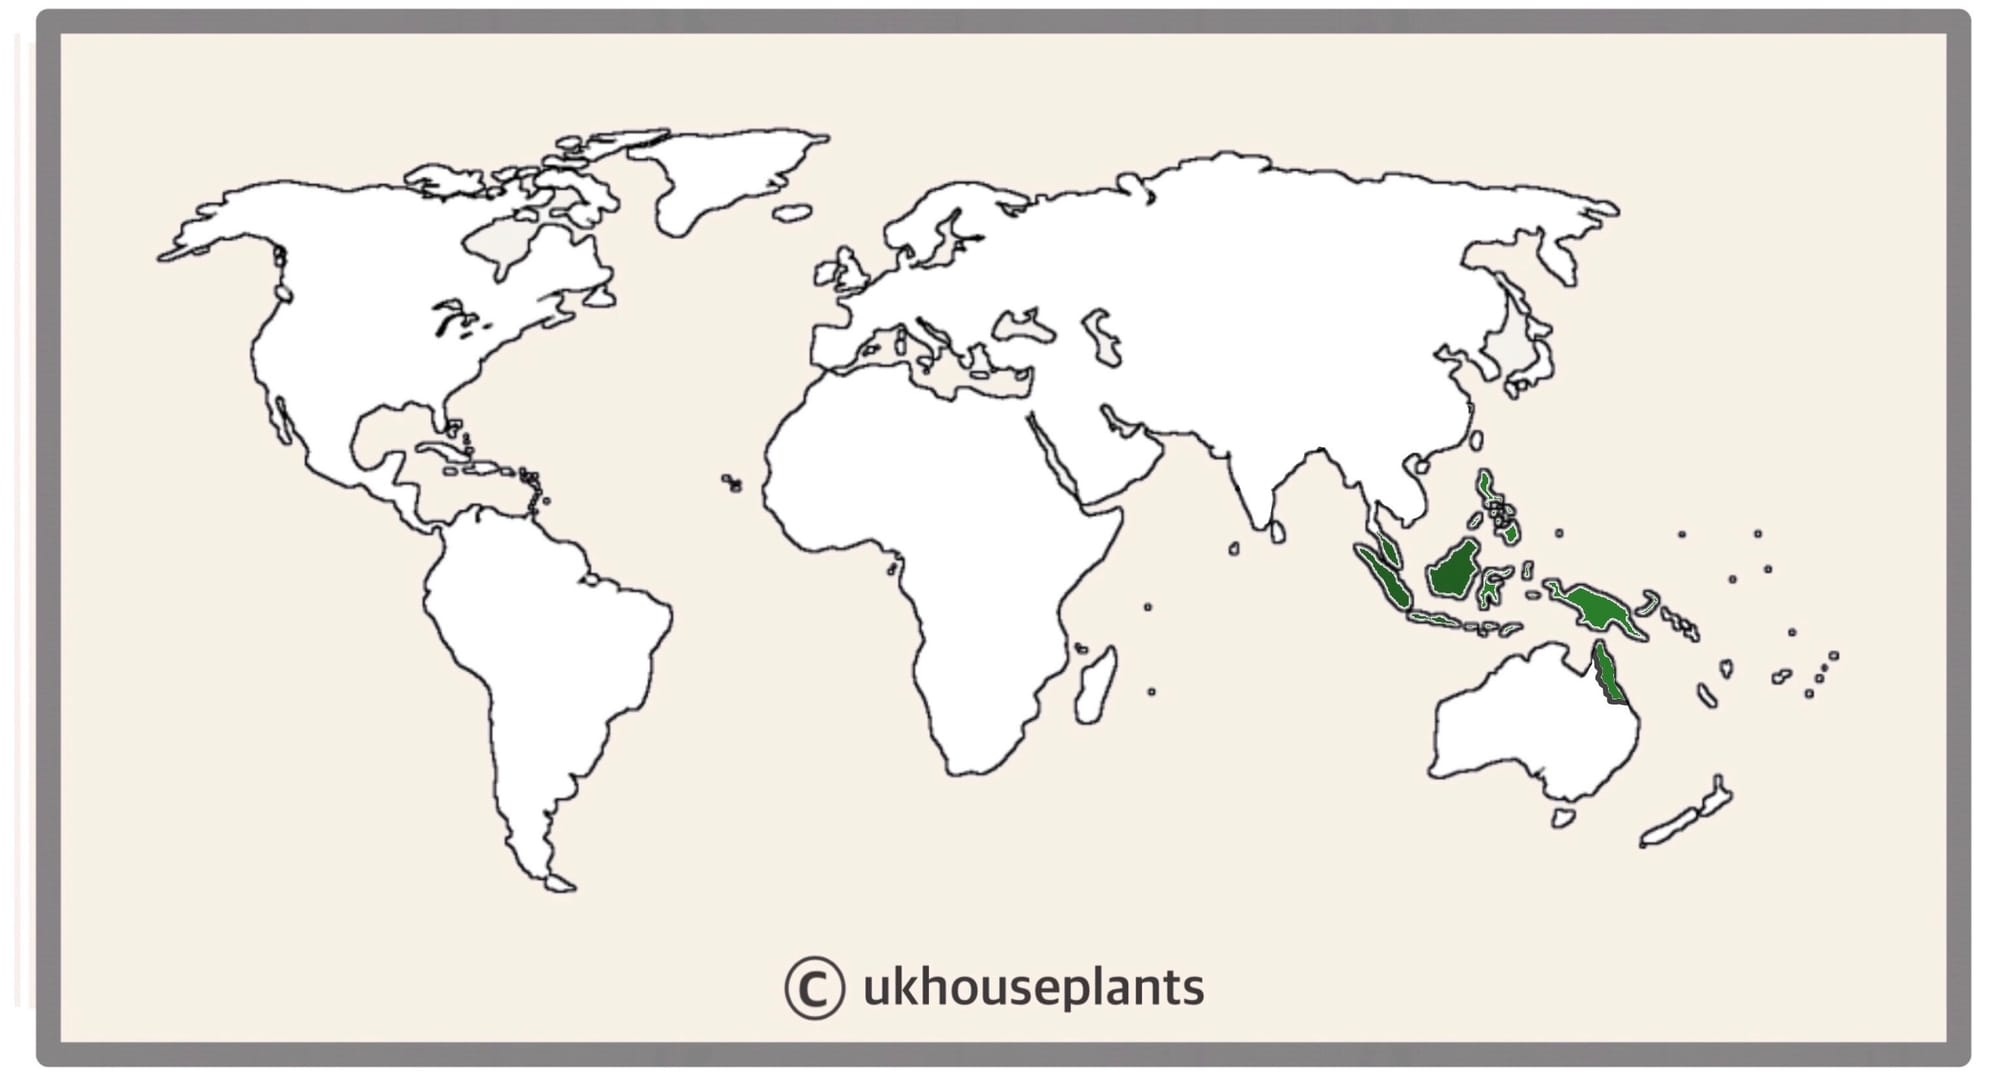 The Distribution of Asplenium nidus
Temperature
12° - 26℃ (56° - 85℉)
H1b (Hardiness Zone 12) - Can be grown outdoors during the summer in a sheltered location with temperatures above 12℃ (54℉), but is fine to remain indoors, too. If you decide to bring this plant outdoors, don't allow it to endure any direct sunlight as it may result in sun-scorch and dehydration. Regularly keep an eye out for pests, especially when re-introducing it back indoors.
Spread
Over 1m in both height and in width, with the ultimate height taking between 4 - 8 years to achieve.
Pruning & Maintenance
Remove yellow or dying leaves, and plant debris to encourage better-growing conditions. While pruning, always use clean scissors or shears to reduce the chance of bacterial and fungal diseases. Never cut through yellowed tissue as this may cause further damage in the likes of diseases or bacterial infections. Remember to make clean incisions as too-damaged wounds may shock the plant, causing weakened growth and a decline in health.
Propagation
Via Spores & Division.
 Spores are the primitive version of seeds that can be dated back to the Triassic Period, 200 million years ago.
Spores (Moderate) - You may have noticed little brown spots under the leaves - those are reproductive spores that can be propagated in the same way as seeds, once matured. These zygotes will develop on the under-leaves of each frond; you'll know when they're ready to be propagated, as they'll brown over and begin to crisp.
- Choose an appropriate potting-mix; we'd recommend a 'Houseplant' labelled compost as it boasts a good balance of drainage and water retention. Place the soil into a plastic pot (any size is fine) that has adequate drainage holes.
- Separate the spores from the under-leaves using your hands. If the spores are brown and crispy, but can't be removed, cut the entire frond off. Make sure that the diameter of the pot is wider than the frond's span; however, you can cut the frond (sideways) to fit the desired container better.
- Place the spores or fronds ON TOP of the compost, making sure that they sit flat against the soil-line.
- If you've managed to separate the spores, maintain moist soil by misting the top layer every few days. Do not submerge into the compost as this will reduce the rates of success. For those who still have entire fronds, place the foliage on top of dry compost. The dehydration will allow the spores to detach from the leaf, settling on the soil below.
- Place the potted spores/fronds into a transparent bag and situate it into a bright, indirect location. Provide temperatures above 18°F (64°F).
- Keep the spores moist, misting the top layer of the soil every few days. The fronds, however, must stay dry until you start to notice missing spores from the under-leaves. Once the majority have detached, discard the frond and begin misting the soil to aid hydration.
- As long as you provide high humidity (aided by the transparent bag locking in moist air) and good soil moisture, germination should begin. This process can take up to two months, but don't discard until it hits five months of nothingness.
Once the spores have developed their first frond, place them into their own pot to grow. Safely remove the transparent bag and follow the care requirements listed at the top of the article.
Rhizomatous Offshoot Division (Easy to Moderate) - Your plant will produce several basal offsets that can be separated once they have a sufficient root system, and surpass 8cm in frond length. If possible, water the soil 24hrs before the main event to reduce the risk of transplant shock, when its dry root systems are over-fingered. Take the plant out of its pot and place your fingers close to the nodal junction - soil may have to be removed for better access. Push the chosen offset downwards until you hear a snap. Separate the foliage and its root system away from the mother plant, mentally noting the high risk of damage. Transplant in the appropriate sized pot with a fresh batch of 'Houseplant' compost. Maintain evenly moist soil and situate it in a bright, indirect location away from any direct sunlight. After ten weeks, treat it like a healthy specimen, following the care tips above!
Flowers
Bird's Nest Ferns will not flower or produce seeds, and instead produce microscopic spores on the under-leaves which could eventually develop into its own plant. Have a look at the section above for more information on propagation.
Repotting
Repot every three years in the spring, using a 'Houseplant' labelled compost and the next sized pot with adequate drainage. Hydrate the plant 24hrs before tinkering with the roots to prevent the risk of transplant shock. For those that are situated in a darker location, add a thin layer of small grit in the pot's base to improve drainage and downplay over-watering. Click here for a detailed step-by-step guide on transplantation, or via this link to learn about repotting with root rot.
Pests & Diseases
Keep an eye out for mealybugs, spider mites, scale, thrips, vine weevils & root mealybugs that'll locate themselves in the cubbyholes and undersides of the leaves, with the exception of the latter two in the soil. Common diseases associated with Bird's Nest Ferns are root rot, rhizoctonia, leaf-spot disease, botrytis, rust, powdery mildew & southern blight - click here to learn more about these issues.
Toxicity
Not known to be poisonous by consumption of pets and humans. If high quantities are eaten, it may result in vomiting, nausea and a loss of appetite.
Retail Locations
Dobbies, British Garden Centres, Online Stores.
Book a 1-to-1 Call with THE HOUSEPLANT DOCTOR™
If you need further advice with your houseplants, book an advice call with ukhouseplants' friendly and expert writer today! This can be done via a video or audio call on most apps, including Facebook, FaceTime & Skype. A ten-minute call costs £5.99 (US$7), or £15.99 for thirty minutes. You can ask multiple questions, including queries on plants, pests, terrariums, repotting advice and anything in between. Please consider supporting this service to keep ukhouseplants thriving!
Comments