
Hoya carnosa
Contents
- Top Tips
- Location, Water, Humidity & Fertilisation
- Dormancy Care & Flowers
- Common Issues
- Origins, Temperature, Propagation, Repotting & Toxicity.
Need the answer to a specific plant query? Book a 1-to-1 video call with THE HOUSEPLANT DOCTOR™, the website's friendly author, to overcome and address your niggling problem! Available on iMessage, WhatsApp, Facebook Messenger & more.
Top Tips & Info
- Care Difficulty - Easy to Moderate
- Water once the soil's top third dries out, reducing this further in the autumn & winter.
- Offer a humid location by introducing a pebble tray to keep the surrounding moisture high; the use of artificial humidity is not needed in the summer.
- Provide a bright location, avoiding more than three hours of direct light or excessively dark environments.
- Fertilise using a 'Houseplant' labelled feed every four waters throughout the year.
- Regularly check for pests, most notably Mealybugs, that'll infest the cubbyholes of the stem & foliage.
- Keep the ambient temperature above 10℃ (50℉) throughout the year, especially if placed outdoors in the summer. Drastic fluctuations may lead to lower leaf loss or short-lived flowers.
- Repot every three years using a 'Cactus & Succulent' potting mix and the next sized pot.
Location & Light - 🔸🔸
Perfecting the amount of light a Hoya receives is crucial for a long-lasting specimen. During the spring and summer, be sure to provide a brightly lit spot away from any direct light. Excessive exposure during this time will negatively affect the plant in the likes of sun scorch and dehydration. Once the autumn kicks in, be sure to include an hour or two of direct light per day to get it through the dormancy period, lasting until the following spring.
Water - 🔸🔸
Although there are over two hundred species of Hoya, they all follow the same rule of thumb when it comes to their care requirements. Allow the top third of the soil to dry out in between waters, reducing this further in the autumn and winter. When it's time to irrigate, be sure to avoid saturating the cubbyholes or flowers unnecessarily, as excess moisture will cause anaerobic conditions which may result in rot. For those situated in shadier environments, allow around half of the soil dry out in between waters to counteract the chance of over-watering, especially in the winter months. Under-watering symptoms include stunted growth, yellowing leaves, a lack of flowers or sudden flower loss. These issues could be a product of many elements; however, too much sunlight or forgetfulness are usually the culprits. Over-watering symptoms include the yellowing or loss of leaves and flowers, stunted growth or a rotten base. These problems are typically familiar with either too little light or heat, or overly soggy soil; if you feel that root rot is the case, be sure to click on this link for more info.
Humidity - 🔸🔸
Create a humidity tray to provide a moist and stable environment for your plant. If the surrounding saturation is too low or the heat too high, its leaves may start to brown over and curl, especially in the direct light. Hose the foliage down from time to time to hydrate the leaves and to keep the dust levels down. Inconsistent levels of surrounding air moisture will upset the specimen, resulting in flower loss and stunted growth.
Fertilisation - 🔸
A product that favours nitrogen (N, P, K) is best for smaller specimens that need further development of foliage. Once the Hoya has reached your desired size, switch to a tomato feed (N, P, K - potassium) every four waters in the spring & summer to entice the plant into bloom. If, however, you're not into gardening, a general 'Houseplant' fertiliser will still do the trick, once every four waters throughout the year.
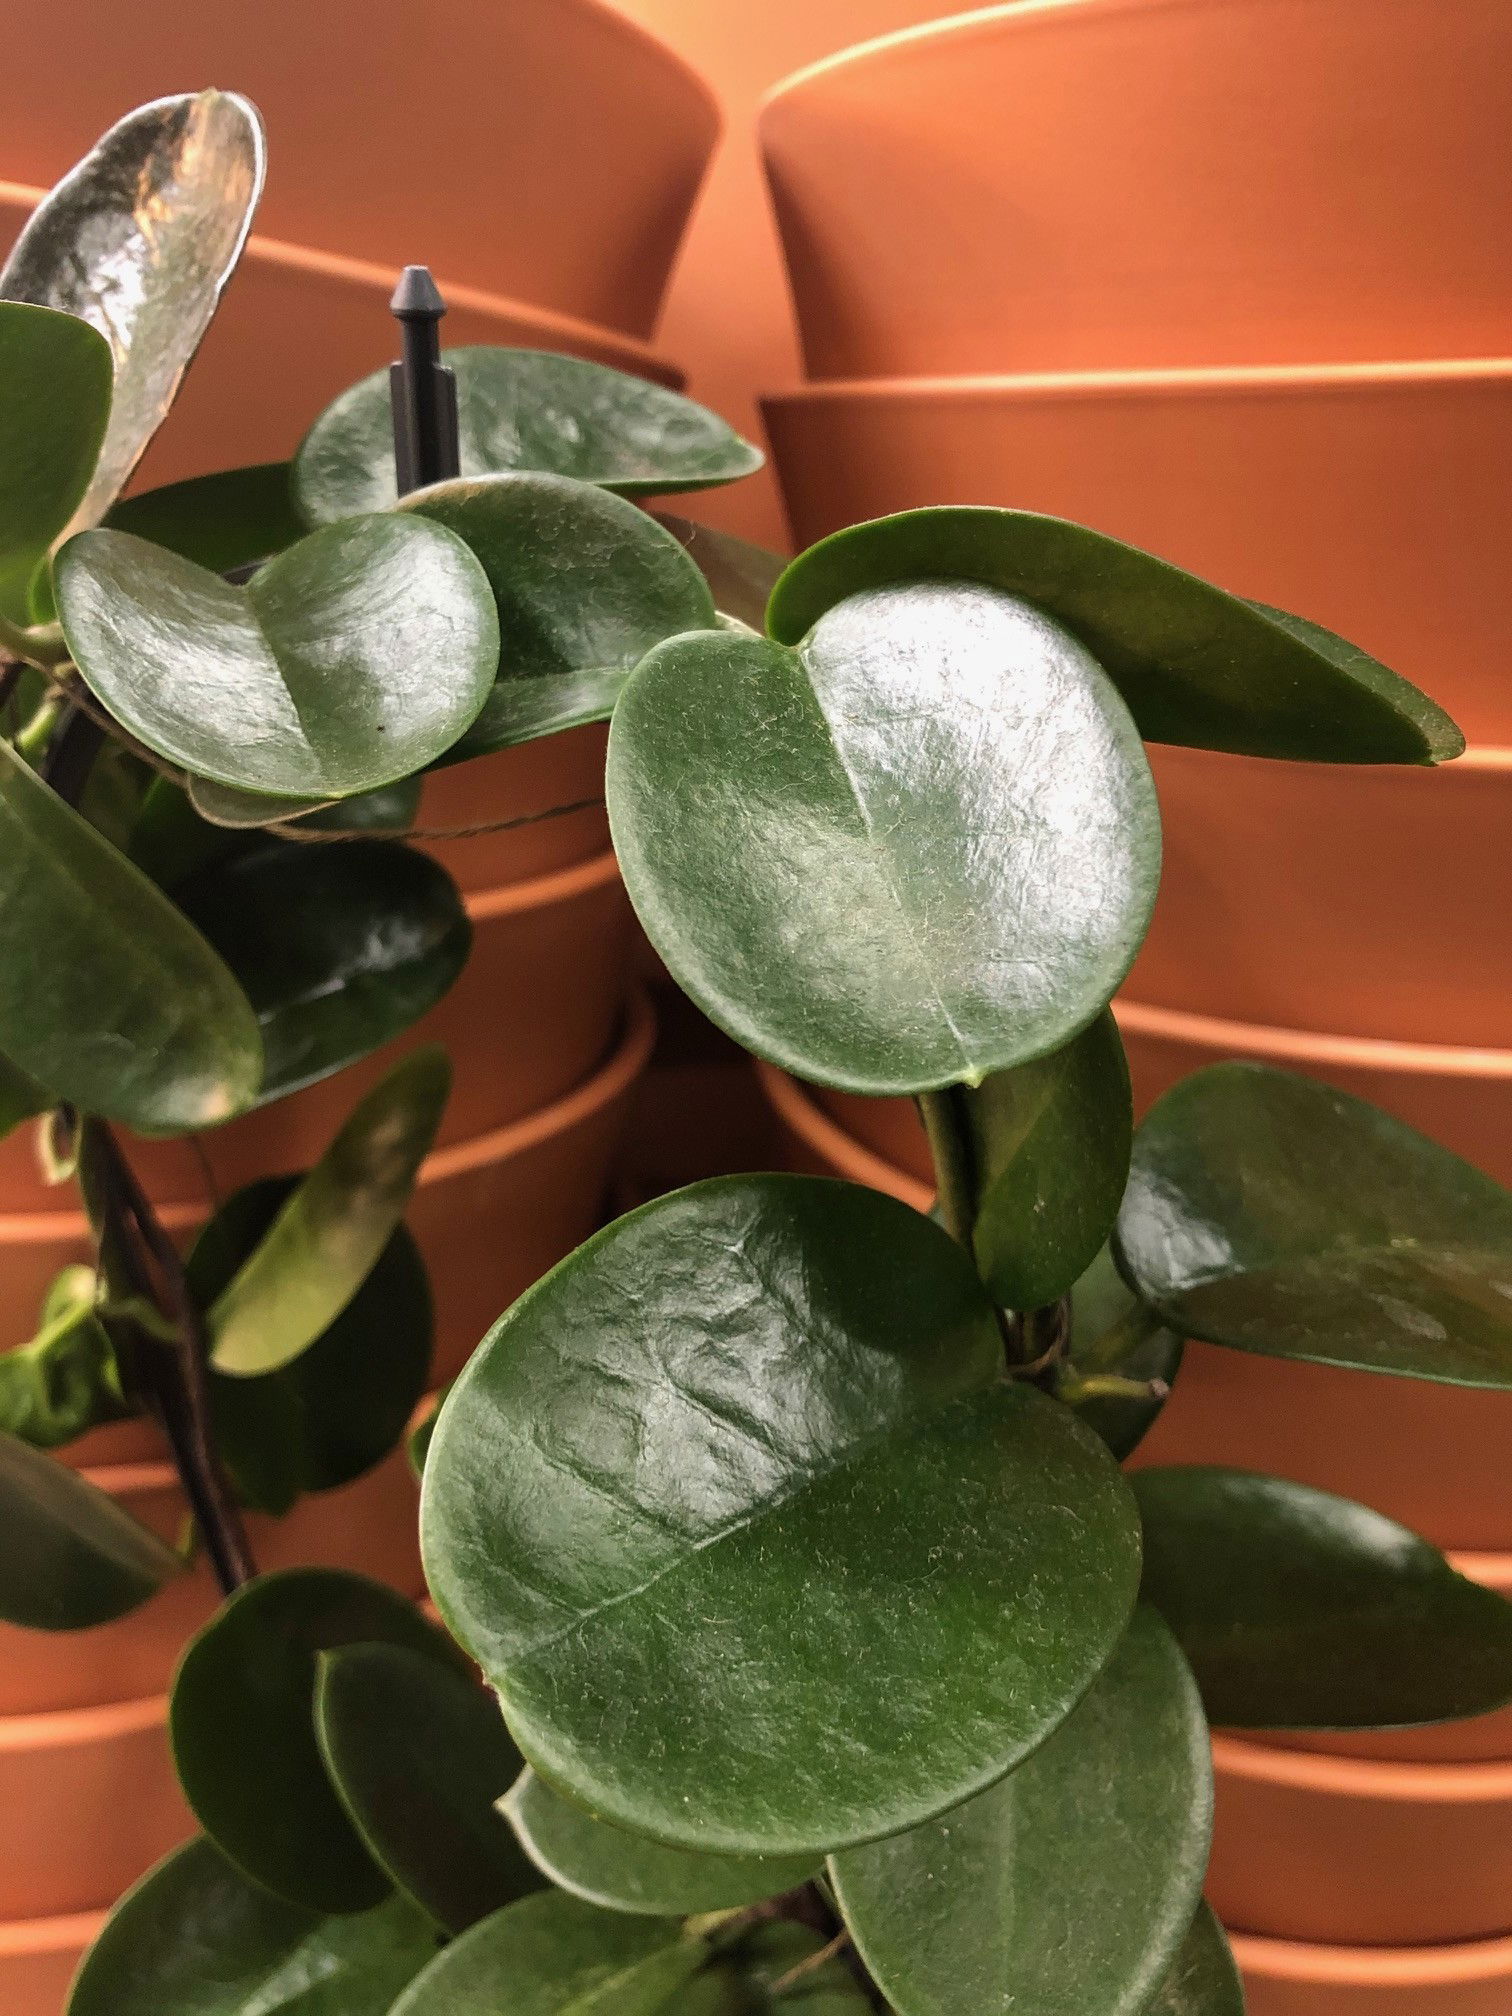 Hoya australis
Dormancy Care & Annual Flowers
Trying to achieve a bloom isn't the hardest of tasks, with those who have a cooler room without artificial light at night being on the upper-hand. The following steps should be done at the start of autumn when the plant is entering its dormancy. Remember - a good dormancy always results in better chances of flowers in the spring and summer.
They're better off staying pot bound for several reasons, including the prevention of root rot or transplant shock, and to put momentarily stress on the plant. Although this may sound harsh, a restriction of roots is the best way to obtain flowers, as it'll send out a spike in response to becoming under threat. As long as the plant is subsequently repotted tri-annually in the spring, no harm is done.
For those with species flowering in the winter, continue to follow these steps. The drop in temperature should ideally last until the inflorescence finishes blooming, although it can still be transferred into the main room as long as it sits on a pebble tray. You'll be at a significant disadvantage if the ambient temperature is kept constant throughout the year, as these species of Hoya will only respond with flowers in cooled environments. Never exceed the minimum temperature as it could lead to plant death or yellowed foliage at a bare minimum.
Sunlight & Location
Be sure to provide a bright location with little to no direct sunlight. Although the winter rays won't necessarily hurt the plant, you can easily fall in the trap of sun-scorch and severe dehydration.
For the specimen to fully become seasoned, avoid the use of artificial lighting or locations that boast temperatures higher than 18℃ (64℉).
Hydration
Reduce waters so that about half of the soil becomes dry. It's essential to keep them on the drier side to life, as they'll think that hard times are ahead and therefore will need to pass its genes on to the next generation.
Occasional Feeds
While in bloom, use a Tomato fertiliser to provide monthly nourishment of potassium.
Reduce Everything
This one is to remind you that everything needs to be reduced - especially the temperature.
Temperature
This is the most significant step; reduce the temperature down by around 5℃ compared to the summertime, or place in a room that's around 14℃ (57℉) at night. The drop in temperature should ideally last until mid-spring before relocating it back into the desired location in the house. Without the prolonged exposure to the cooler temperatures, your Hoya won't be able to fully winterise, thus reducing the chance of a bloom in the spring or summer months. Increase waters and fertilisations from mid-spring onwards, and follow the table below for more advice.
| Time of Year | Care Requirements |
| January & February | Resting/Dormancy Period. Maintain reduced irrigations & fertilisation. |
| March & April | End of Resting/Dormancy Period. Increase waters & feed using a nitrogen-based fertiliser at monthly intervals. From mid April, use a potassium-based feed fortnightly during this period; water once the top third of the soil dries out. |
| May & June | Flowering Period. Maintain moist soil & fortnightly potassium-based feeds. |
| July | End of the Flowering Period. Gradually decrease fertilisation in the soil - remove spent flowers as they wilt. |
| August & September | Water once the top third of the soil dries out; supplement using houseplant feed or a general plant fertiliser, at monthly intervals. |
| October - December | Resting/Dormancy Period. Reduce irrigations & fertilisation. |
N. B. - If you're located in the Southern Hemisphere, push each section six months forward to keep in sync with the current seasons. Example: January & February will become July & August.
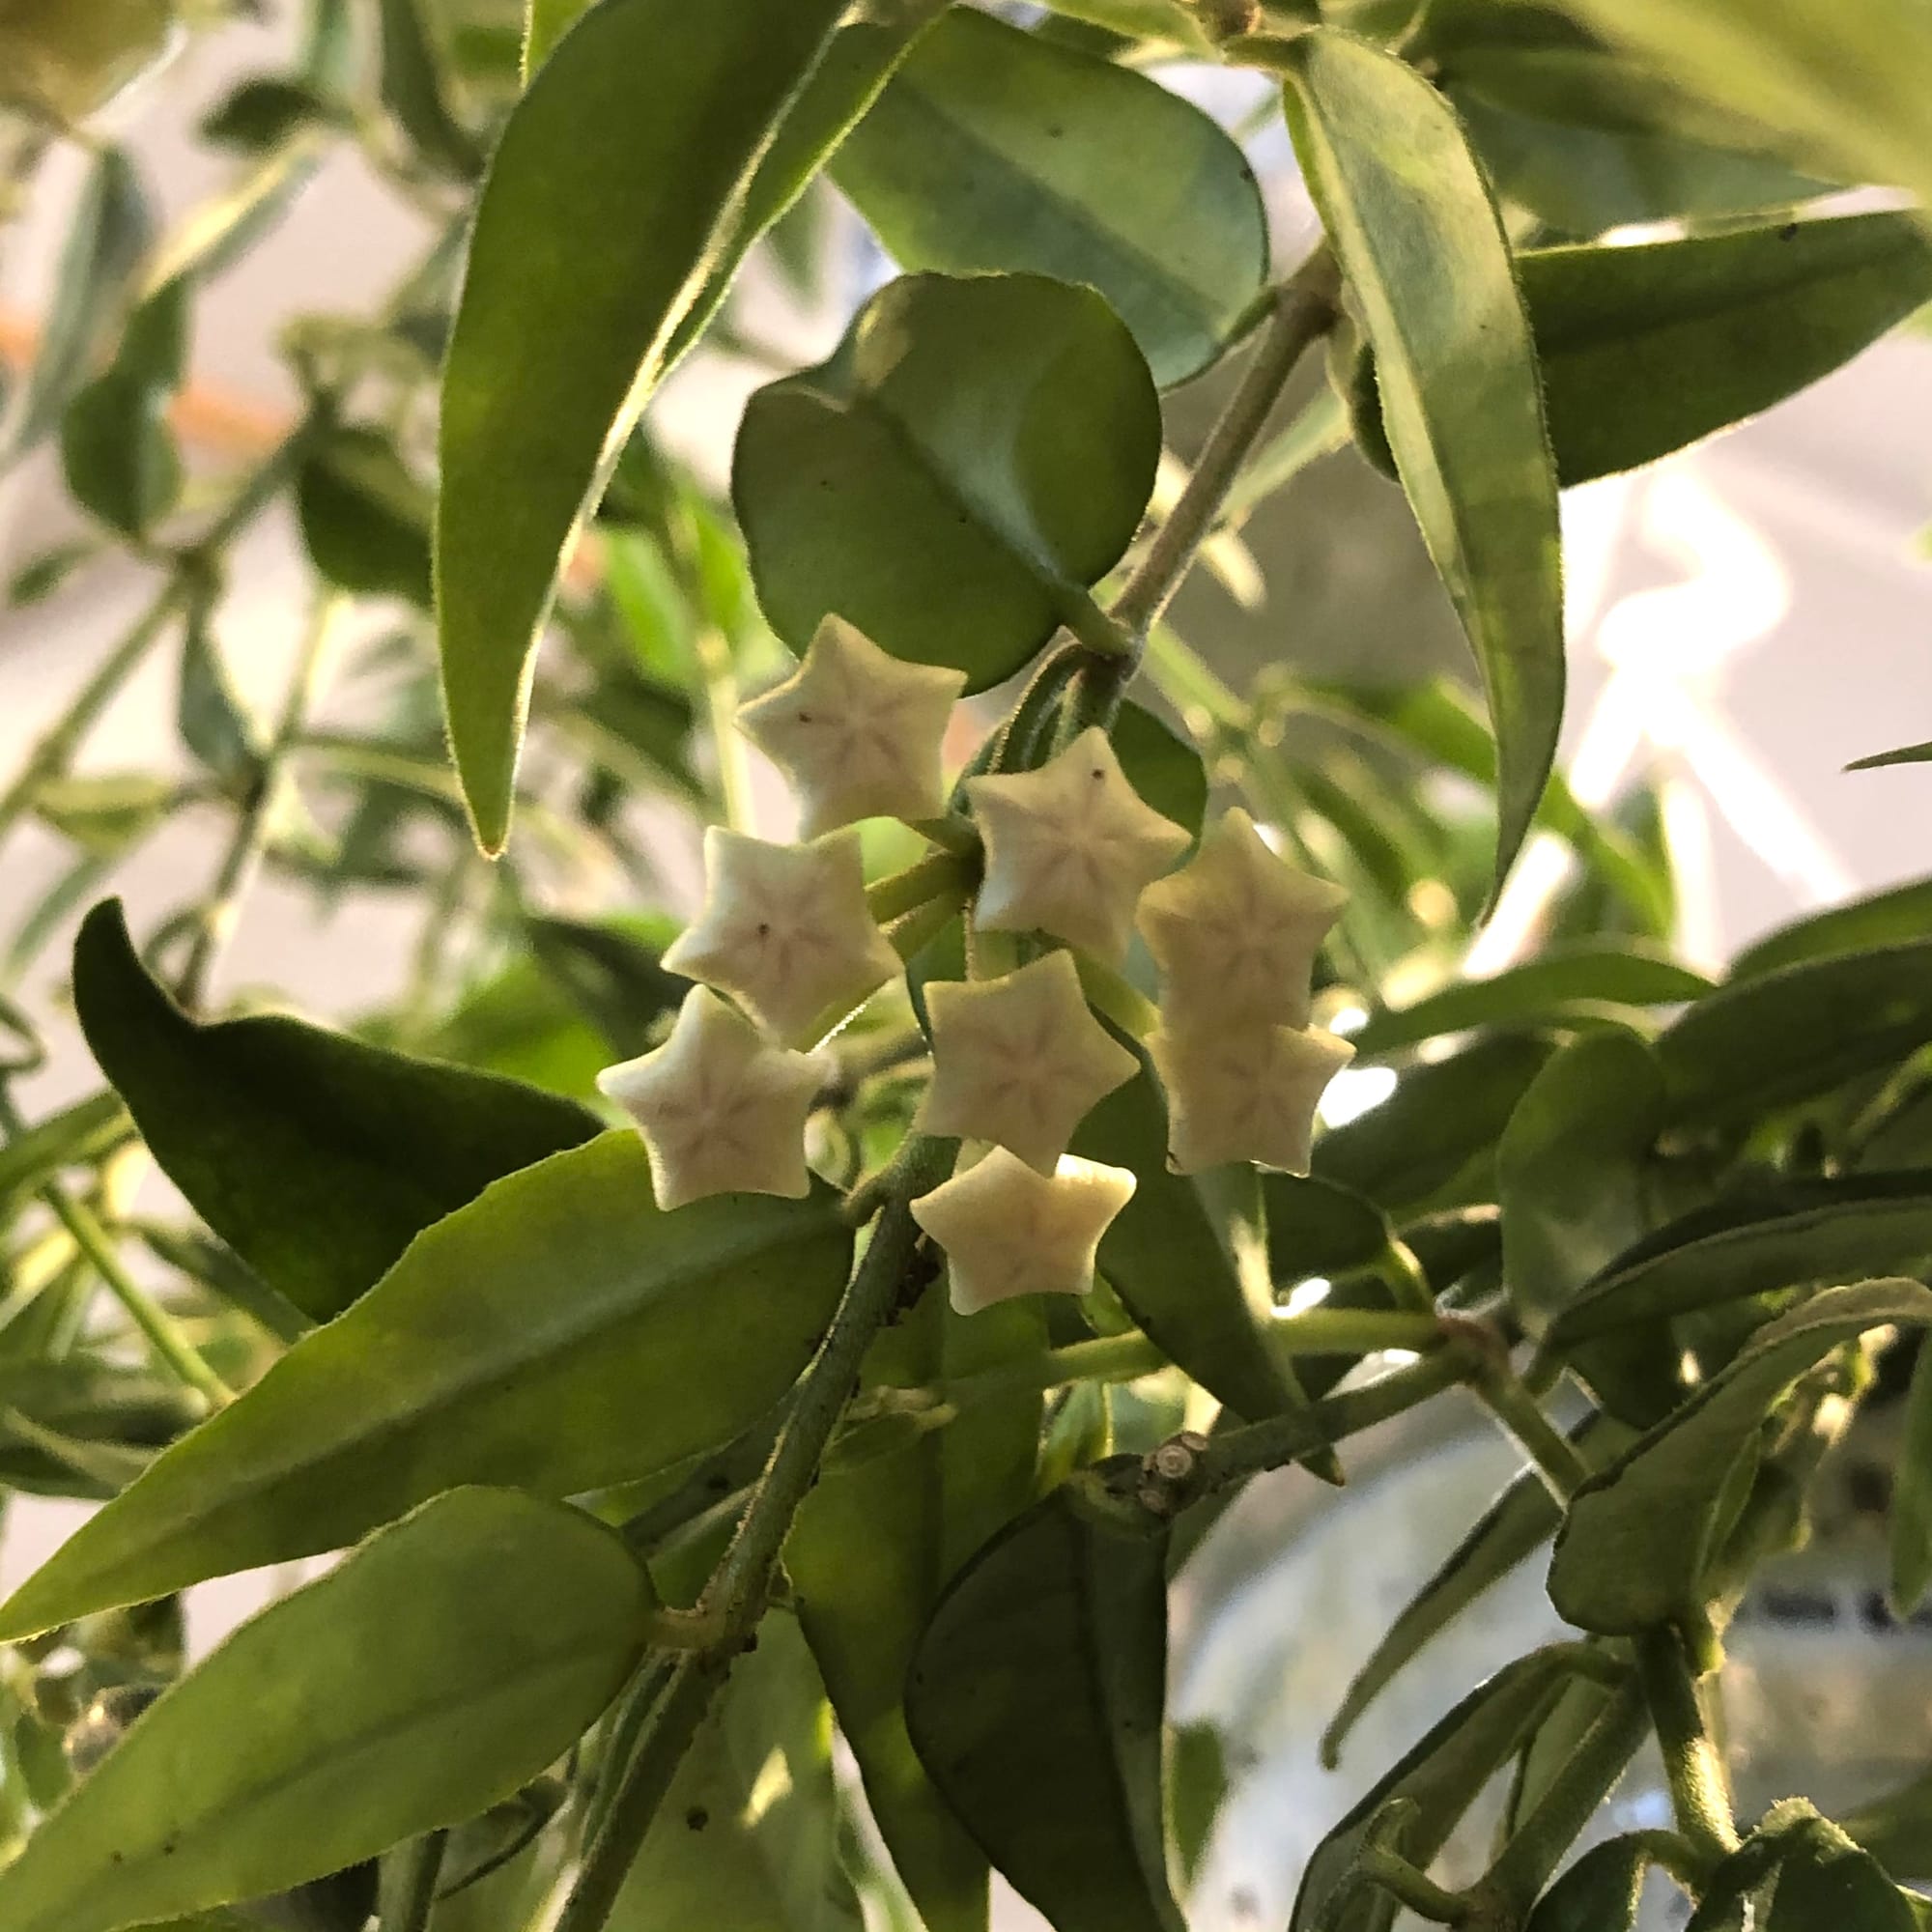 The inflorescence structure of Hoya lanceolata.
Common Issues with Hoyas
If you can't find the answer to your specific houseplant problem, book a 1-to-1 video call with Joe Bagley to point you in the right direction today.
Root rot is a common issue with specimens sat in too moist or waterlogged soil for long periods. Symptoms include rapidly yellowing leaves, stunted growth and a rotten brown base. Take the plant out of the pot and inspect health below the soil line. If the roots sport a yellow tinge, you're good to go, but if they're brown and mushy, action must be taken immediately. More information about addressing root rot can be found on this link.
Is your Hoya producing smaller leaves or just naked, leggy stems each time it grows? It's most likely to do with its light levels or low temperatures. We recommend improving its location by placing it in a sunless windowsill or under a grow light for better, more reliable growth. You can also consider pruning any leggy, leafless stems back to the first leaf to promote a new cluster of foliage in months to come. Other reasons for its reduction of leaf size could be: an absence of a moss pole or plant to climb up, a lack of fertilisation and/or root rot.
Yellowed or blackened leaves (usually closest to soil) are a clear sign of over-watering, usually caused by too little light. Although Hoya can do well in darker locations, the frequency of irrigations must be reduced to counteract the chance of root rot. People don't realise that a plant's root system needs access to oxygen too; when soil is watered, the air will travel upwards and out of the potting mix. A lack of accessible oxygen for the roots will cause them to subsequently breakdown over the oncoming days. Click on this link to learn more about root rot and how to address it, and always feel the pot's weight for confirmation (heaviness = good soil moisture, & vice versa).
Pests could arise at any time, with infestations starting from the original nursery or via contamination in your home. Spider Mites and Mealybugs tend to be the usual inhabitants, with the first being minute and almost transparent, roaming the leaves in search of chlorophyll and a site to hide its eggs. The latter, however, will stand out much more, with white cottony webs developing across the foliage and stems. Thoroughly check the plant's cubbyholes before giving it the all-clear, or click on the appropriate links to learn more about eradicating these issues.
When a Hoya is severely dehydrated, most of its leaves will crisp-up and fall off - leaving you with a naked plant. Although it may spell the end of juvenile plantlets, there may still be light at the end of the tunnel for more established specimens. If its stem is still plump without any signs of retraction, prune-away the seriously affected areas and contain the plant (with its pot) in a transparent bag that has small holes. Keep the soil continually moist, providing a good level of indirect light and temperatures above 15°C (59°F). After a few weeks, new life will form in the nodal junctions on the stems, signalling the start of its recovery process. Maintain a sealed environment for the following month until you feel it's necessary to release it back into the open air. For the prevention of environmental shock, be sure to introduce a humidity tray for higher levels of atmospheric moisture around the plant in its new setting. Not only will this ease the specimen back into normal functioning life, but it'll also reduce the rate of transpiration (water-loss in the leaves), and therefore downplay the risk of dehydration and further decline.
Mould developing on the soil means two things - too little light and over-watering. Despite the harmlessness of the mould, it'll prove unsightly to most gardeners and is therefore removed once known. To remove, replace the top two inches of the soil for a fresh batch of 'Cactus & Succulent' Compost. Either increase the amount of light received (no direct sunlight for the first few weeks to prevent environmental shock) or decrease the frequency of waters slightly. If the mould is accompanied by yellowing lower leaves, you may also have a case of root rot.
Sudden flower loss can be caused by an array of different issues, including an change in location, too little hydration, too hot or cold temperatures or droughts and pests. Whilst the plant is in bloom, keep the soil evenly moist to hydrate the thirsty work of producing flowers. Locations that are outside of the recommended temperature bracket, or have drastic fluctuations must also be kept off the cards. Alternatively, a setting that offers similar temperatures all year round can inhibit blooms. They'll respond very well if the autumn and winter months are a couple of degrees cooler than in summer - this will not only winterise the plant, but it'll also force it into a dormancy period which is a crucial ingredient for successful flowers. The final issue is pests. Although it's highly unlikely that an infestation will cause a sudden change in health, have a quick inspection for Vine Weevils (located in the soil), Spider Mites and Mealybugs.
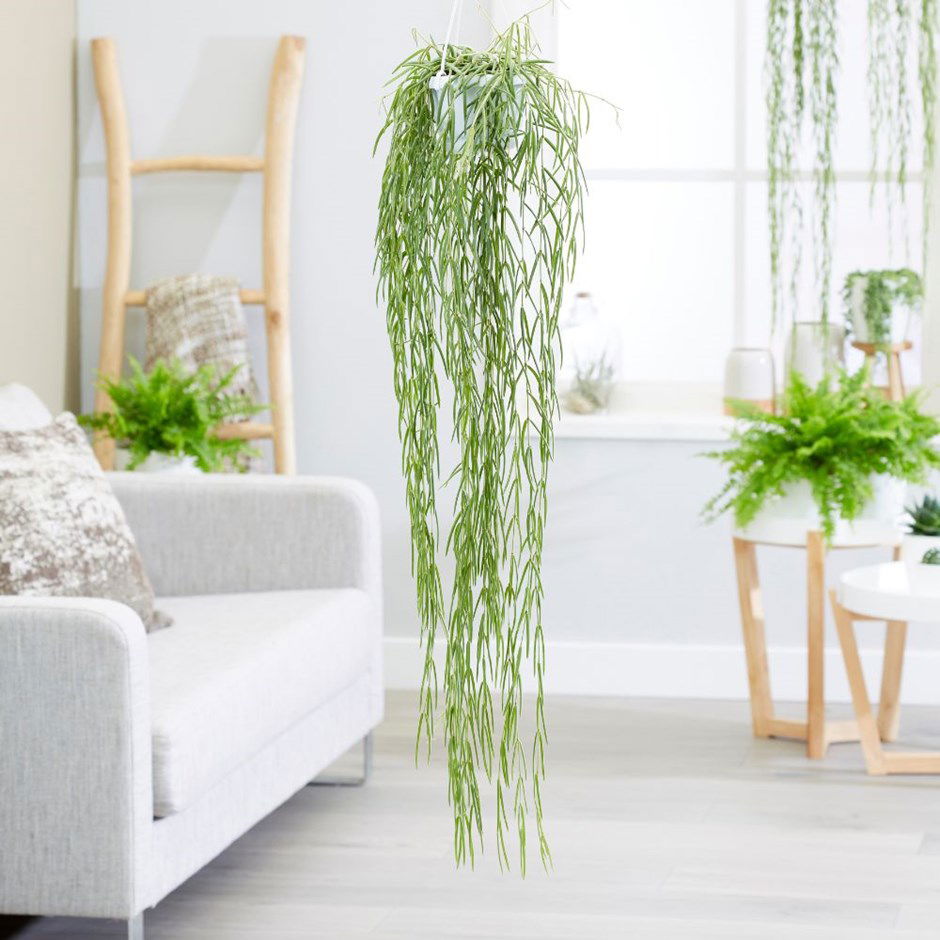 One of our absolute favourites - Hoya linearis. Copyright: crocus.co.uk.
Origins
Hoyas originate from tropical regions from South-East Asia to Australia, with some species being introduced to other subtropical regions around the globe. The genus was named by Robert Brown in 1810 to honour his friend, Thomas Hoy, who was also an English botanist during that era. The most popular species' name, H. carnosa, refers to the thickened leaves which enable it to survive short-lived droughts. H. kerrii or otherwise known as the ' Lucky Heart Plant' during Valentine's, was first brought back to Kew Gardens in 1910 from northern Thailand by English botanist, Arthur Kerr. The species was consequently named after him. H. linearis is species from western China, first described back in 1825 by Nathaniel Wallich, using the species' epithet 'linearis' to describe its unusually long foliage.
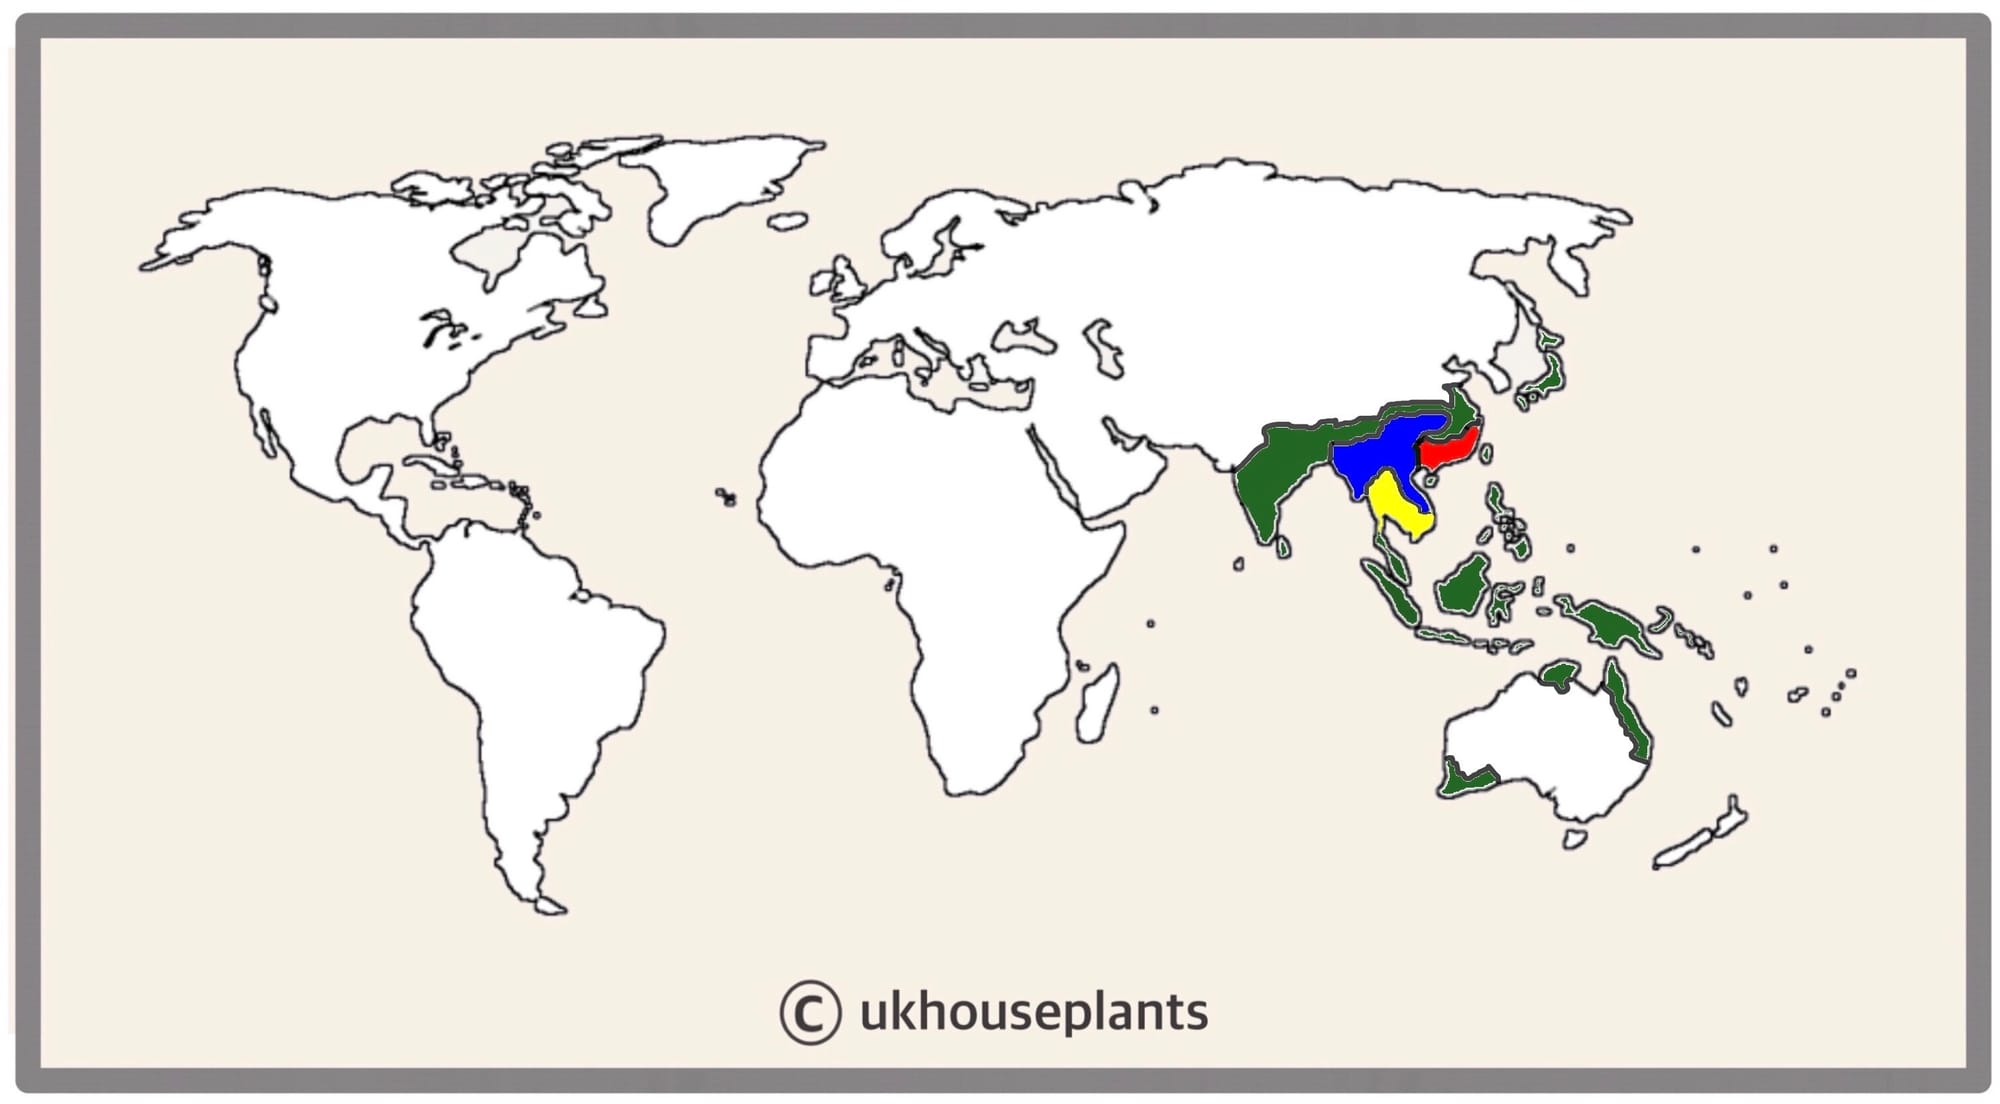 The Distribution of Hoya in Green. H. carnosa in Red, H. kerrii in Yellow & H. linearis in Blue.
Temperature
10° - 30°C (50° - 86°F)
H1b (Hardiness Zone 12) - Can be grown outdoors during the summer in a sheltered location with temperatures above 12℃ (54℉), but is fine to remain indoors, too. If you decide to bring this plant outdoors, don't allow it to endure any direct sunlight as it may result in sun-scorch and dehydration. Regularly keep an eye out for pests, especially when re-introducing it back indoors.
Spread
Most Hoya can reach lengths of up to 1m. In general, it'll take between 3 - 8 years to reach maturity, with most specimens living for over twenty years.
H. carnosa - 0.4m in height and 2m in width; maturity is reached between 3 - 5 years.
H. kerrii - 0.4m in height and 3m in width; maturity is reached between 3 - 5 years.
H. linearis - 1m in height and 0.4m in width; maturity is reached between 3 - 5 years.
Pruning & Maintenance
Remove yellow or dying leaves, and plant debris to encourage better-growing conditions. While pruning, always use clean scissors or shears to reduce the chance of bacterial and fungal diseases. Never cut through yellowed tissue as this may cause further damage in the likes of diseases or bacterial infections. Remember to make clean incisions as too-damaged wounds may shock the plant, causing weakened growth and a decline in health.
Propagation
Via Seed & Vine Cuttings.
Seeds (Moderate) - Soak the seeds in lukewarm water for around 24hrs in a dark location, preferably on top of an operating radiator. The best soil to use is a 'Houseplant' labelled potting mix; however, multipurpose compost with added perlite and sand is just as good. Set the seeds 0.5cm (0.2 inches) into the potting mix, resisting the temptation to compact the soil. Maintain evenly moist soil and allow the excess water to freely drain from the pot's base to prevent water-logged conditions. The ideal location for successful germination is in a bright, indirect setting with temperatures above 18℃ (64℉) with bottom-heat. Keep the pot in a transparent bag to provide a stable level of humidity, along with longer-lasting soil moisture. Germination may take up to four months, so don't discard any unsuccessful seeds until this threshold has been surpassed. Remove the bag once the seedlings produce its second leaf and then split them up into their own 3cm pots.
Stem Cuttings via Water - (Easy)
- Choose the healthiest, most established vines that are wooded, but still juvenile enough to slightly bend. This propagation method can be taken from spring to summer, with each vine having two nodes (one for foliar development and the other for root growth). Although more nodes are fine, be sure only to submerge the bottom ones to avoid inappropriate rooting elsewhere, which will be more difficult when it's time for soil placement.
- Cut directly below a node using a clean knife to reduce bacteria count. Remove the lower half of the leaves and place the vines into a container of lukewarm water. Be sure to submerge at least one node into the water, or else the root development will be hindered.
- The leaves must stay above the waterline, for the prevention of disease.
- Replace the water weekly, using lukewarm water to avert shocking the cutting with cold temperatures.
- Once the roots surpass 4cm ( 2 inches) in length, it's time to pot the specimen.
- Choose a potting mix - as long as it has a well-draining nature, most soils are fine. 'Cactus & Succulent' Compost is best, but a multipurpose compost with a splash of grit or perlite is also acceptable.
- Use a 7cm (3 inches) pot that has suitable drainage holes - plastic or terracotta are both acceptable in this instance. Try not to over-pot the cuttings; blackleg occurs when the bottom wound becomes infected, typically caused by water-logging or a too-damaged wound.
- Set the cutting into the compost, keeping the foliage above the soil line.
- Avoid direct sunlight and offer proper humidity by placing the potted plants into a transparent plastic bag with holes for the first couple of weeks.
- Open the bag every two days for half an hour for the prevention of disease. After a month of being placed in soil, remove it from the bag and follow the care tips provided above.
Stem Cuttings via Soil - (Moderate)
- Choose the healthiest, most established vines that are wooded, but still juvenile enough to slightly bend. This propagation method can be taken all year round, using two or more nodes per cutting. It's best to have only two nodes - one is for root development and the other for foliar growth.
- Cut directly below a node using a clean knife to reduce bacteria count. A small section of the vine should be included with the cutting so that it has a small bureau of stored moisture. Remove the lower leaf and place the vine-section into a moist, well-draining potting mix; 'Cactus & Succulent' compost is best as it'll include perlite for better air circulation within the soil.
- Use a 7-inch pot that has good drainage holes - plastic or terracotta are both acceptable in this instance. Try not to over-pot the cuttings; blackleg occurs when the bottom wound becomes infected, typically caused by water-logging or a too-damaged injury.
- Set the cutting into the compost, keeping the foliage above the soil line. Be sure to submerge the lower node into the soil wholly, or else root development will be hindered.
- Provide a bright, indirect setting with adequate warmth and the avoidance of direct sunlight or operating radiators. Place the potted cutting and its pot into a transparent plastic bag (with small holes) for the first couple of weeks to lock in extra humidity. Maintain moist but not soggy compost throughout this process.
- Open the bag every two days for half an hour for the prevention of disease. After two months of being placed in soil, remove the bag and follow the care tips provided above.
Flowers
Although most Hoyas will develop globular clusters of red to white coloured flowers during the spring or summer months, some species will bloom in the cooler months of winter.
Repotting
Repot every three years in spring using a 'Cactus & Succulent' Compost and the next sized pot with adequate drainage. Hydrate the plant 24hrs before tinkering with the roots to prevent the risk of transplant shock. For those that are situated in a darker location, add a thin layer of small grit in the pot's base to improve drainage and downplay over-watering. Click here for a detailed step-by-step guide on transplantation, or via this link to learn about repotting with root rot.
Specimens that could, or are flowering are best potbound for several reasons, including the prevention of root rot or transplant shock, and restricting its growth for a potential bloom. With this in mind, we'd recommend repotting them as infrequently as possible.
Pests & Diseases
Keep an eye out for mealybugs, spider mites, scale, thrips, vine weevils & root mealybugs that'll locate themselves in the cubbyholes and undersides of the leaves, with the exception of the latter two in the soil. Common diseases associated with Hoyas are root rot, leaf-spot disease, botrytis, rust, powdery mildew & southern blight - click here to learn more about these issues.
Toxicity
This genus is classified as poisonous, so if small sections are eaten, vomiting, nausea and a loss of appetite may occur. Consumption of large quantities must be dealt with quickly; acquire medical assistance for further information. The white latex sap could also lead to skin irritations for sensitive individuals, so try to wear gloves when propagating.
Retail Locations
Online Stores.
Book a 1-to-1 Call with THE HOUSEPLANT DOCTOR™
If you need further advice with your houseplants, book an advice call with ukhouseplants' friendly and expert writer today! This can be done via a video or audio call on most apps, including Facebook, FaceTime & Skype. A ten-minute call costs £5.99 (US$7), or £15.99 for thirty minutes. You can ask multiple questions, including queries on plants, pests, terrariums, repotting advice and anything in between. Please consider supporting this service to keep ukhouseplants thriving!
Comments