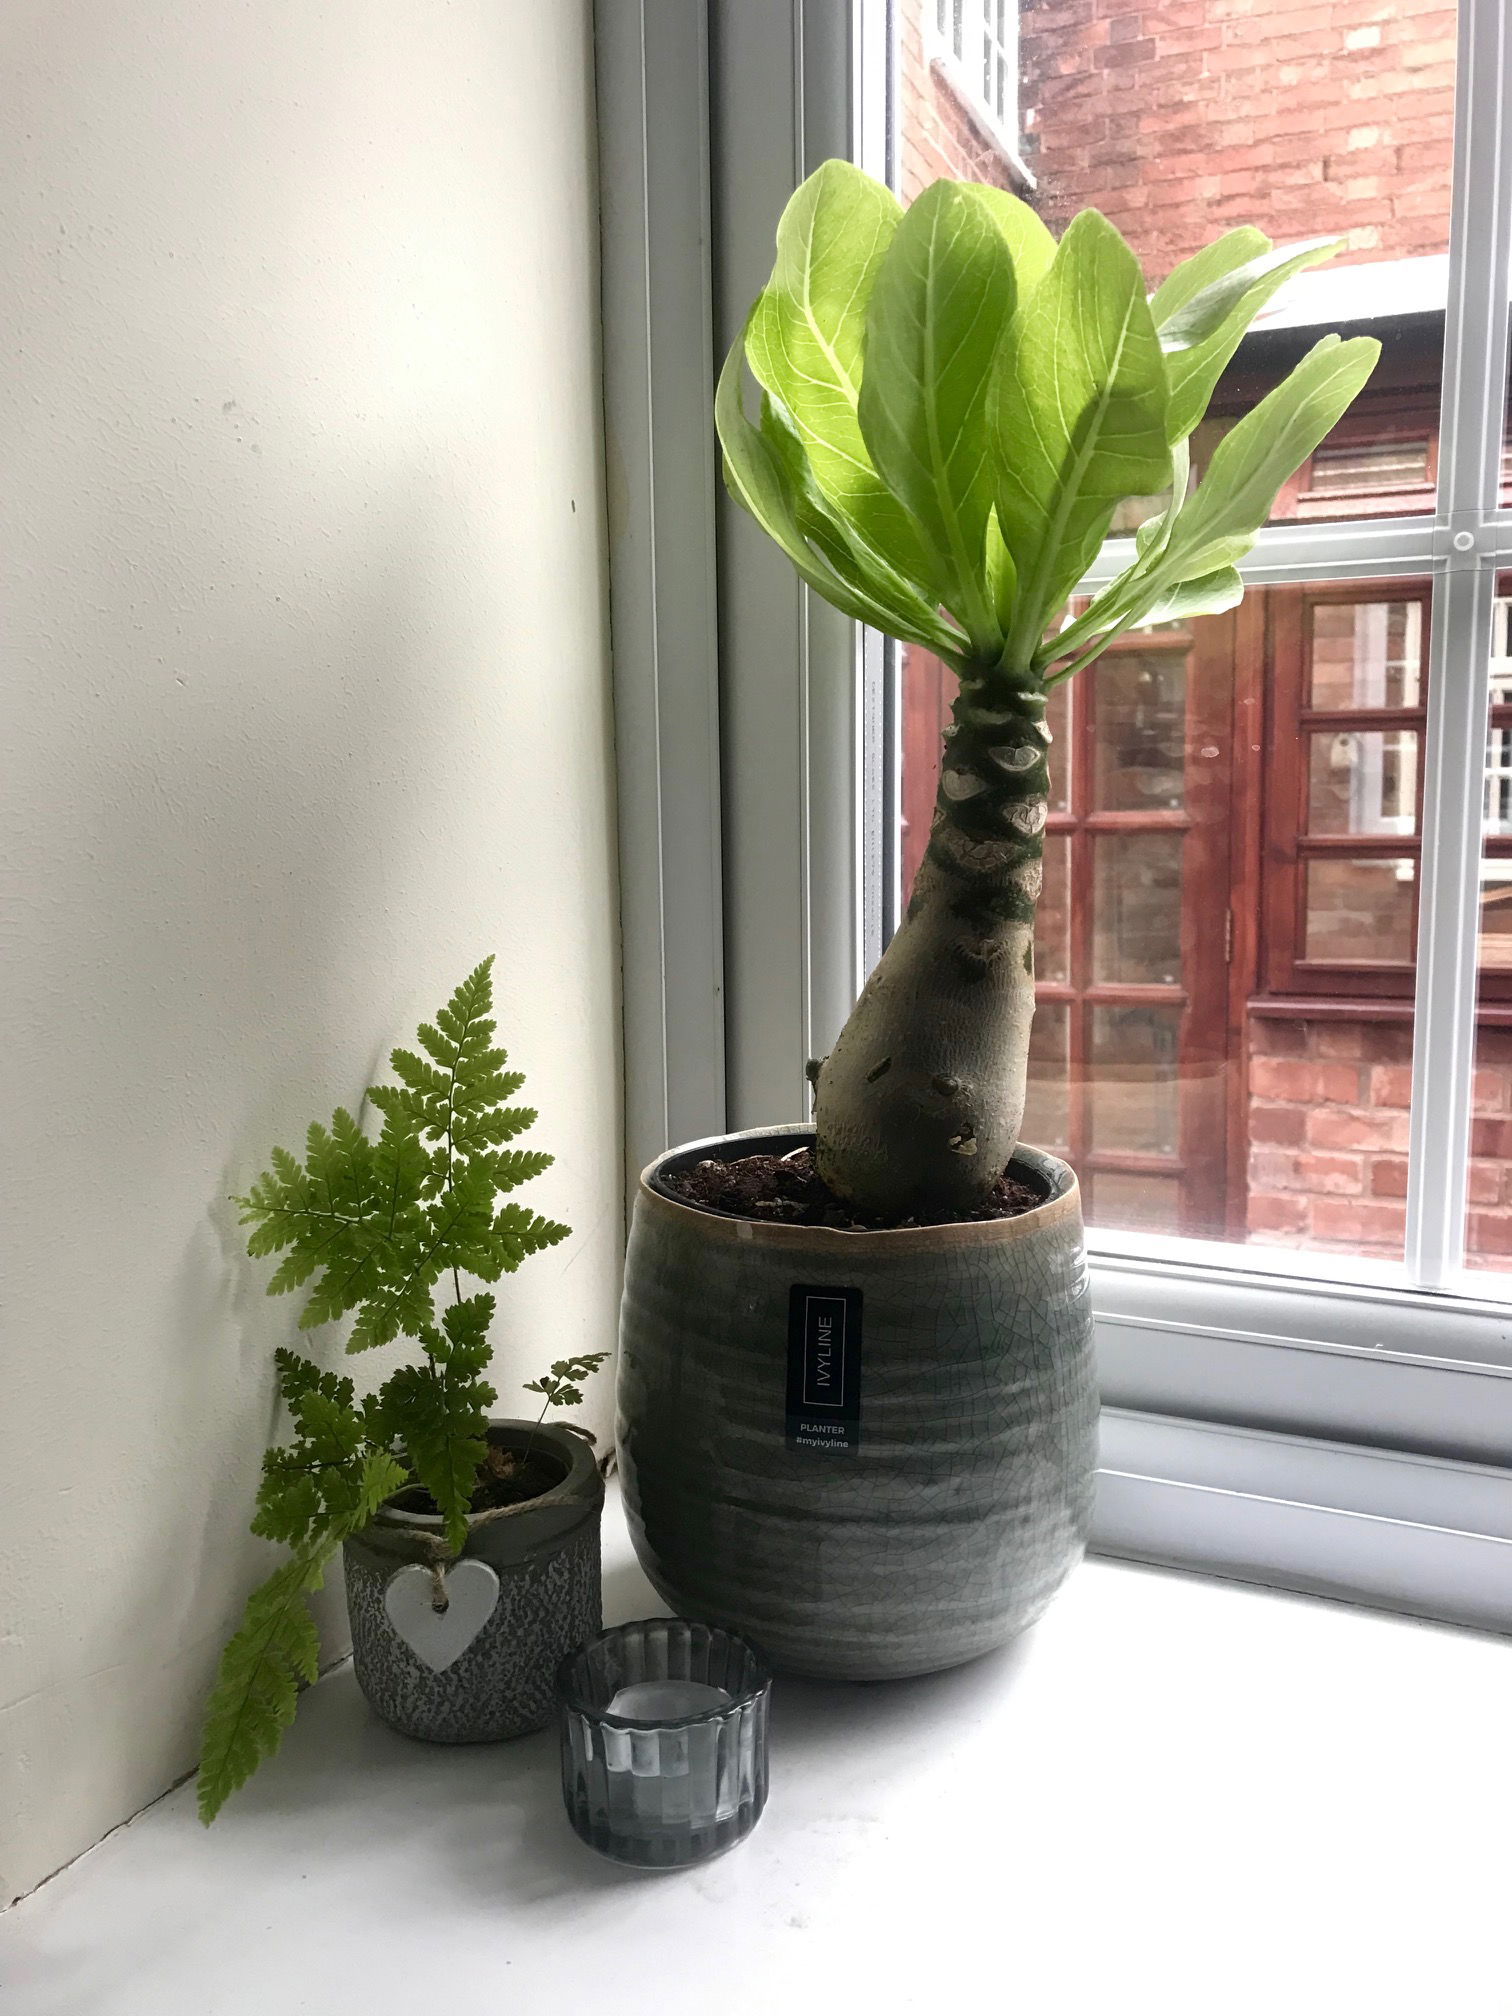
Brighamia insignis
Contents
- Top Tips
- Location, Water, Humidity & Fertilisation
- Common Issues
- Origins, Temperature, Propagation, Repotting & Toxicity.
Need the answer to a specific plant query? Book a 1-to-1 video call with THE HOUSEPLANT DOCTOR™ to overcome and address your niggling problem! Available on FaceTime, WhatsApp & more.
Top Tips & Info
- Care Difficulty - Moderate
- Provide a bright, indirect location. Avoid more than an hour of direct sunlight per day, or excessively dark settings for the best results.
- Water once half of the soil dries out, reducing this further in the autumn & winter. Remember the ukhouseplants' phrase of 'Drenches Between Droughts'.
- Provide a reliable & humid setting by introducing a humidity/pebble tray to keep the surrounding moisture high. The use of artificial humidity is not needed once the heaters are switched off.
- Fertilise using a 'Houseplant' labelled feed every third water, all year-round.
- Regularly check for pests, most notably Mealybugs or Spider Mites that'll locate themselves in the cubbyholes of the foliage.
- Keep the ambient temperature above 15℃ (59℉) throughout the year, especially if placed outdoors in the summer. Exceeding this limit will bare great distress on the specimen.
- Transplant every three years into the next-sized pot with a 'Cactus & Succulent' potting-mix, along with extra grit to the pot's lower portion/compost to strengthen the root ball.
Location & Light - 🔸🔸🔸
Although bright, indirect light is excellent, try to throw in an hour of morning or evening sun, if possible. A short spell in the warmth of the sunlight will bare great benefits for the specimen, as heightened rates of photosynthesis (& therefore water-uptake) will downplay the risk of over-watering. Never situate this species in a dark location due to the species' intolerance to lower light levels and prolonged moisture. If you're worried about its setting being too dark, if a newspaper can be read while having your back towards the light source, you're good to go.
Water - 🔸🔸
As Hawaiian Palms are indeed succulents and not palms, thanks to the swollen caudex, THE HOUSEPLANT DOCTOR's phrase of 'droughts between drenches' must be greatly emphasised. Once around half of the soil dries out, give the plant another proper hydration using lukewarm water to avoid root-stress. If you're unsure as to when the plant needs another drink, feel the pot's weight or dip your finger into the top portion of the potting mix for confirmation. The saying 'little and often' should be avoided at all costs as its soil will prefer periods of dryness. Under-watering symptoms include wilting, little to no growth, and potential foliage shedding. These issues are commonly caused by too much direct sunlight, high ambient temperatures, constricted roots or forgetfulness. Never permit lengthened periods of direct light due to the risk of dehydration and sun-scorch - a common issue throughout the summer months. Over-watering is far more of a problem, with symptoms including yellow lower leaves accompanied by a softened/rotten stem and a loss of leaves. It's always best to under-water a Hawaiian Palm than over-do it, purely based on its impeccable ability to endure short-lived droughts. Root rot is more of an issue during the autumn in winter months, as to suppose to the height of summer.
Humidity - 🔸🔸🔸
Mist the leaves once or twice a week, all year round, as an under-humid room will cause the foliage to develop browning leaf tips. If frequent misting isn't for you, introduce a humidity tray to provide and maintain a stable level of humidity around the plant. Although a bathroom will boast higher concentrations of airborne moisture, it's highly unreliable due to the constant fluctuations throughout the day, which too can lead to an unhappy specimen.
Fertilisation - 🔸🔸
Feed every third water all year-round, using a 'Houseplant' labelled fertiliser. Never apply a 'Ready to Use’ product into the soil without a pre-water first, as it may burn the roots and lead to yellowed leaves. Symptoms of this include yellowed leaves and stunted growth - both of which can take months to rectify.
Try misting the foliage twice a month with 'Liquid Gold Leaf Photo+' to help encourage the plant to produce new healthy leaves. While this product isn't a fertiliser, it instead works with the plant's natural photosynthesis production to allow the plant to invest in new leaf/root production.
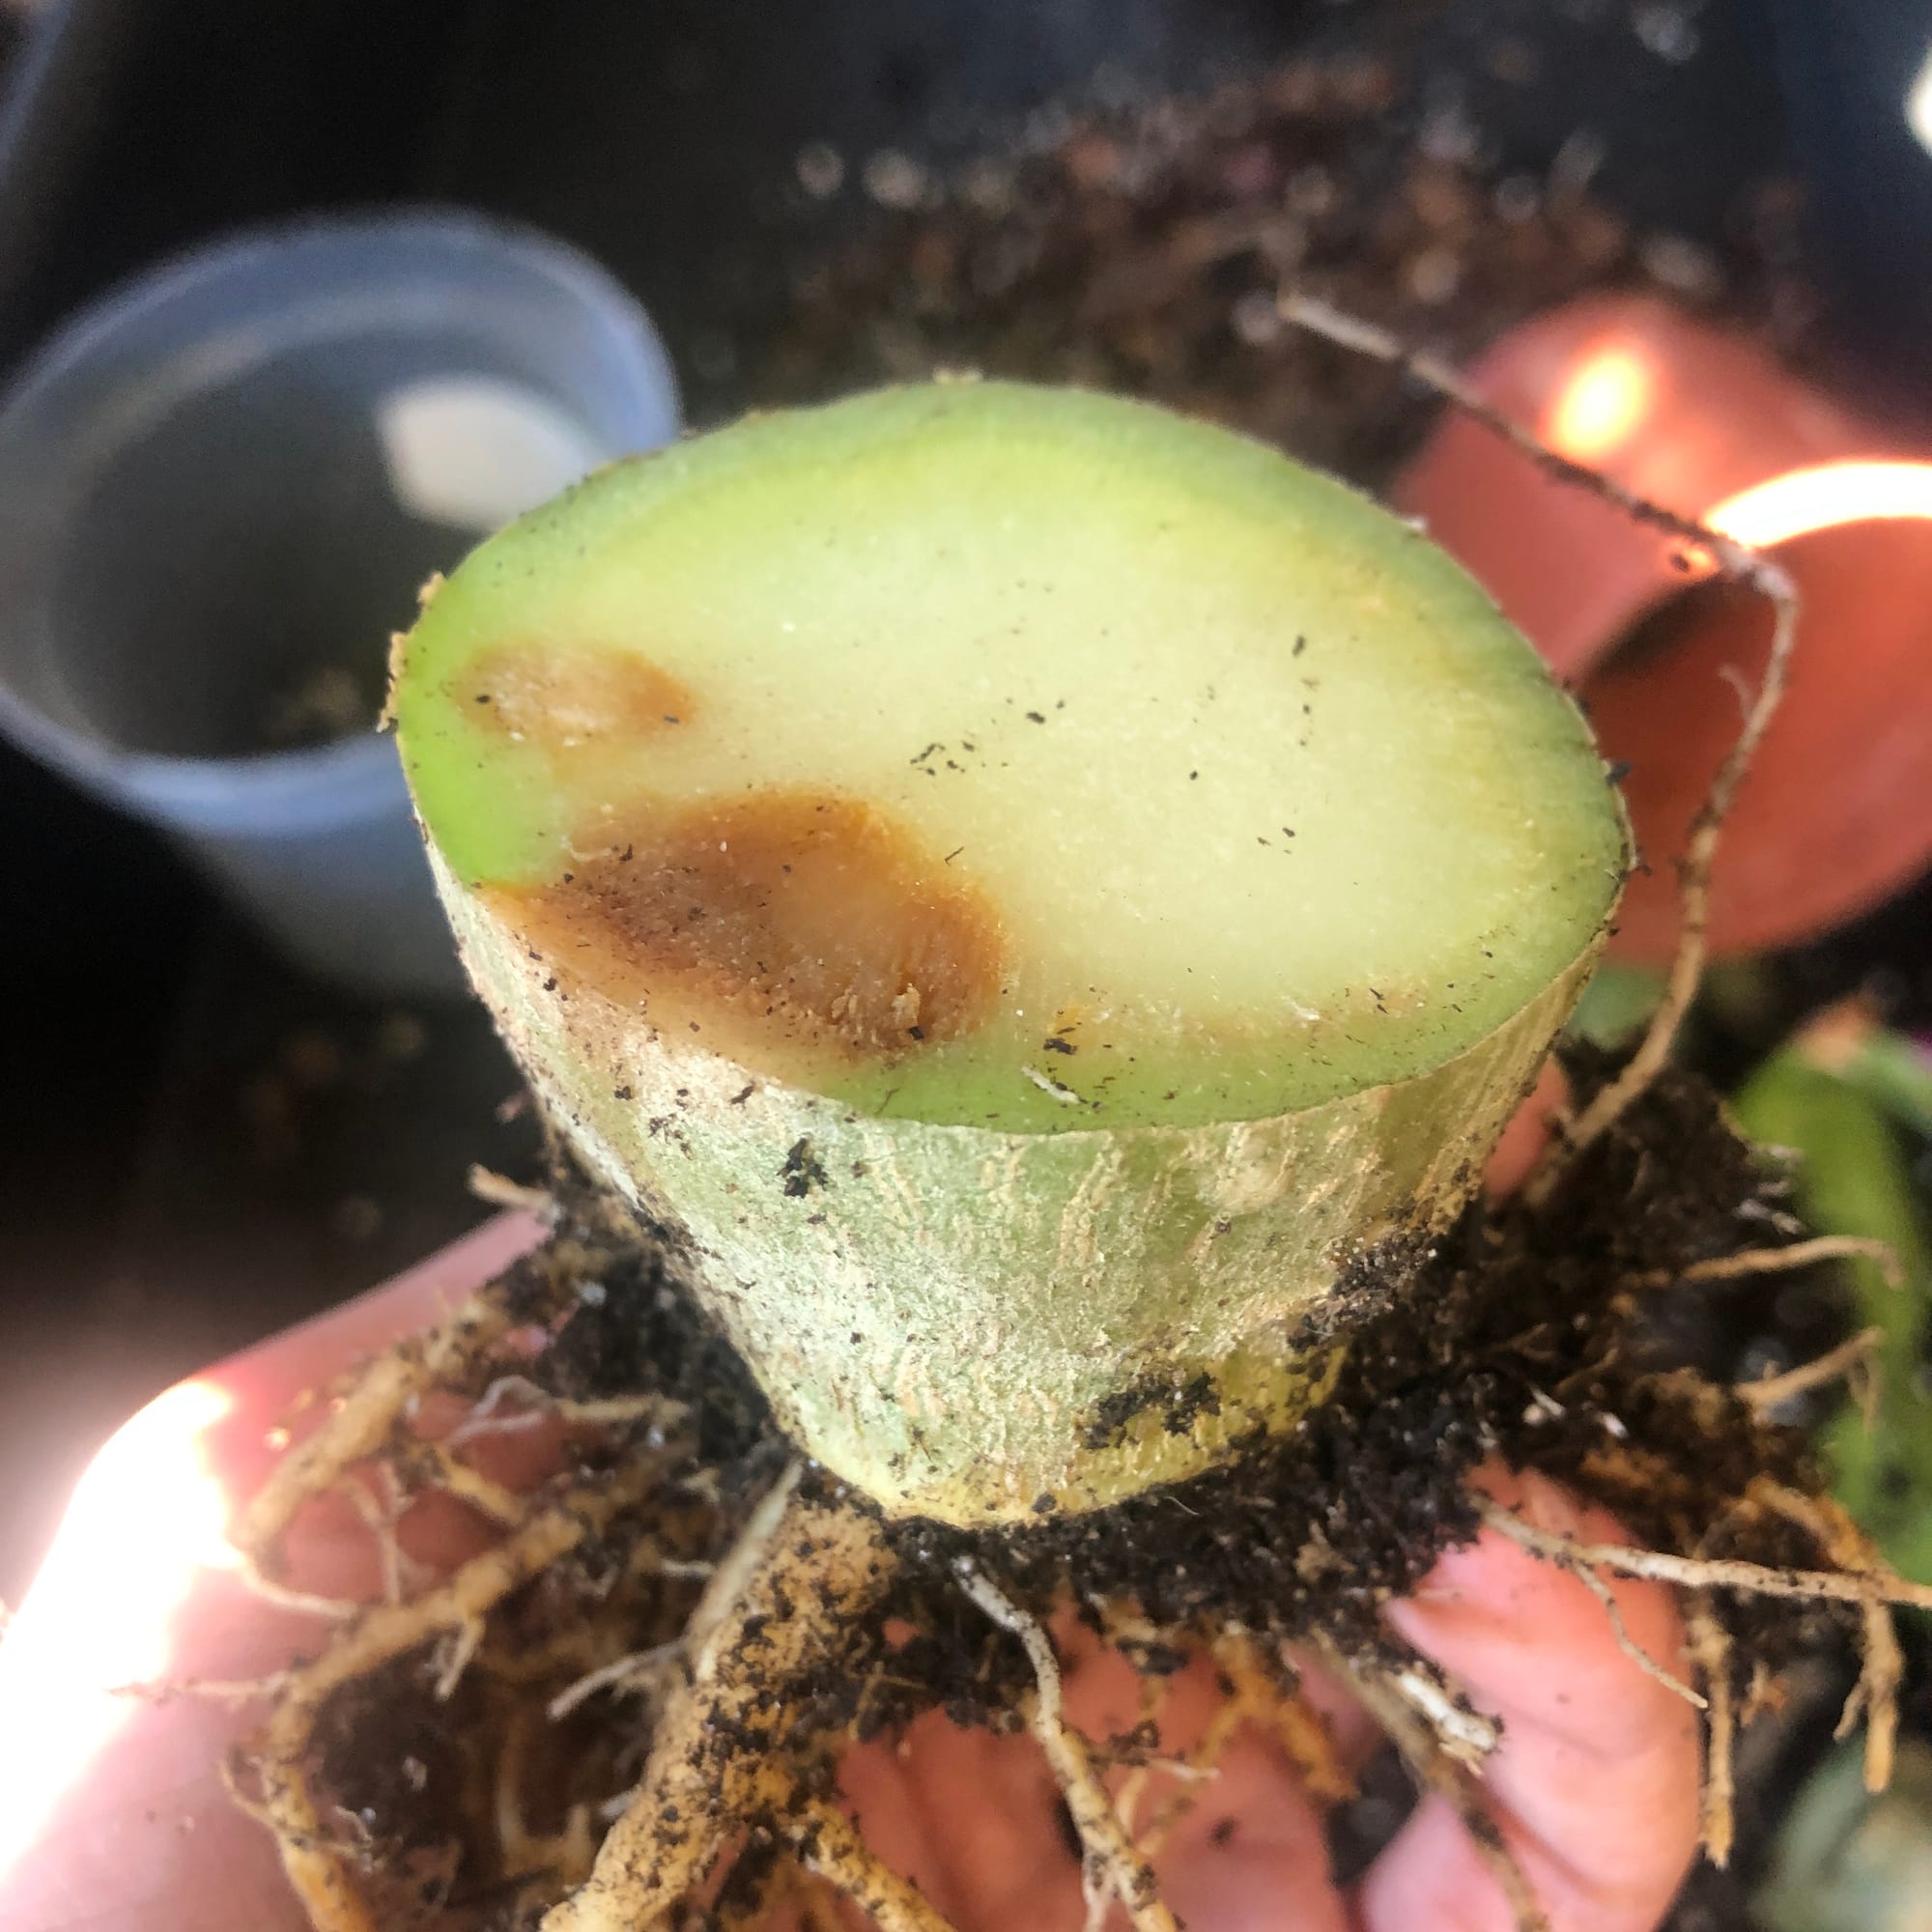 Both damage to its stem and/or anaerobic soil (via over-watering) can cause the fleshy stem to rot. When this happens, your Hawaiian Palm may rapidly yellow and drop its older leaves; scroll down to the next paragraph to learn more.
Common Issues with Hawaiian Palms
Root rot or a softened stem accompanied by yellowing leaves are the two most common diseases when cultivating Hawaiian Palms. Despite its referral to being a palm, it is actually a succulent, meaning the phrase 'droughts between drenches' must be greatly empathised. Over-watering is never far away if the soil hasn't had enough time to dry out in between irrigations, due to the lack of oxygen that can penetrate the roots. For those that are displaying signs of over-watering symptoms (root rot, yellowing or a loss of leaves, etc.), you must act quickly to save the plant; inspect the root ball and prune off affected areas using clean utensils. Replace the deeper soil with a fresh batch of 'Cacti & Succulent' compost, and then repot back into its original container before evaluating its growing conditions. They prefer a bright, indirect location with the option to include morning or evening sun; do not situate it in a dark setting as prolonged soil moisture will push you back to square one.
Mould developing on the soil means two things - too little light and over-watering. Despite the harmlessness of the mould, it'll prove unsightly to most gardeners and is therefore removed once known. To remove, replace the top two inches of the soil for a fresh batch of houseplant compost. Either increase the amount of light received (no direct sunlight for the first few weeks to prevent environmental shock) or decrease the frequency of waters slightly. If the mould is accompanied by yellowing lower leaves, you may also have a case of root rot. Mould developing on a succulent's compost is the first sign of over-watering.
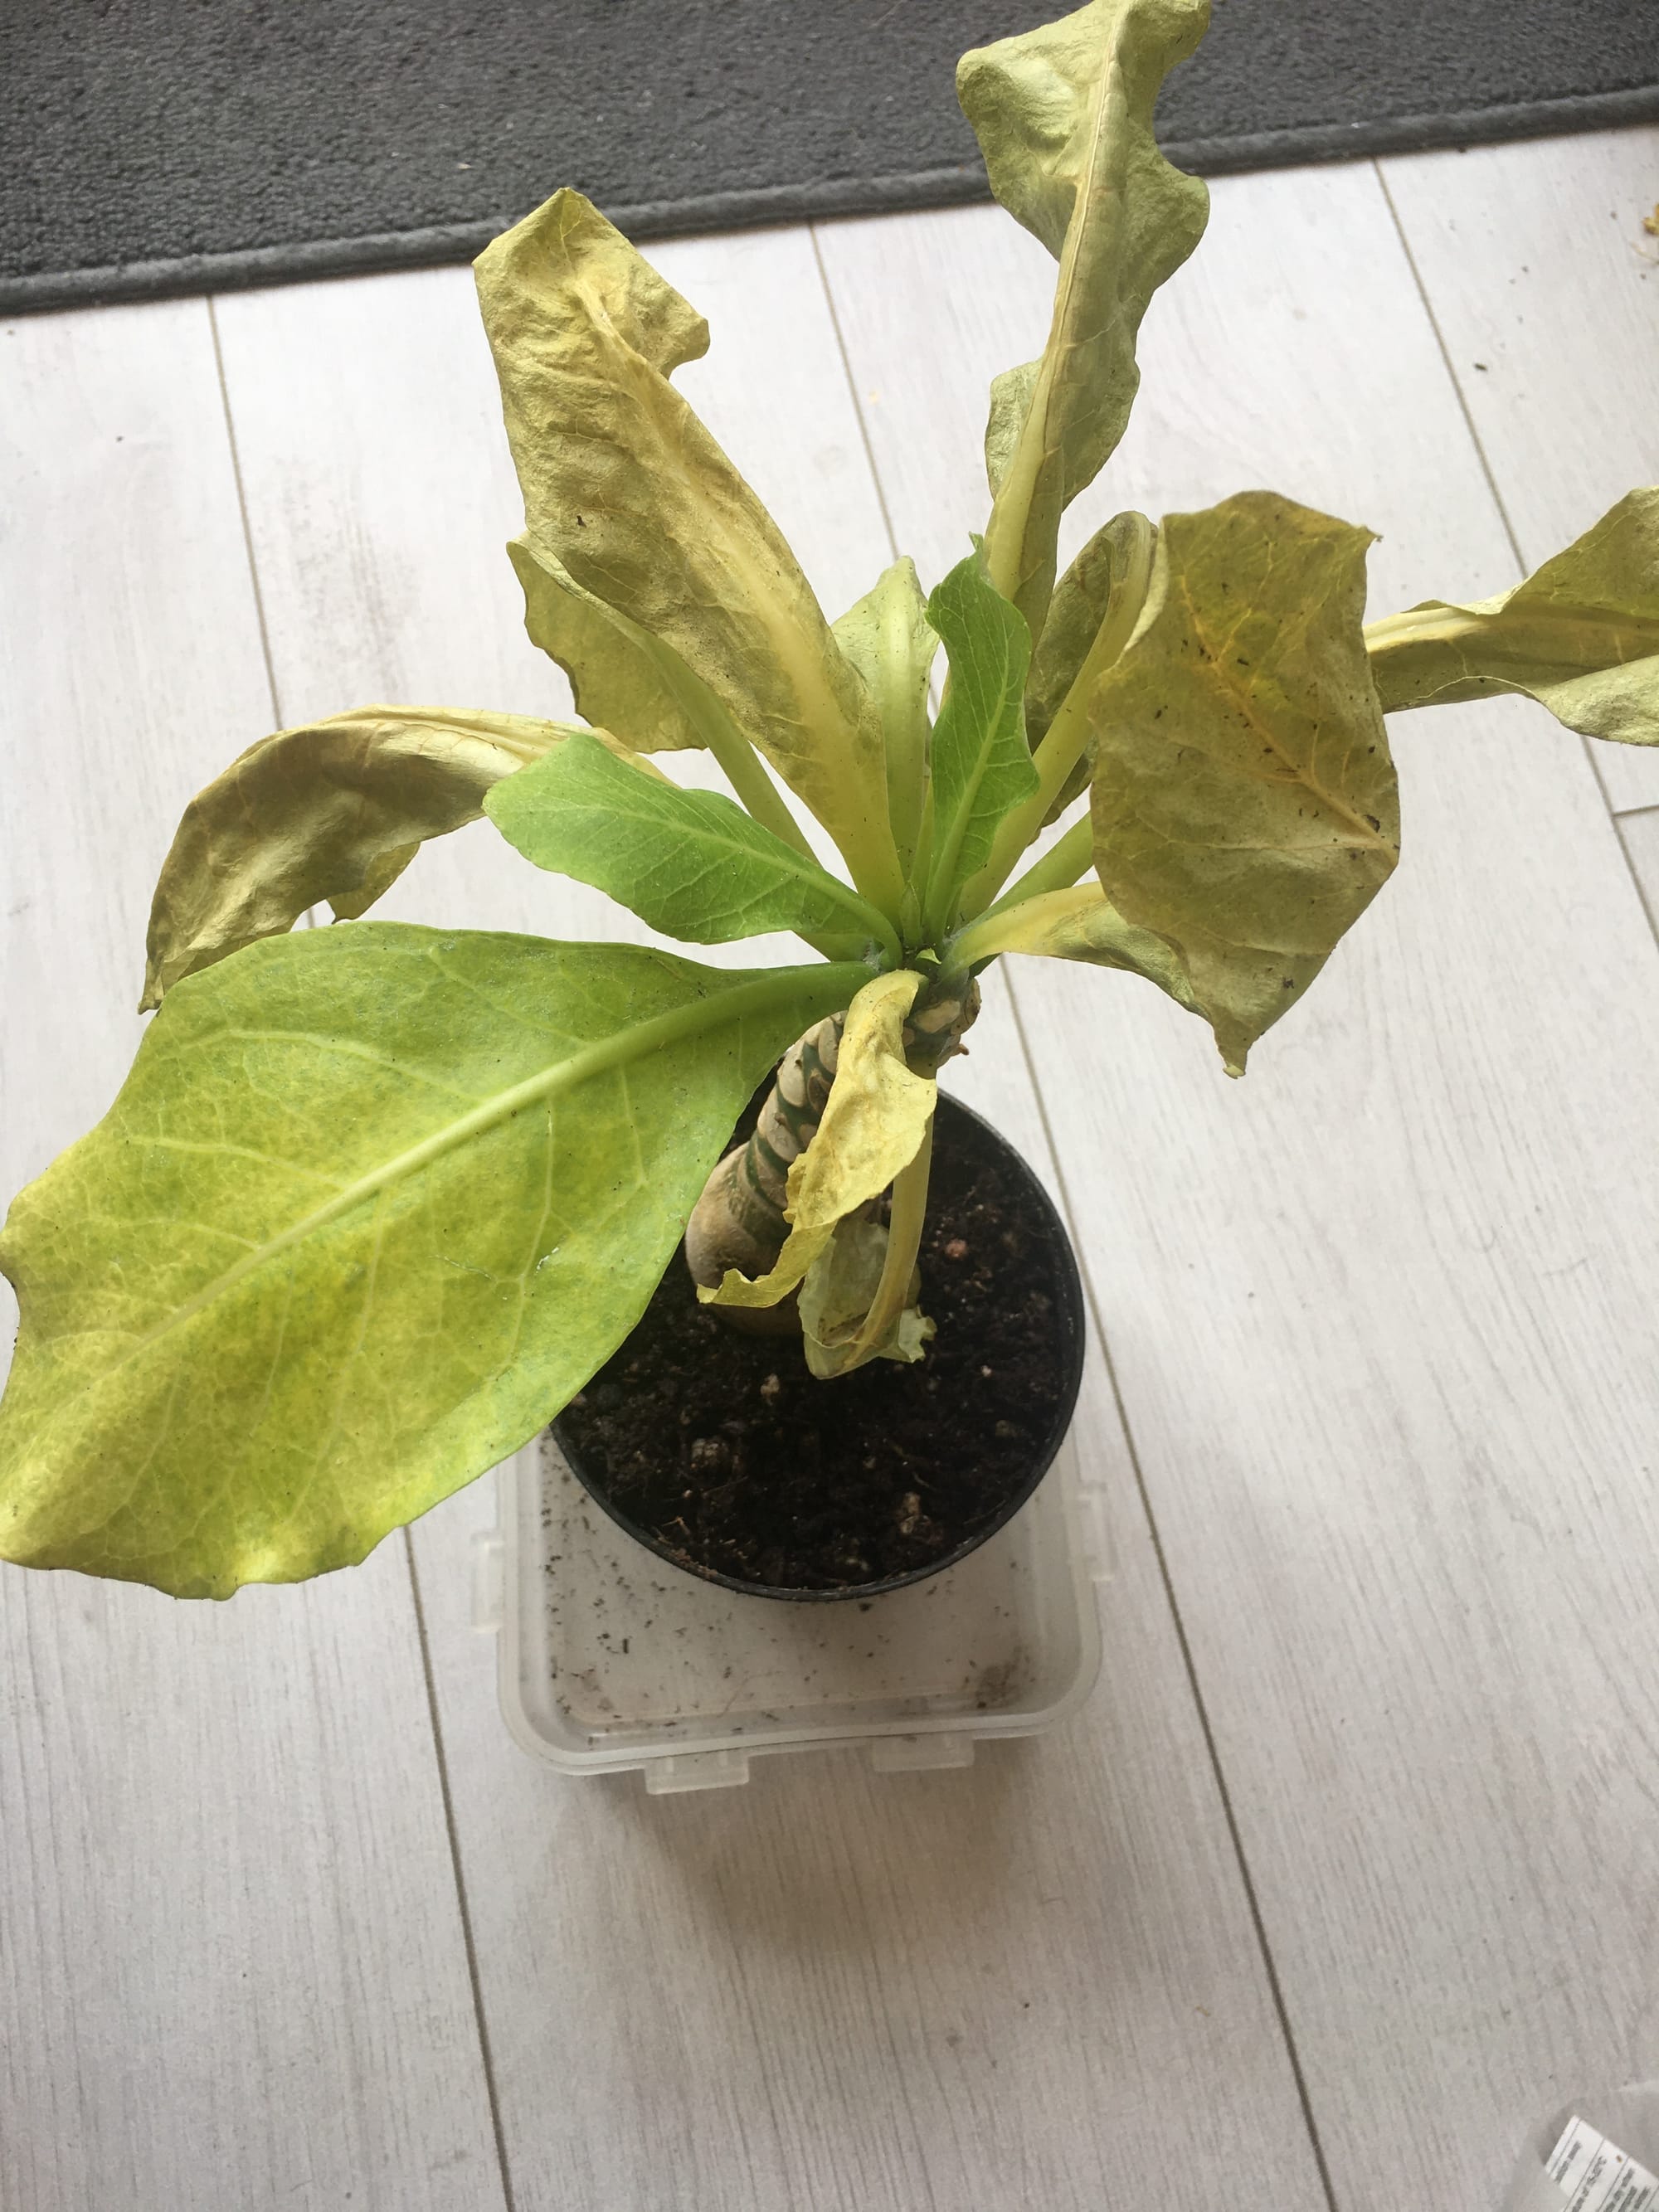
Directly pinpointing yellow leaves is quite hard, due to the many different issues that could be at fault. Problems include watering-related abuse, too much or too little light, and fertilisation issues. If you'd like to speak to ukhouseplants regarding this issue, don't be afraid to book a 1-to-1 call with THE HOUSEPLANT DOCTOR™ to help guide you through the step-by-step process!
Due to the species’ sensitivity to chemicals, Leaf Shine shouldn't be used to improve the appearance of the foliage, and instead should be cleaned using warm soapy water. Failure to do so may cause yellowed, mottled spots that cannot be undone.
Too low humidity can cause browning tips with yellow halos on juvenile leaves. Although this won't kill your specimen, you may want to increase the local moisture to prevent the new growth from adopting these symptoms. Mist or rinse the foliage from time to time and create a humidity tray while the heaters are active to create a stable environment. The browning of leaf-tips on older leaves is wholly natural and is the product of extensive photosynthesis during its life.
 The effects of Spider Mites.
Spider Mites are small, near-transparent critters, that'll slowly suck out the chlorophyll out of the leaves. Have a check under the leaves, most notably along the midrib, for small webs and gritty yellow bumps. Click here to read our article about the eradicating Spider Mites, along with some extra tips that you may not find elsewhere!
If your specimen is located in a dark environment, use a chopstick to gently stab the soil in various areas. You should aim to enter the compost between the base of the plant and the pot's edge, as failure to do so may lead to damaging its lower portion. Leave the holes open for a few days before re-surfacing the soil to avoid it becoming overly dry. Not only will the gentle shift in the soil's structure mimic the work of small invertebrates in the wild (worms, etc.), but it'll also add oxygen back into the soil, thus reducing the risk of root rot. Repeat this monthly, or whenever you feel the potting-mix isn't drying out quickly enough.
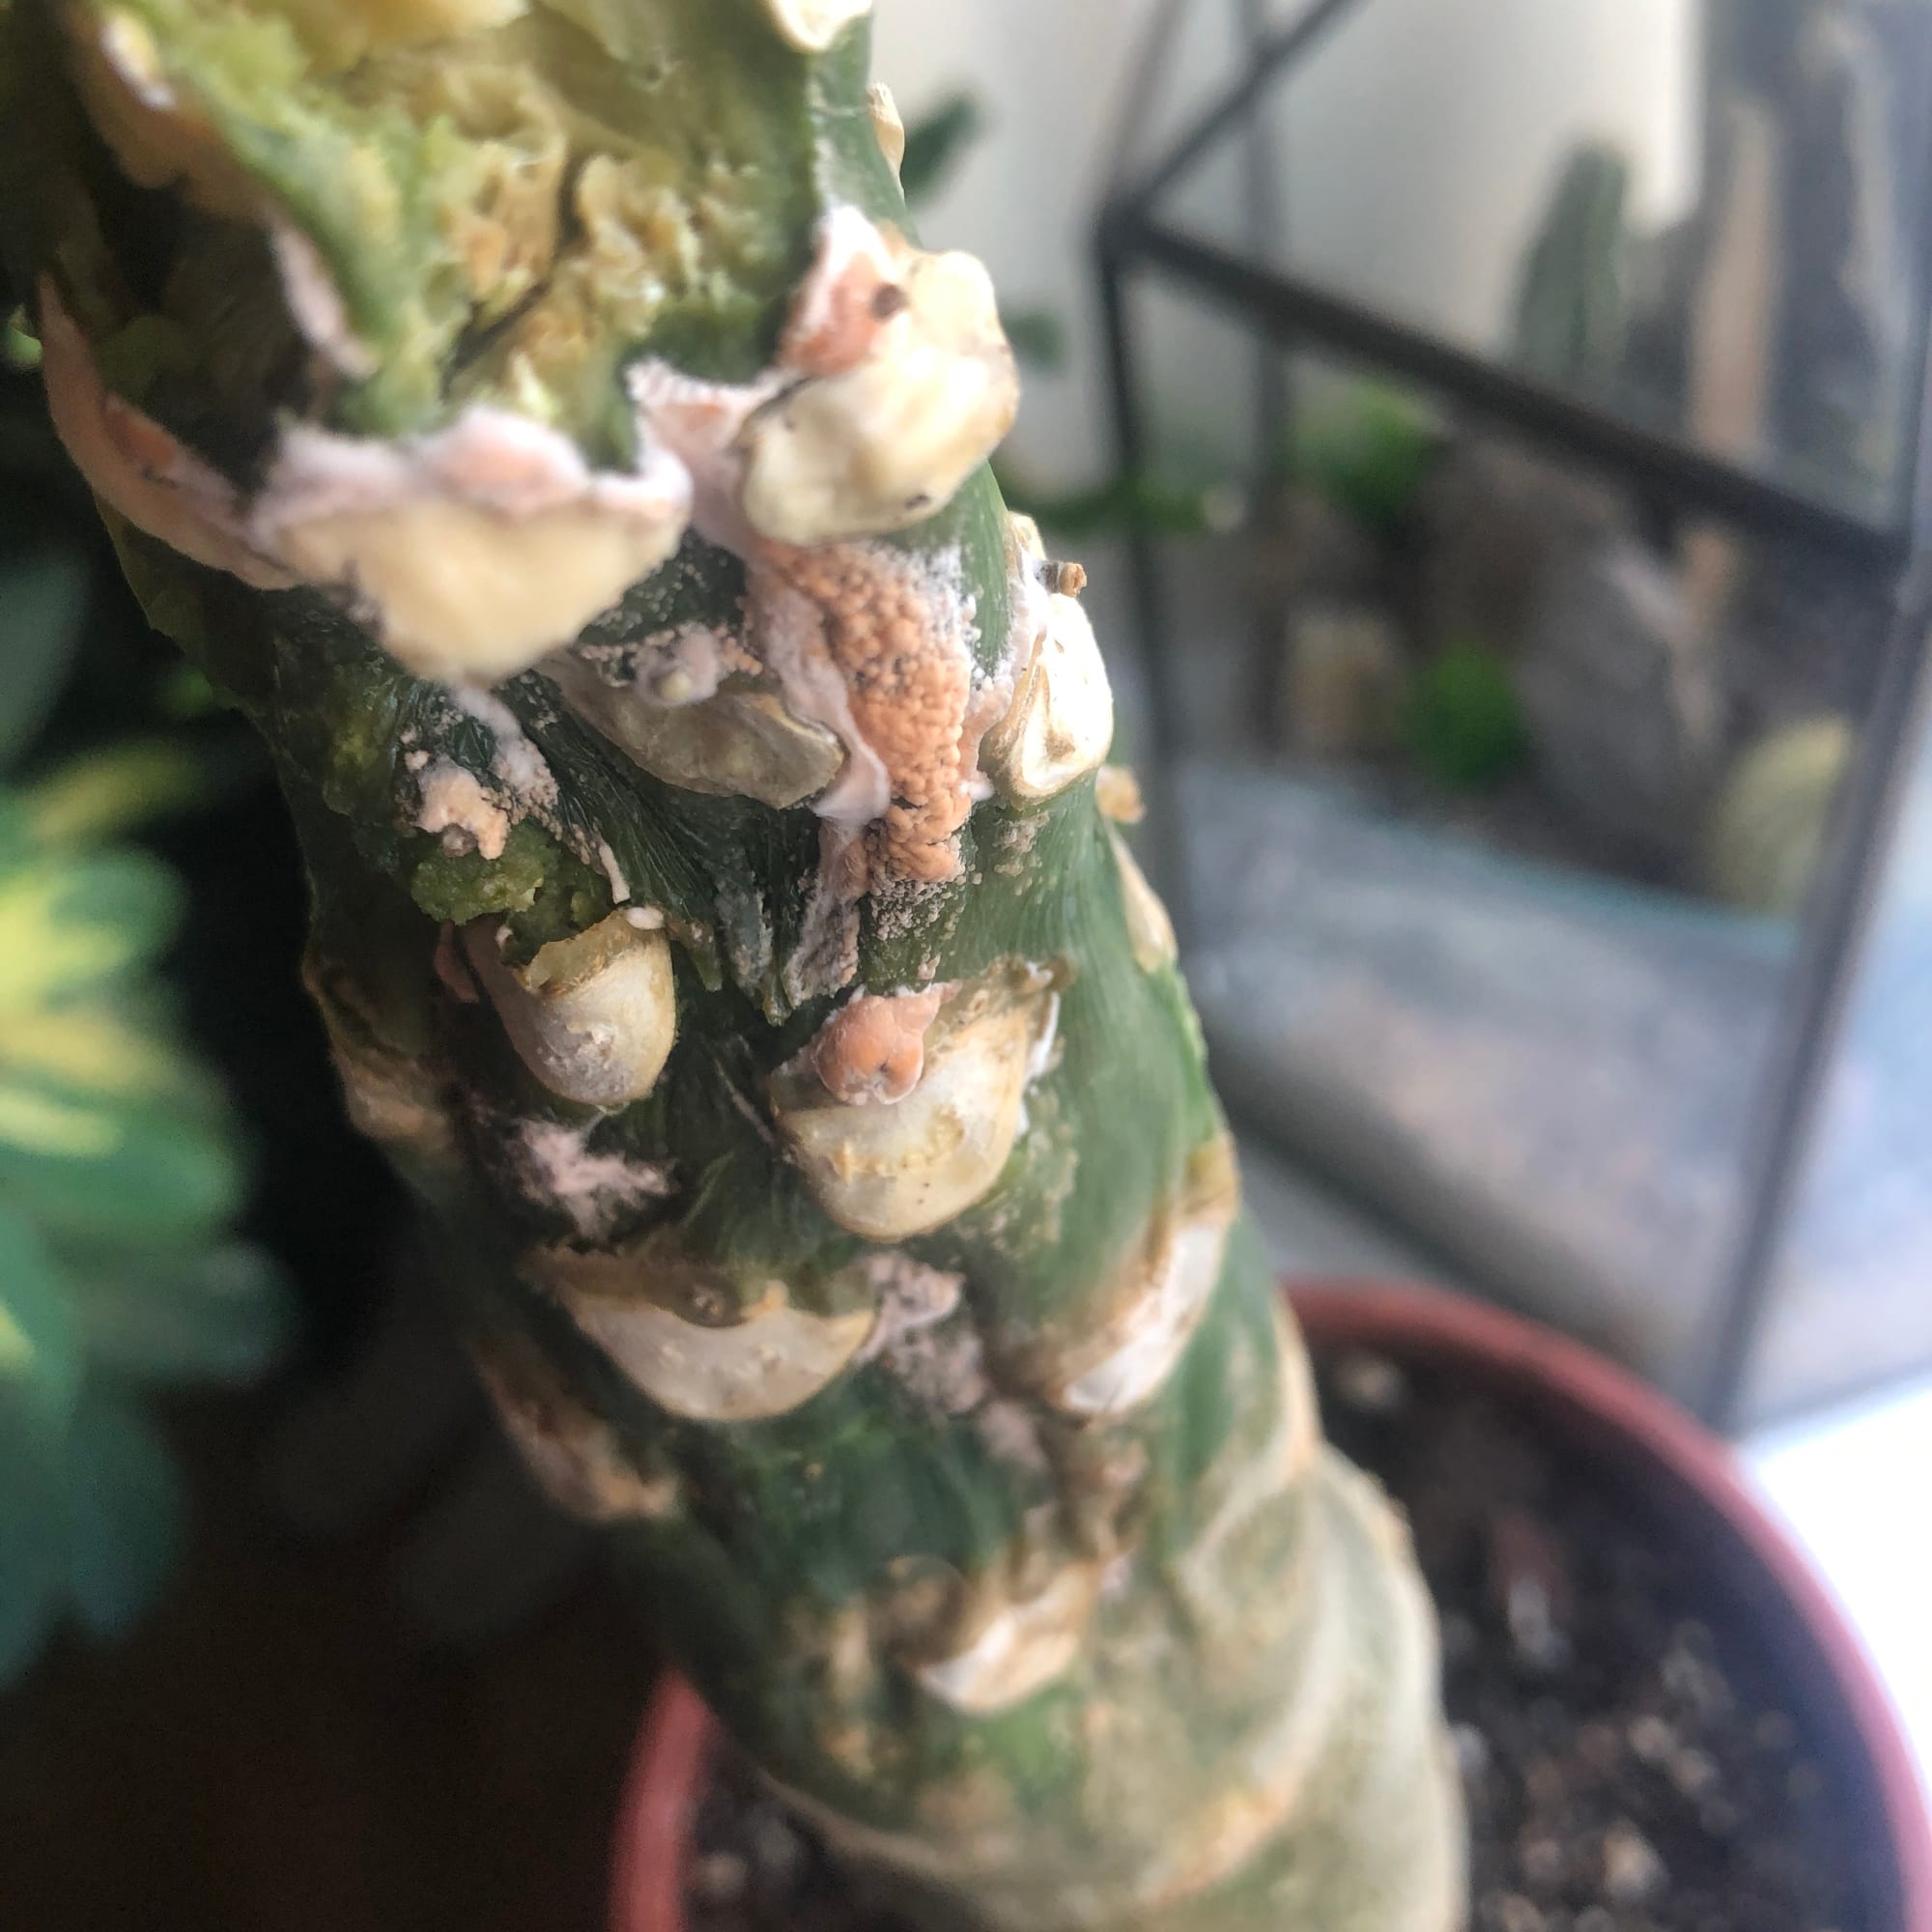 If the Hawaiian Palm's stem becomes squishy or develops brown rust/mould like above, it sadly won't survive as the decay will travel into its very centre.
Curled leaves and brown leaf-edges are the result of too little water and over-exposure to the sun. Hawaiian Palms are best located in bright, indirect settings, and those that haven't acclimatised to the harsh rays will show signs of sun-scorch and environmental shock. A splash of winter sunlight is acceptable as long as the soil moisture is regularly observed, with complete avoidance once summer comes along.
A lack of flowers in the summer is caused by an insufficient dormancy period, where the temperatures are kept more or less the same over the year. Reduce the ambient warmth by a couple of degrees over the autumn and winter months, along with fewer irrigations to ensure a well-spent dormancy. Fertilisation isn't necessary until the spring.
Origins
Brighamia is a genus consisting of two species, B. insignia and B. rockii, that differentiate by their flower colours and native ranges. As the nickname suggests, Hawaii was the only location in the wild that the species naturally grew in, with only a now-extinct hawkmoth known to aid pollination. Their numbers have dwindled for at least twenty years, with a survey initially conducted in 1994 totalling around fifty in the wild. A further study was carried out in 2014, confirming that only one remained in the wild, thus classifying the plant as critically endangered (CR) by the IUCN. Despite the difficulties of natural cultivation in the wild, its efficiency of seed germination enables the species to be sold commercially worldwide, keeping the species from entire extinction.
The genus was first described by Asa Gray in 1867, honouring a then-young American botanist, William Tufts Brigham, who spent many years on the islands as the first director of the Bernice P. Bishop Museum. B. insignis was also classified by Gray in the same year, referring to the 'outstanding' appearance of its foliage. The B. rockii was described in 1969 by Harold St. John, honouring Joseph Rock, who was an American-Austrian self-taught botanist of the twentieth-century.
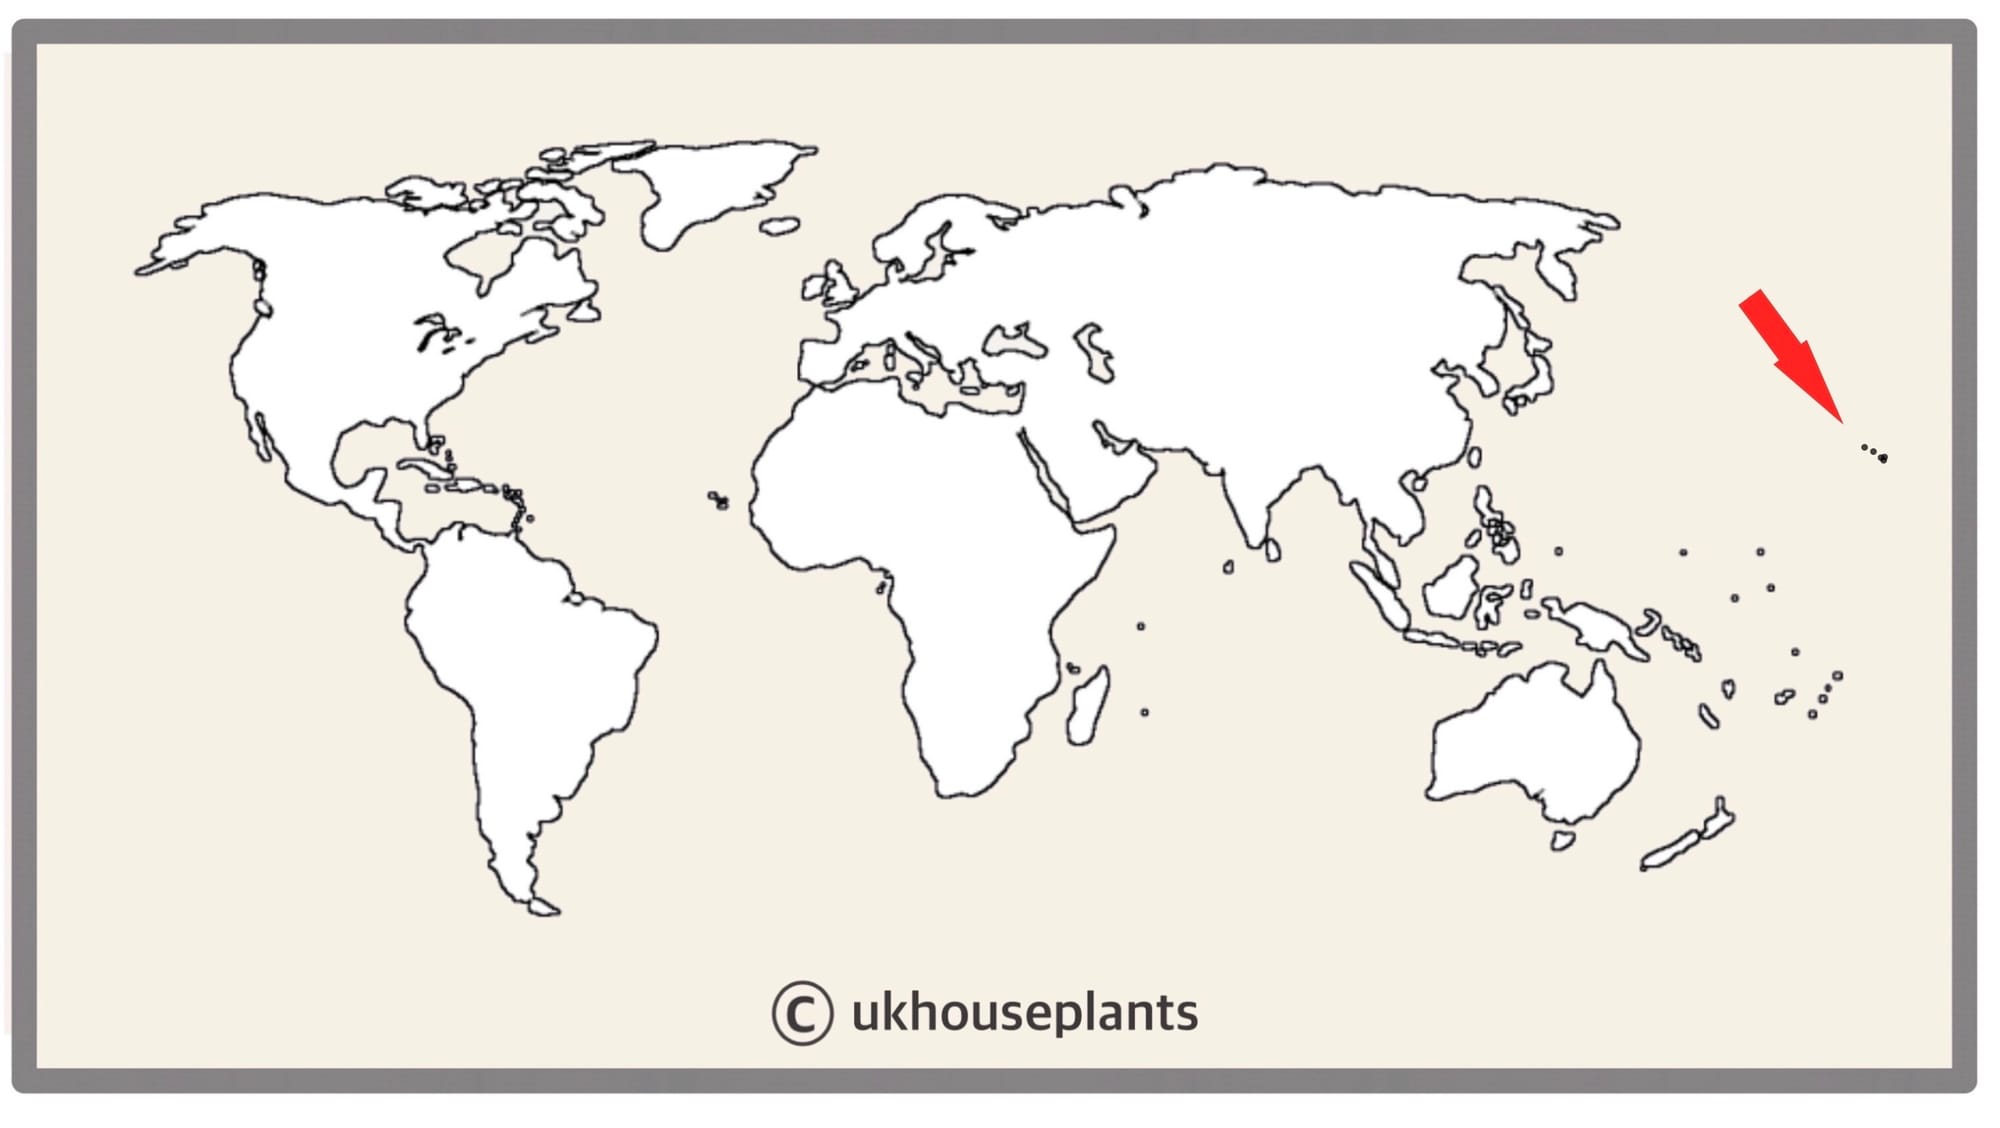 A Distribution Map of Brighamia.
Temperature
15° - 27℃ (59° - 80℉)
H1a (Hardiness Zone 13) - Must be grown indoors or under glass all year round. Never allow temperatures to dip below 15℃ or permanent damage may occur in the likes of flower loss, stunted growth and yellowed leaves.
Spread
Up to 1.5m in height and 0.3m in width, with the ultimate height taking between 5 - 10 years to achieve. Up to 10cm of growth will be put-out per season.
Pruning & Maintenance
Discard yellowed or dying leaves to encourage better growth and improve the all-round appearance. Remove the yellowed leaves by gently pulling the leaf's base downwards, until you hear a snap - this is what gives the plant it's interesting trunk features.
Propagation
Via Seed - (Moderate). Despite its succulent body, the only way in which a Hawaiian Palm can be propagated is by artificial pollination during late summer. Some specimens can flower in their first or second year, but it'll depend on the quality of its growing conditions and cultivation. If pollination is successful, the ovules should begin to swell, developing into green berries shortly after. Once they become brown crispy, collect the seed pods and store them in a dry, dark location until the following spring.
Soak the seeds in lukewarm water for around 24hrs in a dark location, preferably on top of an operating radiator. The best soil to use is a 'Houseplant' labelled potting mix; however, multipurpose compost with added perlite and sand is just as good. Set the seeds on top of the soil, resisting the temptation to compact the soil. Cover the seeds with a thin layer of vermiculite to retain moisture. Maintain evenly moist soil by misting and allow any excess water to freely drain from the pot's base to prevent water-logged conditions. The ideal location for successful germination is in a bright, indirect setting with temperatures around 25℃ (77℉) with bottom-heat. Keep the pot in a transparent bag to provide a stable level of humidity, along with longer-lasting soil moisture. Germination may take up to three months, so don't discard any unsuccessful seeds until this threshold has been surpassed. Remove the bag once the seedlings produce its second leaf and then split them up into their own 3cm pots.
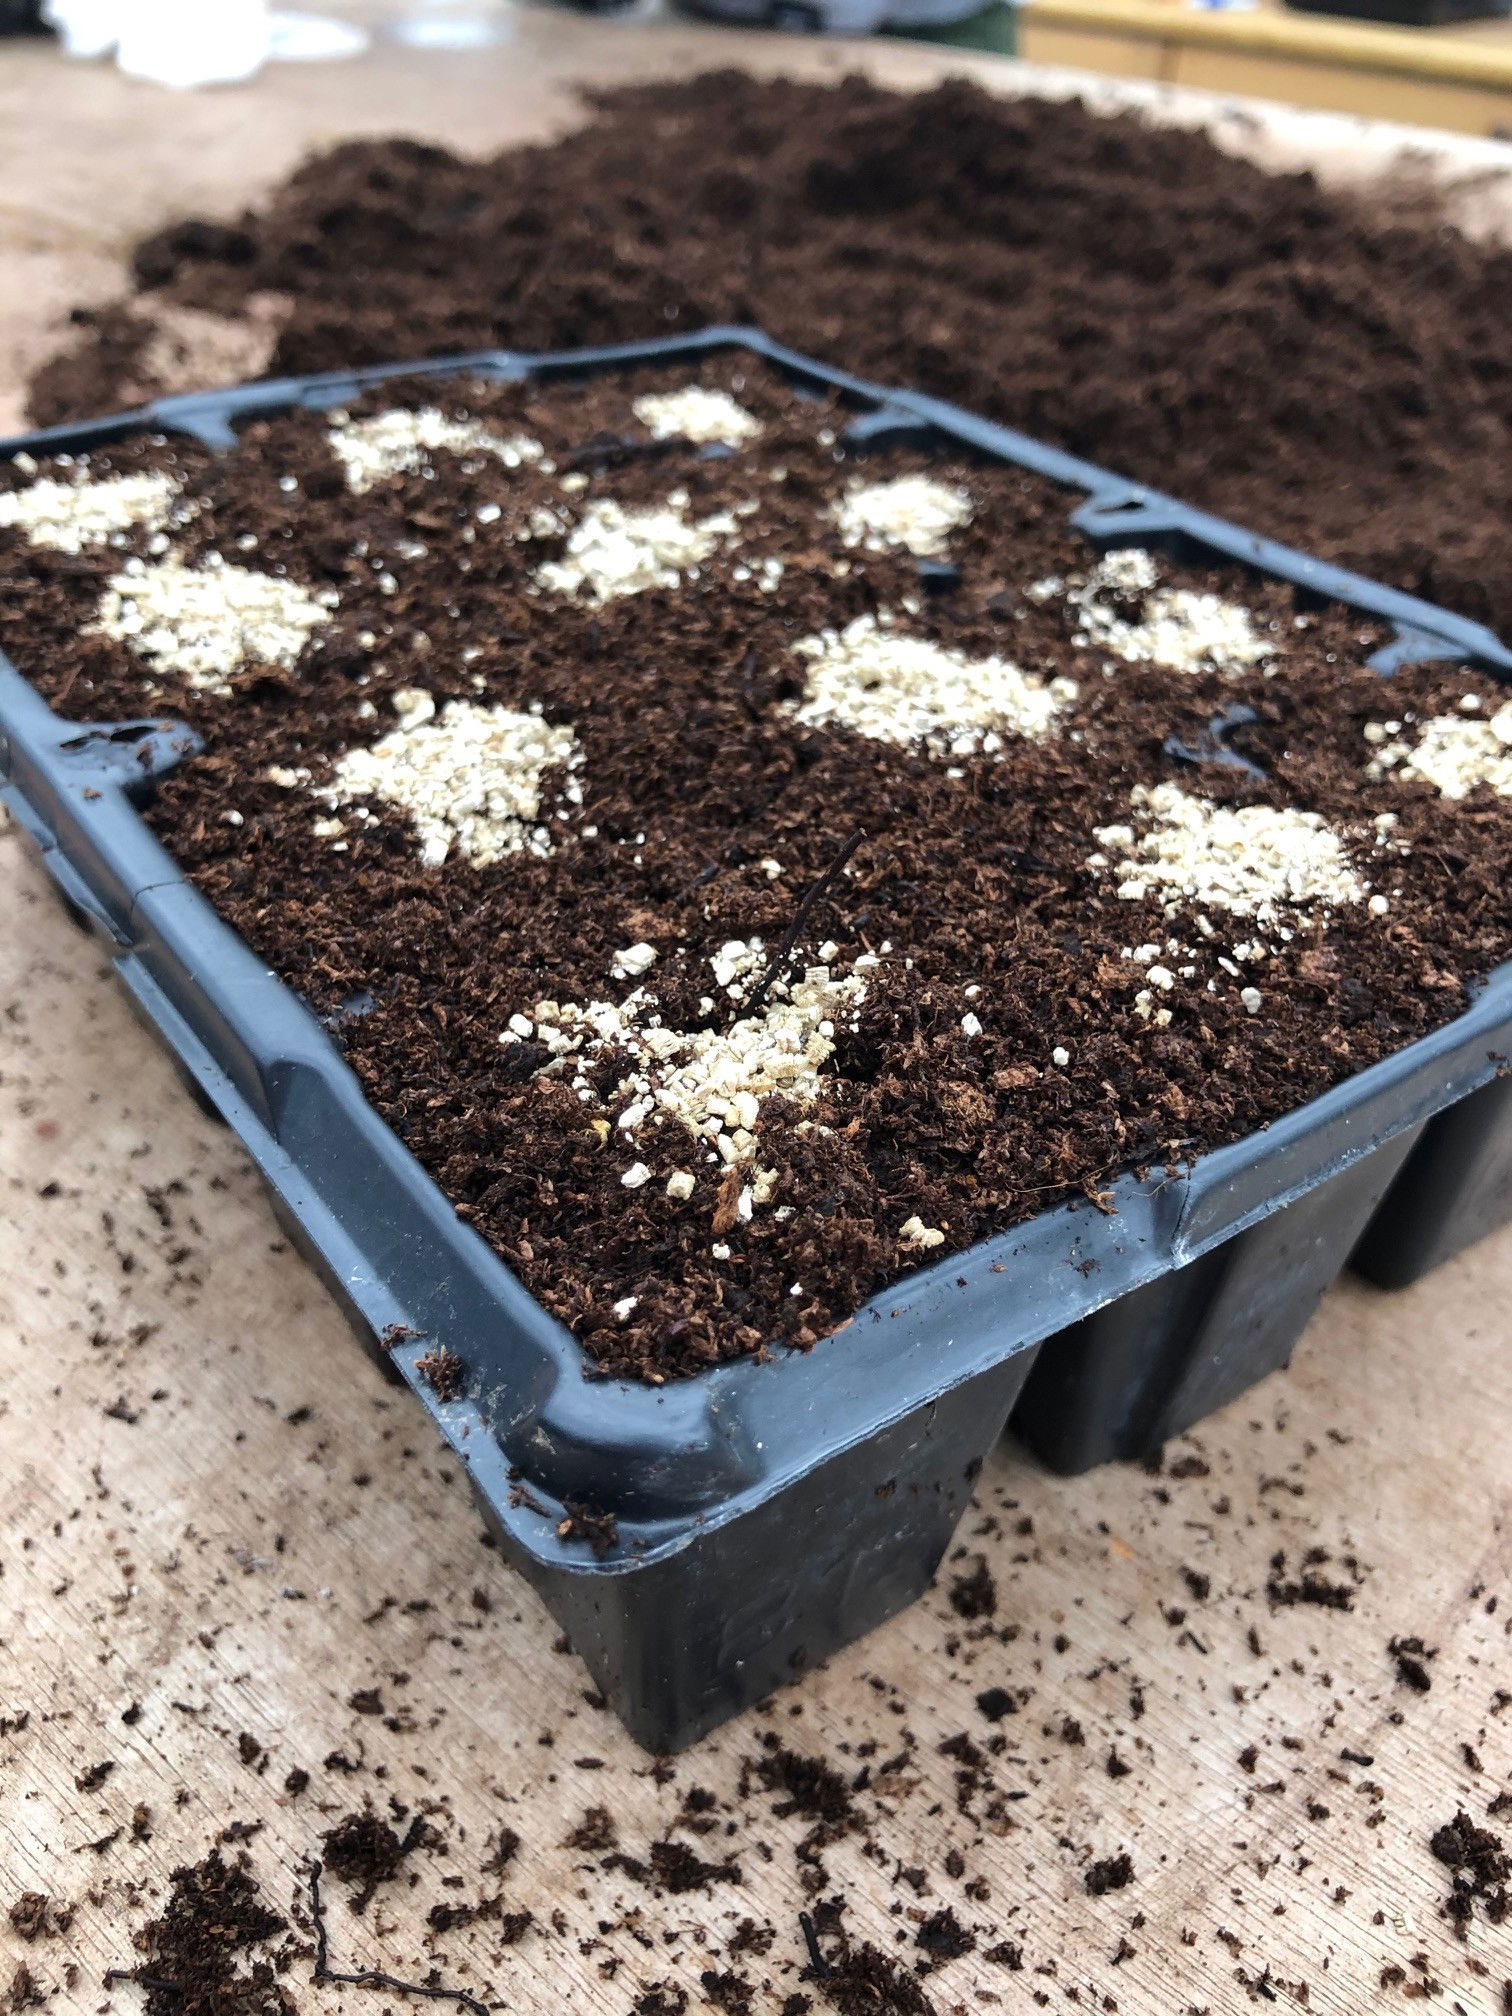 Due to the small nature of the seeds, burying them too deeply will restrict their ability to penetrate the soil, thus leading to unsuccessful germination. Scattering them loosely onto the soil with a thin layer of vermiculite will provide moisture and substrates for successful yields.
Flowers
Your Hawaiian Palm (Brighamia insignis) will produce yellow star-shaped flowers in late summer that can last up to several weeks; their strong fragrance slightly resembles a sweet honeysuckle!
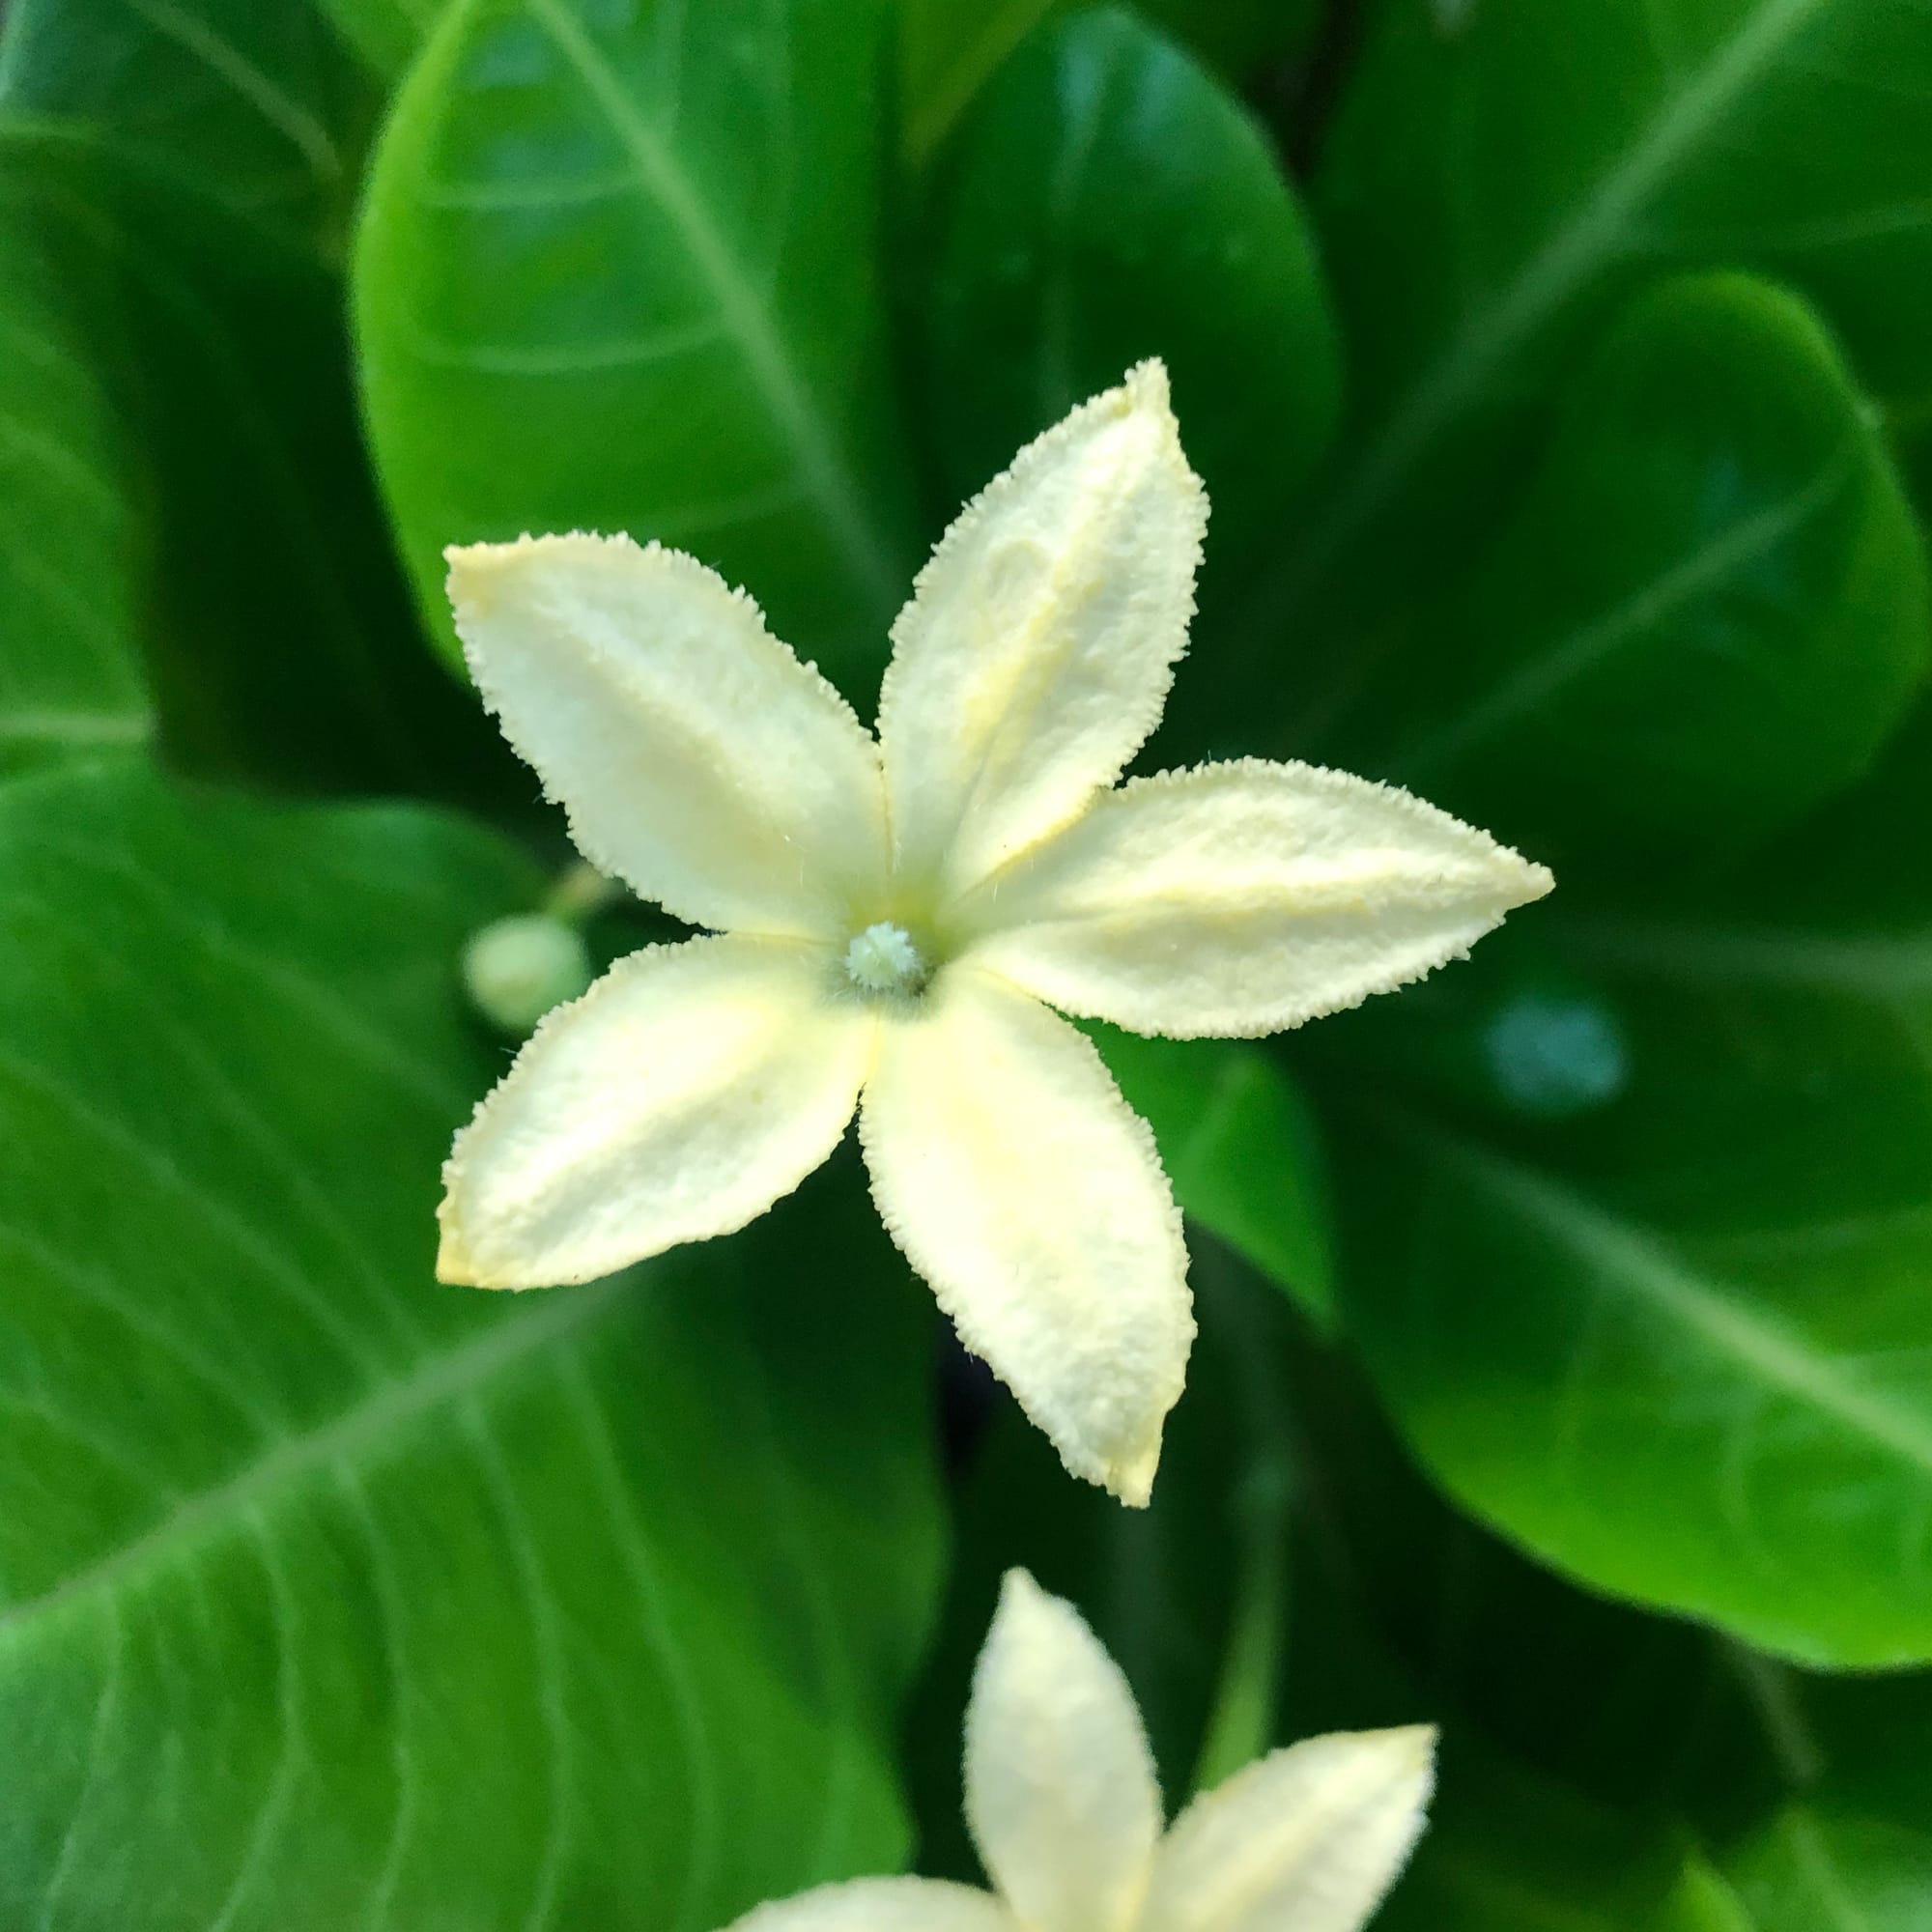 During the summer period, your Hawaiian Palm may flower with up to six blooms in one season, lasting around a month in total. If you're not overly fussed with a show of colour, feel free to prune the flowers off to re-divert energy back into leaf production.
 Brighamia is part of the wider Campanula family (Bellflowers) due to the similarity in their flower structures.
Repotting
Repot every three years in spring using a 'Cactus & Succulent' compost and the next sized pot with adequate drainage. You can also go the extra mile by making your mix bio-active which will significantly increase the chances of your Hawaiian Palm growing for many years to come.
When it's time to repot, hydrate the plant 24hrs before tinkering with the roots to prevent the risk of transplant shock. For those that are situated in a darker location, add an extra batch of perlite in the potting mix improve drainage and downplay over-watering. Click here for a detailed step-by-step guide on transplantation, or via this link to learn about repotting with root rot.
Book a 1-to-1 video call with THE HOUSEPLANT DOCTOR™ if you'd like a personal guide to repotting your houseplant. This will include recommending the right branded-compost and pot size, followed by a live video call whilst you transplant the specimen for step-by-step guidance and answer any further questions!
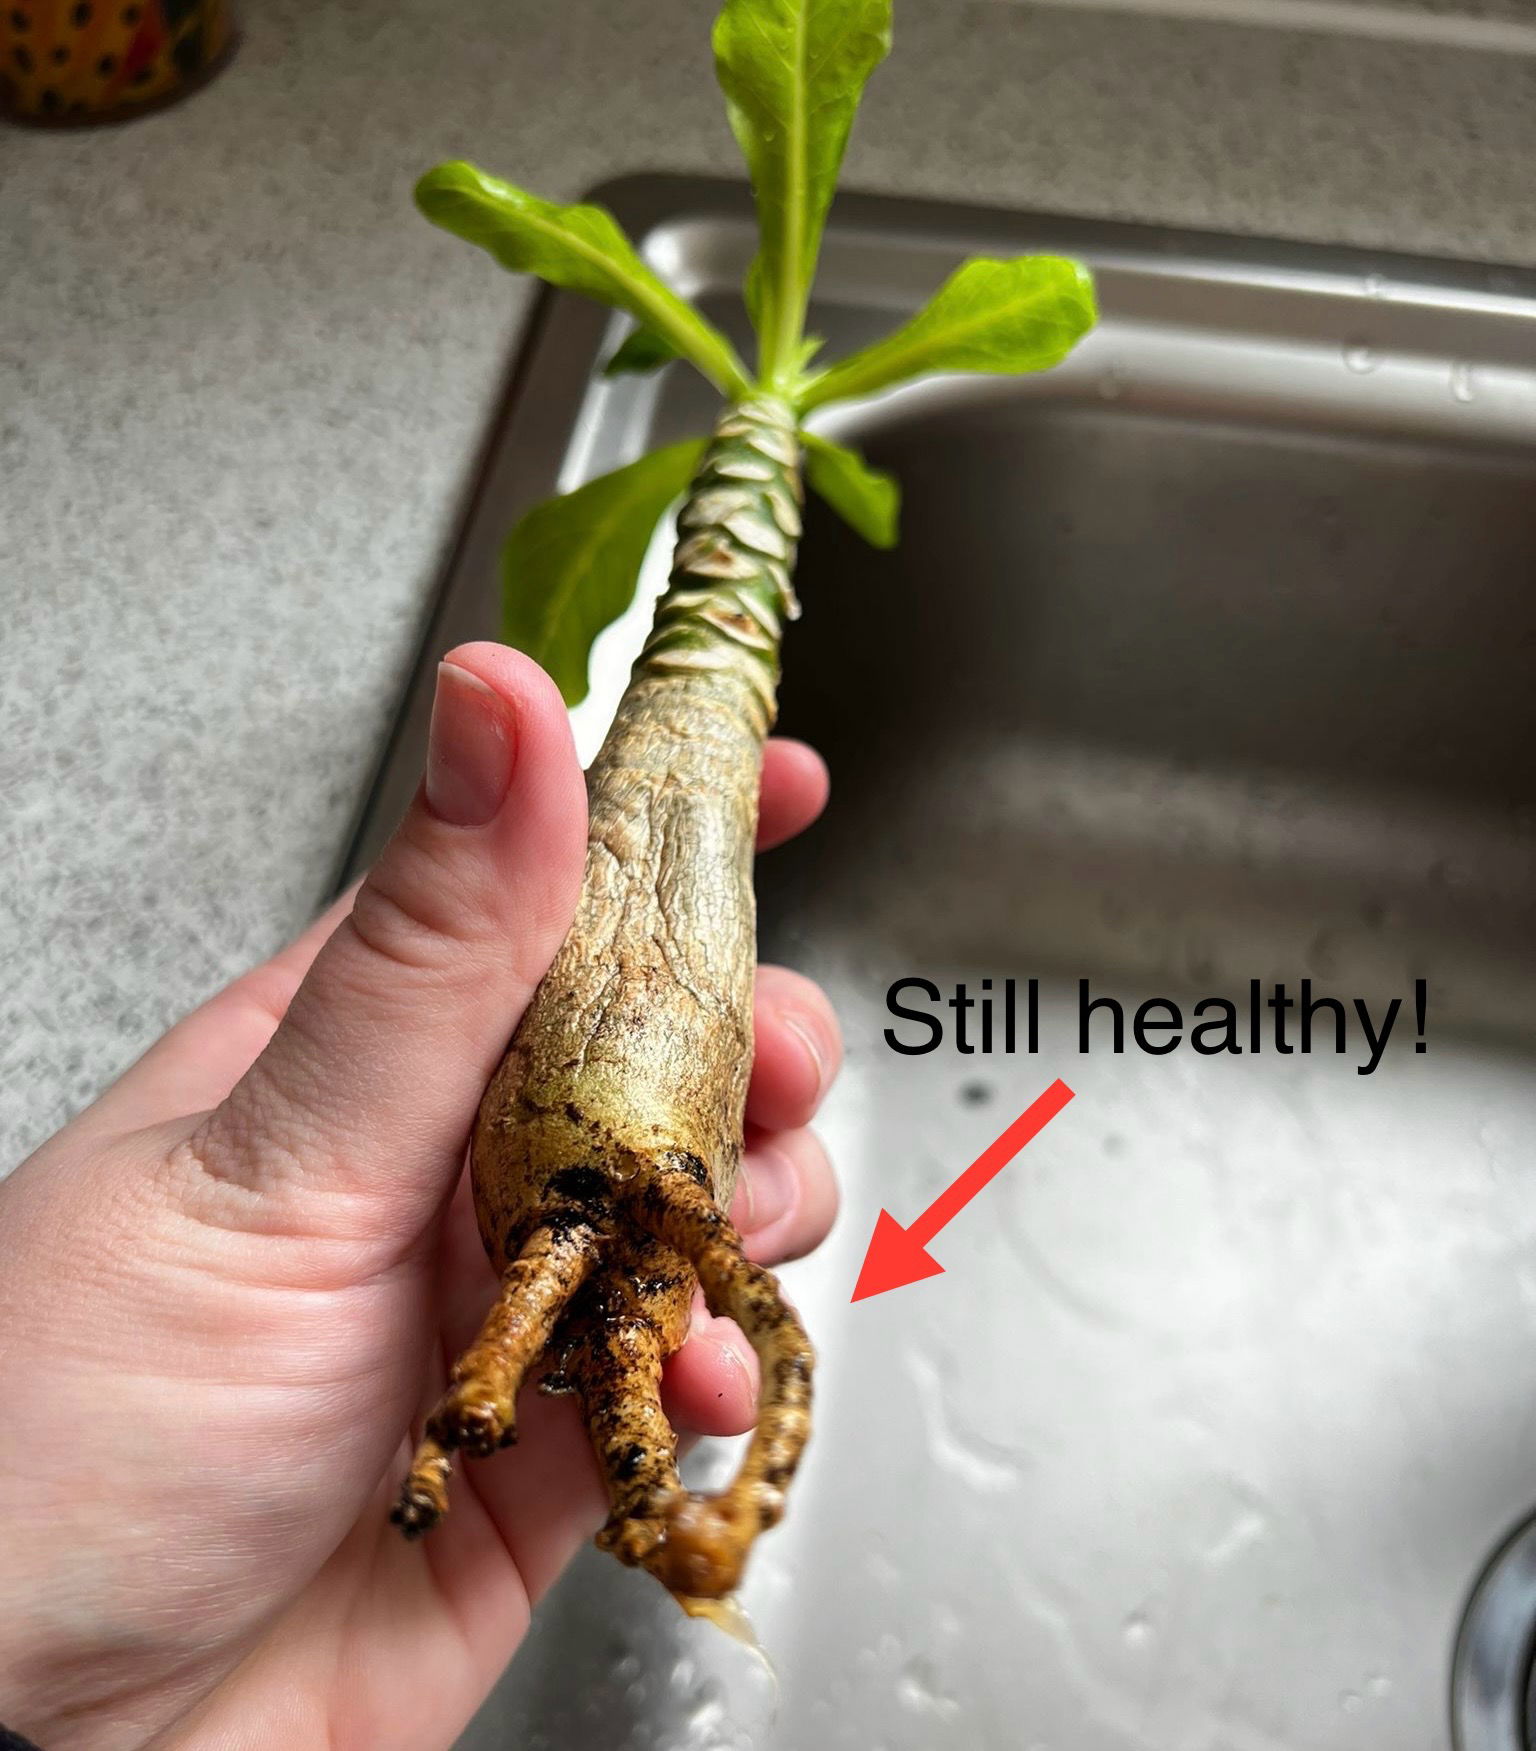 Although the smaller roots have died off, the main primary roots that are attached to the stem's base are still alive. In this situation above, THE HOUSEPLANT DOCTOR™ recommends to repot your Hawaiian Palm back into the same pot with a 'Houseplant' labelled soil. Only water once the compost's top half dries out to avoid over-watering.
Pests & Diseases
Keep an eye out for mealybugs, aphids, spider mites, scale, thrips, blackfly, vine weevils & root mealybugs that'll locate themselves in the cubbyholes and undersides of the leaves, with the exception of the latter two in the soil. Common diseases associated with Hawaiian Palms are root rot, leaf-spot disease, botrytis, rust, powdery mildew & southern blight - click here to learn more about these issues.
Toxicity
Not known to be poisonous by consumption of pets and humans; if high quantities are eaten, it may result in vomiting, nausea and a loss of appetite.
Retail Locations
YouGarden, Online Stores.
Book a 1-to-1 Call with THE HOUSEPLANT DOCTOR™
If you need further advice with your houseplants, book an advice call with ukhouseplants' friendly and expert writer today! This can be done via a video or audio call on most apps, including Facebook, FaceTime & Skype. A ten-minute call costs £5.99 (US$7), or £15.99 for thirty minutes. You can ask multiple questions, including queries on plants, pests, terrariums, repotting advice and anything in between. Please consider supporting this service to keep ukhouseplants thriving!
Comments