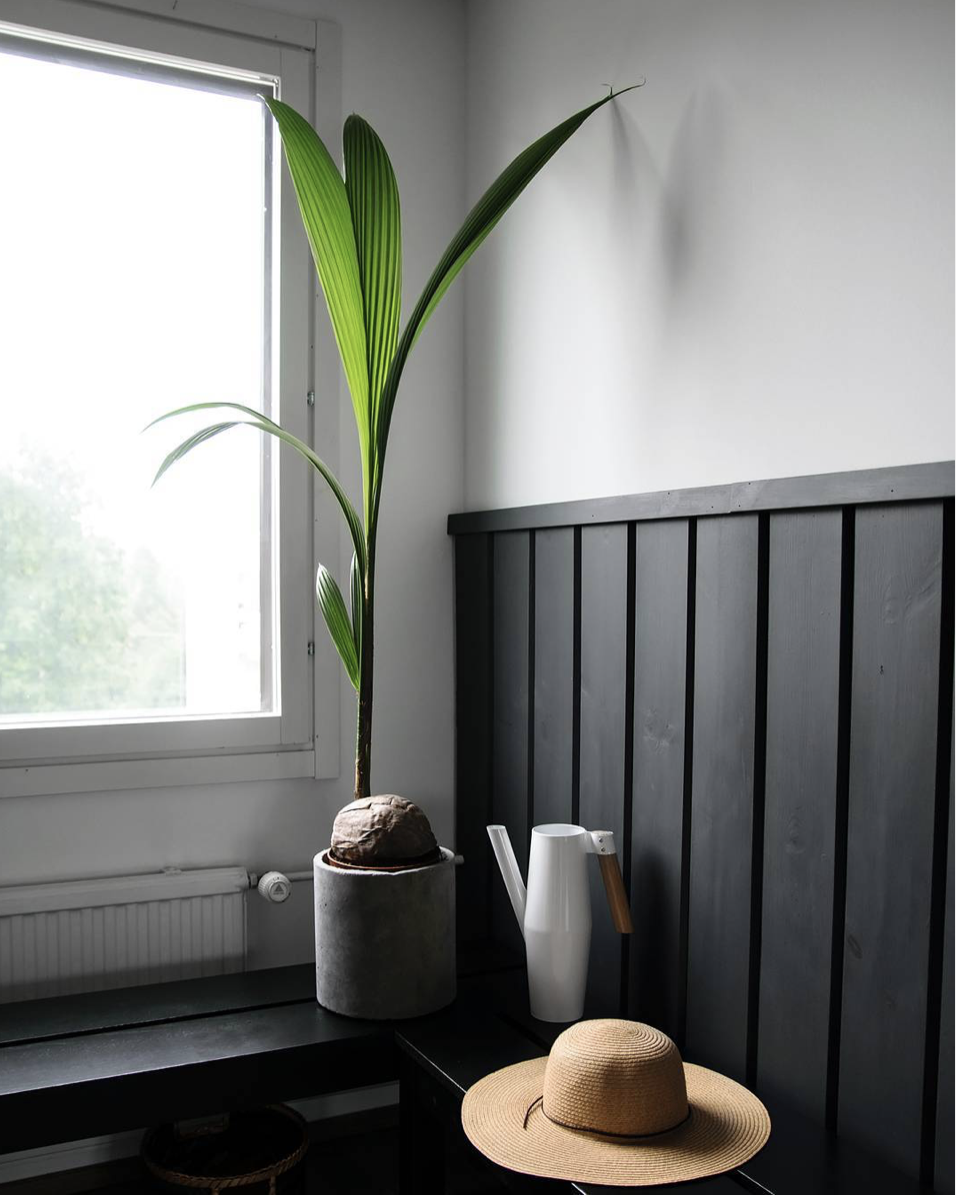
Cocos nucifera - Copyright: @Alyssa.polaris
Contents
- Top Tips
- Location, Water, Humidity & Fertilisation
- Common Issues
- Origins, Temperature, Propagation, Repotting & Toxicity.
Need the answer to a specific plant query? Book a 1-to-1 video call with THE HOUSEPLANT DOCTOR™, the website's friendly author, to overcome and address your niggling problem! Available on iMessage, WhatsApp, Facebook Messenger & more.
Top Tips & Info
- Care Difficulty - Easy, but difficult to maintain over a long period.
- Provide a sun-filled location with either a few hours of morning or evening rays. Never situate this plant in an area that doesn't offer the sunlight or overhead lighting due to the risk of plant collapse.
- Allow the top half of the soil to dry out in between waters, reducing this slightly in the autumn and winter months. The attached coconut can retain a minimal amount of moisture, so never attempt to over-water this species.
- Provide a humid location away from operating radiators by introducing a humidity tray throughout the year.
- Fertilise using a 'Houseplant' or 'Palm' labelled feed every four waters in the spring and summer, reducing this to every six in the colder months.
- Repot every three years using a 'Houseplant' labelled potting mix. Be sure to respect the roots as transplant shock is a big issue that could cause death in some cases.
- Keep an eye out for Spider Mites that'll locate themselves in webs along the ridges of the under-leaves.
- This species generally won't last more than a year due to the unfavourable growing conditions in the home. To maximise the chance of survival and success, be sure to situate it in a conservatory (with temperatures above 18℃ (64℉))
- A 'Drupe' is the nut's correct botanical name due to the singular seed wrapped by a fleshy substance with thin skin. This article will refer the drupe as a 'nut' to save confusion.
Location & Light - 🔸🔸🔸
Seat the Palm in the brightest location as possible. A few hours of off-peak sunlight will be highly beneficial for the plant, as it'll significantly reduce the risk of over-watering and root rot. Coconut Palms naturally occur in sun-filled locations, so within a metre of a south-facing window or a conservatory is perfect for quality growth. Due to the species' intolerance to low light, avoid placing it in areas where a newspaper can't be read without the use of artificial light.
Water - 🔸🔸
Over-watering is a common issue among growers. Allow the top half of the soil dry out in between waters, reducing this slightly further in the cooler months. It's important to use lukewarm water due to the root's sensitivity to cold temperatures - if it's too cold for teeth, it'll too cold for the Palm, too! Over-watering symptoms include a rotting stem, little to no growth and yellowing leaves; these issues are usually due to a lack of heat or sunlight, over-potted roots, an incorrect soil type or water-logging. Alternatively, under-watering and dehydration symptoms including yellow or pale fronds, little to no growth, brown crispy new growth and gradual decline. These issues are commonly caused by forgetfulness, being potbound or situated in too much light/heat. If it's placed in a bright location with a splash of sun, be sure to keep the soil adequately moist as prolonged dehydration will hinder new growth for a while.
Humidity - 🔸🔸🔸
Coconut Palms love humidity, so creating a pebble tray is the best way to improve the surrounding growing conditions. Throughout the year, mist both sides of leaves frequently to combat the dry air which would cause the browning of leaf-edges and weakened juvenile growth. We also recommend misting or rinsing the foliage to wash away potential Spider Mite eggs and dust, both of which will contribute to better light-capturing efficiency (& therefore better overall health). This should be done at monthly intervals, but can even be performed every fortnight as long as you avoid getting excess moisture into the soil.
Fertilisation - 🔸🔸
Feed every four waters during the growing period and every six in the autumn and winter, using a 'Houseplant' or 'Palm' labelled fertiliser. Never apply a 'ready to use’ product into the soil without a pre-water first, as it may burn the roots and lead to yellowed leaves.
Common Issues with Coconut Palms
Root rot is a common issue with specimens sat in too moist or waterlogged soil for long periods. Symptoms include rapidly yellowing leaves, stunted growth and a rotten brown base. Take the plant out of the pot and inspect health below the soil line. If the roots sport a yellow tinge, you're good to go, but if they're brown and mushy, action must be taken immediately. More information about addressing root rot can be found on this link.
A rotten or loose coconut shouldn't cause concern as it's common behaviour for a maturing specimen. If, however, your Palm is developing soil mould and is sat in heavy soil, this may be a sign of root rot. Click on the link above to learn more about eradicating this issue, and remove the coconut once it becomes loose (this may take several weeks after you address the root rot, so follow the instructions today and wait for the nut thereafter).
Yellowing lower leaves (closest to soil) could be a sign of over-watering, but equally is a byproduct of maturity. If the older leaves rapidly become yellow in quick succession, over-watering could be to blame. People don't realise that a plant's root system needs access to oxygen too; when soil is watered, the air will travel upwards and out of the potting mix. A lack of accessible oxygen for the roots will cause them to subsequently breakdown over the oncoming days. Click on this link to learn more about root rot and how to address it.
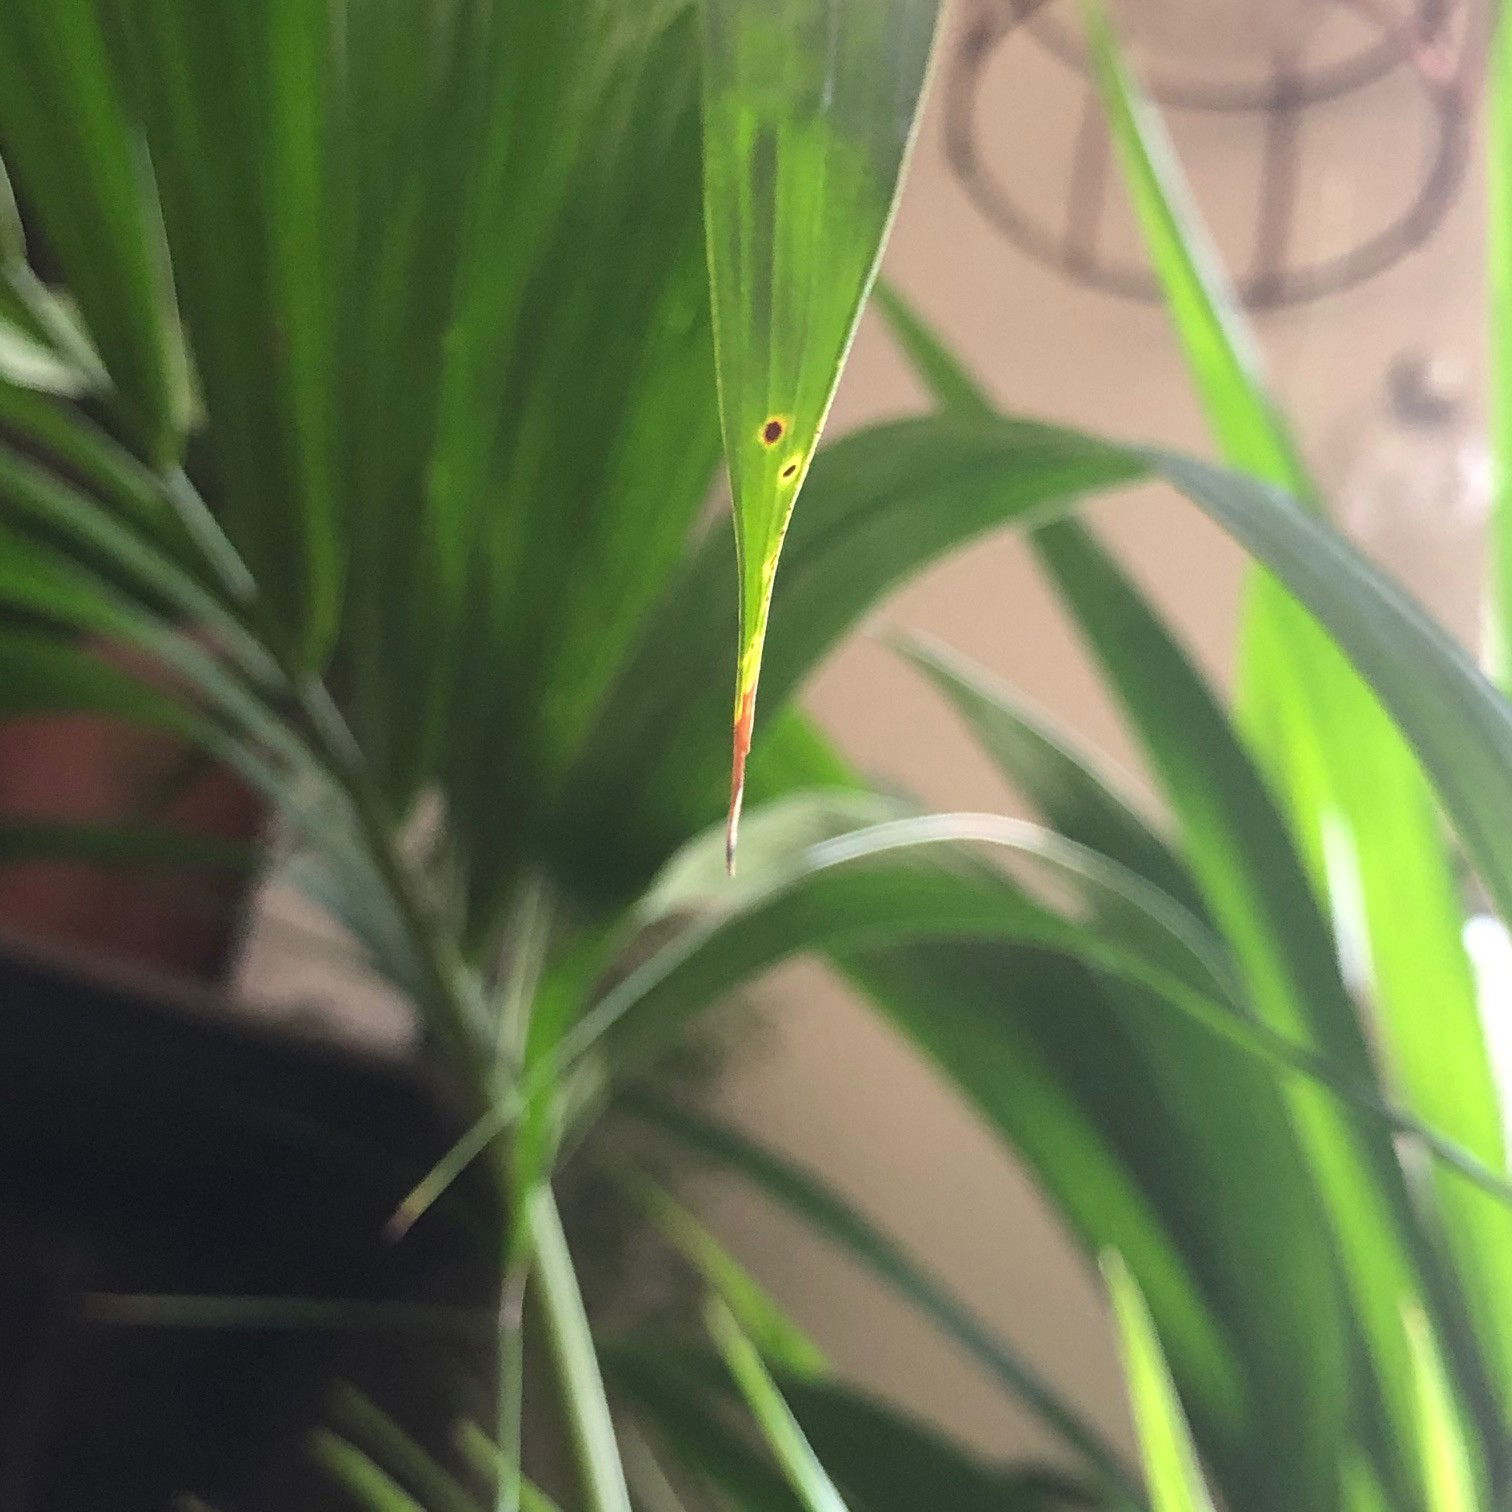
 Similarly to Kentia Palms, these brown markings are entirely natural for Coconut Palms, so don't worry!
Spider Mites are small, near-transparent critters, that'll slowly extract the chlorophyll from of its leaves. Have a check under the leaves, most notably along the midrib, for small webs and gritty yellow bumps; the older leaves are most likely the ones that'll have an infestation though. Click here to read our article about the eradicating Spider Mites, along with some extra tips that you may not find elsewhere!
Mould developing on the soil means two things - too little light and over-watering. Despite the harmlessness of the mould, it'll prove unsightly to most gardeners and is therefore removed once known. To remove, replace the top two inches of the soil for a fresh batch of 'Houseplant' compost. Either increase the amount of light received (no direct sunlight for the first few weeks to prevent environmental shock) or decrease the frequency of waters slightly. If the mould is accompanied by yellowing lower leaves, you may also have a case of root rot.
Too low humidity can cause browning leaf tips with yellow halos. Although this won't kill your specimen, you may want to increase the local moisture to prevent the new growth from adopting these symptoms. Mist or rinse the foliage from time to time and create a pebble tray whilst the heaters are active to create a stable environment for your specimen.
 Browning leaf tips on a Kentia Palm, which has the same behaviour as Coconut Palms when exposed to low moisture. The dry air will become most prominent on the juvenile young growth of a new frond, so always introduce a pebble tray to keep the specimen happy!
Transplant shock is a big issue when it comes to heavy-handed repots. Give the plant a good soak 24hrs before the action and never tinker with the roots, unless it has been affected by root rot. Typical signs of transplant shock are largely similar to under-watering, with wilting, yellowing leaves and stunted growth among the most common symptoms. Click here to learn more about addressing transplant shock and a step-by-step guide on performing the perfect transplant.
There are several species of Leaf-Spot Disease, (Graphiola, Botrytis, Anthracnose & Cercospora) and all of them operate in the same way. Fungi spores will land on the leaf's surface and will slowly develop along with the plant. Unfortunately, as there aren't any products that'll address the issue head-on, you can only remove the affected areas and regularly wash the leaves to limit the spread. Keep the plant away from unaffected specimens for at least a month after the last symptom.
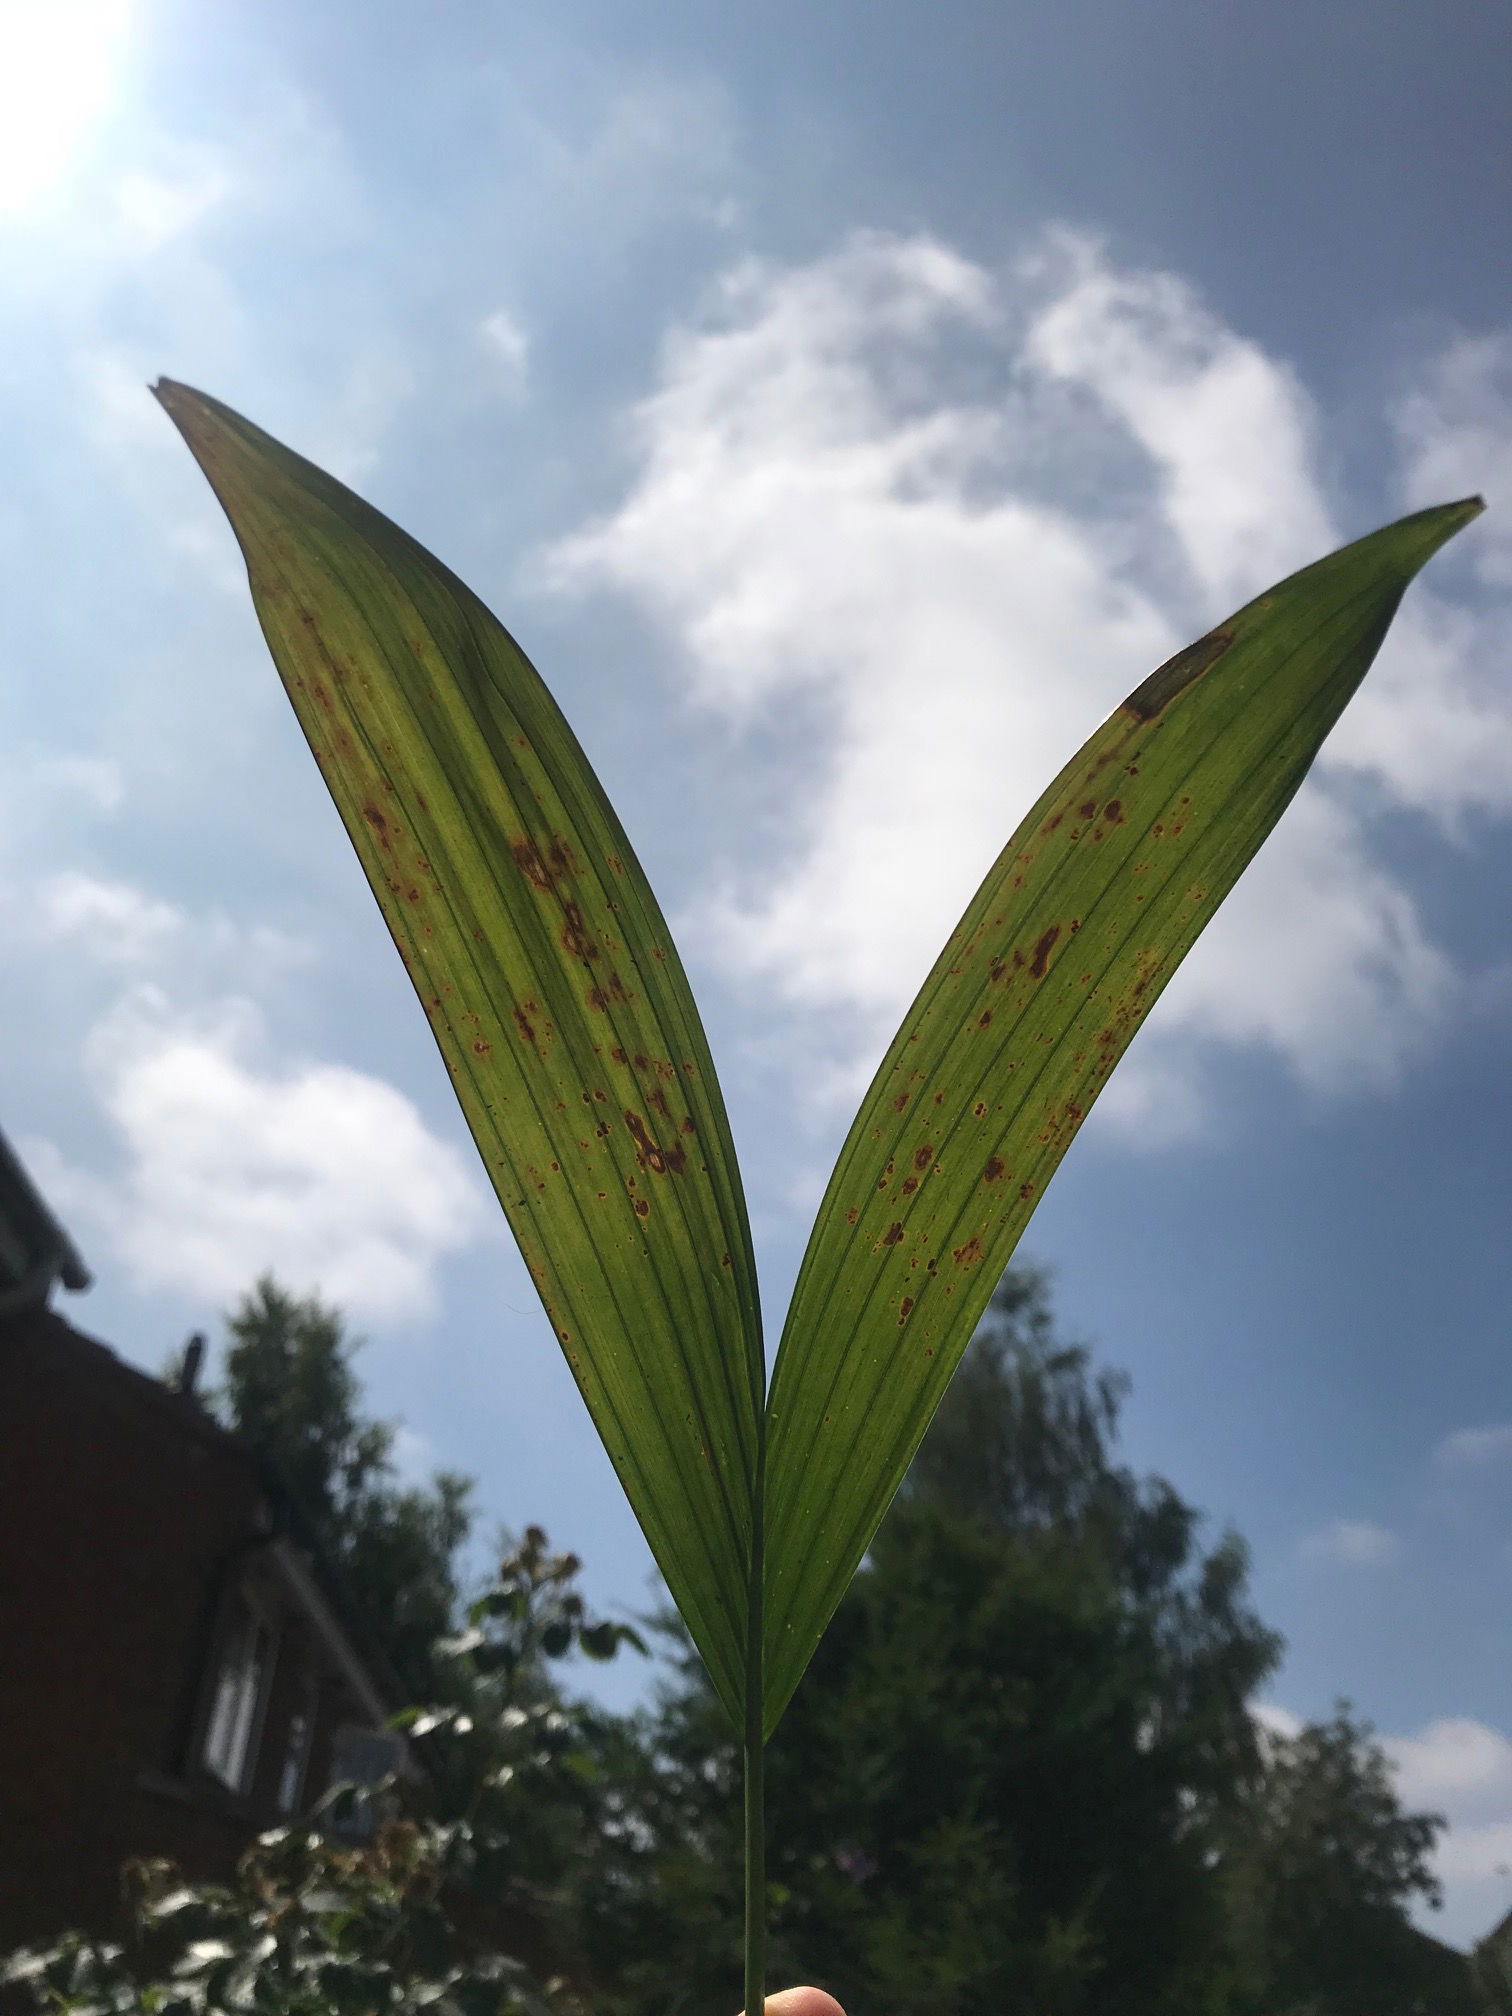 The effects of Leaf-Spot Disease. Click on the image to learn more!
Origins
The term, coconut, derives from the 16th-century Spanish word for 'skull', coco, as it resembles facial features from the plugged and functional 'pores'. The species was initially penned in Western cultures as 'nut indica' by Marco Polo in 1280, based off the Arabian word, جوز هندي, translating to 'Indian Nut'. In 1753, Carl Linnaeus reclassified the species into the newly-formed Cocos genus, acknowledging the original name of five hundred years. 'Nucifera' can be translated from modern Latin to mean 'nut-bearing'.
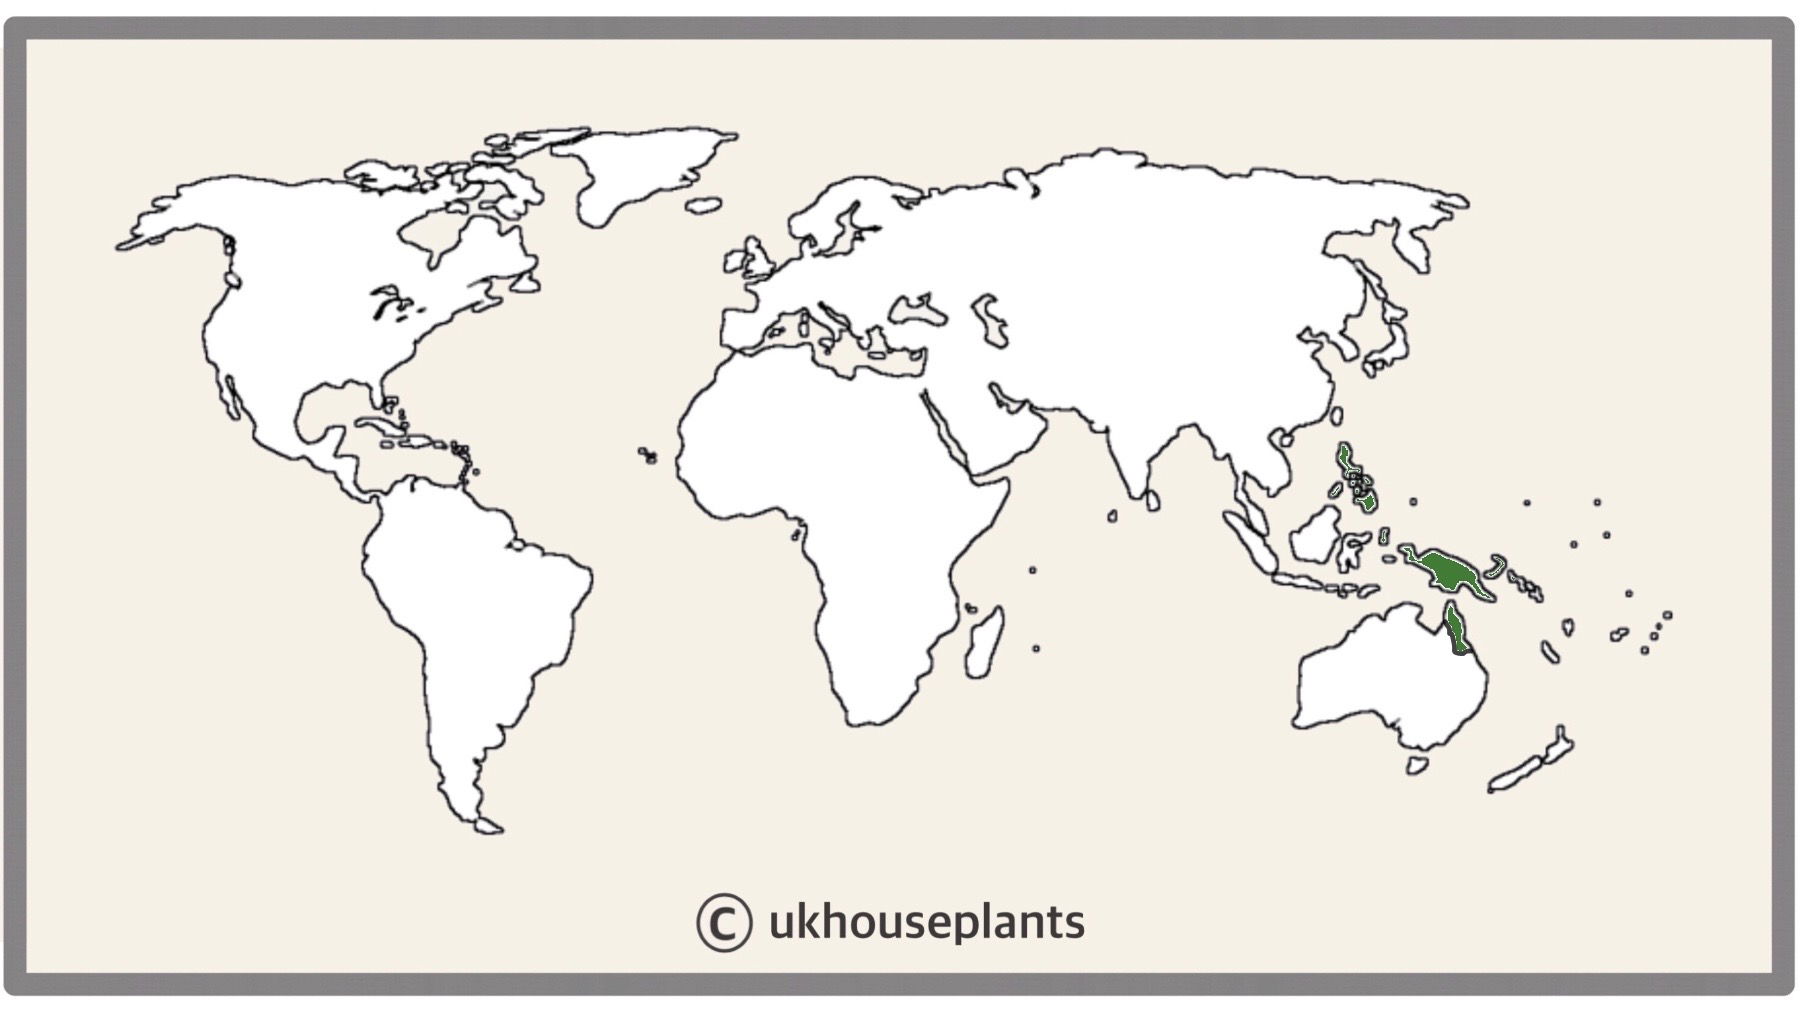 The Distribution of Cocos nucifera.
Temperature
18° - 30°C (64° - 86°F)
H1a (Hardiness Zone 13) - Must be grown indoors or under glass all year round. Never allow temperatures to dip below 18℃ 64℉) or permanent damage may occur in the likes of stunted growth and blackened leaves.
Spread
Specimens in their natural environment of the Western Pacific can reach up to 20m in height and 5m in width. The ultimate height will take between 15 - 20 years to achieve, with two new fronds put out each year. Unfortunately, the chance of a specimen lasting more than a year is highly unlikely unless it's situated in a conservatory or orangery. Keep the cleanliness of the foliage in tip-top condition, along with regular Spider Mite checks to boost its survival rates!
Pruning & Maintenance
Remove yellow or dying leaves, and plant debris to encourage better-growing conditions. While pruning, always use clean scissors or shears to reduce the chance of bacterial and fungal diseases. Never cut through yellowed tissue as this may cause further damage in the likes of diseases or bacterial infections. Remember to make clean incisions as too-damaged wounds may shock the plant, causing weakened growth and a decline in health. Do not prise a healthy nut away from the plant's base due to the risk of bacterial infection.
Propagation
Via Sowing Drupes (better known as 'nuts' or 'seeds').
Drupes (Difficult) - Obtaining a coconut is relatively easy and can be purchased from the local shop or market square. Be sure to buy one with its husk and a fair amount of contained fluid - shake it if you become unsure! Soak the drupe in lukewarm water for around three days in a bright location, before placing it sideways (around a third depth) into a bed of 'Houseplant' labelled potting mix. If you're unsure as to which angle it should be placed in, have a glance at the image below. Maintain evenly moist soil and allow the excess water to freely drain from the pot's base to prevent water-logged conditions. The ideal location for successful germination is in a bright, indirect setting with temperatures above 18℃ (64℉) with bottom-heat. Germination may take up to six months, so don't discard the drupe until this threshold has been surpassed, or it becomes rotten or mouldy. Keep the specimen in the same container for the first year of its life before repotting it not the next sized pot with a 'Houseplant' labelled potting mix!
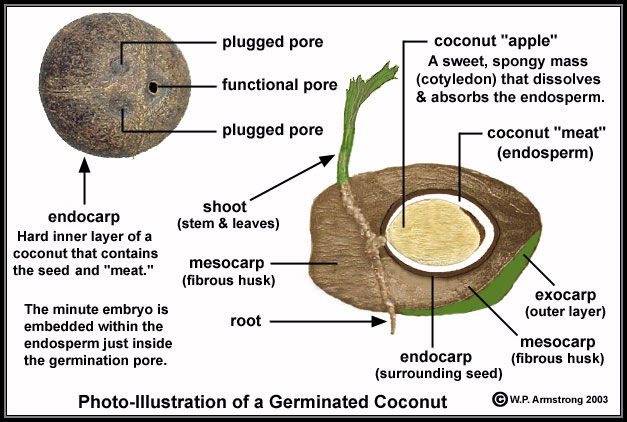 Copyright: W. P. Armstrong
Flowers
Coconut Palms will never flower indoors; however, those grown in the fresh outdoors will produce both separate male and female flowers (monoecious), blooming at slightly different times to avoid self-pollination. They'll typically flower from the start of spring, lasting several months with up to eighty flowers on mature specimens. In some cases, most commonly with dwarf varieties, specimens can become self-pollinating to increase the overall yield for the season.
Repotting
It's recommended to repot your specimen as soon as it gets home as the nursery pot is usually too small for its current size. Follow the step-by-step guide and always respect the roots to avoid transplant shock!
After that, repot every three years in the spring using a 'Houseplant' labelled and the next sized pot with adequate drainage. Hydrate the plant 24hrs before tinkering with the roots to prevent the risk of transplant shock. For those that are situated in a darker location, add a thin layer of small grit in the pot's base to improve drainage and downplay over-watering. Click here for a detailed step-by-step guide on transplantation, or via this link to learn about repotting with root rot.
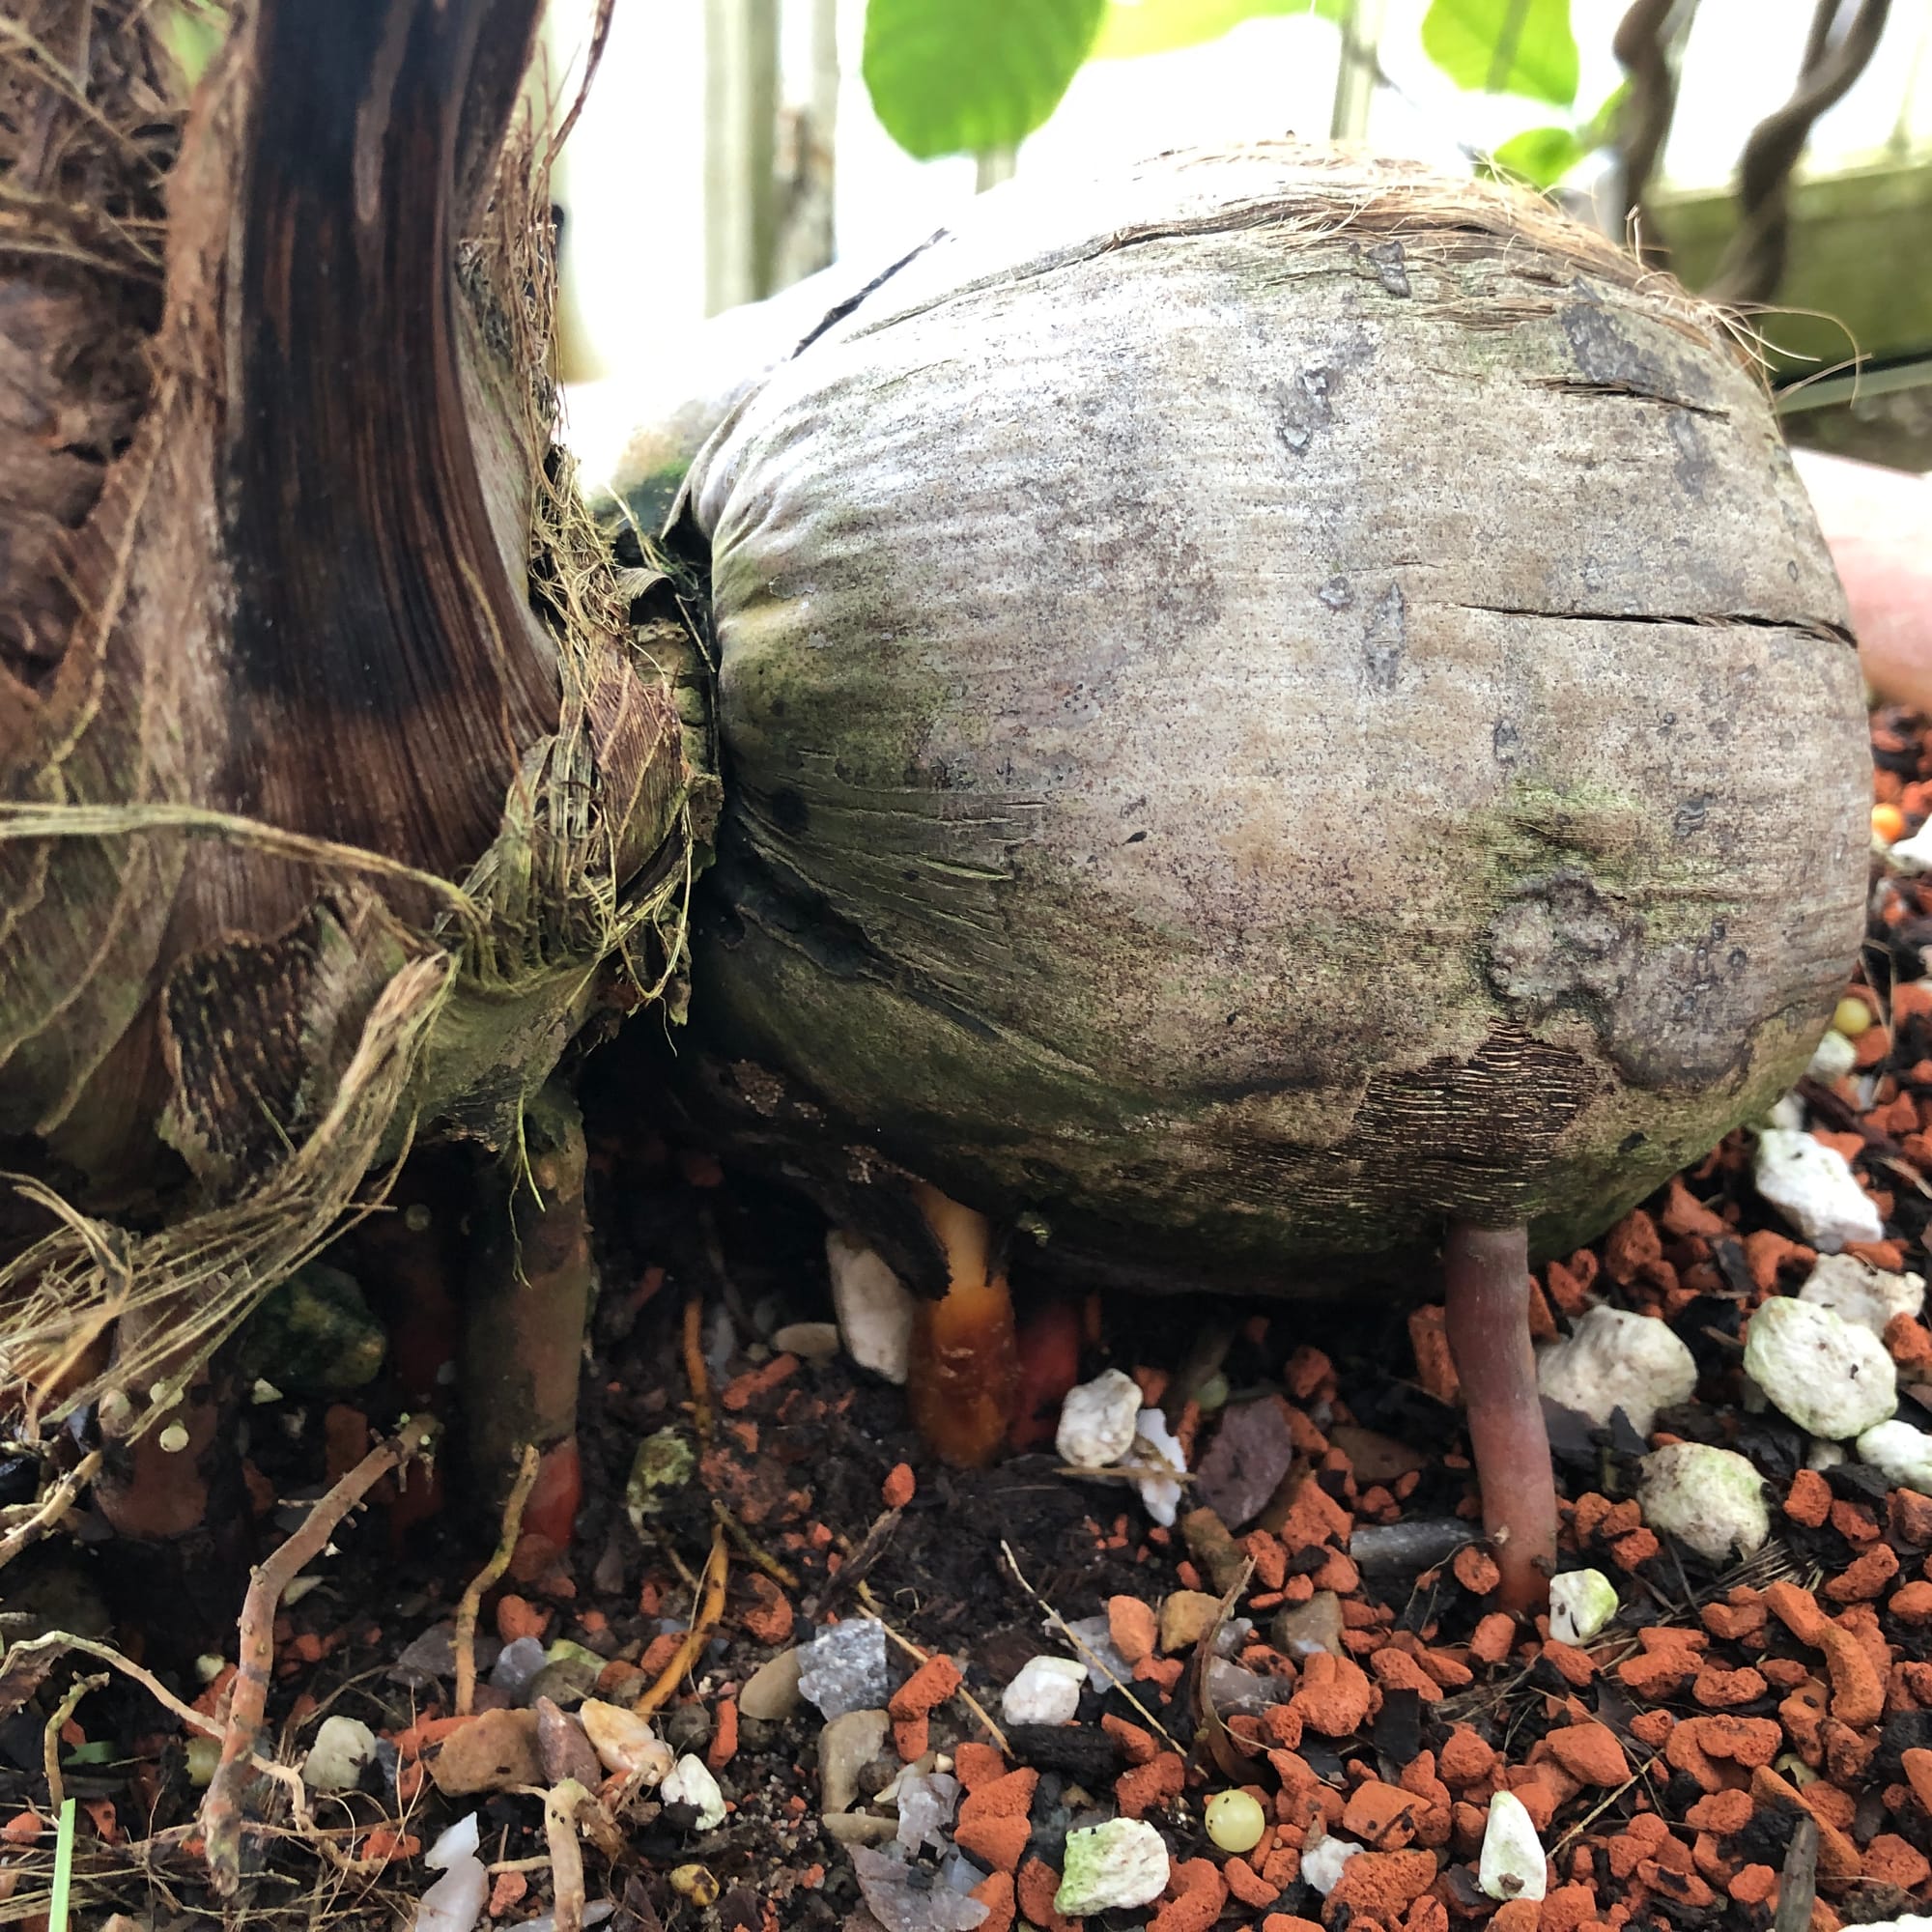 Remember not to submerge the coconut with soil when transplanting it into a bigger pot as it may cause it to decay or rot.
Pests & Diseases
Keep an eye out for mealybugs, spider mites, scale & thrips that'll locate themselves in the cubbyholes and undersides of the leaves. Common diseases associated with Coconut Palms are root rot, leaf-spot disease, botrytis, powdery mildew & southern blight - click here to learn more about these issues.
Toxicity
Not known to be poisonous by consumption of pets and humans. If high quantities are eaten, it may result in vomiting, nausea and a loss of appetite.
Retail Locations
Most reliably sold via online stores, but can sometimes become available at B&Q, Homebase, IKEA & Morrison's.
Book a 1-to-1 Call with THE HOUSEPLANT DOCTOR™
If you need further advice with your houseplants, book an advice call with ukhouseplants' friendly and expert writer today! This can be done via a video or audio call on most apps, including Facebook, FaceTime & Skype. A ten-minute call costs £5.99 (US$7), or £15.99 for thirty minutes. You can ask multiple questions, including queries on plants, pests, terrariums, repotting advice and anything in between. Please consider supporting this service to keep ukhouseplants thriving!
Comments