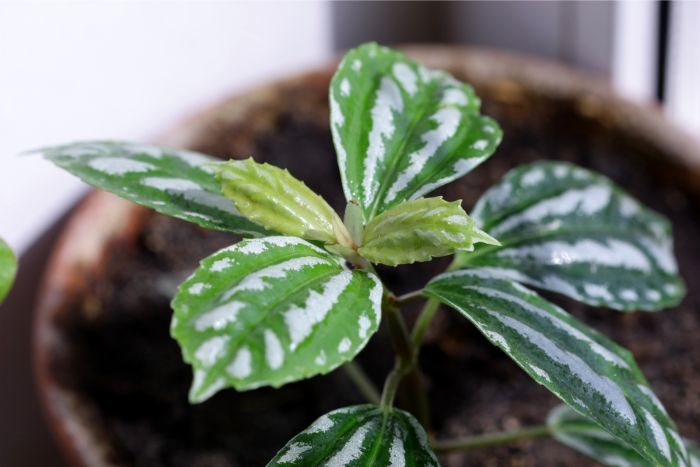
Pilea cadierei. Copyright: Smart Garden Guide.
Contents
- Top Tips
- Location, Water, Humidity & Fertilisation
- Common Issues
- Origins, Temperature, Propagation, Repotting & Toxicity.
Need the answer to a specific plant issue? Book a 1-to-1 video call with THE HOUSEPLANT DOCTOR™, the website's friendly author, to overcome and address your niggling problem! Available on iMessage, WhatsApp, Facebook Messenger & more.
Top Tips & Info
- Care Difficulty - Easy to Moderate
- Aluminum Plants will require a bright, indirect setting with the absence of direct sunlight. If you keep yours in a dark setting, be sure to avoid over-watering the soil too often, as soil mould is a common issue among gardeners.
- Water once the top third of the soil dries out, reducing this further in the autumn and winter. As they can be rather thirsty at times, introduce a pebble tray to slow the rates of drying soil and increase the local humidity levels.
- Fertilise using a 'Houseplant' labelled feed every four waters in the spring and summer, reducing this to every six in the colder months.
- Although pests are a rare occurrence with Aluminum Plants, you're most likely to see Mealybugs or Spider Mites that'll inhabit the leaves and cubbyholes.
- Repot every two years in spring using a houseplant-labelled potting mix - scroll down to 'Repotting' to learn more!
Location & Light - 🔸🔸
Aluminum Plants can withstand all ranges of indirect light, meaning that most locations in a home will be accepted. Avoid situating it in a spot that receives intense sunlight or heat (radiators, etc.) as it'll quickly lead to dehydration, sun-scorch and bleached leaves. We'd recommend locating yours within three metres of a window, or on a north-facing windowsill for the best results and healthy growth.
Water - 🔸🔸
Hydrate once the soil's top third dries out, reducing this slightly over the autumn and winter months. Due to their quick growth, which requires a lot of moisture and energy, you may get caught out with under-watering from time to time. Introduce a pebble tray to slow the rates of drying soil by placing a bed of stones on a plastic saucer, followed by a dash of water to increase the local humidity levels. Place the specimen's pot onto the bed of stones, making sure the water level doesn't reach the pot's base for rotting-related issues. Top up the saucer along with watering the specimen as normal. Under-watering symptoms include grey leaves or stunted growth; these issues are commonly down to much sunlight or heat, as well as forgetfulness. Over-watering, on the other hand, include rapidly yellowing leaves, stunted growth, wilting and root rot. These symptoms could be due to a location that is too dark, waterlogging, too little heat and an excess of moisture on the foliage. If you feel that root rot is to blame, click this link for more information.
Humidity - 🔸🔸🔸
Create a humidity tray to provide a moist and stable environment for your plant. If the surrounding saturation is too low or the heat too high, the new growth may start to brown over and curl, especially in direct sunlight. Gently hose the foliage down from time to time to hydrate the leaves and keep the dust levels down. This will also slow the rates of drying soil and dehydration.
Fertilisation - 🔸🔸
Feed every four waters during the growing period and every six in the autumn and winter, using a 'Houseplant' labelled fertiliser. Never apply a 'ready to use’ product into the soil without a pre-water first, as it may burn the roots and lead to yellowed leaves.
Common Issues with Aluminum Plants
Root rot is a common issue with specimens sat in too moist or waterlogged soil for long periods. Symptoms include rapidly yellowing leaves, stunted growth and a rotten brown base. Take the plant out of the pot and inspect health below the soil line. If the roots sport a yellow tinge, you're good to go, but if they're brown and mushy, action must be taken immediately. More information about addressing root rot can be found on this link.
Too low humidity can cause browning leaf tips with yellow halos. Although this won't kill your specimen, you may want to increase the local moisture to prevent the new growth from adopting these symptoms. Mist or rinse the foliage from time to time and create a humidity tray whilst the heaters are active to create a stable environment for your specimen.
When an Aluminum Plant is severely dehydrated, most of its leaves will crisp-up and fall off. Although it may spell the end of juvenile plantlets, there may still be light at the end of the tunnel for more established specimens. If its stem is still plump without any signs of retraction, prune-away the seriously affected areas and contain the plant (with its pot) in a transparent bag. Keep the soil continually moist, providing a good level of indirect light and temperatures above 15°C (59°F). Remove from the bag around two months after the plant starts to produce leaves again.
Origins
Pilea cadierei, or Aluminum Plant, is commonly found in the Yunnan and Guizhou regions of central-south China, not too far from the wider-known Pilea peperomioides. The species was first described by François Gagnepain & André Guillaumin in 1939, placing it in the genus of Pilea and using the specific epithet of 'cadierei' that honours 20th-century French botanist, Léopold Michel Cadière. The name, Pilea, derives from the Latin word pileus, meaning 'felt cap' due to the calyx covering the achene.
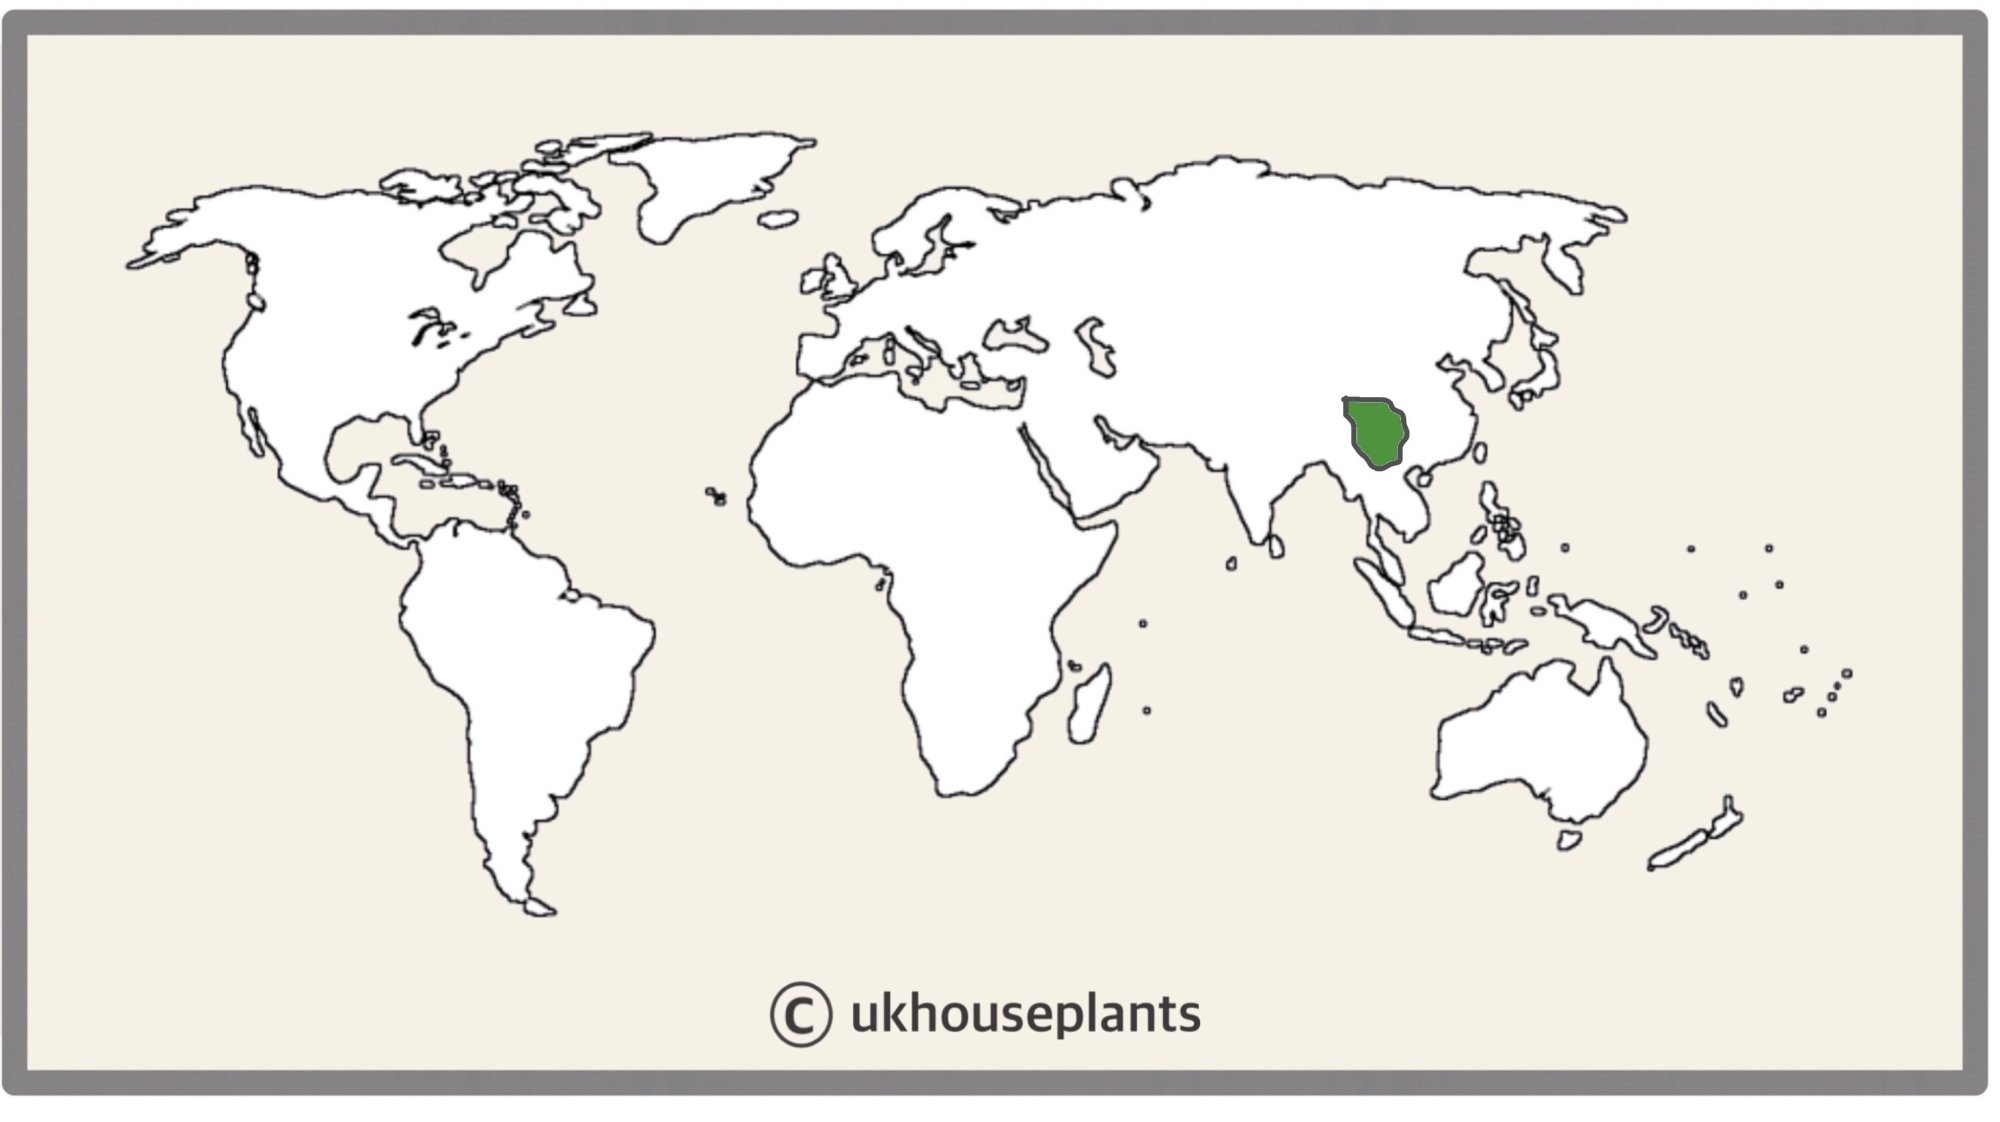 The Distribution of Pilea cadierei.
Temperature
12° - 24°C (54° - 75°F)
H1b (Hardiness Zone 12) - Can be grown outdoors during the summer in a sheltered location with temperatures above 12℃ (54℉), but is fine to remain indoors, too. If you decide to bring this plant outdoors, don't allow it to endure more than an hour of direct sunlight a day as it may result in sun-scorch. Regularly keep an eye out for pests, especially when re-introducing it back indoors.
Spread
Up to 0.3m (12 inches) in both height and 0.4m (14 inches) in width. The ultimate height will take between 3 - 5 years to achieve. Once it hits maturity of 30cm, prune the specimen back by a third to promote a bushier appearance. Scroll down to 'Propagation' to learn more about taking stem cuttings on the discarded growths!
Pruning & Maintenance
Remove yellow or dying leaves, and plant debris to encourage better-growing conditions. While pruning, always use clean scissors or shears to reduce the chance of bacterial and fungal diseases. Never cut through yellowed tissue as this may cause further damage in the likes of diseases or bacterial infections. Remember to make clean incisions as too-damaged wounds may shock the plant, causing weakened growth and a decline in health.
Propagation
Via Seed & Stem-Tip Cuttings.
Stem-Tip Cuttings (Moderate) can be taken at the start of spring when specimens surpass 8cm (3 inches) in height. Either pinch or prune the top 3cm (1.1 inches) of growth with at least to nodes (leaves) - one for foliar growth and the other for root development. Gently remove the lower leaves and set the bottom half of the stem into a moist potting mix. Although we’d recommend using a 'Houseplant'-labelled soil, a general-purpose compost with added perlite and sand will work wonders, too. As long as there is a splash of perlite introduced into the mix, oxygen will flow liberally around the cutting’s base to reduce the risk of basal rot. Wrap the plant (& its pot) in a transparent bag with small holes to maintain high humidity, as an absence of roots will result in moisture loss within the stem. Provide a bright, indirect location with continual soil moisture to quicken the rate of root development, along with better overall health. Remove the bag once the signs of new growth emerge, following the care advice provided above!
Flowers
Small clusters of white flowers will appear midway down the stem and can last up to several days. This process usually gets underway in late spring, but some specimens can flower before, or after this time bracket. It's somewhat a rarity for the species to bloom indoors though.
Repotting
Repot every three years in the spring using a 'Houseplant' labelled compost and the next sized pot with adequate drainage. Hydrate the plant 24hrs before tinkering with the roots to prevent the risk of transplant shock. For those that are situated in a darker location, add a thin layer of small grit in the pot's base to improve drainage and downplay over-watering. Click here for a detailed step-by-step guide on transplantation, or via this link to learn about repotting with root rot.
Pests & Diseases
Keep an eye out for aphids, mealybugs, spider mites & whitefly. Common diseases associated with Aluminum Plants are root rot, leaf-spot disease, powdery mildew and botrytis (grey mould) - click here for more information about how to identify and address these issues.
Toxicity
Not known to be poisonous when consumed by pets and humans. If large quantities are eaten, it may result in vomiting, nausea and a loss of appetite.
Retail Locations
Online Stores.
Book a 1-to-1 Call with THE HOUSEPLANT DOCTOR™
If you need further advice with your houseplants, book an advice call with ukhouseplants' friendly and expert writer today! This can be done via a video or audio call on most apps, including Facebook, FaceTime & Skype. A ten-minute call costs £5.99 (US$7), or £15.99 for thirty minutes. You can ask multiple questions, including queries on plants, pests, terrariums, repotting advice and anything in between. Please consider supporting this service to keep ukhouseplants thriving!
Comments