
Vanda tessellata 'Kanchana Deift Blue'
Contents
- Top Tips
- Light, Water, Humidity & Fertilisation
- Dormancy Care & Annual Flowers
- Common Issues
- Origins, Temperature, Propagation, Repotting & Toxicity.
Need the answer to a specific plant query? Book a 1-to-1 video call with THE HOUSEPLANT DOCTOR™, the website's friendly author, to overcome and address your niggling problem! Available on iMessage, WhatsApp, Facebook Messenger & more.
Top Tips & Info
- Care Difficulty - Easy to Moderate
- Vanda Orchids are best suited in a bright, indirect setting with minimal sunlight. Never place a specimen in excessive sun or within three metres of an operating heat source due to the heightened risk of dehydration and sun-scorch.
- Don't dunk your Vanda Orchid. Instead, mist the whole plant once its root system has turned silver. Whilst the roots are green, the plant is sufficiently hydrated. (Recommended frequency of misting/showering is three times a week).
- While using a mist spray bottle, feed your plant with an Orchid-labelled fertiliser every third mist or shower.
- Scroll down to 'Dormancy Period & Annual Flowers' for information about re-blooming Vanda Orchids between the autumn to early spring months.
- Repot every three years using an Orchid Bark & a slightly larger pot, during the spring. If yours is grown bare-rooted, prune the browned or yellowed roots using a clean pair of scissors to improve the overall appearance - you won't need to repot it into a potting mix as its plastic teak basket is enough.
- Keep an eye out for Mealybugs that'll locate themselves in the cubbyholes of the stems & foliage.
Location & Light - 🔸🔸🔸
Vanda Orchids do rather well in brightly-lit environments with a splash of morning sun. Although they can withstand short periods of direct sunlight, it's important to keep them sufficiently watered to downplay the risk of sun-scorch. The ideal setting would be within two metres of an east or west-facing window, or under an overhead window. Those situated in darker areas will be at risk of root rot, along with the minimal chance of another bloom.
N. B. - Never hang your specimen over a radiator (or within three metres, too), as this will lead to plant death from dry air and dehydration.
Water - 🔸🔸🔸
During the spring and summer months, be sure to hydrate the plant once its root system turns silver again (while they're green its sufficiently watered). The frequency of watering can depend on your room's light, humidity and temperature, so always keep an eye out for the coloured roots. We wouldn't recommend dunking your Vanda Orchid in a bucket due to the higher risk of root rot, so only mist the foliage or take it into the shower with you when the roots are silver. Under-watering symptoms include sudden flower loss, wilted or wrinkled leaves, deformed growth and a gradual decline in health. Never allow the intense sun or forgetfulness to take over, as both will result in a premature flower loss and a weakened specimen. Over-watering symptoms include lower yellowing of leaves, a rapidly declining stem, rotten root caps, and a wrinkled leaves. These issues are commonly down to either too frequent watering, too little light, or foliage that has allowed to remain wet for long periods.
Humidity - 🔸🔸🔸
Especially while the heaters are operating, you must keep the specimen in a humid location. Although the frequent waters will provide a splash of additional moisture, we'd recommend situating yours in a bathroom or laundry room with adequate light levels (as mentioned above).
Fertilisation - 🔸🔸
Vanda Orchids have open stomata, meaning that fertilisation can be achieved via 'Foliar Feeds'. With a mist bottle, mix the recommended amount of concentrated fertiliser into warm water and spray both the roots and foliage. Normal Orchid Fertiliser is perfectly fine to use as a foliar spray as long as you halve the recommended concentrate strength.
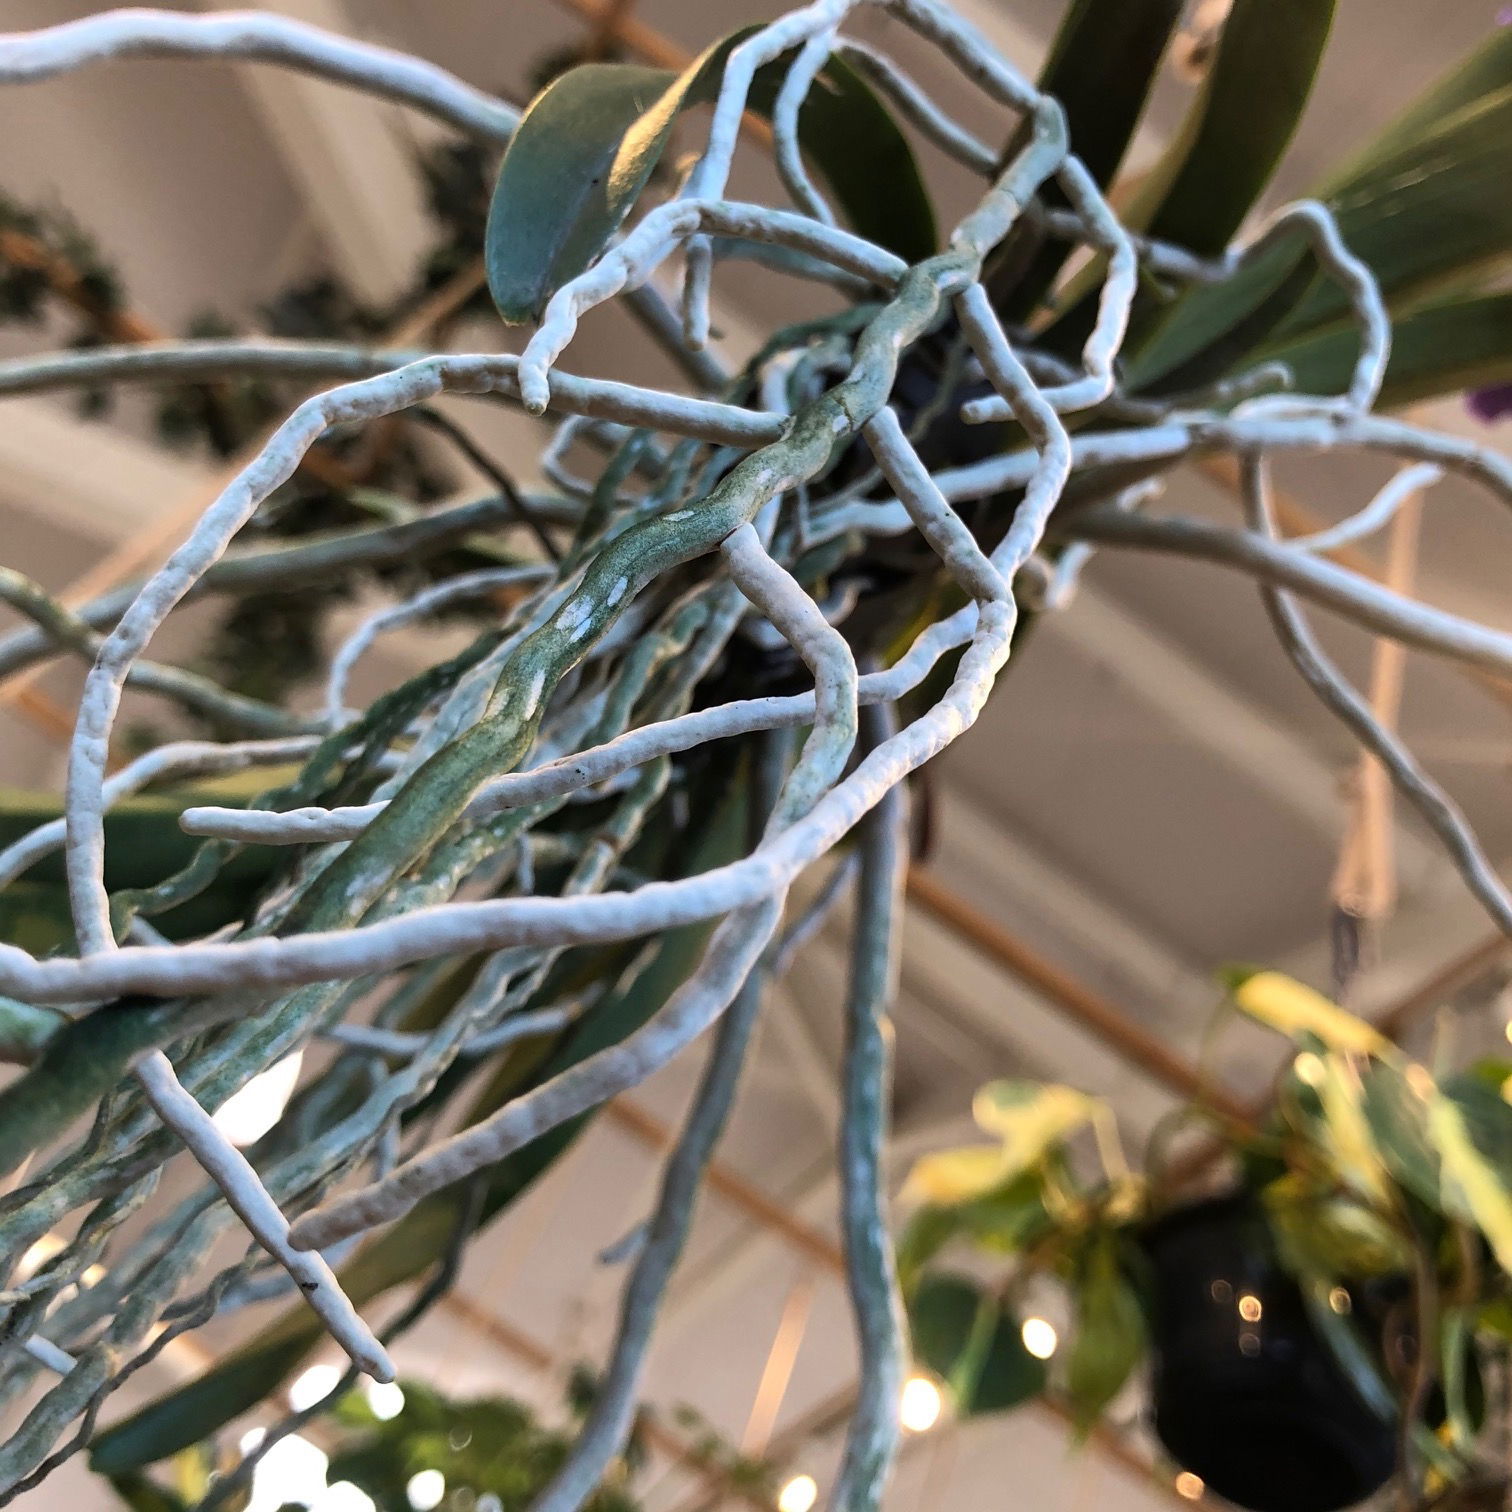 The silver/green tinge of the Orchid roots is called the 'Velamen'. This is a sponge-like epidermis tissue that can absorb and hold moisture for the root thread located in the centre. You should aim to mist the specimen (roots & foliage) in lukewarm water once the roots turn silver (pictured above); whilst they're green they are still sufficiently hydrated. Scroll down to 'Common Issues' for more information regarding brown or yellowed roots!
Dormancy Care & Annual Flowers
Vanda Orchids are easily manipulated to flower when its dormancy waters are reduced by half. Those who have a cooler room without artificial lighting at night are on the upper-hand, too. The following steps should be performed from then autumn through until early spring when they enter their dormancy. Blooms will generally appear from the late autumn, but may occur at any season, lasting several months.
Sunlight & Location
Be sure to provide a bright location with a splash of morning sunlight. Although the winter rays won't necessarily hurt the plant, be careful not to fall in the trap of sun-scorch and severe dehydration if over-exposed.
Avoid the use of artificial lighting at night or locations that boast temperatures higher than 18℃ (64℉), whereas in the summer it must be above 21℃ (70℉) throughout the daytime.
Hydration
Reduce waters to around two or three times a week at most. It's essential to keep them on the drier side to life, as they'll think that hard times are ahead and therefore will need to pass its genes on to the next generation. Shrivelled leaves or roots are a key indication that you're too harsh on the watering, though!
Occasional Feeds
Whilst in bloom, use an Orchid-labelled foliar feed to keep the specimen sufficiently supplemented at fortnightly intervals. During the non-flowering months, reduce the misting to once every three or four weeks.
Reduce Everything
This is to remind you that everything needs to be reduced - especially the temperature.
Temperature
This is the most significant step; reduce the temperature down by around 5℃ compared to the summertime or place in a room that's between 15 - 18℃ (59 - 64℉). The drop in temperature should ideally last until the inflorescence finishes blooming, although it can still be transferred into the main house as long as you provide a humid, bright area. You'll be at a significant disadvantage if the ambient temperature is kept constant throughout the year, as Vanda Orchids will only respond in locations that have yearly fluctuations of around 5℃. Never exceed the minimum temperature as it may lead to plant death or yellowed foliage at a bare minimum.
In some instances, the Orchid will flower several times a year, in any given season. It is also good to mention that they are partial to warmer summer months where the temperatures can reach around 25℃ (77℉). Locations that offer two or three hours of morning sunlight will naturally increase the ambient temperature around the Orchid, which should, in theory, stimulate a flower spike.
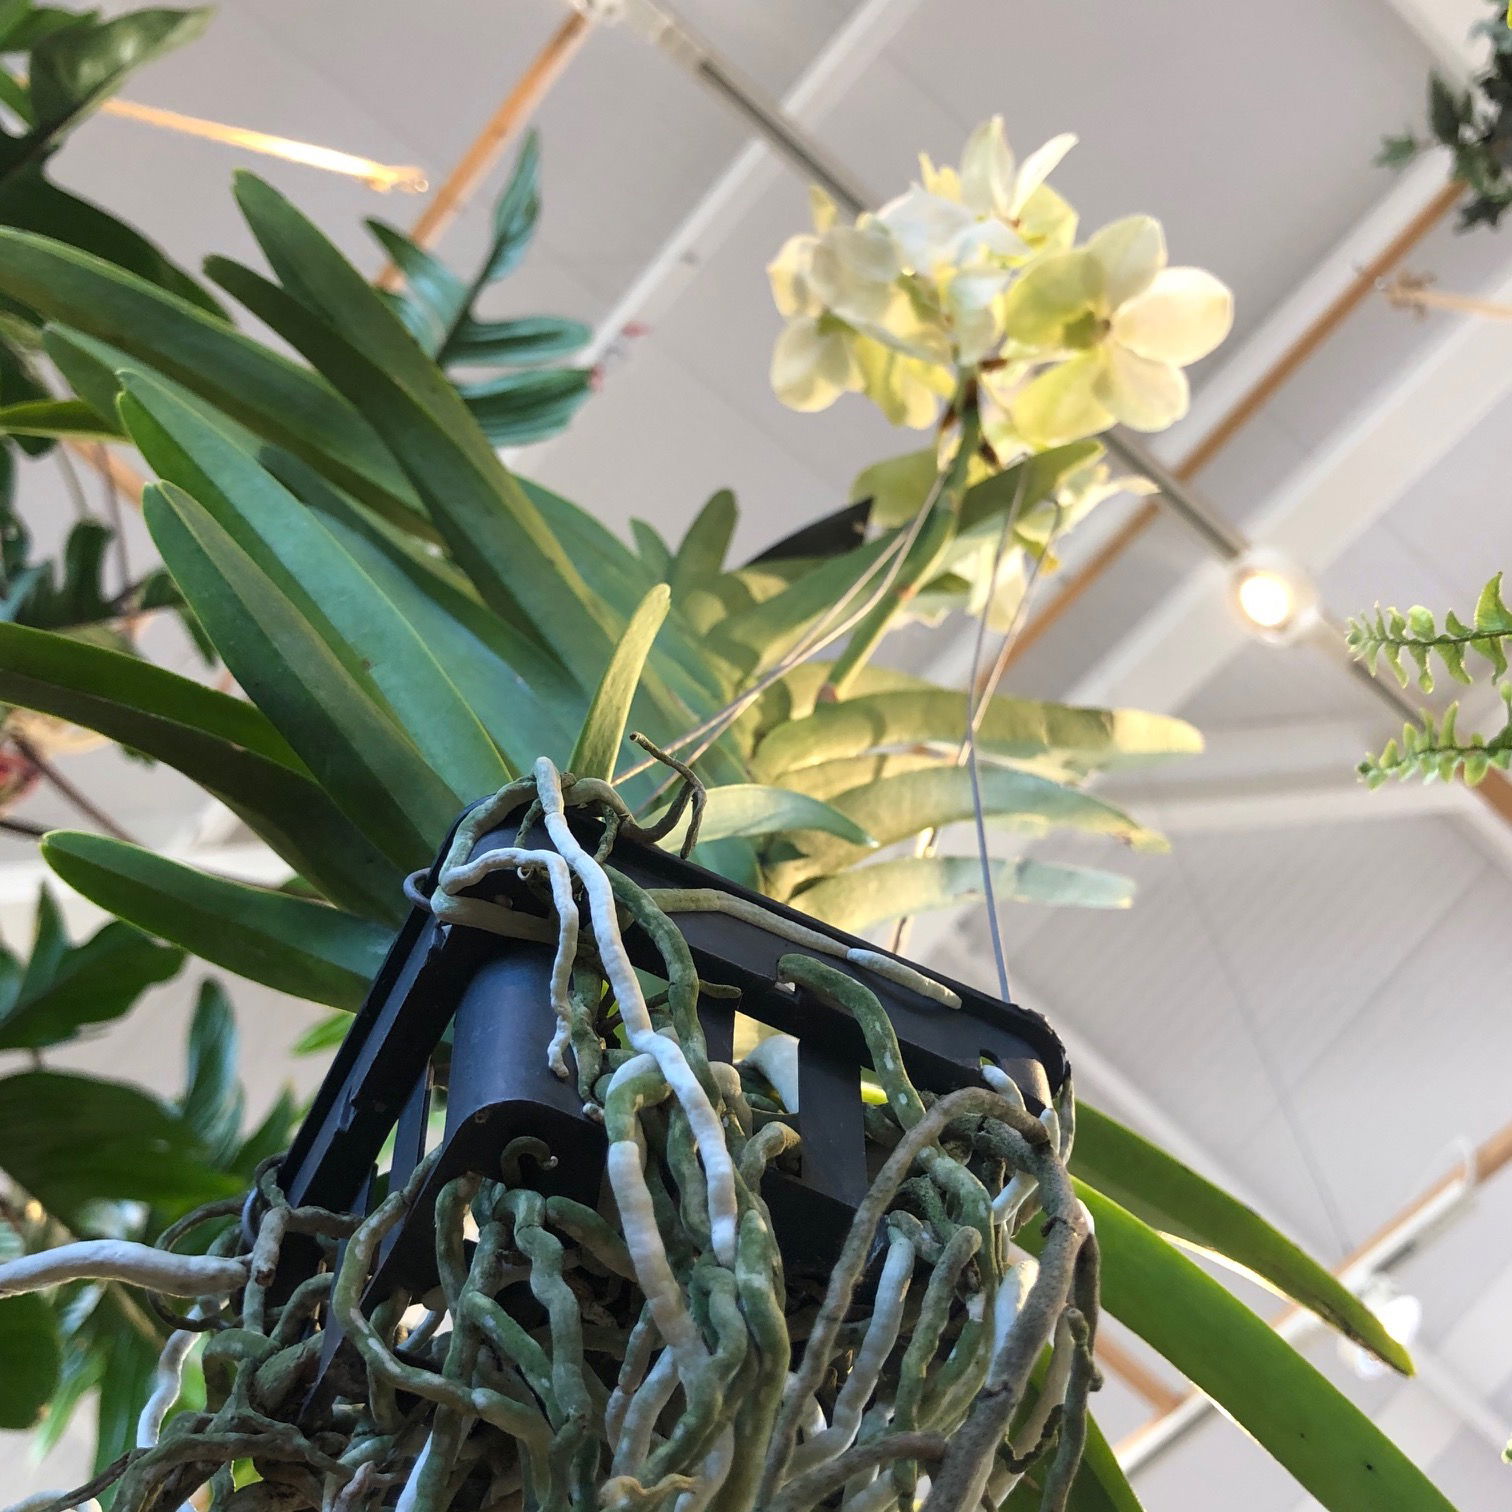 Vanda Orchids are almost always grown in these 'teak baskets' which will allow the roots to grip onto something while proving good drainage.
Common Issues with Vanda Orchids
Directly pinpointing yellow older leaves is quite hard due to the many different issues that could be at fault. Problems include watering-related abuse, too much or too little light, and fertilisation issues. If you'd like to speak to ukhouseplants in regards to this issue, be sure to book a 1-to-1 video call for more detailed advice.
Root rot is a common issue with specimens that are either over-watering or located in a too dark setting. Symptoms include yellowing older leaves, stunted growth and rotten brown roots. Inspect the health below the foliage line; if the roots sport a silver or green appearance, you're good to go, but if they're brown and mushy, action must be taken immediately. Prune away the affected roots with a clean pair of scissors. It's essential to reconsider your watering habits as this is a very problematic issue amount owners, which may easily re-arise over time. Finally, have a look at the current location of the Orchid, as those situated in darkened areas will require less moisture and may rot when over-watered.
Specimens that develop purple or reddened foliage are located in too intense sun. Although this isn't too much of a concern, we'd recommend reducing the amount of light slightly, so that the Orchid doesn't develop signs of sun-scorch.
A lack of flowers is caused by an insufficient dormancy period, where the temperatures are kept more or less the same over the year. Reduce the temperature by a couple of degrees over the autumn and winter months, along with fewer irrigations. Click on this link for more information on annualising blooms.
A sudden loss of older flowers with a yellowed stalk is a sign of prolonged droughts. Especially during the flowering process, near-continuous moist conditions are mandatory for extended blooms; allow the roots to turn a green-greyish colour in between irrigations. Fine misting of the roots will not be sufficient enough to keep the specimen hydrated, so mist the roots and foliage with lukewarm water every few days.
Short-lived flowers could be the product of low humidity. Place the Orchid on a humidity/pebble tray, keeping the reservoir topped up with water while the heaters are operating. Never mist the flowers due to the high risk of developing Botrytis.
Total flower loss can be caused by an array of different issues, including a change in location, too little hydration, too hot or cold temperatures or droughts and pests. While the plant is in bloom, keep the roots evenly moist to hydrate the thirsty work of producing flowers. Locations that are outside of the recommended temperature bracket (below), or have drastic fluctuations must also be kept off the cards. Alternatively, a setting that offers similar temperatures all year round can inhibit blooms. They'll respond very well if the autumn and winter months are a couple of degrees cooler than in summer. In essence, this will not only winterise the plant, but it'll also force it into a dormancy period which is a crucial ingredient for successful flowers. The final issue is pests. Although it's highly unlikely that an infestation will cause a sudden change in health, have a quick inspection for Mealybugs which are located within the cubbyholes of the stem.
Large quantities of aerial roots that cascade over the pot shouldn't cause concern. Once the flowers have fully elapsed, take the plant and remove any old or browned roots. Give the Orchid a good service, as a healthy specimen always starts with its roots. If they begin to split, it's the result of too little water or humidity or sun-scorch. Remove once they've fully yellowed over.
Botrytis Petal Blight is small spots or patches that'll develop on the flowers' bodies, usually caused by misting or an over-humid location with poor air circulation. Remove the infected flowers or the complete stalk with sterile utensils to put a stop the airborne disease. Improve the air circulation and move to a slightly brighter location with no direct sunlight. Be careful not to saturate the flowers from there on in, and regularly inspect to see if it has spread. Click here for more info - Common Orchid Diseases.
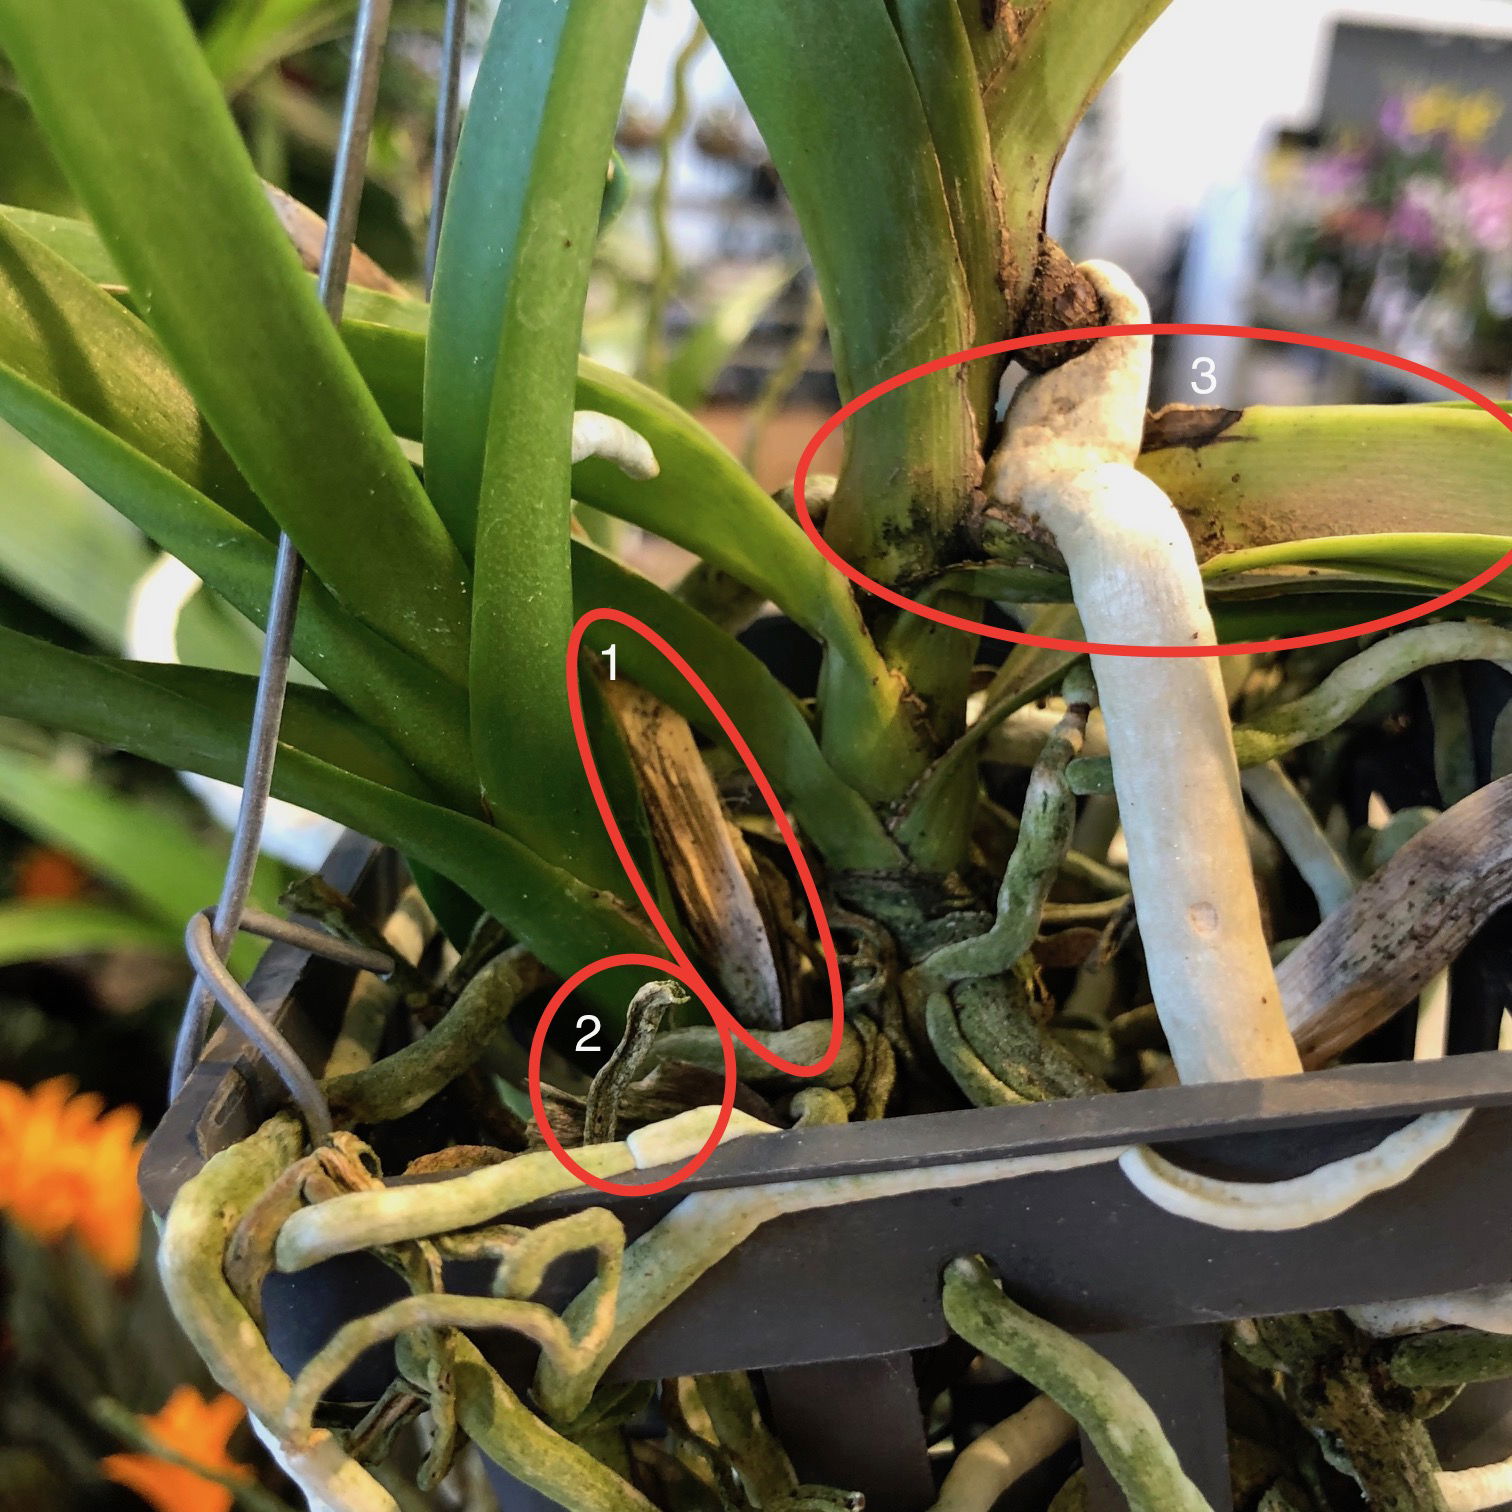 Regularly prune browned or deflated roots to improve the overall appearance of the Orchid (1 & 2), while cutting dying leaves off at the base to stimulate better foliar growth (3).
Origins
The genus, Vanda, was erected back in 1820 by Robert Brown, using the Sanskrit word for 'mistletoe' in reference to its epiphytic nature. There are around eighty species within this genus, all of which originate from south-east Asia or northern Australasia. The root of the type species, V. tassellata, has many traditional medicinal uses, including the treatment for hiccups, piles & even bronchitis!
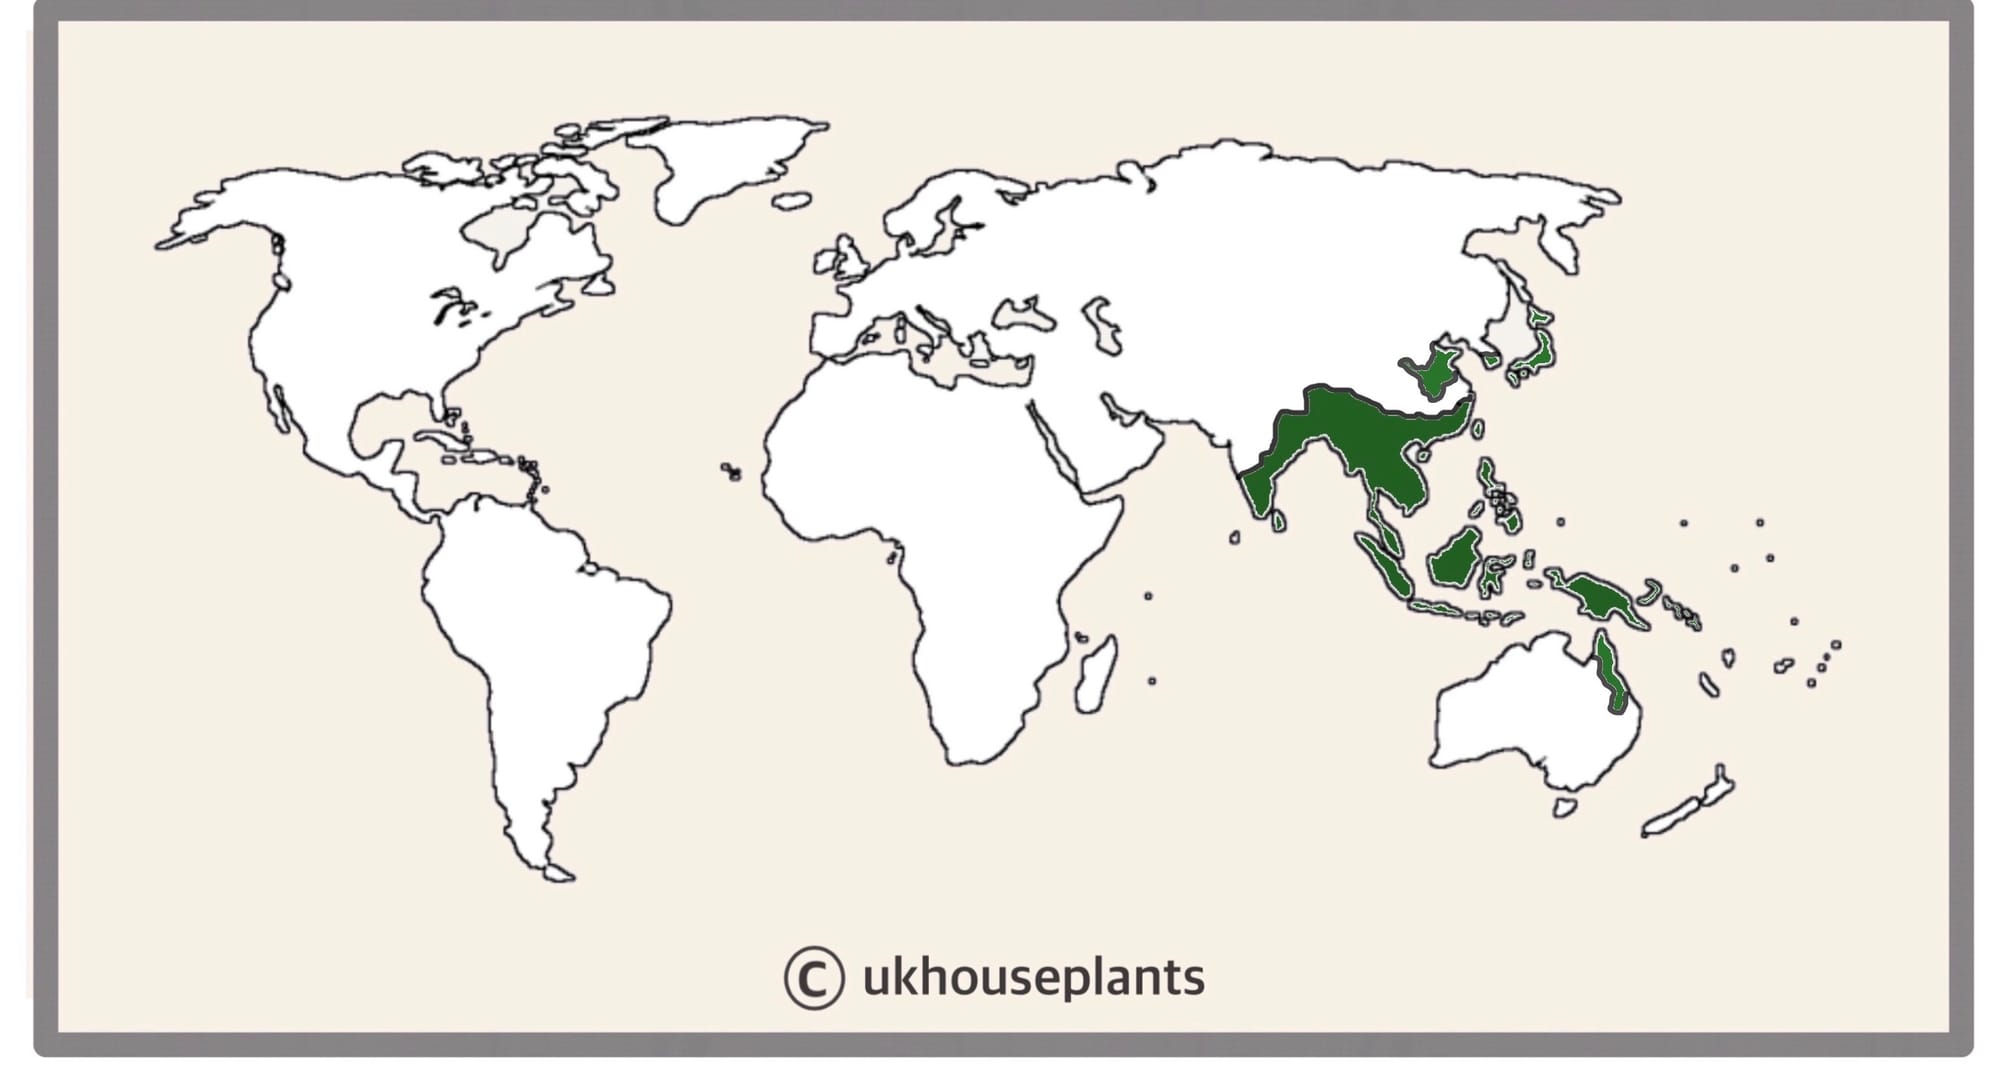
The Distribution of Vanda.
Temperature
14° - 30°C (57° - 86°F)
H1b (Hardiness Zone 12) - Can be grown outdoors during the summer in a sheltered location with temperatures above 15℃ (59℉), but is fine to remain indoors, too. If you decide to bring this plant outdoors, don't allow it to endure any direct sunlight as it may result in sun-scorch and dehydration. Regularly keep an eye out for pests, especially when re-introducing it back indoors.
Spread
Up to 0.7m in height & 0.5cm in width, with maturity being achieved in around 5 - 8 years.
Pruning & Maintenance
Remove yellow or dying leaves, and elapsed flowers to encourage better-growing conditions. While pruning, always use clean scissors or shears to reduce the chance of bacterial and fungal diseases. Remember to make clean incisions as too-damaged wounds may shock the plant, causing weakened growth and a decline in health. Cut and separate any rotten roots that are located at the base of the plant to improve the overall appearance; if there are excessive rotten roots, scroll up to 'Common Issues' for more information.
Propagation
Via Seed & Offset Cuttings.
Seed Propagation (Very Difficult) - Obtaining and sowing of seeds is both problematic and near-impossible without the correct equipment. Sow on a seaweed-based agar in an enclosed transparent tub on some bottom-heat (25℃, 77℉). Do not open the container until the seedlings are around two inches in height with adequate roots. Pour water into the agar to loosen it off the roots, and pot them up into 5cm (2 inches) pots with Orchid Bark. Maintain high humidity and bright indirect light to alleviate the severity of environmental shock, which can be achieved using a pebble tray. Follow the care requirements mentioned at the top.
Offset ('Pup') Cuttings (Moderate) - During springtime, choose stems that are around 12cm (5 inches) in length with multiple roots emerging between the roots. Wrap the cuttings tightly in moist sphagnum moss (found at most garden centres in the hanging basket department) for the first month of its life. Keep it away from direct sunlight or avoid water-logging during this period and remove from the moss once the roots are at least 10cm in length. Teak pots can be purchased online along with other Orchid accessories. Please note that this form of propagation should only be taken if there are new roots emerging within the leaves in the top two-thirds of the foliage. See image below.
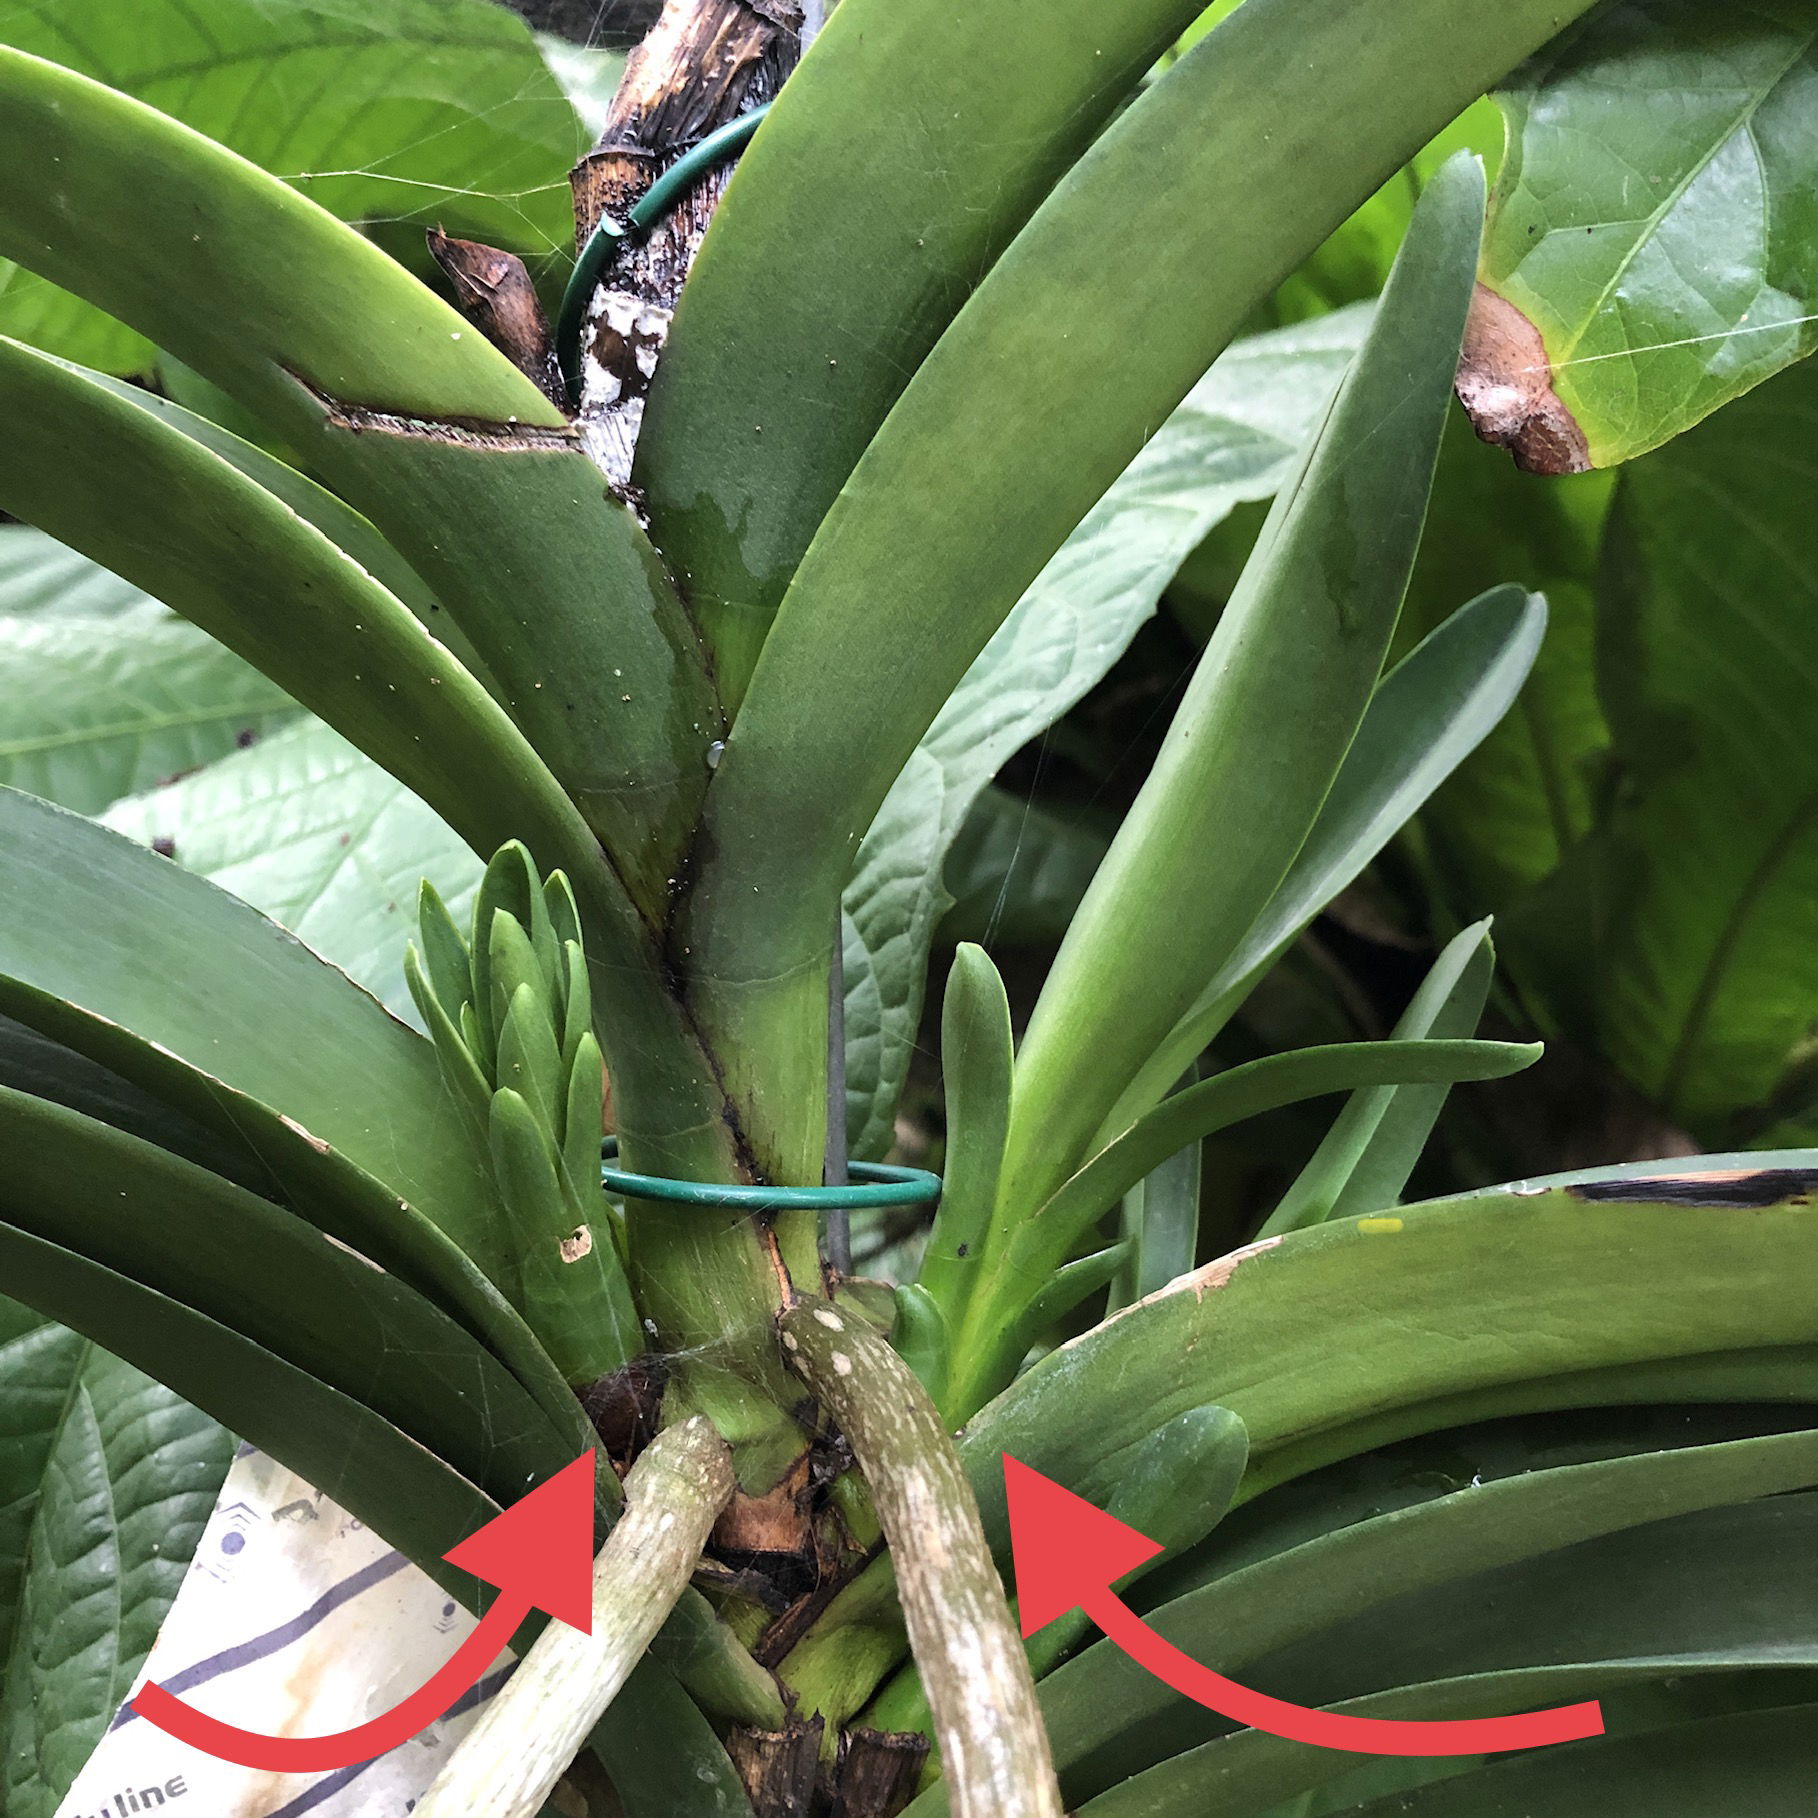
Here's two examples of an offset that can be propagated once the roots are around 5cm (2 inches) in length. The right-arrowed offset is still too small to be propagated though.
Flowers
Vanda Orchids can flower up to two or three times a year, with each show lasting several months. Usually, they'll naturally flower in the parameters of late autumn to early spring, with enhanced chances of a bloom originating from a cooled dormancy period in the winter.
Each spike will reach around 30cm in height and will only house up to ten flowers. The individual blooms can last up to four weeks, and its longevity will solely rely on your cultivation. They may sport lavender, white, yellow, pink, orange or even red appearances, with cinnamon or citrus scents bursting from each inflorescence.
Repotting
See 'Pruning & Maintenance' for more information on regulating the roots of a Vanda Orchid.
If you're still unsure of what to do, don't hesitate to book a 1-to-1 call with our friendly writer, Joe Bagley, to get his expert advice on Vanda Orchids.
Pests & Diseases
Keep an eye out for mealybugs, scale & thrips that'll locate themselves in the cubbyholes and undersides of the leaves. Common diseases are root rot, leaf-spot disease, rust, mosaic virus (brown or purple spots on the leaves), black rot, botrytis petal blight, powdery mildew & southern blight - click here to learn more about these issues.
Toxicity
Not known to be poisonous by consumption of pets and humans. If high quantities are eaten, it may result in vomiting, nausea and a loss of appetite.
Retail Locations
Very few garden centres will unreliably stock Vanda Orchids, so search online for a potential purchase. We'd recommend Cameleon for the best range and quality of Orchids!
Book a 1-to-1 Call with THE HOUSEPLANT DOCTOR™
If you need further advice with your houseplants, book an advice call with ukhouseplants' friendly and expert writer today! This can be done via a video or audio call on most apps, including Facebook, FaceTime & Skype. A ten-minute call costs £5.99 (US$7), or £15.99 for thirty minutes. You can ask multiple questions, including queries on plants, pests, terrariums, repotting advice and anything in between. Please consider supporting this service to keep ukhouseplants thriving!
Comments