Contents
- Top Tips
- Location, Water, Humidity & Fertilisation
- Common Issues
- Origins, Temperature, Propagation, Repotting & Toxicity.
Need the answer to a specific plant query? Book a 1-to-1 video call with THE HOUSEPLANT DOCTOR™, the website's friendly author, to overcome and address your niggling problem! Available on iMessage, WhatsApp, Facebook Messenger & more.
Top Tips & Info
- Care Difficulty - Easy
- Bright, indirect light is advised as excessive periods in the intense sun will quickly lead to sun-scorch and dehydration. Keep the specimen slightly under-watered with those situated in darker environments.
- Maintain a good level of soil moisture by allowing the top third to dry out in between waters.
- Fertilise using a 'Houseplant' labelled feed every four waters in the spring and summer, reducing this to every six in the colder months.
- Each individual plant will only flower once, so you'll have to wait until the 'pups' (basal offsets) reach maturity for another bloom. You can even separate the 'pups' in the spring once they surpass 5cm in length.
- Repot every three years using a 'Houseplant' potting mix; this is the perfect time for propagation and a quick check on the root/soil health.
- This group of Bromeliad is an excellent choice for terrariums due to its compact-nature and uncomplicated care requirements.
Location & Light - 🔸🔸
Bright, indirect light is best. Prolonged droughts or exposure to the sun will quickly result in pale foliage, stunted growth and crisping foliage - if it's too hot for a chocolate bar, it'll be too hot for the plant, too! Despite the stigma around ground-baring Tillandsia doing well in dark environments, you must reduce the amount of water somewhat to counteract the longer soil-drying times. If the central foliage begins to rot with mould on the soil, it could be a case of excess moisture settling on its leaves and over-watering.
Water - 🔸🔸
Allow the top third of the soil to dry out between waters, reducing this further in the autumn and winter. Under-watering symptoms include pale leaves, brown leaf patches, sunken foliage and crisping flowers; these issues are typically caused by intense sun or heat, being potbound, or pure forgetfulness. Over-watering symptoms include a rotten stem with yellowing leaves, flower collapse and 'pup' death. If this occurs AFTER the flowers have elapsed, this is a natural response after unsuccessful reproduction. For those that haven't bloomed, possible reasons for the decline are too little light or heat, excess moisture within its foliage and a lack of drainage.
Humidity - 🔸🔸🔸
Although Tillandsia will accept average room humidity, introduce a pebble tray to provide a moist and stable environment for your plant. If the surrounding saturation is too low or the heat too high, its leaf-tips may start to brown over and curl, especially in direct sunlight. Hose the foliage down from time to time to hydrate the leaves and keep the dust levels down. Those situated in a terrarium won't require misting or use of a pebble tray due to the proximity of other plants and higher levels of transpiration.
Fertilisation - 🔸
Fertilise every four waters during the growing period before reducing this to every six in the autumn & winter. Although an 'All-Purpose' fertiliser will still do the job, we'd recommend using either a 'Houseplant' or 'Bromeliad' labelled fertiliser as both will support the vital thirteen nutrients that this species will need to grow.
Common Issues with Tillandsia
Plant death shortly after the flowering process is a natural and prevalent issue among growers. If you're looking to preserve the specimen for several years after the blooming period, be sure to provide a bright location and keep it under-watered with no moisture accumulating in its central 'well'. As over-watering and shady spots are the usual killers with recently-flowered individuals, keeping the foliage and soil on the drier side will allow it to enter its dormancy before developing basal offsets between its lower leaves. You can either leave the plant as it is or separate the offsets (pups) to grow in their own pots. Scroll down to 'Propagation' for more avid regarding this matter.
Alternatively, a lack of blooms from a non-flowered specimen is caused by an insufficient dormancy period, where the temperatures are kept more or less the same over the year. Reduce the temperature by a couple of degrees over the autumn and winter months, along with fewer irrigations to ensure a well-spent dormancy.
A wobbly/lopsided plant with yellowing older leaves (closest to soil) are a clear sign of over-watering, usually caused by too little light. Although Tillandsia can do well in darker locations, the frequency of irrigations must be reduced to counteract the chance of root rot. People don't realise that a plant's root system needs access to oxygen too; when soil is watered, the air will travel upwards and out of the potting mix. A lack of accessible oxygen for the roots will cause them to subsequently breakdown over the oncoming days. Click on this link to learn more about root rot and how to address it.
Curled leaves and brown leaf-edges are the result of too little water and over-exposure to the sun. Tillandsia are best located in bright, indirect settings, and those that haven't acclimatised to the harsh rays will show signs of sun-scorch and environmental shock. A splash of winter sunlight is acceptable as long as the soil moisture is regularly observed, with complete avoidance once summer comes along.
Too low humidity can cause browning tips with yellow halos on juvenile leaves. Although this won't kill your specimen, you may want to increase the local moisture to prevent the new growth from adopting these symptoms. Mist or rinse the foliage from time to time and create a humidity tray while the heaters are active to create a stable environment. The browning of leaf-tips on older leaves is wholly natural and is the product of extensive photosynthesis during its life.
Origins
Although Tillandsia is mostly epiphytic, there are fifteen species that grow terrestrially and therefore require different care compared to their airborne counterparts. The genus was first penned in 1753 by Carl Linnaeus, honouring Dr E. Tillandz, a Swedish botanist and physician during mid-17th-century. Out of the 650 species of Tillandsia, around 630 are classified as epiphytic and are divided into seven subgenera - Allardtia, Anoplophytum, Diaphoranthema, Phytarrhiza, Pseudalcantarea, Pseudo-Catopsis & Tillandsia.
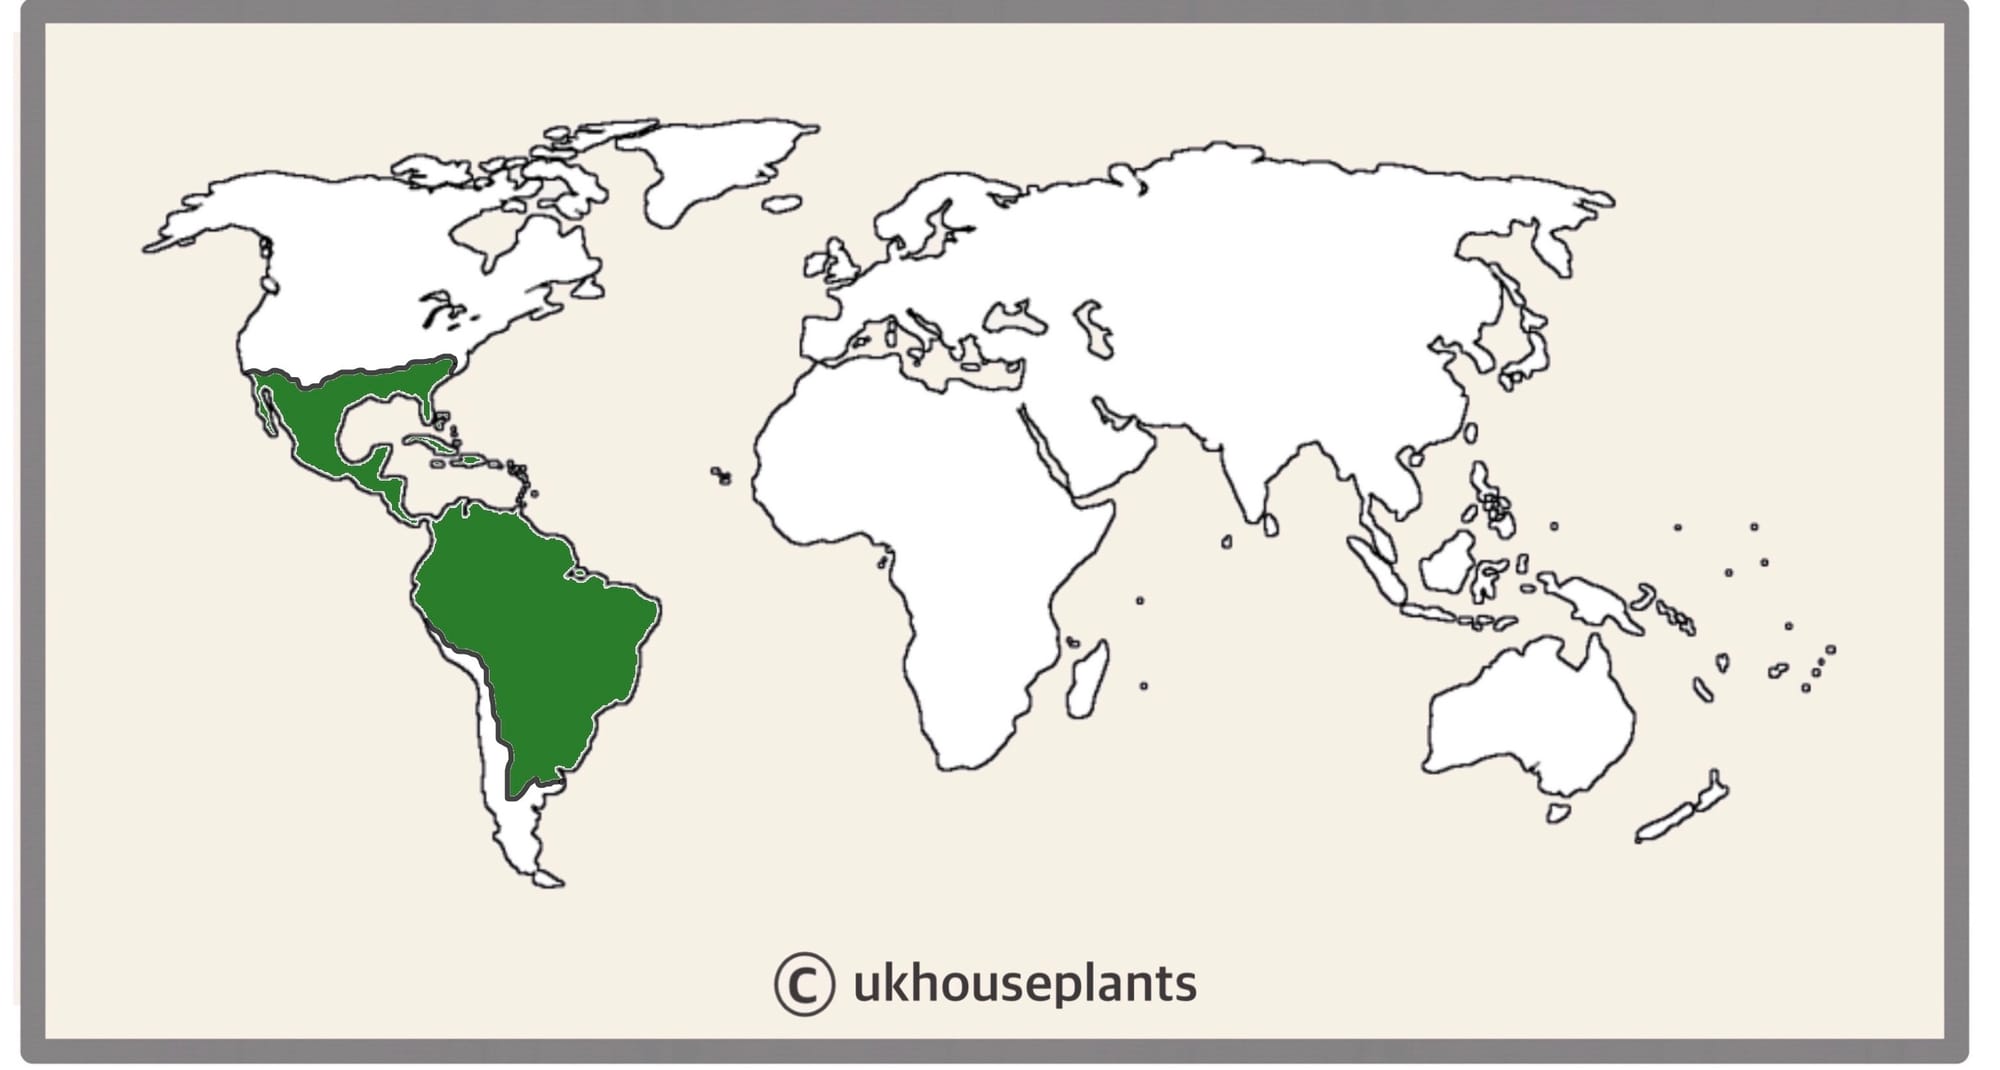 The Distribution of Tillandsia
Temperature
12° - 30°C (54 - 86°F)
H1a (Hardiness Zone 13) - This plant should ideally be grown indoors or under glass all year round. Never allow temperatures to dip below 12℃ or permanent damage may occur in the likes of flower loss, stunted growth and yellowed leaves.
Spread
Most species will only reach up to 15cm in height and width. Maturity can take around four years to achieve, with 'pups' achieving this stage in around 6 years.
Pruning & Maintenance
Remove yellow or dying leaves, and plant debris to encourage better-growing conditions. While pruning, always use clean utensils or shears to reduce the chance of bacterial and fungal diseases. Never cut through yellowed tissue as this may cause further damage in the likes of diseases or bacterial infections. Remember to make clean incisions as too-damaged wounds may shock the plant, causing weakened growth and a decline in health.
Remove the flower stalk close to the plant's well once it begins to wilt, keeping the well dry from there on in. If the open tissue from the stalk's base remains submerged in water, it could result in rot that may spread to the rest of the plant if untreated.
Propagation
Via Seed or 'Pup' Propagation.
Basal Offset Division (Easy) - Your plant will produce several basal offsets that can be separated once they have a sufficient root system and surpass the mother plant's height by half. If possible, water the soil 24hrs before the main event to reduce the risk of transplant shock, when its dry root systems are over-touched. Take the plant out of its pot and place your fingers close to the nodal junction - compost may have to be removed for better access. Push the chosen offset downwards until you hear a snap. Separate the foliage and its root system away from the mother plant, mentally noting the high risk of damage. Transplant in the appropriate sized pot with a fresh batch of 'Houseplant' labelled compost. Maintain evenly moist soil and situate it in a bright, indirect location away from any direct sunlight. After four weeks, treat it like a healthy specimen, following the care tips above!
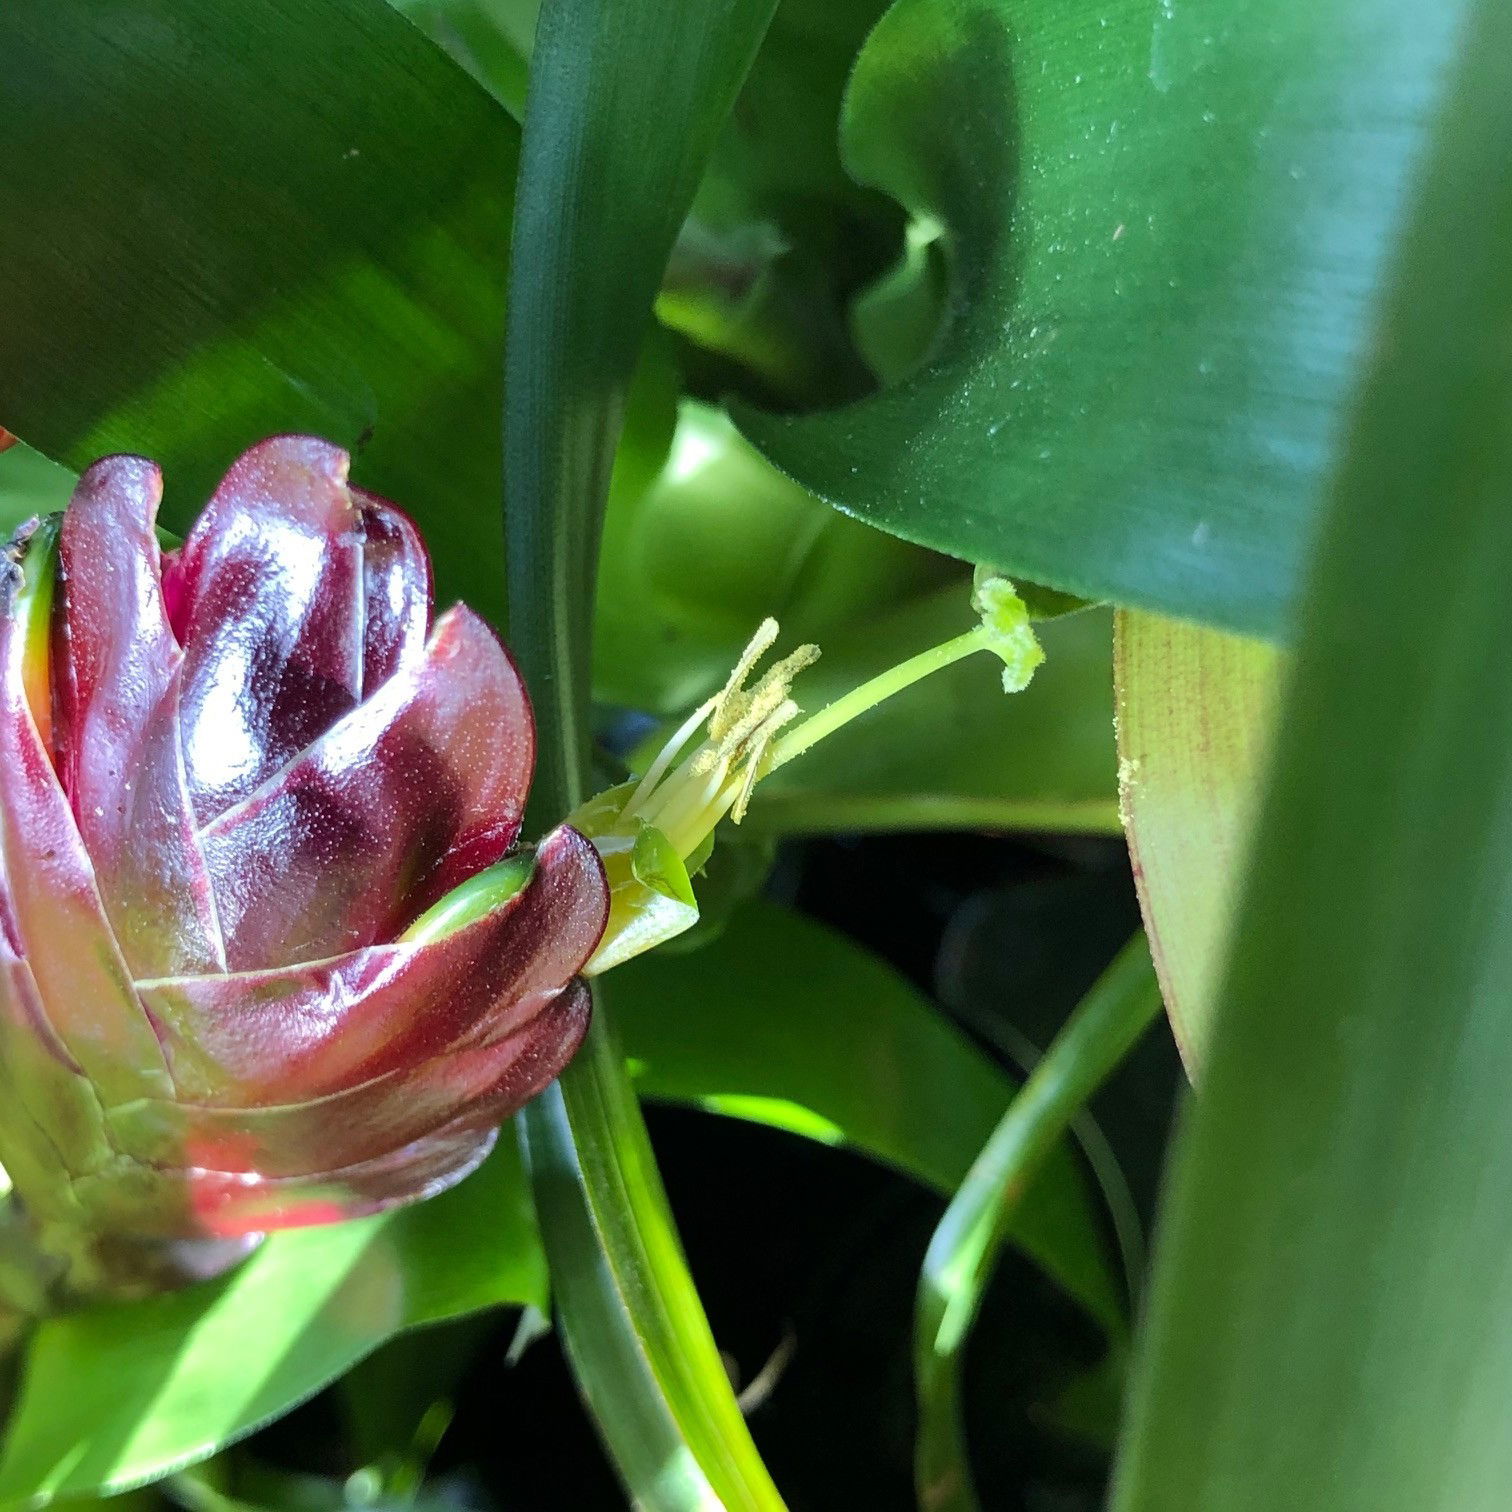
Flowers
The individual specimen will only flower once, but as mentioned above, pups will form at the base of the plant that'll eventually flower. The bloom can be up to 20cm in length and can last up to three months in the spring or summer. The bract's colours include red, yellow, green, brown, purple or pink that are arranged in either a zigzag, spade or pole-shaped inflorescence.
Are you interested in stimulating a show of blooms in the summer months? Reduce the ambient temperature throughout the autumn and winter, along with a reduction of watering to encourage a dormancy period. As the natural temperatures and daylight hours begin to increase in the spring, your specimen will slowly exit the resting period, potentially producing a bloom by mid-summer!
Repotting
Although it isn't entirely necessary, you can transplant it every few years in the spring using a 'Houseplant' labelled compost with the next sized pot. Hydrate the plant 24hrs before tinkering with the roots to prevent the risk of transplant shock. For those that are situated in a darker location, add an extra splash of perlite in the pot's base to improve drainage and downplay over-watering. Click here for a detailed step-by-step guide on transplantation, or via this link to learn about repotting with root rot.
Book a 1-to-1 video call with THE HOUSEPLANT DOCTOR™ if you'd like a personal guide to repotting your houseplant. This will include recommending the right branded-compost and pot size, followed by a live video call whilst you transplant the specimen for step-by-step guidance and answer any further questions!
Pests & Diseases
Keep an eye out for mealybugs, spider mites, scale, thrips & root mealybugs that'll locate themselves in the cubbyholes and undersides of the leaves, with the exception of the latter in soil. Common diseases associated with Tillandsia are root rot, leaf-spot disease, botrytis, rust, powdery mildew & southern blight - click here to learn more about these issues.
Toxicity
Not known to be poisonous when consumed by pets and humans. If large quantities are eaten, it may result in vomiting, nausea and a loss of appetite. Although the leaves may look delicate from online pictures, its foliage and flowers can be very sharp, acting like small Swiss-army knives.
Retail Locations
Online Stores.
Book a 1-to-1 Call with THE HOUSEPLANT DOCTOR™
If you need further advice with your houseplants, book an advice call with ukhouseplants' friendly and expert writer today! This can be done via a video or audio call on most apps, including Facebook, FaceTime & Skype. A ten-minute call costs £5.99 (US$7), or £15.99 for thirty minutes. You can ask multiple questions, including queries on plants, pests, terrariums, repotting advice and anything in between. Please consider supporting this service to keep ukhouseplants thriving!
Comments