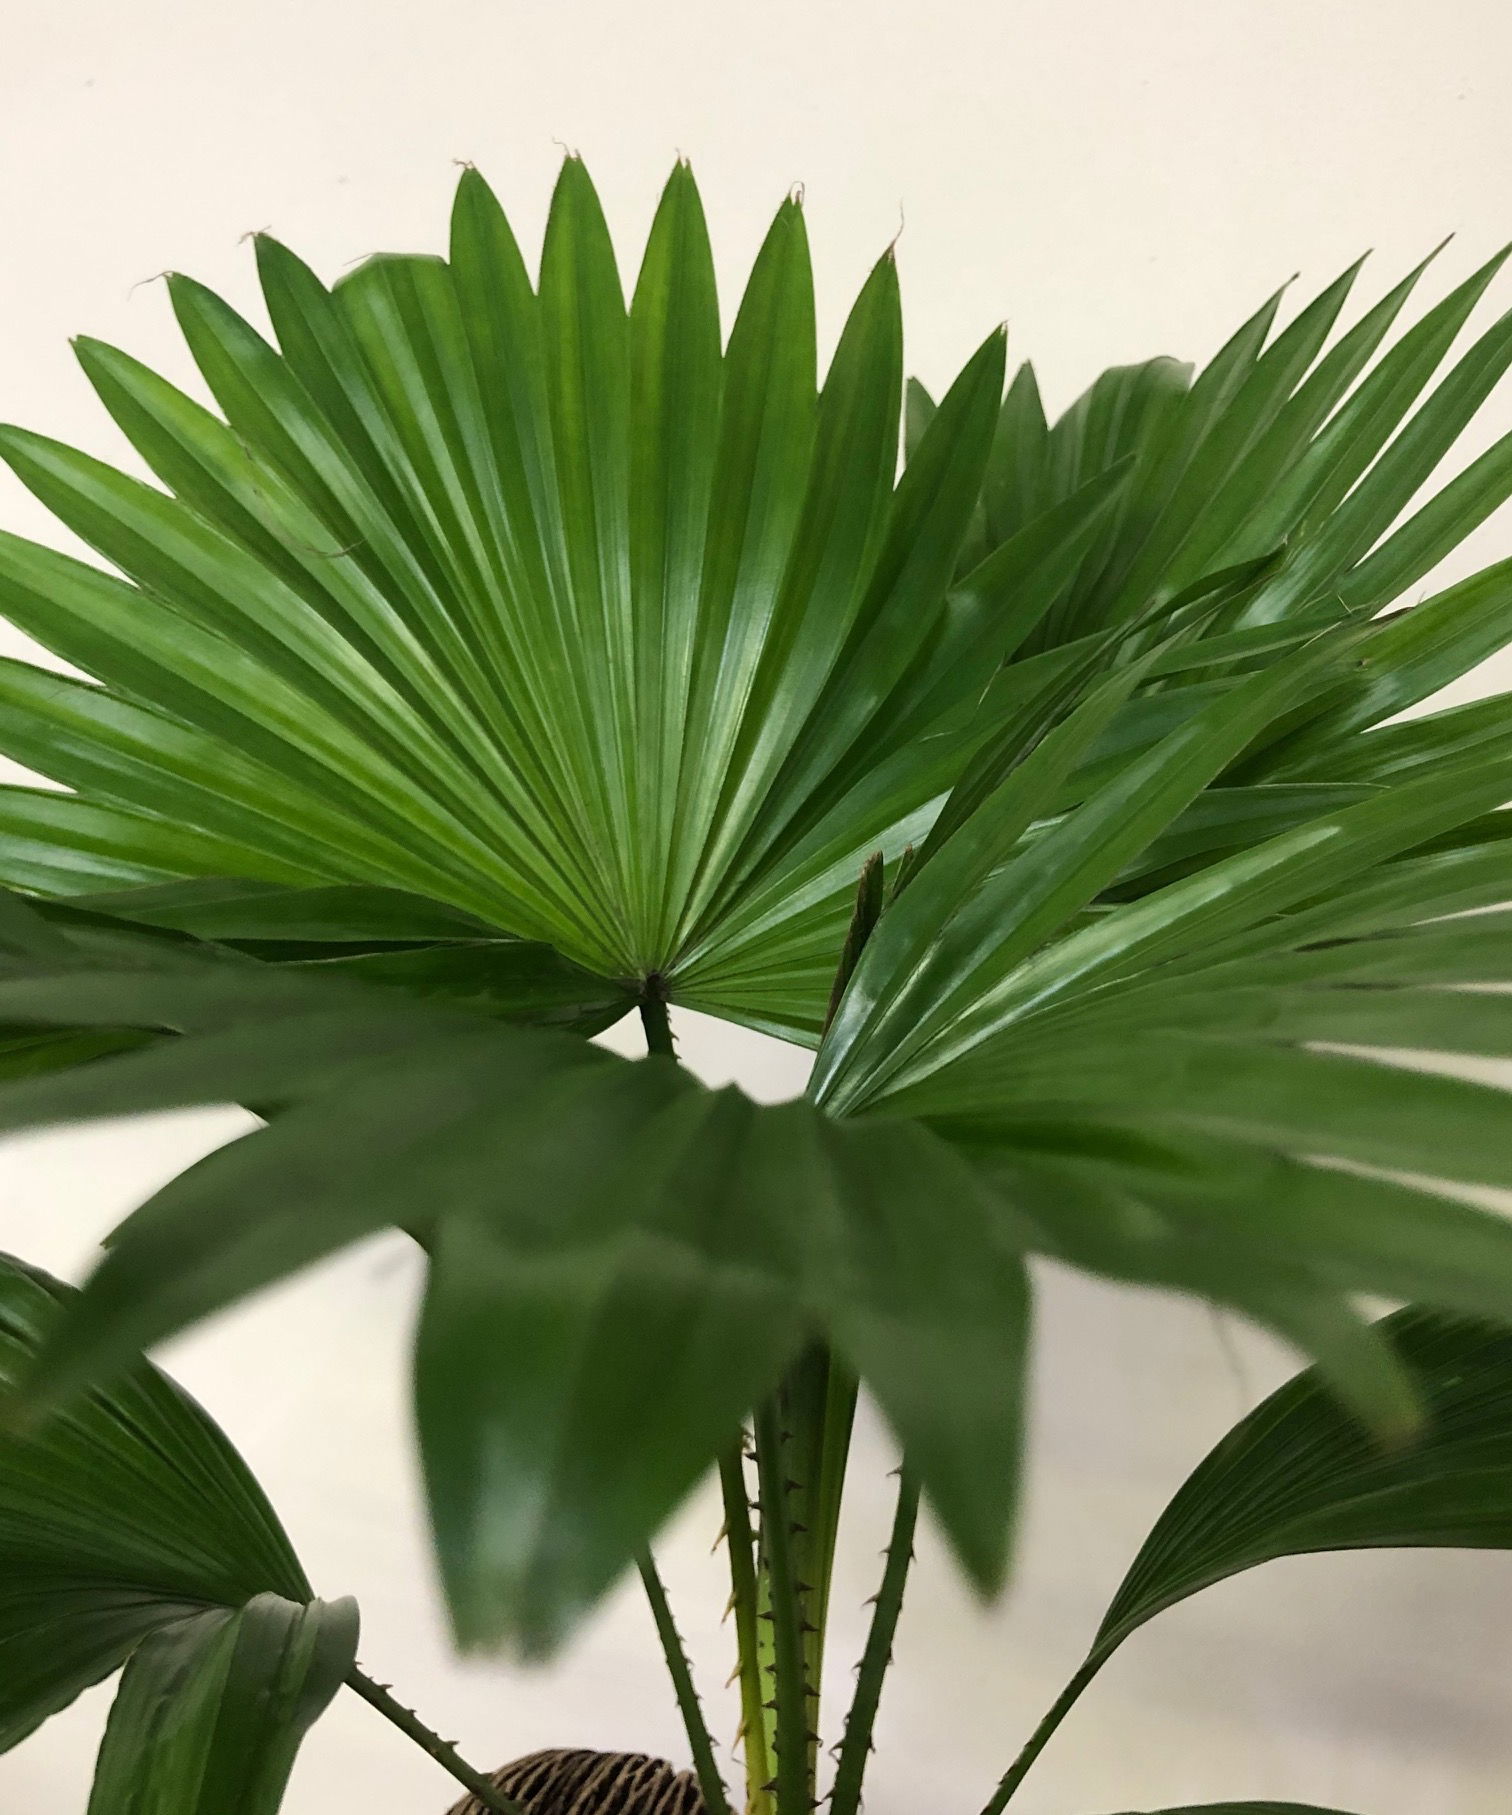
Saribus rotundifolium. (Formally known as Livistona rotundifolia).
Contents
- Top Tips
- Location, Water, Humidity & Fertilisation
- Common Issues
- Origins, Temperature, Propagation, Repotting & Toxicity.
Need the answer to a specific plant query? Book a 1-to-1 video call with THE HOUSEPLANT DOCTOR™, the website's friendly author, to overcome and address your niggling problem! Available on iMessage, WhatsApp, Facebook Messenger & more.
Top Tips & Info
- Care Difficulty - Moderate
- This species will prefer to be situated in a bright area with little to no direct sunlight. We recommend that you don't situate your specimen in a shaded area with minimal natural lighting, as it may result in weakened growth and gradual death.
- Allow the top third of the soil to dry out in between waters, reducing this slightly further during the autumn and winter months. If there's mould developing on the soil's surface, it may denote over-watering and a too dark location.
- For the prevention of browning leaf-tips, be sure to create a pebble tray to increase the local humidity levels.
- Fertilise using a 'Houseplant' or 'Palm' labelled feed every four waters in the spring and summer, reducing this to every six in the colder months.
- Repot every two years using a 'Houseplant' labelled potting mix and always respect the roots as transplant shock is a big issue that can lead to death in some cases.
- Keep an eye out for Spider Mites that'll locate themselves in small webs on the leaves' undersides. Click on the link to learn more about eradicating this issue.
- Although the correct botanical name of the species is Saribus rotundifolium, this article will refer it to the more common and commercial name of Livistona.
Location & Light - 🔸🔸
Despite the general idea that this species can tolerate dark locations, we'd recommend situating yours on a north, north-east or north-west facing windowsill, or within two metres of a south-facing one. Once the autumn kicks in, be sure to include an hour or two of direct light per day to get it through the dormancy period, lasting until the following spring.
If you're worried about its location being too dark, when a newspaper can be read while having your back towards the window, you're good to go.
Water - 🔸🔸
Like all Palms, the amount and frequency of irrigations dramatically depend on the location. For those that are situated in brightly lit rooms, be sure to let around a third of the soil dry out in between waterings to avoid thorough dehydration. For those in a darker location, be sure to allow almost half the soil dry out for the prevention of over-watering and root rot. Under-watering symptoms include yellow or pale fronds, little to no growth, brown crispy new growth and gradual decline. If your Palm is situated in a sunny position, only permit around a third of the soil dry out in between waterings. Over-watering symptoms include rotting stems, zero growth and plant death. These issues are usually due to a lack of heat or sunlight, being over-potted, an incorrect soil type or water-logging. Root rot is a prominent issue among houseplants, and Livistona Palms are no exception. If you feel that your specimen has been sat in too moist soil for a long period of time, have a read on our article about root rot for further advice and information.
Humidity - 🔸🔸🔸
Livistona Palms will thrive in a humid spot, so introducing a pebble tray whilst the heaters are operating will ensure adequate moisture around its foliage. You can even mist the foliage once a month to hydrate and wash away excess dust from its leaves. An under-humid location will cause the leaf-tips to dry and brown over which is typically more common in the height of winter.
Always keep the Palm at least four metres from an operating heat source due to the negative effects it has on transpiration and therefore leaf hydration.
Fertilisation - 🔸🔸
Feed every four waters during the growing period and every six in the autumn and winter, using a 'Houseplant' or 'Palm' labelled fertiliser. Never apply a 'ready to use’ product into the soil without a pre-water first, as it may burn the roots and lead to yellowed leaves.
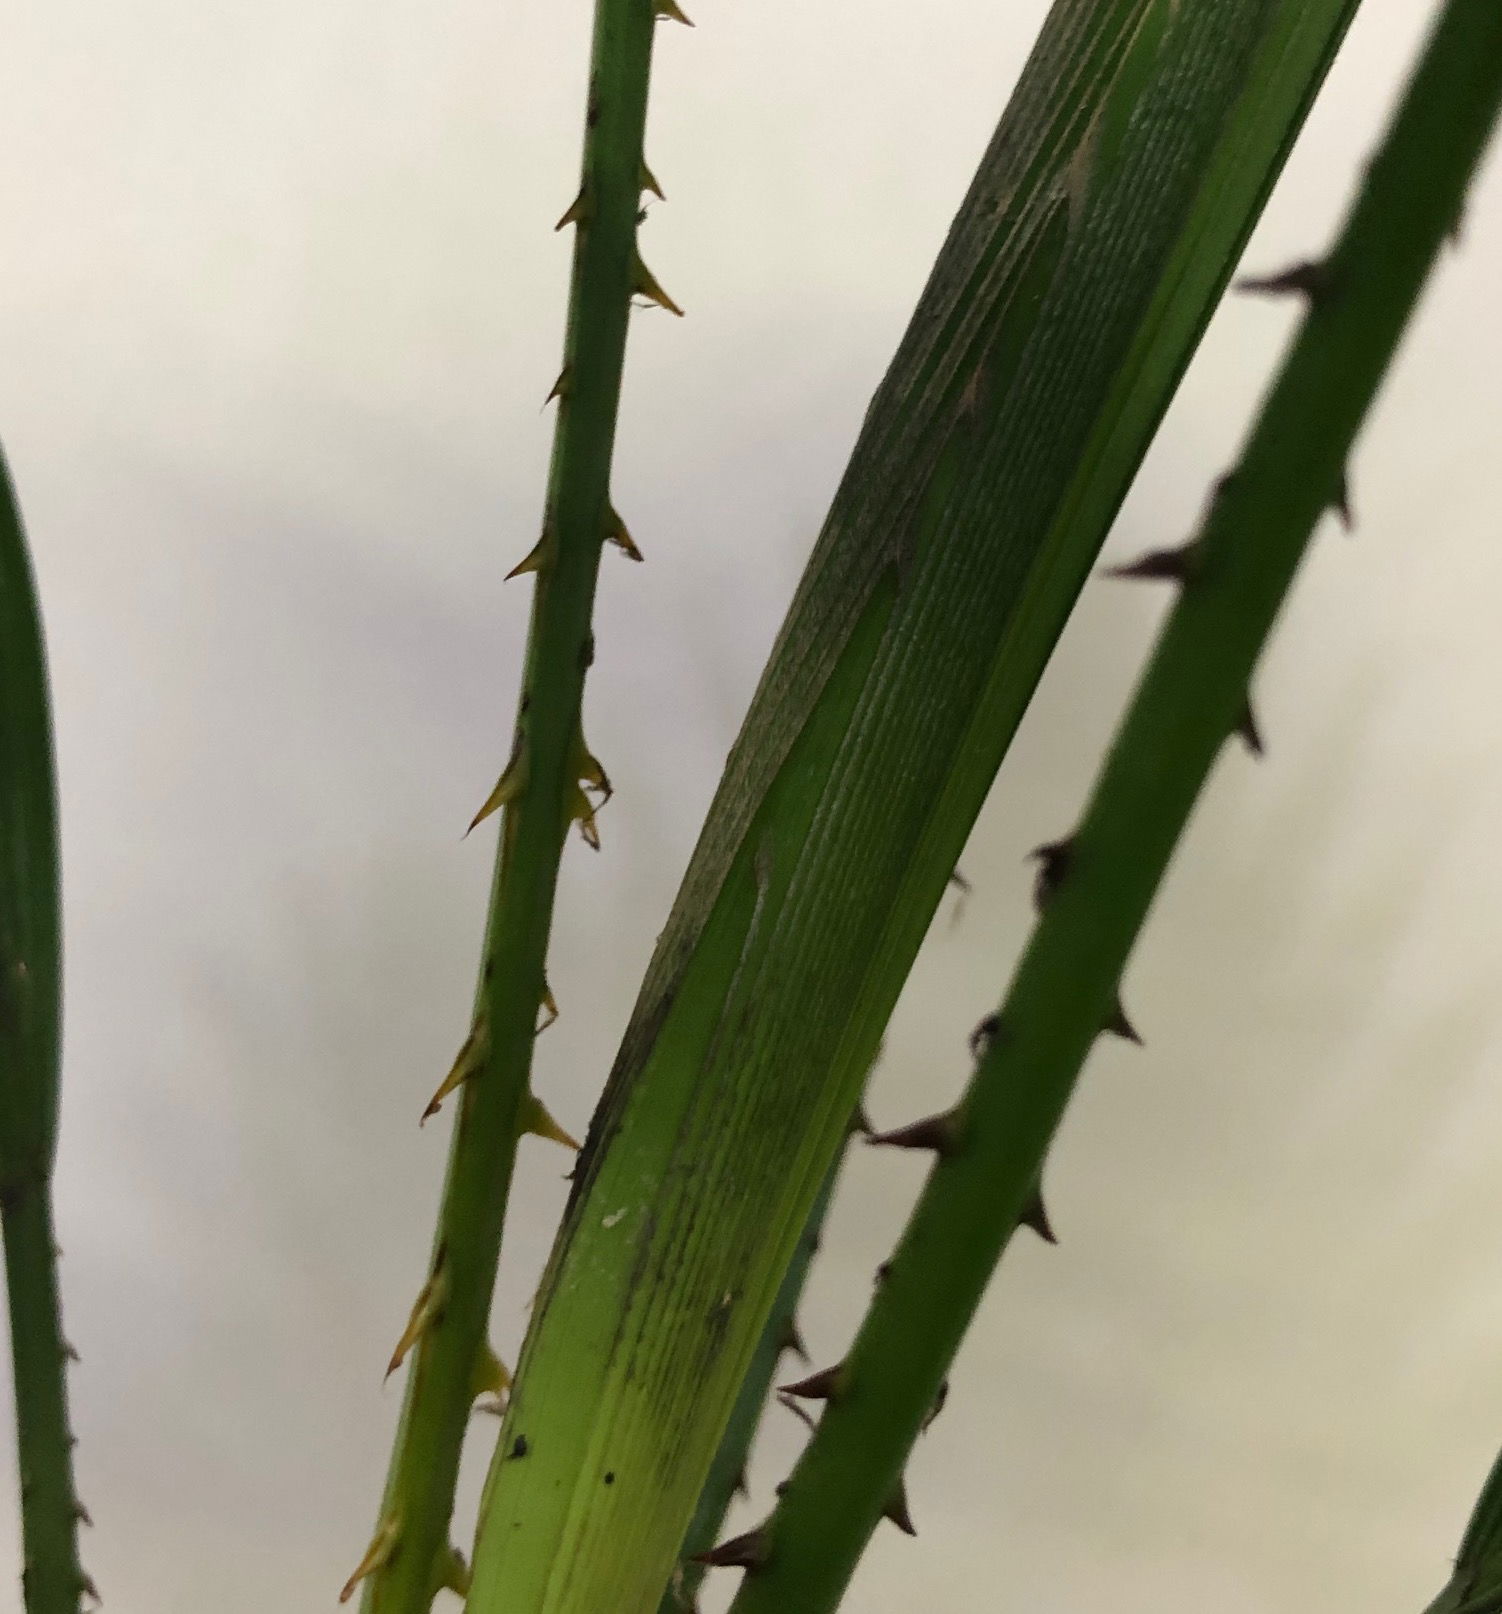 When the frond becomes mature, it'll produce sharp thorns that can easily puncture skin if incautious. When handling this specimen, we'd recommend wearing gloves to avoid minor injuries.
Common Issues with Livistona
Root rot is a common issue with specimens sat in too moist or waterlogged soil for long periods. Symptoms include rapidly yellowing leaves, stunted growth and a rotten brown base. Take the plant out of the pot and inspect health below the soil line. If the roots sport a yellow tinge, you're good to go, but if they're brown and mushy, action must be taken immediately. More information about addressing root rot can be found on this link.
Yellowing lower leaves (closest to soil) could be a sign of over-watering, but equally is a byproduct of maturity. If the older leaves rapidly become yellow in quick succession, over-watering could be to blame. People don't realise that a plant's root system needs access to oxygen too; when soil is watered, the air will travel upwards and out of the potting mix. A lack of accessible oxygen for the roots will cause them to subsequently breakdown over the oncoming days. Click on this link to learn more about root rot and how to address it.
Pests could arise at any time, with infestations starting from the original nursery or via contamination in your home. Spider Mites and Mealybugs tend to be the usual inhabitants, with the first being minute and almost transparent, roaming the leaves in search of chlorophyll and a site to hide its eggs. The latter, however, will stand out much more, with white cottony webs developing across the foliage and stems. Thoroughly check the plant's cubbyholes before giving it the all-clear, or click on the appropriate links to learn more about eradicating these issues.
Too low humidity can cause browning leaf tips with yellow halos. Although this won't kill your specimen, you may want to increase the local moisture to prevent the new growth from adopting these symptoms. Mist or rinse the foliage from time to time and create a humidity tray whilst the heaters are active to create a stable environment for your specimen.
Transplant shock is a big issue when it comes to heavy-handed repots. Give the plant a good soak 24hrs before the action and never tinker with the roots, unless it has been affected by root rot. Typical signs of transplant shock are largely similar to under-watering, with wilting, yellowing leaves and stunted growth among the most common symptoms. Click here to learn more about addressing transplant shock, and a step-by-step guide on performing the perfect transplant.
There are several species of Leaf-Spot Disease, (Graphiola, Botrytis, Anthracnose & Cercospora) and all of them operate in the same way. Fungi spores will land on the leaf's surface and will slowly develop along with the plant. Unfortunately, as there aren't any products that'll address the issue head-on, you can only remove the affected areas and regularly wash the leaves to limit the spread. Keep the plant away from unaffected specimens for at least a month after the last symptom.
If your specimen is located in a dark environment, use a chopstick to gently stab the soil in various areas. You should aim to enter the compost between the base of the plant and the pot's edge, as failure to do so may lead to damaging its lower portion. Leave the holes open for a few days before re-surfacing the soil to avoid it becoming overly dry. Not only will the gentle shift in the soil's structure mimic the work of small invertebrates in the wild (worms, etc.), but it'll also add oxygen back into the soil, thus reducing the risk of root rot. Repeat this monthly, or whenever you feel the potting-mix isn't drying out quickly enough.
Mould developing on the soil means two things - too little light & over-watering. Despite the harmlessness of the mould, it'll prove unsightly to most gardeners and is therefore removed once known. To remove, replace the top two inches of the soil for a fresh batch of 'Houseplant' compost. Either increase the amount of light received (no direct sunlight for the first few weeks to prevent environmental shock) or decrease the frequency of waters slightly. If the mould is accompanied by yellowing lower leaves, you may also have a case of root rot.
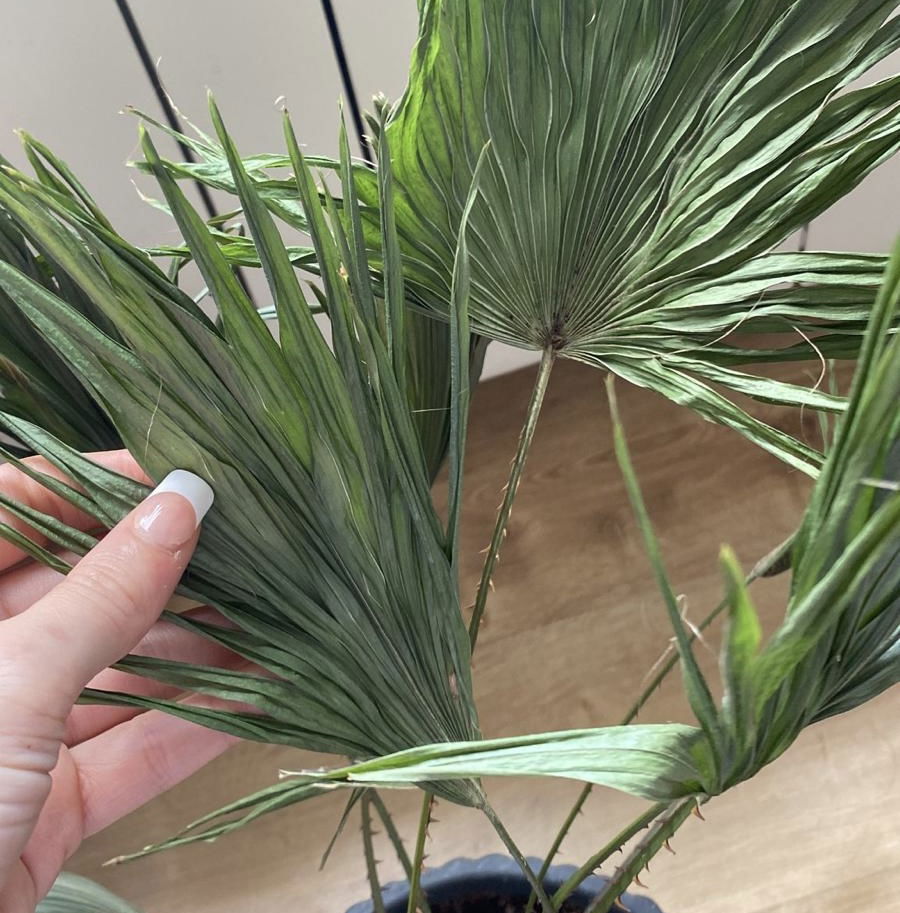 Dehydration/under-watering systems consist of browning leaf tips, stunted or no growth & total leaf desiccation. Prune off the affected leaves and maintain good soil moisture with regular feeds to save your specimen.
Brown murky leaf-tips accompanied by black spots are a type of leaf-spot disease. Remove the affected areas using a clean pair of secateurs or scissors. Even after the removal of the disease, it may resurrect itself, meaning that you'll have to remove the whole frond or even the individual Palm. This is a serious issue that can kill both the affected plant and neighbouring ones in the same pot due to its contagious nature. It's important to wash the scissors or pruners shortly after cutting diseased specimens due to the high risk of contaminating other plants. If the nighttime temperatures are above 15°C (59°F), situate it outside in a sheltered location with regular waters. Providing fresh air and natural lighting will benefit the Palm greatly, along with the lower risk of contaminating nearby plants. If the symptoms don't improve in the next few months, it may have to be respectfully discarded.
If the individual plants develop brown or yellowed foliage and then subsequently die, it may indicate several problems with its environment or your care. As mentioned heavily in this article, the amount of light received is paramount for its success. We'd recommend situating it in a bright, indirect setting with an abundance of atmospheric moisture (pebble tray or misting, etc.), allowing the soil's top third to dry out in between waters. Place the poorly specimen outside in a sheltered spot once the nighttime temperatures are above 14°C (57°F) with regular waters. A brief spell outside for a few months will do it no end of good, and may even present you with new fronds. When returning indoors, thoroughly check for pests and replace the soil's top two inches for a fresh batch of 'Houseplant' soil to remove any burrowed pest-eggs.
Origins
This species was initially described as Corypha rotundifolia by Jean-Baptiste Lamarck in 1786, before being relocated in Saribus, by Carl Ludwig Blume fifty years later. In 2011, after several morphological studies, the reclassification from Livistona to the resurrected genus Saribus was accepted.
Corypha comes from the Greek word, koryphē, meaning top or summit that refers to its ecology.
The name, Saribus, originates from the name of a local language in the species' hometown of Malaysia, called Sariboe.
Livistona was first penned by Robert Brown in the 19th century, honouring Patrick Murray, Baron of Livingston, a botanist and horticulturist, who was largely responsible for establishing the botanical gardens in Edinburgh.
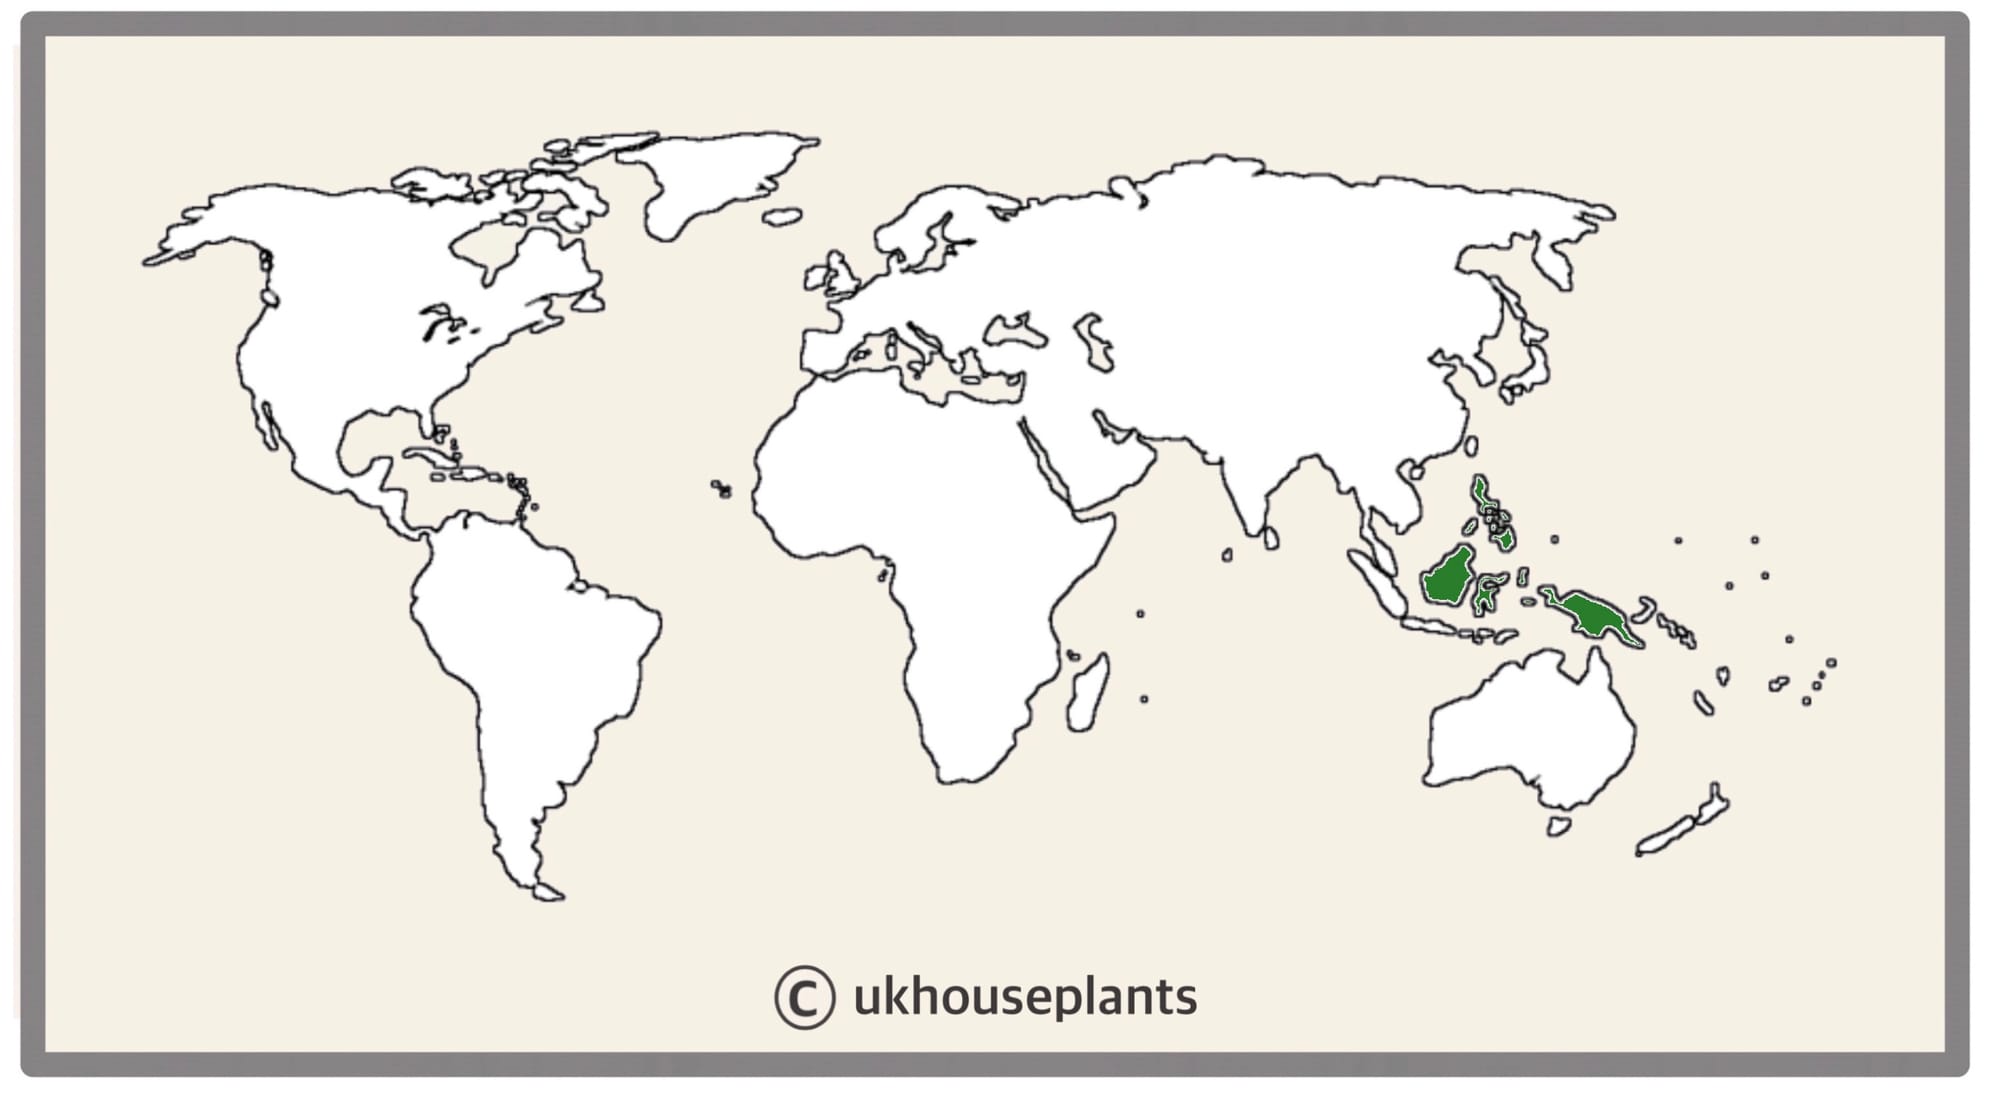 The Distribution of Saribus rotundifolius.
Temperature
12° - 30°C (54° - 86°F)
H1b (Hardiness Zone 12) - Can be grown outdoors during the summer in a sheltered location with temperatures above 12℃ (54℉), but is fine to remain indoors, too. If you decide to bring this plant outdoors, don't allow it to endure more than an hour of direct sunlight a day as it may result in sun-scorch. Regularly keep an eye out for pests, especially when re-introducing it back indoors.
Spread
Up to 2m in height and 1m in width. The ultimate height will take between 5 - 12 years to achieve, with two fronds being developed each season.
Pruning & Maintenance
Remove yellow or dying leaves, and plant debris to encourage better-growing conditions. While pruning, always use clean scissors or shears to reduce the chance of bacterial and fungal diseases. Never cut through yellowed tissue as this may cause further damage in the likes of diseases or bacterial infections. Remember to make clean incisions as too-damaged wounds may shock the plant, causing weakened growth and a decline in health.
Remove any plantlets from the soil as they yellow and die. Any fronds that develop brown spots and marks on its leaflets should also be pruned off, as the abnormality may go rampant across other non-affected areas.
Propagation
Via Seed, Division or Basal Offset ('Pup') Division.
Seeds (Easy to Moderate) - Soak the seeds in lukewarm water for around 24hrs in a dark location, preferably on top of an operating radiator. The best soil to use is a 'Houseplant' labelled potting mix, however, 'Multipurpose' compost with added perlite and sand is just as good. Set the seeds around an inch into the potting mix, resisting the temptation to compact the soil. Maintain evenly moist soil and allow the excess water to freely drain from the pot's base to prevent water-logged conditions. The ideal location for successful germination is in a bright, indirect setting with temperatures above 18℃ (64℉) with bottom-heat. Keep the pot in a transparent bag to provide a stable level of humidity, along with longer lasting soil moisture. Germination may take up to a six months, so don't discard any unsuccessful seeds until this threshold has been surpassed. Remove the bag once the seedlings produces its second leaf. Remove the bag once the seedlings produces its second leaf and then split them up into their own 3cm pots.
Basal Offset Division - Each individual stem will produce a basal offset that can be separated once it has a sufficient root system, and surpass 30cm in height. If possible, water the soil 24hrs before the main event to reduce the risk of transplant shock, when its dry root systems are over-fingered. Take the plant out of its pot and place your fingers close to the nodal junction - soil may have to be removed for better access. Push the chosen offset downwards until you hear a snap. Separate the foliage and its root system away from the mother plant, mentally noting the high risk of damage. Transplant in the appropriate sized pot with a fresh batch of 'Houseplant' soil. Maintain evenly moist soil and situate it in a bright, indirect location away from any direct sunlight. After ten weeks, treat it like a normal specimen, following the care tips above!
Flowers
This species will produce yellow panicles of flowers during the spring or summer once maturity is reached; this process will take many years and many not even flower due to the insufficient growing conditions found in the typical home. Although the sowing of Palm seeds is relatively easy, artificial pollination beforehand is rather difficult without specific training. The blooming period lasts up to several weeks with the seedpods taking up to two months to fully develop. Its seeds largely resemble that of miniature coconuts that can take up to four months to produce its first monocotyledonous leaf!
Repotting
Repot every two years in the spring, using a 'Houseplant' labelled and the next sized pot with adequate drainage. Hydrate the plant 24hrs before tinkering with the roots to prevent the risk of transplant shock. For those that are situated in a darker location, add a thin layer of small grit in the pot's base to improve drainage and downplay over-watering. Click here for a detailed step-by-step guide on transplantation, or via this link to learn about repotting with root rot.
Pests & Diseases
Keep an eye out for mealybugs, spider mites, scale, thrips & whitefly that'll locate themselves in the cubbyholes and undersides of the leaves. Common diseases associated with Livistona are root rot, red leaf-spot, botrytis & southern blight - click here to learn more about these issues.
Toxicity
Not known to be poisonous by consumption of pets and humans. If high quantities are eaten, it may result in vomiting, nausea and a loss of appetite.
Retail Locations
B&Q, IKEA & Online Stores.
Book a 1-to-1 Call with THE HOUSEPLANT DOCTOR™
If you need further advice with your houseplants, book an advice call with ukhouseplants' friendly and expert writer today! This can be done via a video or audio call on most apps, including Facebook, FaceTime & Skype. A ten-minute call costs £5.99 (US$7), or £15.99 for thirty minutes. You can ask multiple questions, including queries on plants, pests, terrariums, repotting advice and anything in between. Please consider supporting this service to keep ukhouseplants thriving!
Comments